Hey all! Happy Friday! And Happy Chinese New Year 2021 – year of the Ox! To celebrate, I wanted to share my Beef and Mushroom Dumplings with Asian Dipping Sauce recipe that I created for my client (Steakhouse Elite) recently. They are super easy and fun to make, and the perfect way to celebrate the occasion!
They’re filled with a savory mixture of juicy grass-fed ground beef, baby bella mushrooms, water chestnuts, scallions, cilantro, ginger, white and red pepper, and soy sauce. I chopped all the fresh ingredients and seasonings together in a mini-food processor to make it easier and get a fine mince, then mixed it in with the ground beef and an egg to make the filling.
Then I started filling the dumpling wrappers (about a tablespoon in the center of each) and then brushed some water around the edges and pressed and sealed them in a dumpling maker. First I pan-fried them in a little bit of oil for about a minute to brown them, then added about an inch of water into the hot pan and covered it to steam them for a couple of minutes to give a crispy, soft and juicy finish on the dumplings.
They are served with a delicious Asian dipping sauce I made with soy sauce, rice vinegar, sesame oil, a little bit of brown sugar, and sriracha garnished with chives and sesame seeds for extra flavor and texture. It’s tangy and salty and sweet and just the right amount of umami to complement the beef and mushroom dumplings. So good!! I could seriously eat a whole plate of these myself, you guys 😉
And be sure to check out my other recipes below that would also be great to celebrate the Chinese New Year with – some of my absolute favorites and a couple of them are award-winning! (The Kung Pao Beef and Black Pepper Caramel Chicken)
Beef + Mushroom Dumplings with Asian Dipping Sauce
Yield: 30-40 dumplings
These Beef and Mushroom Dumplings with Asian Dipping Sauce are super easy and fun to make and perfect way to celebrate the Chinese New Year! Filled with grass-fed ground beef, baby bella mushrooms, water chestnuts, scallions, cilantro, ginger, white and red pepper, and soy sauce and first pan-fried then steamed for a crispy and juicy finish on the dumplings. They are served with a delicious Asian Soy Dipping sauce and garnished with chopped chives and sesame seeds for extra flavor and texture.
Ingredients
Dumplings:
3/4 pound Steakhouse Elite Grassfed Ground Beef
3/4 cup sliced baby Bella mushrooms
3/4 cup water chestnuts
4 green onions
1/2 bunch cilantro leaves
1/8 cup soy sauce
1 1/2 tablespoon fresh ginger, minced
1 tablespoon sesame oil
1 teaspoon white pepper
½ teaspoon red pepper flakes (optional)
1 egg, beaten
1 package pot sticker or gyoza wrappers (30-40)
Canola oil, for frying
Asian dipping sauce:
1/4 cup soy sauce
1/4 cup rice vinegar
1 tablespoon sesame oil
1 teaspoon brown sugar
1 teaspoon sriracha or hot garlic chile sauce
1 teaspoon minced chives (fresh or dried)
1 teaspoon sesame seeds
Instructions
Place mushrooms, water chestnuts, green onions, and cilantro in a food processor and blitz until finely minced.
Cook the ground beef in a large sauté pan over medium heat until no longer pink; drain and let cool for 5 minutes.
In a large mixing bowl, combine the ground beef, mushrooms, scallions, cilantro, soy sauce, ginger, sesame oil, white pepper, red pepper flakes and egg. Mix well with a large spoon or hands.
Set up a work area with the dumpling wrappers and a small bowl of water; lay out the dumpling wrappers on a large cutting board or baking sheet. Place a 1 tablespoon of filling in the center of each wrapper.
Moisten wrapper edges with water with your finger or pastry brush, and fold the wrapper over filling to make a half circle. Seal edges, pleating the front side several times to form a pleated pouch. (You can also use a dumpling maker to seal the dumplings to make it easier and faster to assemble.)
Heat a skillet over high heat until very hot. Add 1 tablespoon oil and coat the sides. Place dumplings in a single layer to line the pan, pan fry for about 30 seconds, then carefully and slowly pour in 1/2 cup of water so the dumplings are covered by 1/2-inch. Cover the skillet with a lid and cook dumplings until all the water is absorbed. Remove the cooked dumplings with a spatula and set aside on a plate. (You can also carefully flip the pan over on to a plate with a hot pad, and scrape the dumplings off the pan). Repeat cooking the remaining dumplings.
To make the dipping sauce, whisk all ingredients in a small bowl. Serve the sauce with hot dumplings, garnish with additional sliced scallions.
Notes
You could also substitute ground chicken or pork or even shrimp using the same ingredients and these dumplings will turn out absolutely delicious!
JSL Foods recently invited me to participate in their 2nd Blogger Recipe Challenge, and guess what? I won the GRAND PRIZE and $1500 for my Black Pepper Caramel Chicken Udon recipe! And I am so thrilled to share it with you!
I decided to use their delicious Fortune Chicken Udon Noodles as the base for this amazing dish.
Black Pepper Caramel Chicken is a traditional Vietnamese dish made with chicken thighs, shallots and red chili peppers, jalapeños, and cilantro..
tossed in a luscious caramel sauce made with brown sugar, fish sauce, vinegar, red chili garlic sauce, fresh garlic, ginger and freshly ground black pepper,
all mixed together and reduced in a pan into a gorgeous sticky spicy sweet glaze to coat the chicken.
The noodles are cooked separately, then drained and sprinkled with the packaged chicken-flavored seasoning,
then tossed back into the pan with the cooked chicken and sweet savory Black Pepper Caramel sauce.
For serving I topped the dish with a dash of Everything Bagel seasoning (you could also just use white or black sesame seeds if you like), a few sliced jalapeños and fresh cilantro for an extra kick of heat and bright flavor.
You guys, this noodle dish is to die for! These Udon noodles are precooked so they only need to be reheated for a few minutes before serving. And they’re perfectly durable for holding this gorgeous thick glaze on the chicken, and full of ALA Omega-3’s, are non-GMO, zero trans fats, with only .5g of fat and 5g of protein in each serving!
You can also try this recipe using their Mushroom or Original Shoyu Udon Noodles for another layer of flavor to mix it up. Try pairing it with an oaky Napa Chardonnay or grassy Marlborough NZ Sauvignon Blanc to balance out the spiciness and sweetness of the dish. Superb!
Absolutely delicious…Hope you enjoy! And feel free to comment below and please share this post on social media with the hashtags @artfulgourmet @jslfoods #fortunenudonoodles #cheftyaki #udonsoups
This is a traditional Vietnamese Chicken dish made with a sticky spicy and sweet caramelized sauce with shallots, garlic, chilies, fish sauce, rice vinegar, brown sugar, ginger and coarse ground black pepper. The chicken thighs are cooked right in the sauce then tossed with Fortune Chicken Udon Noodles and garnished with fresh cilantro and sliced jalapeños for extra heat and bright flavor.
Everything bagel seasoning, garnish Cilantro sprigs, for garnish
Sliced jalapeños, for garnish (optional)
Instructions
In a large pot, bring water to a boil and add JSL Foods Chicken Udon Noodles. Cook for 5-6 minutes, and sprinkle with the packet of Chicken seasoning, mixing throughout cooked noodles. Keep warm, and set aside.
In a small mixing bowl, combine brown sugar, fish sauce, water, sesame oil, rice vinegar, garlic, ginger, black pepper, chili garlic sauce, soy sauce; stir together to make black pepper caramel sauce. Set aside.
Heat the oil in a large skillet or wok pan. Add the shallot and red chili pepper and sauté over medium heat until soft, about 4 minutes. Remove from pan; set aside to add back in with chicken and sauce at the end.
Add the black pepper caramel sauce mixture and the chicken to the pan; simmer over high heat until the chicken is cooked through and sauce is caramelized for about 8-10 minutes. Reduce heat to low and stir in the shallots and hot chiles and cooked Chicken Udon Noodles coating them with the sauce and mixing in the chicken evenly throughout.
Transfer Black Pepper Caramel Chicken Udon Noodles to serving bowls, garnish with everything bagel seasoning, fresh cilantro and sliced jalapenos (if using).
Notes
Pairs well with an oaky Napa Valley Chardonnay or grassy, fresh New Zealand Sauvignon Blanc wine to balance out the spicy-sweet flavors of the dish.
As an added bonus, Chef Yaki is offering a special discount to my readers by joining their Noodle Club online! Click here get the coupon for special discounts and free offers!
You can purchase Fortune Udon noodle products at Target and Walmart as well as these groceries stores online:
This post is sponsored byJSL Foods for The 2nd Fortune Udon Noodle Blogger Recipe Challenge. All reviews, opinions, photos, recipes and written content expressed in this post are my own.
Hey guys! Oh my gosh, it’s almost the end of the year! Can you believe it? Where does time fly? I’m so ready for a New Year though – #2019 can’t come soon enough! 🙂
I was invited to participate in the #Steviva #Holiday #Keto #Blogger #Recipe Challenge this year and made a Sweet and Spicy Meyer Lemon Shrimp Stir Fry. With all the #holidays going on and the rich, delectable #food I’ve been enjoying this month, I wanted to make a recipe a little bit lighter and healthier, and on the lower carb side…(before it all happens again this weekend for New Years!)
I love Steviva products because they are lower in carbs, low glycemic, low calorie and they use all natural ingredients in their products. Their line of good-for-you all natural alternative sweeteners are terrific options for cooking and baking without sugar. Whether you need a granulated sweetener to replace table sugar, a powdered sweetener to replace confectionery sugar or a liquid sweetener to replace corn syrup, they have carefully developed safe, low glycemic, low caloric sweeteners that taste and act just like sugar.
This dish is super easy and quick to make and has great flavors using fresh Meyer Lemon juice, soy sauce, sesame, Nectevia Agave Stevia Blend, Steviva Erythritol Blend, a dash of ginger and #Sriracha for some spiciness to make a delicious sticky marinade to go with the shrimp and fresh veggies. And it’s low carb and low cal! BONUS*** 🙂
Simply make your marinade for the shrimp with all the ingredients and put it in the fridge in a ziplock baggie for 1/2 an hour. Then stir fry the shrimp for a few minutes until they are no longer pink and remove the shrimp from the pan.
Add the veggies and stir fry those for about 5-7 minutes until tender crisp and the sauce starts to thicken. Add the cooked shrimp back in and toss together for another minute or so.
Serve immediately over brown or cauliflower rice, zucchini noodles or soba noodles and spoon the rest of the spicy and sweet sauce on top and garnish with a few more sesame seeds and even some green onions if you wish.
A super easy and delicious stir fry made with shrimp and fresh veggies, marinated in a spicy and sweet sauce made with Meyer lemon juice, soy sauce, Sriracha, Steviva Blend and Nectevia. Great for a weeknight dinner or special occasion. Best served over brown rice, cauliflower rice, zucchini noodles or soba noodles.
Whisk together Steviva Blend, Nectevia agave nectar, soy sauce, garlic, lemon juice, sesame oil, sesame seeds, Sriracha, red pepper flakes and ginger in a small mixing bowl.
Add half of the sauce to the shrimp and let marinade in the refrigerator for 30 minutes or more.
Heat butter in a medium sized skillet over medium high heat. Add the shrimp, discard marinade from the bag (save the other unused half for making the sauce). Saute for about 3-5 minutes until shrimp is no longer pink.
Remove shrimp from the pan and add the fresh vegetables. Saute for about 5 minutes or so until soft.
Add the reserved marinade and pour over the vegetables. Cook for another few minutes until sauce thickens.
Add the cooked shrimp back into the pan and toss together with the vegetables and the sauce. Season with pepper, to taste.
Serve immediately, garnish with additional sesame seeds and green onions if desired over brown rice, cauliflower rice, soba noodles or zucchini noodles.
Notes
You can also use this marinade for scallops or chicken or beef, just increasing the cook time appropriate for the protein (about 10-12 mins for chicken or beef until cooked through).
Vegetables can be swapped out as well whatever you prefer!
I’d love to hear your comments on this recipe below if you decide to make it! Please make sure to tag @stevivabrands and @artfulgourmet with a link back to this original post on my blog if you do share any recipes or photos on social media!
For more information on #Steviva Brands products and more recipes, please visit their website and social media pages:
Note: I received products from Steviva Brands to experiment with recipes for the Blogger Challenge Recipe Contest. All opinions, recipes, photos and text are my own.
I love soup in the winter time because it’s a great way to warm up in the freezing weather, and a delicious, healthy thing to eat after all the heavy food from the holidays. And I especially love noodle soup with lots of veggies, meat and seasonings.
I recently was invited to join the blogger recipe challenge for JSL Foods to create a unique soup recipe using their Fortune Udon Noodles.
I created a soup recipe using their Mushroom Udon noodles – they are so good and easy to make! They are fresh and pre-cooked, perfect for a soup or stir fry and fortified with Omega-3 and have no MSG.
You simply add the noodles to some water and add the flavor packet provided, then cook for a few minutes after the water comes to a boil. Alternatively you can microwave the noodles in just 3 minutes and then add it to your soup base.
After the noodles were done, I set them aside and made the Spicy Pork mixture to go in the soup. First I added all the seasonings and spices, sriracha, fish sauce, soy sauce and togarashi seasoning (a Japanese spicy pepper seasoning you can find online) to the ground pork and sautéed over medium-high heat until cooked through.
Then I returned the pot of cooked noodles to the burner, added some chicken broth, fresh chopped kale, yellow sweet corn and a little more garlic salt and pepper and let that cook until the kale wilted and the corn was heated through. I added the cooked spicy pork mixture back into the pot with the noodles, kale and corn and let it simmer for another 5-10 minutes on low heat to let all the flavors meld together.
And voila! A super delicious and healthy soup for the winter with a great combination of flavors from the mushroom Udon noodles, the spicy pork, the fresh kale and corn, all topped with more sliced green onions, togarashi seasoning and a pat of butter to give it another layer of silky flavor and dash of sweetness to cool the heat from the spicy broth.
This is spicy and delicious mushroom Udon noodle soup - topped with a spicy pork mixture, kale, corn, garlic and green onions to make a savory soup perfect for winter.
Ingredients
1 package Fortune Udon noodles, mushroom flavor
1 tablespoon vegetable or peanut oil
1 tablespoon sesame oil
1 pound ground pork
1 1/2 tablespoons garlic, minced
1 tablespoon ginger paste
1 teaspoon lemongrass, minced
1 teaspoon fish sauce
2 tablespoons soy sauce
2 tablespoons Sriracha
1 tablespoon Togarashi seasoning
Black pepper, to taste
4 cups chicken broth
1 teaspoon garlic salt
1 (11 ounce) can sweet yellow corn
3-4 large handfuls kale, chopped
2 green onions, sliced
Butter, for garnish (optional)
Instructions
Cook the Fortune Udon noodles in a large pot according to package directions (add 1 1/4 cups of boiling water and seasoning packet to the noodles and simmer for 3 minutes). Set aside.
Heat the oil in a medium saute pan over medium high heat, add the ground pork, garlic, ginger, lemongrass, fish sauce, soy sauce, Sriracha, Togarashi seasoning and black pepper and cook for about 5 minutes or so until the pork is cooked all the way through.
Return the pot of cooked Udon noodles back to the burner, add the chicken broth, garlic salt, kale, corn and green onions, and let simmer over medium heat until kale is wilted and the corn is cooked through.
Add the cooked spicy pork mixture and stir together, simmering for a few more minutes until the flavors are blended through the soup.
Serve the Udon noodle soup immediately and garnish with additional sliced green onions and a pat of butter until melted, for garnish.
You can also try their other flavors in chicken and original flavor – check out their website and social media pages for more info on their products. You can purchase JSL Foods products at the following stores: Hannaford’s, Price Rite, and Shop Rite.
Disclosure: This is a sponsored post and I received products from the client to develop and test a recipe and create photos and copy for the post. All recipes, images, copy and opinions are my own. Do feel free to share this post, but please make sure to link back to this page and give credit to me as “Kristen Hess/The Artful Gourmet” for any photos, recipes and copy shared online.
I recently was approached by Steviva to compete in the Sweetin It-Up Blogger Recipe Challenge and decided to make a sugar free, gluten free Kung Pao Beef with Cauliflower Rice. I love Asian food, but oftentimes it has many hidden sugars in the sauce, so I thought it would be cool to make this savory dish for the challenge.
Steviva has a wide range of stevia-based products and I chose to use Necteviaand Erysweet for my recipe to replace the normal sugar in the sauce. Erysweet is a pure, non-GMO erythritol that is naturally derived and can be substituted cup-for-cup for sugar in recipes. Nectevia is an organic blue agave nectar infused with premium 100% pure stevia extract – and has only 1/4 the calories, carbs and sugars of regular agave, or table sugar with a warm honey flavor.
Kung Pao is made with chicken or beef marinated in soy sauce, sesame oil, and rice wine, which is then sautéed in a wok on high heat with crunchy bell peppers, water chestnuts, garlic, ginger, green onions and hot chilies.
I made a sweet and spicy sauce made with more soy sauce, rice wine, Chinese black vinegar, chicken broth, Erysweet and Nectevia in the pan with the cooked meat and veggies and tossed in some spicy peanuts, which was thickened into a luscious sweet/spicy/savory pot of yum. To serve, I topped the dish with fresh cilantro and more crunchy peanuts along with some yellow cauliflower rice sautéed with soy sauce and sesame oil and some fresh cilantro tossed in to keep it gluten free. Absolutely delicious without all the sugar and carbs!
Kung Pao Beef w/ Cauliflower Rice (Sugar + Gluten Free)
Prep Time: 20 minutes
Cook Time: 20 minutes
Total Time: 40 minutes
Yield: 4-6
Serving Size: 1 cup
Ingredients
MARINADE:
1 3/4 pounds boneless beef sirloin
1 tablespoon soy sauce
2 tablespoons sesame oil
1 tablespoon rice wine
1 egg white, lightly beaten
1/2 teaspoon kosher salt
1/2 teaspoon freshly ground black pepper
KUNG PAO:
2 tablespoons peanut oil
4-6 dried red chilies
1 tablespoon garlic, minced
1/2 tablespoon ginger, grated (or ginger paste)
1 teaspoon red chile flakes
3 scallions, sliced on the bias, 1/2-inch pieces
1/2 red bell pepper, sliced into strips
1 can water chestnuts, sliced in half
2 tablespoons soy sauce
3 tablespoons rice wine
1 tablespoon Chinese black vinegar (or balsamic)
2 tablespoons Nectevia Original
2 teaspoons Erysweet
1 cup chicken broth
1 tablespoon cornstarch mixed with 2 tablespoons water
3/4 cup roasted spicy peanuts
1/4 cup cilantro, chopped
Cauliflower rice sautéed with soy sauce, sesame oil and cilantro
Instructions
MARINADE:
Trim the fat from the steak all over and cut into 1-inch cubes. Combine the marinade ingredients in a large bowl and mix in the beef. Stir together to coat well, and place covered in the fridge for at least an hour to overnight.
KUNG PAO:
Heat the peanut oil in a wok or large sauce pan over medium heat, add chilies and cook for a minute until they begin to brown. Add garlic, ginger and cook for another minute. Turn heat up to high and add scallions, peppers, water chestnuts and chile flakes; saute for about 5 minutes until they begin to get soft and lightly browned. Add steak (remove from marinade and discard excess) and cook for about 3 minutes or so until beef begins to brown. Add soy sauce, rice wine, Chinese vinegar, Erysweet, Nectevia and chicken broth. Mix in the cornstarch, stirring well, to thicken the sauce. Toss in the roasted peanuts and serve over cauliflower rice with chopped cilantro, additional peanuts if desired.
Hope you enjoy making this recipe – please let me know what you think if you made it in the comments below! And feel free to share this post on social media tagging #theartfulgourmet and #steviva with a link back to the original post on this blog.
For more info on Steviva products, check them out online and social media:
Disclaimer: This was a sponsored post by Steviva Brands and I received products to create recipes and photos for this post. All opinions, images, and text are my own.
Since the holidays are coming soon, we all know what THAT means..lots of holiday parties with food and drinks, and with that in mind, I’ve decided to commit to eating healthier and lighter the next few weeks.
I absolutely love my KitchenAid® Spiralizer Attachment that goes with my KitchenAid® Stand Mixer – and I’m so excited to make some healthier low-carb meals! It comes with five different blades for peeling, coring and slicing and is perfect for fresh fruits and vegetables. I love pasta and rice, but spiralized veggies are such a great substitute when I want to lighten up my recipes and eat low carb.
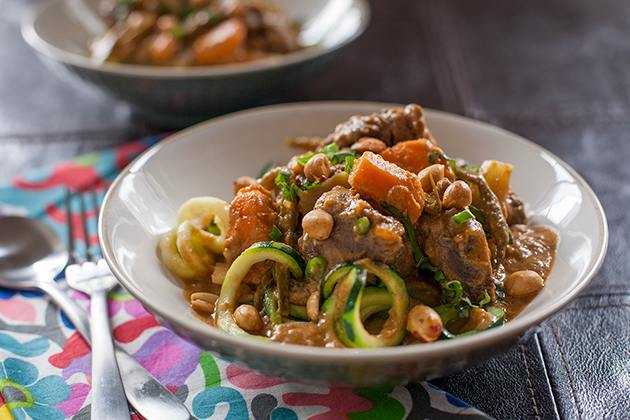
I thought a delicious comfort food dish with a healthy twist would be perfect for the cooler months, and decided to make a Red Curry Beef with Zucchini Noodles.
I used lots of fresh, organic ingredients: beef, sweet potatoes, onions, garlic and green beans, and then made a lovely curry sauce with coconut milk, red curry paste, fresh lime juice, fish sauce, some beef broth and a dash of Sriracha to spice it up.
The larger Chef’s knife was great for cutting up the large chunks of beef and sweet potatoes with its sturdier grip and large super sharp blade.
My heavy duty KitchenAid ceramic cast iron pot is perfect for making this dish – it cooks evenly and is large enough to make a large pot of curry or stew, and is ovenproof to 500 degrees!
The KitchenAid spiralizer attachment is also easy to use! All you need to do is attach it to the KitchenAid mixer, and the spirals come right out perfectly cut. Then you just briefly cook them in a saucepan with some olive or peanut oil, season them with some salt and pepper.
Top the #zoodles with this luscious and creamy curry – lots of great flavors and textures, sweet and spicy – all in one pot. Delish!
This is such a great Winter comfort food dish to make and it’s so easy to make with all the right tools… You’ll definitely want to make this Red Curry Beef Zucchini Noodles for dinner – tonight!
2 1/2 pounds lean stewing beef, (chuck or round), cut into 1 1/2 inch chunks
1 teaspoon Kosher salt
1 teaspoon freshly ground black pepper
3 tablespoons canola oil
1 sweet onion, finely chopped
4 garlic cloves, minced
1/4 cup red curry paste
2 cans (13.5 ounce) unsweetened coconut milk
2 tablespoons Thai fish sauce
2 tablespoons fresh lime juice
2 tablespoons dark brown sugar
1/4 cup beef broth
1 tablespoon Sriracha hot sauce (optional)
1 large handful French green beans, trimmed
3 medium sweet potatoes, peeled and cut into medium chunks
1 (8 ounce) can sliced bamboo shoots, drained
3 tablespoons fresh basil, chopped or torn, for garnish
1-2 Thai green chilies, sliced fine, for garnish
1/2 cup peanuts, for garnish
Instructions
Attach the KitchenAid® Spiralizer Attachment to your KitchenAid® Stand Mixer and choose your desired spiralizing blade. Attach the vegetable skewer to the Spiralizer and secure it to the zucchini. Move the spiralizing blade to the end of the zucchini and turn on the Stand Mixer to low (level 2) to make the spiralized zucchini noodles. Make sure you place a bowl underneath to catch the zucchini noodles as they fall. Set the noodles aside or keep them in the refrigerator until ready to serve.
Cut the beef into 1 1/2 inch large chunks and place in a bowl. Sprinkle with kosher salt and freshly ground black pepper.
Heat the oil over medium-high heat in your KitchenAid® 6.0Qt Cast Iron Cookware and brown the beef in two batches until lightly browned on all sides. Remove the beef from the pot and transfer to a bowl, set aside.
Add the onion and garlic to the same pot and sauté over medium heat for about a minute. Add the curry paste, stirring into the onions and garlic, until lightly fragrant, for about 30 seconds. Add the coconut milk, and deglaze the pan, stirring up all the crispy brown bits with a wooden spoon. Stir in the fish sauce, lime juice, brown sugar, beef broth, Sriracha (if using) and bring the liquid to a boil.
Add the green beans and sweet potatoes and stir into the liquid. Next add the browned beef back in and stir together well. Cover the pot, reduce the heat to low and let simmer for about an hour and 45 minutes. Add the bamboo shoots into the curry and let simmer for another 15 minutes.
Meanwhile, heat a tablespoon of olive oil in your 10? Skillet from the KitchenAid® Stainless Steel 8-Piece Set over medium heat. Add the zucchini noodles, with some salt and pepper to taste, and sauté for a few minutes until the noodles are soft.
Serve the noodles in bowls topped with the Red Beef Curry, garnishing with fresh chopped basil, sliced Thai green chilies and peanuts.
I don’t know about you, but Thai food is one of my favorite foods ever. I love the harmony of flavors and textures in Thai food that all play together like a perfect symphony. One of my all time favorites is Thai Peanut Noodles – similar to Pad Thai, but with a smooth peanut sauce with a hint of heat. I decided to kick it up a notch by adding some Spicy Thai Chicken that pairs perfectly with the creamy peanut-y noodles.
This dish is a gorgeous combination of spicy, savory and sweet with a marinade base for the chicken made with sesame, honey, soy sauce, garlic, and chile sauce, mixed with acidic notes of rice vinegar. It’s the perfect marriage of varying textures from the chewy noodles, crunchy peanuts and water chestnuts, all bathed in a smooth and luscious damn-good-peanut-sauce. Then to perfect it even more, it’s topped with fresh bright flavors of cilantro, lime and scallions. It’s so good, it just might be illegal. And don’t be ashamed to dig in right out of the pan. Grab some chopsticks, a pal or two and go to town. It’s rustic Asian comfort food at its best. Serve with a sweeter wine such as a Riesling, which pairs nicely with the spicy Asian flavors in this dish.
2 pounds chicken breast cutlets, sliced into thin strips
1 can water chestnuts, diced
1 package Thai Rice Noodles (flat, wide or Pad Thai)
Instructions
Prepare Spicy Chicken Marinade:
In a large mixing bowl, add all nine ingredients (sesame oil through dried ginger) along with sliced chicken breast and mix together thoroughly, coating chicken well. Top with plastic wrap and let chicken marinade in the refrigerator for at least 30 minutes up to 2 hours.
Once chicken is done marinating, bring a large pot of salted water to a boil and cook Thai noodles according to package directions, drain and rinse in cold water to stop cooking. Set aside.
Meanwhile, heat a large saute pan over medium heat, spray with cooking spray and saute chicken for approximately 8 minutes until cooked through and no longer pink. Add diced water chestnuts and saute for another minute or two until soft and heated through. Note: Make sure to drain and discard extra marinade off the chicken before sauteing to allow the chicken to brown in the pan and not steam. Reduce heat to low, cover and keep warm.
Make the peanut sauce: combine soy sauce, peanut butter, broth, garlic-chile sauce, honey, salt and lime juice in a medium saucepan over medium heat, mixing and stirring well until sauce is smooth and blended. Toss noodles together with peanut sauce.
Add the peanut noodles into the large pan with the cooked chicken and water chestnuts, toss together well with tongs to blend the flavors and ingredients. Squeeze fresh lime juice over the top, and garnish with chopped peanuts, cilantro, and sliced scallions. Add additional red pepper flakes or garlic-chile sauce for extra heat, as desired.
Notes
A sweet German Riesling wine would pair well with the spicy acidic flavors in this Asian dish.
It’s that time of year again to start planning menus and recipes for the holidays. But instead of just serving traditional turkey or ham, mashed potatoes and green bean casserole, why not mix it up a little bit and serve your holiday meal with an international flair? I had the opportunity to go behind the scenes and interview several Top Chefs and restaurants in NYC to get some creative ideas for non-traditional holiday menus for the holidays. Whether it have a Spanish, French, Asian, Jewish or Italian twist; here are some great international menu ideas and recipes for a fabulous holiday meal with family and friends that break the norm.
Spanish Holiday Menu – Alex Raij, Executive Chef at Txikito NYC
Executive Chef Alex Raij from the Spanish restaurant Txikito in NYC always makes a classic, festive dish for the holidays. This Canelones de Bakalao Recipe (Salted Cod Fish Canneloni with Crème Fraiche) feeds a crowd and references Basque, Catalan and Argentine family holiday traditions that Chef Raij grew up with in Spain. Serve with other traditional Spanish hot and cold tapas such as: Pikillos: roasted Navarran sweet peppers with ajoarriero; Kroketas: crispy creamy croquettes; Boquerón: marinated white anchovy with eggplant and piquillo; Cogollos: butter lettuce, Basque anchovy, and Bonito del Norte and Tutera: gratin of artichoke, Roncal, Jamón.
Canelones de Bakalao
Photo Credit: Kristen Hess
Canelones de Bakalao Recipe (Salted Cod Fish Canneloni with Crème Fraiche)
Executive Chef Alex Raij, Txikito
Serves 6
1 9×9 inch baking dish, preferably earthenware
12 – 4 inch square pieces fresh pasta sheets boiled and shocked in ice water (The Chef recommends cooking longer sheets and then cutting them after they are cooled in ice bath so they are more uniform)
Filling and topping
2.5 pounds cod
2 tablespoons Kosher salt, plus more for seasoning
2 cups olive oil
1.5 cup tomato pulp pref. pomi brand
2 cups Creme fraiche
2 tablespoons finely chopped chives
50 grams hackleback or other high quality caviar
Preheat oven to 375 degrees.
Salt the cod with the 2 T. kosher salt and let stand 10 minutes.
Rinse and pat dry.
Place the cod in a small pot and cover with olive oil.
Place on medium low heat and poach the cod in the oil until it flakes when prodded
Remove the fish to a mixing bowl to cool.
Pour 1/2 cup of the poaching oil over the cooling cod to cool with it.
Heat remaining oil add the tomato fry the tomato until cooked and a little sweet, season with salt.
Pour the tomato oil mix I the bottom of the baking dish.
Break up the cooled cod and flake it with clean hands.
Whip it up with the oil with a spatula or wooden spoon.
Place 6 pasta sheets side by side and place 1/12 of the filling at the end of each sheet.
Roll away from you and place on the tomato.
Repeat with the rest of the filling and next 6 sheets.
Season the crème fraiche with salt and pour over the caneloni.
Bake at 375 until bubbly.
Sprinkle with chives and top with caviar just before serving.
Serve 2 pieces per person.
Printed with permission of Alex Raij. All rights reserved.
—–
French Holiday Menu – Olivier Quignon, Executive Chef at Bar Boulud
Even as Chef Olivier Quignon of Bar Boulud prepares to celebrate his seventh Christmas in NYC, he hasn’t lost touch with the French holiday traditions of his hometown, the Northern French town of Beauvais. Christmas in the Quignon household, and in the restaurant he helms on behalf of renowned French Chef Daniel Boulud, Bar Boulud, is traditional to a tee, lasting up to six hours and spanning just as many courses. What does a typical French holiday meal entail?
Oysters “Always oysters. We shuck them at lunch and the eating begins.”
Cured or Smoked Fish
Foie Gras “This can be hot, seared, or served as a terrine.”
Hot Fish or Pasta
Poultry
Beef or Game
Cheese “ALWAYS cheese. French people eat cheese at practically every meal. We may sometimes skip dessert, but we never skip cheese.”
Pastry “At Christmas this is often a Bûche de Noel. But my wife is a pastry chef, so there are usually many desserts.”
Tournedos Rossini with Truffles and Foie Gras
Photo Credit: Kristen Hess
Traditionally, Tournedos Rossini is a French steak dish, purportedly created for the composer Gioachino Rossini by French master chef Marie-Antoine Carême. The dish comprises a tournedos (beef tenderloin) pan-fried in butter, served on a crouton, and topped with a hot slice of fresh whole foie gras briefly pan-fried at the last minute. A few slices of black truffle and Madeira demi-glace sauce garnish the dish.
At Bar Boulud New York, ‘Rossini’ is a dish that makes an appearance on the menu every holiday season, and on the tables at many French holiday meals. It is rich in ingredients and flavors, hearty, and the perfect celebration dish. There are several way to prepare Rossini, but Bar Boulud sticks to the traditional preparation—seared beef tenderloin atop a brioche toast, topped with seared foie gras and Madeira-beef jus, served with Pommes Macaire dotted with a celery root puree.
Tournedos Rossini with Truffles and Foie Gras and Pommes Macaire
Executive Chef Olivier Quignon, Bar Boulud
Serves 4
Pommes Macaire
Kosher salt, as needed
4 yellow gold potatoes
Salt and freshly ground white pepper
Black truffle butter or oil
2 egg yolks
Canola oil for frying
½ cup flour
Celery Root Puree
1 small (about 3/4 pound) celery root, peeled
Salt
1 tablespoon butter
1 cup milk
Freshly ground white pepper
To Finish
1 ½ lbs angus beef tenderloin, tied with butchers twine
12 ounces fresh grade A foie gras
6 tablespoons beef jus or demi glace
2 ounces Madeira
1 Tablespoon chopped shallot
4 ¼ thin slices of brioche, cut into 3 ½-inch circles, toasted
8 small light green celery leaves
1 small black winter truffle
For the Pomme Macaire
Preheat the oven to 350°F. Make a bed of salt on an aluminum foil-lined baking sheet and place potatoes on top. Bake potatoes for 45 minutes, or until tender.
Remove from the oven, and when cool enough to handle, cut potatoes in half and scoop the flesh into a bowl. Mash the potato with a fork, season to taste with salt, pepper, and truffle butter (or oil). Stir in the egg yolk to combine. Press mixture into a bread loaf pan and chill overnight.
Turn the potatoes onto a cutting board and cut into (at least 8) 3 x ½-inch batons. Lightly coat the batons in the flour and shake off excess.
Fill 1/3 of a saucepan with canola oil and heat to 350°F. When ready to serve, fry the potatoes in batches until golden brown. Strain onto a paper towel-lined tray, sprinkle with salt.
For the Celery Root Puree
Cut the celery root into medium dice. Place the butter in a medium saucepan over medium heat and cook until browned. Add the celery root, milk, and water to cover; bring to a simmer. Cook until tender, about 12 minutes. With a slotted spoon, transfer the celery root to a blender and puree with enough of the cooking liquid to make a smooth puree. Pass through a fine-meshed sieve into a bowl.
When ready to serve, transfer to a small saucepan and stir over medium heat to heat through.
To Finish
Slice the tenderloin into four portions and season on all sides with salt and pepper.
Cut the foie gras into four slices and season on all sides with salt and pepper.
Place a large sauté pan over high heat. Once very hot, sear the foie gras on both sides to brown, about 2 minutes on each side. Transfer to a platter, cover with foil and set aside.
Reduce the heat to medium and return the pan with the foie gras fat to the heat. Sear the beef on all sides, about 3-4 minutes each, basting the meat constantly with the fat. Brown the beef on all sides while basting the constantly with the fat in the pan, about 10 minutes, or until the internal temperature reaches 120°F for medium rare. Transfer the beef to the platter with the foie gras, cover, and rest in a warm place.
Add the shallots to the same pan over medium low heat, and cook, stirring until translucent. Add the Madeira and simmer to reduce by 2/3. Stir in the beef jus and adjust seasoning with salt and pepper if needed.
For each serving, place a brioche toast on a plate and top with a portion of beef. Top the beef with a piece of roasted foie gras, and shavings of black truffle. Place two pommes macaire next to the beef and top each with a spoonful of celery puree. Garnish puree with two celery leaves. Spoon the sauce from the pan around and serve.
—–
Asian Holiday Menu – Hung Huynh, Executive Chef at Catch Restaurant NYC
Whole Roasted Branzino is a favorite recipe of Chef Hung Huynh of Catch NYC for the holidays. It’s simple, delicious and easy to make and great for feeding a crowd. Chef Hung also recommends adding some miso, ginger, soy and lemongrass to the seasonings to amp up the Asian flavors in this beautiful seafood holiday dish. His Asian inspired holiday menu includes:
Roasted Whole Branzino
Sautéed Green beans with EVOO and Soy Sauce
White or Brown Steamed Rice
Miso Soup
Fresh fruit
Roasted Whole Branzino
Photo Credit: Kristen Hess
Roasted Whole Branzino
Executive Chef Hung Huynh
Serves 2-4 people
Ingredients:
1.5 to 2 pound Branzino
1 tablespoon of Aged Balsamic
Seasoning Rub:
1 tablespoon of salt
1 teaspoon of ground black pepper
1 teaspoon of picked chopped thyme
3 cloves of minced garlic
3 tablespoons of olive oil
Zest of one lemon
Zest of one lime
Directions:
Before cooking, the Branzino must be scaled, gutted and scored.
Combine all the seasoning rub ingredients.
Rub entire fish with seasoning including the cavity, distributing evenly.
Make sure that the entire fish is covered in the rub.
Take a half sheet pan and roast at 450 degrees for about 15 minutes.
Reserve the remaining olive oil in the sheet pan.
Place the fish on a platter and drizzle with the reserved olive oil and aged balsamic vinegar.
—–
Jewish Holiday Menu – Zach Kutsher, Proprietor, Kutsher’s Tribeca
Zach Kutsher, Chef and Owner of Kutsher’s Tribeca, always serves Latkes for the Hanukkah holiday. These crispy potato latkes are a traditional Jewish dish made of grated potatoes, onion, eggs and matzo meal, shaped into round potato pancakes and fried to a crispy golden brown. The traditional way to serve them is with a spoonful of sour cream, but Zach likes to also add ½ ounce of caviar (salmon roe, paddlefish caviar and wasabi flying fish roe) to the latkes to give them a special holiday touch. Some other fun ideas that Chef Zach does to dress up the latkes are to use some non-traditional savory toppings such as:
Peking Duck with Cucumber, Scallions and Sesame Hoisin
Wild Hen of the Woods Mushrooms and Herbed Ricotta
Gravlax and Dilled Creme Fraiche
Pastrami Reuben (pastrami, sauerkraut, emmentaler and thousand island dressing)
VLT – Veal Bacon, Lettuce and Tomato
To make it a complete Jewish holiday menu, serve the latkes with: Chopped Duck and Chicken Liver, Seasonal Pickles, Golden and Red Beet Salad with Lemon Ricotta, Arugula and Pecans, Turkey or Brisket with Challah Chestnut Stuffing, Cheesy Spaetzle Kugel, Brussels Sprouts and Pumpkin Shlishkas with Amaretto Matzo and Sage Brown Butter and Babka Sticky Buns for dessert.
Grate onion on the fine side of a cheese grater and then line a strainer with some paper towels and let drain in sink as dry as possible.
Mix egg, yolk, matzo meal, salt, lemon juice, and drained onion together, set aside.
Julienne the potatoes (cut into thin small matchsticks) or grate on the large side of cheese grater, and periodically put the potato in the egg mix to prevent browning. Do not wash potato after it is cut.
Mix all together, fry in schmaltz (rendered/clarified chicken or goose fat – or you can substitute canola oil)
Take one handful of mix, twisted in the palm of your hand like you would spaghetti on a fork, till golden brown and crispy, then flip.
Finish in oven if necessary.
Season with salt and pepper to taste.
—–
Italian Holiday Menu – Gabe Thompson, Executive Chef of Epicurean Group (dell’anima, L’Artusi, L’Apicio, and Anfora)
Grilled Pork Chop
Photo Credit: Epicurean Group
Chef Thompson, Executive Chef of the Epicurean Group in NYC loves creating special menus for the holidays. It is all about the food, flavors and family. His menu below puts his crave-able Italian twist on some fall favorites to make for a classic holiday menu!
Grilled Pork Chop — roasted vegetable and chestnut panzanella, pork sugo
Warm Cranberry-pumpkin Budino – served with apple cider sauce
—–
Roasted Acorn Squash Salad Recipe
Executive Chef Gabe Thompson, Epicurean Group
Serves 4-6
2 acorn squash (1 ½ pounds)
¼ cup extra virgin olive oil
Kosher salt
2 tablespoons butter
8 sage leaves
2 tablespoons maple syrup
Preheat oven to 350 degrees. Cut each squash into 8-9 wedges, each wedge about 1 inch thick. Remove and discard seeds. In a large bowl, toss the squash wedges together with 2 tablespoons olive oil and season generously with salt.
Meanwhile, heat a large sauté pan over medium-high heat. Add 1 tablespoon of olive oil, and 1 teaspoon of butter. As soon as the butter melts, add half of the squash to the pan, arranging the pieces so that they are cut-side down. Sprinkle half of the sage over the squash. Cook undisturbed until it is golden brown on one side, about 2-3 minutes. Turn each squash piece over and cook for another 2-3 minutes until golden brown on the other side. Remove squash from the pan and place on a half sheet tray or cookie sheet. Repeat this process with remaining olive oil, butter, squash and sage leaves.
Drizzle maple syrup over the squash segments. Place in the oven and bake until each piece of squash is easily pierced with a fork, about 25-30 minutes. Remove and set aside.
This is a lovely Thai dish, not only in taste but in presentation. I made this with some good friends of mine in Atlanta over Memorial Day weekend on their Big Green Egg grill. If you haven’t seen one of these things – its totally cool and easy to use. And it’s BIG. And GREEN. And looks like and EGG. It’s actually a ceramic grill and smoker that reaches temperatures up to 700 degrees F and has the ability to grill, smoke or steam everything on the planet in about 15-20 minutes. Very cool. Anyways, we decided to make this Thai Sea Bass in Banana Leaves recipe from their Big Green Egg Cookbook and took a trip over to the Dekalb Farmer’s Market (which is also totally awesome if you haven’t been there – you must!). We picked up some fresh Sea Bass steaks (you can also use fillets), herbs, red curry paste, and banana leaves (which actually come frozen and need to be defrosted and cut down to size first before using).
Banana leaves are often used in Thai cooking to wrap around fish and add subtle flavor to whatever food they surround. This recipe was surprisingly easy to make and had wonderful tasty Asian flavors from the fresh herbs (basil, mint, cilantro, ginger and garlic and Thai chile) and lime. The red curry sauce is also easy to make by adding some paste to coconut milk and chicken stock and letting it simmer down while you grill/steam the fish in the banana leaves on the Big Green Egg. You just lay down a strip of the herb mixture, top it with some fish and lime slices, drizzle a little bit of oil, salt and pepper and then wrap the fish up in the leaves into cute little packets and throw them on the Big Green Egg (or any covered grill will do). After about 15-20 minutes you just unwrap the little packets, and top the fish with the curry sauce and serve with a side of lemony buttered green beans and fresh corn on the cob to go with it. Fresh, healthy and delicious.
Ingredients
1 (15 ounce) can coconut milk
1 teaspoon red curry paste
1/2 cup chicken stock
1/2 cup firmly packed chopped fresh basil
1/2 cup firmly packed chopped fresh mint
1/2 cup firmly packed chopped fresh cilantro
1/2 cup grated fresh ginger
1/4 cup crushed garlic
1 thinly sliced red jalapeno or serrano pepper
4 banana leaves (cut to 12 inches square)
4 (6 to 7 ounce) sea bass fillets or steaks
1 lime, cut into 8 thin slices
2 tablespoons canola oil or spray
Kosher salt and freshly ground pepper
Preparation
Big Green Egg
Preheat the EGG (or grill) to 350 degrees F.
Sea Bass and lime
Prep fish and lime and set aside to begin making coconut curry.
Red Curry Coconut Sauce
To make the sauce, combine the coconut milk, curry paste and chicken stock in a small saucepan. Simmer on the stovetop over medium heat for 10 minutes, then keep warm.
Chopped Herbs
Combine all the herbs (basil, mint, cilantro, ginger, garlic and chile) in a medium bowl and mix well.
Banana Leaves
Lay the banana leaves out flat,
Sea Bass & Herbs on Leaves
and place 3 to 4 tablespoons of the herb mixture on the center of each leaf and top each mound of herbs with fish.
Fish, Herbs and Lime on Leaves
Top each packet with 2 lime slices and 1/2 teaspoon canola oil (or some oil spray).
Folding Banana Leaf Packets
Season with salt and pepper and begin folding packets by folding the sides of the leaf inward, then fold the top and bottom over and tucking the ends under (kinda like making a banana leaf fish burrito!!).
Folded Leaves ready for the grill
Secure each packet with butcher’s twine and brush or spray more oil on the outside of the leaves.
Grilled Banana Leaves
Place the leaves directly on the EGG porcelain-coated grid (or regular grill if using) and close the lid. Grill for 7 to 8 minutes per side, until the interior of the fish is opaque (unwrap a package and insert a knife into the fish to test). Transfer the fish to individual plates, remove the twine, open the top, and spoon the curry sauce over the fish. Serve while hot and with a side of buttery lemon green beans and fresh corn on the cob. For wine pairing, serve with a Sauvignon Blanc or Chardonnay.