Kung Pao Beef w/ Cauliflower Rice (Sugar + Gluten Free)

Kung Pao Beef

Kung Pao Beef w/ Cauliflower Rice

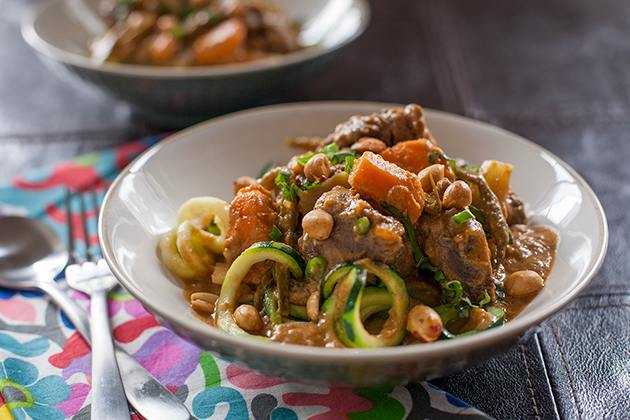
I recently was approached by Steviva to compete in the Sweetin It-Up Blogger Recipe Challenge and decided to make a sugar free, gluten free Kung Pao Beef with Cauliflower Rice. I love Asian food, but oftentimes it has many hidden sugars in the sauce, so I thought it would be cool to make this savory dish for the challenge.

Steviva Recipe Ingredients

Steviva has a wide range of stevia-based products and I chose to use Nectevia and Erysweet for my recipe to replace the normal sugar in the sauce. Erysweet is a pure, non-GMO erythritol that is naturally derived and can be substituted cup-for-cup for sugar in recipes. Nectevia is an organic blue agave nectar infused with premium 100% pure stevia extract – and has only 1/4 the calories, carbs and sugars of regular agave, or table sugar with a warm honey flavor.

Kung Pao Beef w/ Cauliflower Rice

Kung Pao is made with chicken or beef marinated in soy sauce, sesame oil, and rice wine, which is then sautéed in a wok on high heat with crunchy bell peppers, water chestnuts, garlic, ginger, green onions and hot chilies.

Kung Pao Beef w/ Cauliflower Rice

I made a sweet and spicy sauce made with more soy sauce, rice wine, Chinese black vinegar, chicken broth, Erysweet and Nectevia in the pan with the cooked meat and veggies and tossed in some spicy peanuts, which was thickened into a luscious sweet/spicy/savory pot of yum. To serve, I topped the dish with fresh cilantro and more crunchy peanuts along with some yellow cauliflower rice sautéed with soy sauce and sesame oil and some fresh cilantro tossed in to keep it gluten free.  Absolutely delicious without all the sugar and carbs!

Kung Pao Beef w/ Cauliflower Rice (Sugar + Gluten Free)

Prep Time: 20 minutes

Cook Time: 20 minutes

Total Time: 40 minutes

Yield: 4-6

Serving Size: 1 cup

Ingredients

  • MARINADE:
  • 1 3/4 pounds boneless beef sirloin
  • 1 tablespoon soy sauce
  • 2 tablespoons sesame oil
  • 1 tablespoon rice wine
  • 1 egg white, lightly beaten
  • 1/2 teaspoon kosher salt
  • 1/2 teaspoon freshly ground black pepper
  • KUNG PAO:
  • 2 tablespoons peanut oil
  • 4-6 dried red chilies
  • 1 tablespoon garlic, minced
  • 1/2 tablespoon ginger, grated (or ginger paste)
  • 1 teaspoon red chile flakes
  • 3 scallions, sliced on the bias, 1/2-inch pieces
  • 1/2 red bell pepper, sliced into strips
  • 1 can water chestnuts, sliced in half
  • 2 tablespoons soy sauce
  • 3 tablespoons rice wine
  • 1 tablespoon Chinese black vinegar (or balsamic)
  • 2 tablespoons Nectevia Original
  • 2 teaspoons Erysweet
  • 1 cup chicken broth
  • 1 tablespoon cornstarch mixed with 2 tablespoons water
  • 3/4 cup roasted spicy peanuts
  • 1/4 cup cilantro, chopped
  • Cauliflower rice sautéed with soy sauce, sesame oil and cilantro

Instructions

  1. MARINADE:
  2. Trim the fat from the steak all over and cut into 1-inch cubes. Combine the marinade ingredients in a large bowl and mix in the beef. Stir together to coat well, and place covered in the fridge for at least an hour to overnight.
  3. KUNG PAO:
  4. Heat the peanut oil in a wok or large sauce pan over medium heat, add chilies and cook for a minute until they begin to brown. Add garlic, ginger and cook for another minute. Turn heat up to high and add scallions, peppers, water chestnuts and chile flakes; saute for about 5 minutes until they begin to get soft and lightly browned. Add steak (remove from marinade and discard excess) and cook for about 3 minutes or so until beef begins to brown. Add soy sauce, rice wine, Chinese vinegar, Erysweet, Nectevia and chicken broth. Mix in the cornstarch, stirring well, to thicken the sauce. Toss in the roasted peanuts and serve over cauliflower rice with chopped cilantro, additional peanuts if desired.
https://www.theartfulgourmet.com/2017/10/kung-pao-beef-w-cauliflower-rice-sugar-gluten-free/

Kung Pao Beef w/ Cauliflower Rice

Hope you enjoy making this recipe – please let me know what you think if you made it in the comments below! And feel free to share this post on social media tagging #theartfulgourmet and #steviva with a link back to the original post on this blog.

For more info on Steviva products, check them out online and social media:

Website: https://www.steviva.com/

Facebook: https://www.facebook.com/steviva

Twitter: https://twitter.com/steviva

Instagram: https://www.instagram.com/stevivabrands/

Pinterest: https://www.pinterest.com/stevivabrands/

Disclaimer: This was a sponsored post by Steviva Brands and I received products to create recipes and photos for this post. All opinions, images, and text are my own. 

Sriracha Mango Grilled Chicken Wings + Spicy Micheladas

Sriracha Mango Chicken Wings + Spicy Micheladas

Summer is here and almost half way over at that! I love grilling anything and everything during the warm weather months so I’ve created a super delish recipe for Sriracha Mango Chicken Wings with a Ginger-Lime Sour Cream dipping sauce and a Spicy Michelada to pair it with.

Sriracha Mango Chicken Wings + Spicy Micheladas

Once again, I’ve used a fantastic infused balsamic vinegar from Seven Barrels, one of my favorite clients ever. The Sriracha Mango vinegar is delicious on chicken so I made a glaze with fresh mango, sriracha, vinegar, fresh lime zest and orange juice to toss the wings in after I grilled them a bit, then glazed them again for extra flavor at the end.

Sriracha Mango Chicken Wings + Spicy Micheladas

They’re spicy and sweet, and oh so good. And I made a lovely Ginger-Lime Sour Cream dipping sauce to cool off the heat a bit, along with a Spicy Michelada made with Mexican beer (Corona) and a dash of the Sriracha Mango vinegar, a dash of salt, and a fresh squeeze of lime juice.

Sriracha Mango Grilled Chicken Wings

Ingredients

  • Chicken Wings: 
  • 2 pounds chicken wings (24 wing pieces)
  • 1/4 cup Seven Barrels Lime Olive Oil
  • 1 teaspoon garlic salt
  • 1 teaspoon freshly ground black pepper
  • Vegetable oil or spray, for grill
  • Sriracha Mango Lime Glaze:
  • 1 cup mango, peeled and diced
  • ¼ cup orange juice
  • ¼ cup Sriracha
  • 1 tablespoon Seven Barrels Sriracha Mango Vinegar
  • 1 tablespoon Seven Barrels Lime Olive Oil
  • 1 tablespoon honey
  • 1 tablespoon soy sauce
  • 1 tablespoon garlic, finely minced (or 1 teaspoon garlic powder)
  • 1 small red chile pepper
  • ¼ cup cilantro
  • Salt and pepper, to taste
  • Ginger Lime Sour Cream Dipping Sauce:
  • ½ cup sour cream
  • 1 tablespoon Seven Barrels Lime Olive Oil
  • 1 teaspoon garlic salt
  • 1 teaspoon fresh lime zest
  • ½ teaspoon fresh ginger, grated
  • Michelada:
  • 1 (12 ounce) Corona Beer
  • Fresh lime juice from ½ a lime
  • 1 tablespoon Seven Barrels Sriracha Mango Balsamic Vinegar
  • 1 teaspoon Kosher salt
  • Dash of hot sauce
  • Lime wedges, for garnish

Instructions

  1. Heat a grill or grill pan over medium-high heat (spray or brush pan with a light coat of cooking oil). Toss the chicken wings in 1/4 cup Seven Barrels Lime Olive Oil, and season with salt and pepper. Cook wings on the grill for about 15 minutes, flipping halfway through, until no longer pink and skin starts to get charred with grill marks.
  2. To make the glaze, add the mango, orange juice, Sriracha, Seven Barrels Sriracha Mango Vinegar, Seven Barrels Lime Olive Oil, honey, soy sauce, garlic, chile pepper and cilantro into a food processor and process until smooth. Place the sauce into a saucepan over medium-low heat and let simmer until warmed through while the wings are cooking. Season with salt and pepper to taste. Remove from the heat to a large mixing bowl.
  3. Once the wings are finished cooking, toss them gently in the Sriracha Mango Lime glaze and let them marinate for about 5 minutes or so. Return wings back to the grill for an additional 5 minutes, flipping over once. Remove wings from the grill on to a large platter and let them cool to give them a nice caramelized glaze.
  4. To make the Ginger Lime Sour Cream dipping sauce, stir together the sour cream, Seven Barrels Lime Olive Oil, garlic salt, lime zest and grated ginger in a bowl and serve with the wings with celery and carrot sticks.
  5. NOTE: Alternatively, you can bake the wings for 1 hour at 375 degrees on a large baking sheet covered with foil (and toss them in the sauce at the end).
  6. Makes approximately 24 wings, 1 cup of glaze and ½ cup sour cream sauce.
  7. To make the Michelada: stir all the ingredients into the beer and garnish with a lime wedge.
https://www.theartfulgourmet.com/2017/08/sriracha-mango-grilled-chicken-wings-spicy-micheladas/

Sriracha Mango Chicken Wings + Spicy Micheladas

This really is the quintessential recipe pairing for Summer now, isn’t it?

Sriracha Mango Chicken Wings + Spicy Micheladas

You can also try the glaze on pork chops or even add some grilled shrimp – it’s absolutely delicious and you can always adjust the heat by adding or removing some of the Sriracha hot sauce. Or maybe making it even hotter by adding in a dash of habanero hot sauce to the mix – now, this recipe is on FIRE!

Sriracha Mango Chicken Wings + Spicy Micheladas

Perfect for a lovely evening outside with friends, watching the sun go down…that’s #howisummer 🙂

Happy July 4th :: Best Deviled Eggs Ever

Best Deviled Eggs Ever

Hey guys, it’s the 4th of July! One of my favorite holidays ever. Sunshine, pool parties, beach days, picnics on the patio, campfires, grilling, and the season of FUN.

Best Deviled Eggs Ever

I’m sure you’ve had your fill of July 4th recipe posts this week and to be honest, so have I. We all love to grill and have backyard BBQs with tons of picnic salads, burgers, ribs, chicken, hot dogs, strawberry shortcakes and berry pies. Thanks to everyone who has shared their recipes as I always love to see what everyone is making and get some fun ideas for future posts and food parties! So, this year I’ve decided to actually ENJOY my holiday — by relaxing, reading, hanging out with the fam, cooking, eating and drinking, and spend less time working, stressing and blogging. I always think it’s the perfect time to focus on blogging and my portfolio because I have extra time, but I really just need a BREAK. I’m sure you can relate.

Best Deviled Eggs Ever

But, I couldn’t pass up posting this outta control good recipe for my Best Deviled Eggs EVER – they’re creamy with mayo and mustard and eggs, with a delicious tang of vinegar and hot sauce and seasonings, plus an irresistible crunch from the dill pickle relish, finely minced celery and sweet onion. OMG. I could eat the whole tray. REALLY. (And I”m pretty sure you will too, my deviled egg lovers in the universe! 🙂

Happy July 4th and celebrate the season!

Happy July 4th :: Best Deviled Eggs Ever

Prep Time: 20 minutes

Cook Time: 10 minutes

Yield: 4-6 servings

Serving Size: 2-4 deviled eggs

These are the best deviled eggs ever. Creamy and crunchy with finely chopped celery and onion, dill pickle relish and seasonings...these will be a hit at your July 4th party and gone in seconds!

Ingredients

  • Sea salt
  • 12 large eggs
  • 4 1/2 tablespoons mayonnaise
  • 4 tablespoons very finely chopped celery
  • 3 tablespoons finely chopped dill pickle relish
  • 3 tablespoons very finely chopped sweet onion
  • 3 teaspoons yellow mustard
  • 2 teaspoons white vinegar
  • 1 teaspoon Nature's Seasons seasoning blend (Morton's)
  • 1 teaspoon Deliciously Dill Blend (The Spice Hunter)
  • 2 dashes hot sauce (RedHot or Crystal), plus more for serving
  • Dash of paprika, plus more for garnish
  • Freshly ground black pepper

Instructions

  1. Place eggs in a large pot of salted water. Bring to a boil. Reduce to a simmer and cook eggs 7 minutes. Turn off heat and let eggs sit in hot water for about 5 minutes. Drain and rinse eggs in cold water and transfer to a bowl of ice water; let sit until cool. Peel eggs under cold water once cooled.
  2. Meanwhile, whisk mayonnaise, celery, dill relish, sweet onion, mustard, vinegar, herb seasonings, and hot sauce in a mixing bowl; season with salt and pepper to taste.
  3. Halve eggs lengthwise. Mix the egg yolks into mayo-mustard-relish mixture andplace whites on a plate.
  4. Gently mash into a dressing; season with salt and pepper. Using a small fork or spoon, fill egg halves with yolk mixture.
  5. Top eggs with freshly cracked pepper and more paprika and serve with hot sauce.

Notes

Make Ahead: Eggs can be made 1 day ahead. Cover and chill egg whites and filling separately; fill just before serving.

You can also garnish the eggs with some minced chives or green onion or bacon.

Recipe adapted from Hillstone Restaurant Group

https://www.theartfulgourmet.com/2017/07/happy-july-4th-best-deviled-eggs-ever/

Happy Memorial Day! Grilling, Cocktails + Recipes

Happy Memorial Day

Happy Memorial Day

Happy Memorial Day! A time to reflect all of those brave soldiers and military servicemen and women who have sacrificed their lives and families for the safety of ours.  Big applause and respect goes out to them and I’m grateful we have a safe and secure country to live in because of them. Especially now.

Memorial Day Cake

In honor of the holiday, I rounded up a few of my favorite recipes to celebrate. Wishing you all a lovely holiday, hopefully filled with family and friends, food and drinks with grateful hearts to our heroes that keep us safe. EVERY DAY. XO

Dr Pepper Ribs

Spicy Dr. Pepper Ribs

Beach BBQ Burger

Beach BBQ Burgers

Thai BBQ Shrimp

Thai BBQ Shrimp

Sambal Chicken Skewers

Grilled Sambal Chicken Skewers

Lobster and Potato Chip Rolls

Lobster and Potato Chip Rolls

Coffee Marinated Steak

Coffee Marinated Steak 

Grilled Corn and Poblano Salad

Grilled Corn and Poblano Chile Salad

Watermelon Feta & Mint Salad

Watermelon Feta & Mint Salad

Roasted Garlic Potato Salad

Roasted Garlic Potato Salad

Summer Berry Shortcake

Summer Berry Shortcake


Hope you enjoy the weekend and here’s a few more links to Memorial Day recipes and menu ideas!

http://chicago.cbslocal.com/2017/05/26/memorial-day-recipe-guide/

http://www.foxnews.com/food-drink/2017/05/29/memorial-day-weekend-barbecue-recipes-best-dishes-for-summer-cookout.html

http://www.tasteofhome.com/recipes/holiday—celebration-recipes/memorial-day-recipes

http://www.foodnetwork.com/holidays-and-parties/packages/memorial-day/memorial-day-picnic-

Coffee Marinated Steak

Now that Summer is rapidly approaching, I am so excited about getting outdoors to enjoy the warm weather and especially cooking outdoors with friends and family. Grilling is one of my favorite ways to cook in warm weather months, simply because it’s so easy and a healthy way to cook, and it usually takes place with a group of friends outside making fun memories and laughter to go with it.

I recently went down to Atlanta where I used to live to visit some old friends and we had a blast grilling outside on my friend’s outdoor BBQ grill in her backyard. We sat around the grill and made grilled sliders, shrimp, jalapeno poppers, and wings (with lots of snacks and drinks to go with of course!) It reminded me of the good old days when I used to live there… living and working in NYC we don’t get the opportunity to grill much anymore and it’s a precious occasion when I go to visit my friends and family who live in greener pastures.

One of my favorite things to make is a big juicy grilled steak..it’s always a tasty treat, easy to prepare and everyone loves it…especially with some grilled vegetables, salad, potatoes and a glass of wine or beer while sitting out on the patio dining al fresco watching the sunset.

My go-to Summer recipe is Coffee Marinated Steaks, which I know you’re gonna love. The marinade has a light smoky essence from the coffee (I use Gourmesso House Blend Lungo Dark coffee, an espresso alternative to Nepresso capsules,  with a beautiful dark and rich flavor; some spicy heat from the red chilies and black peppercorns; a touch of sweetness from the brown sugar; and is balanced out with a slight tanginess from the balsamic vinegar, Dale’s seasoning (or soy sauce), mustard, shallots and garlic. You simply mix all the ingredients together in a blender or food processor, then marinade the steaks for an hour or up to overnight for some really delicious flavor.

Then simply pop them on the grill for about 8-10 minutes and you have the most juicy, flavorful and delicious steaks you’ve ever tasted in your life. Not to mention, a great idea for Father’s Day to spoil Dad! Click here to see more of my grilling ideas and recipes for Father’s Day.

Ah, Summertime and the livin’s easy…Enjoy J

Coffee Marinated Steak

Prep Time: 1 hour, 15 minutes

Cook Time: 10 minutes

Total Time: 1 hour

Yield: 4

Serving Size: 1 (12-14 ounce) Strip Steak

My go-to Summer recipe is Gourmesso Coffee Marinated Steaks, which I know you’re gonna love. The marinade has a light smoky essence from the coffee (I use Gourmesso House Blend Lungo Dark coffee, which is an espresso (alternative to Nepresso capsules) that has a beautiful dark and rich flavor; some spicy heat from the red chilies and black peppercorns; a touch of sweetness from the brown sugar; and is balanced out with a slight tanginess from the balsamic vinegar, Dale’s seasoning/soy, mustard, shallots and garlic.

Ingredients

  • 1 shallot, minced
  • 2 garlic cloves, minced
  • 1 cup Gourmesso House Blend Lungo Dark coffee, room temp
  • ¼ cup balsamic vinegar
  • ¼ cup Dijon mustard
  • 1/8 cup low-sodium Dale’s seasoning (or dark soy sauce)
  • ¼ cup brown sugar
  • 1 teaspoon red paprika
  • 3 small red chilies
  • 1 teaspoon whole black peppercorns, crushed
  • 2 tablespoons extra virgin olive oil
  • Coarse Kosher salt
  • 4 (12-14 ounce) boneless Strip steaks

Instructions

  1. In a food processor or blender, add the shallots, garlic, Gourmesso coffee, balsamic vinegar, Dale’s sauce/soy sauce, brown sugar, paprika, chilies, peppercorns, and olive oil and kosher salt and blend together well. Pour half the marinade in a glass dish or large plastic ziptop bag, add the steaks and toss to coat with the marinade. Seal and refrigerate for at least 1 hour or up to overnight. Cover the remaining marinade and set aside in the fridge until ready to grill.
  2. Heat grill to medium-high and lightly oil the grill rack. Remove steak from marinade and discard the remaining marinade. Bring steaks to room temperature before grilling.
  3. Season the steaks with salt and pepper and place on grill. Cook for 4-5 minutes per side for medium-rare (less or more according to desired doneness), basting occasionally with remaining marinade.
  4. Transfer steak to a cutting board and let rest tented in foil for 5 minutes. Serve with grilled vegetables or a simple green salad dressed with vinaigrette and a glass of wine. Enjoy!

Notes

You can make the marinade up to a day ahead of time and store in the fridge with the steaks in a plastic bag or covered dish.

https://www.theartfulgourmet.com/2017/05/gourmesso-coffee-marinated-steak/

Things are getting Coco Loco for Summer!

CocoLoco-hero

Captain Morgan Loco Nut

Hey guys, listen up! Summer is almost around the corner and do I have some exciting news for you coconut lovers around the world! CAPTAIN MORGAN just took a bunch of coconuts and turned them into a delicious new shot, CAPTAIN MORGAN LocoNut. This super delicious shot is made with Caribbean rum, coconut liqueur, spice and natural flavors.

Loco-&-Chill

It comes in a coconut-shaped bottle, smells like a coconut and yes,  tastes like a coconut (and a day on the beach in a glass!) LocoNut is affordable too, just $14.99 for a 750 ml bottle, and it’s coming to a store (and a beach) near you. And, on top of that, CAPTAIN MORGAN LocoNut is also gluten-free!

Loconut2

It’s simply amazing as a chilled shot, but it’s also great simply on the rocks, and a great base for a variety of tropical cocktails or mixed shots, so get creative! I’d love to hear some of your cocktail ideas using LocoNut in the comments below.

Here’s a few cocktail ideas to get your tastebuds singing and a head start on Summer vacay:

Loco & Coco 

3 oz. CAPTAIN MORGAN LocoNut Coconut Shot

4 oz. Coconut Water

Directions: Combine CAPTAIN MORGAN LocoNut with coconut water and serve over ice.

—–

Captain & Loco 

2 oz. CAPTAIN MORGAN LocoNut Coconut Shot

0.5 oz. CAPTAIN MORGAN Original Spiced Rum

Directions: Combine CAPTAIN MORGAN LocoNut and CAPTAIN MORGAN Original Spiced Rum and serve over ice.

—–

Livin’ Vanilla Loco 

1 oz. CAPTAIN MORGAN LocoNut Coconut Shot

0.5 oz. CROWN ROYAL Vanilla

Directions: Combine CAPTAIN MORGAN LocoNut and CROWN ROYAL Vanilla into a shaker with ice.

Shake and strain into a rocks glass with ice.

LocoNut

——-

To learn more about CAPTAIN MORGAN follow us on social media on Instagram (@CaptainMorganUSA), Twitter (@CaptainMorganUS) and like us on Facebook (@CaptainMorganUSA).

——-

About Diageo 

Diageo is a global leader in beverage alcohol with an outstanding collection of brands including Johnnie Walker, Crown Royal, Bulleit and Buchanan’s whiskies, Smirnoff, Cîroc and Ketel One vodkas, Captain Morgan, Baileys, Don Julio, Tanqueray and Guinness.

Diageo is listed on both the New York Stock Exchange (DEO) and the London Stock Exchange (DGE) and our products are sold in more than 180 countries around the world. For more information about Diageo, our people, our brands, and performance, visit us at www.diageo.com. Visit Diageo’s global responsible drinking resource, www.DRINKiQ.com, for information, initiatives, and ways to share best practice.

Follow on Twitter for news and information about Diageo North America: @Diageo_NA.

Celebrating life, every day, everywhere

——-

Disclaimer: This is a sponsored post and I received a product sample from the client to perform this product review on my site. I was not compensated monetarily and all opinions are my own. #ad #spon

Lemon Garlic Shrimp w/ Spaghetti Squash

Lemon Garlic Spaghetti Squash

So we are well into the New Year, and it’s definitely time to up my game and start smashing my fitness and healthy cooking and eating goals for this year.

I’ve joined a new gym, hired a Personal Trainer and committing to doing Yoga, Pilates, Barre and weight training plus lots of walking at least 4 times a week from now on. I’m also focusing on lower carb eating for a while – cutting out sugar, processed foods, carb loaded foods. And drinking more water, getting more rest and taking my vitamins. The list goes on! Gosh, getting healthy and in shape is not easy.

Roasted Spaghetti Squash

I decided to make a lighter version of Lemon Garlic Shrimp Spaghetti that’s normally loaded. I swapped out healthy spaghetti squash roasted with olive oil, sea salt and pepper instead of pasta to lighten up the carbs and calories.

Spaghetti Squash

Then I simply shredded it into spaghetti strands with a fork…

Sautéed Lemon Garlic Shrimp

and sautéed some sliced fresh garlic and shrimp in olive oil, butter, red chile pepper,  fresh parsley and a big splash of fresh lemon juice. YUM!

Lemon Garlic Roasted Spaghetti Squash

It’s so light and delicious i don’t even miss the pasta or bread (truly!) This lovely dish is also low in calories and high in protein – two staples to losing weight. Not to mention staying full and energized without the sugar highs and lows from eating all those heavy carbs.

You can also add more veggies to the dish if you like..try sautéing some mushrooms, zucchini, cherry tomatoes or bell peppers and adding them to the mix. I absolutely love the possibilities of this dish! Who needs pasta when you have delicious buttery strands of squash instead? Please add your comments below on how you would make or alter the dish – creativity is good!

Hope you enjoy the recipe and here’s to happy and healthy New Year to all of you. xx

Lemon Garlic Shrimp w/ Spaghetti Squash

Prep Time: 30 minutes

Cook Time: 1 hour, 30 minutes

Total Time: 2 hours

Yield: Makes 4-5 cups Spaghetti Squash and approximately 3 cups of Lemon Garlic Shrimp, serving 2.

This light and healthy dish is made with roasted spaghetti squash topped with sautéed shrimp, garlic, olive oil, chile flakes, lemon and parsley. Super easy and tasty and low on the carbs!

Ingredients

  • Roasted Spaghetti Squash:
  • 1 (3-pound) spaghetti squash
  • 2 tablespoons olive oil
  • Sea salt and freshly ground black pepper
  • Lemon Garlic Shrimp:
  • 6 cloves garlic, sliced
  • 1 pound medium shrimp, peeled and deveined (16-20 ct)
  • 2-3 tablespoons extra-virgin olive oil
  • 2 tablespoons unsalted butter
  • Pinch of red pepper chile flakes
  • 3 teaspoons fresh lemon juice
  • 2 tablespoons chopped fresh parsley leaves, plus more for garnish
  • Sea salt and black pepper, to taste
  • Grated Parmesan cheese, for garnish (optional)

Instructions

  1. Roasted Spaghetti Squash:
  2. Preheat oven to 375 degrees F.
  3. Cut spaghetti squash in half lengthwise and scrape out seeds and inner membranes. Drizzle and rub squash with olive oil, and sprinkle with salt and pepper.
  4. Place the halves, cut side down, in a large baking dish and roast squash for 35-45 minutes until tender.
  5. Remove squash from oven and turn side up, letting it cool for about 10 minutes.
  6. Scrape the inside of the squash with a fork to make spaghetti strands and serve with the Lemon Garlic Shrimp.
  7. Lemon Garlic Shrimp:
  8. Heat oil and butter over medium-high heat in a skillet until shimmering, then add the sliced garlic and cook while stirring constantly, about 1 minute.
  9. Add the shrimp and cook, stirring constantly, until shrimp are slightly cooked through, about 2-3 minutes. Add the lemon juice, red pepper flakes and parsley; toss to combine.
  10. Season to taste with salt and pepper, serve immediately over roasted spaghetti squash.
  11. Garnish with additional fresh parsley and grated parmesan cheese, if desired.
Schema/Recipe SEO Data Markup by Yummly Rich Recipes
https://www.theartfulgourmet.com/2017/01/lemon-garlic-shrimp-w-spaghetti-squash/

Mini Vegan Chocolate Donuts w/ Salted Caramel Pumpkin Spice Glaze

Mini Vegan Chocolate Donuts

Fall has arrived my friends, and we all know what that means. Pumpkin Spice. Everything. In the spirit of the season, I’ve decided to make some Mini Vegan Chocolate Doughnuts with Salted Caramel Spiced Pumpkin Glaze.

Vegan ingredients

They’re a perfect fall dessert, and healthy too! These doughnuts are made with all natural vegan ingredients – red kidney beans, unsweetened soy milk, vanilla extract, coconut sugar, cocoa powder, flour and baking powder – and you wouldn’t believe how good they taste.

KitchenAid Mini Donut Pan

They are so delicious (and cute!) and easy to make with the help of my KitchenAid® Diamond Blender and Mini Doughnut Pans – and they bake in only 10 minutes in my Convection Countertop Oven!

Glazed Mini Donuts

The glaze is super easy to make too – made in my KitchenAid Stainless Steel sauce pan with fresh pumpkin puree, coconut cream and coconut sugar and pumpkin pie spice all cooked into a gooey luscious caramel sauce then topped with flaky sea salt – it’s the most lovely combination of Fall flavors in one tiny bite!

mini vegan chocolate donuts

ooh…aren’t they lovely and delicious? Oh, and they’re vegan and gluten-free too! Isn’t that wonderful.

bet you can’t have just one bite! 

Mini Vegan Chocolate Donuts w/ Salted Caramel Pumpkin Spice Glaze

Yield: Makes about 16-18 mini donuts and 1 cup of glaze.

These mini vegan donuts are a perfect fall dessert, and healthy too! Made with all natural vegan ingredients – red kidney beans, unsweetened soy milk, vanilla extract, coconut sugar, cocoa powder, flour and baking powder – and you wouldn’t believe how good they taste.

Ingredients

  • Donuts:
  • 1 (15-ounce) can red kidney beans
  • 1 cup unsweetened soy milk (or almond milk)
  • 1 tablespoon pure vanilla extract
  • ½ cup coconut sugar
  • 1 cup cocoa powder (Guittard Cocoa Rouge)
  • 2 teaspoons baking powder
  • 1-2 tablespoons coconut or vegetable oil (if needed, for dough)
  • Salted Caramel Pumpkin Spice Glaze:
  • 1 cup coconut sugar
  • ¾ cup coconut cream (top thick layer from full-fat coconut milk), refrigerated
  • 1 ½ teaspoons pure vanilla extract
  • ¾ teaspoon Himalayan pink sea salt
  • ¼ cup pumpkin puree
  • ½ teaspoon pumpkin pie spice
  • Flaky sea salt (such as Maldon), for garnish

Instructions

  1. Donuts:
  2. First, rinse and drain the kidney beans and place them in your KitchenAid Diamond blender along with the soy milk, coconut sugar and cocoa powder, blending them together on Mix (3) setting.
  3. Then, transfer the mixture to your large KitchenAid Ceramic Mixing Bowl and stir in the flour, baking powder and vanilla until the dough comes together smoothly and thoroughly mixed. If it seems a little dry, add a little more soy milk or a tablespoon or two of coconut or vegetable oil.
  4. Spoon a couple tablespoons of dough into the donut pan (fill to the top and smooth). This recipe makes approximately 16-18 donuts so you’ll need at least 2 mini donut pans or make them in 3 batches.
  5. Bake the donuts in your preheated KitchenAid Convection Countertop Oven on 350 degrees for 10 minutes, then let them cool for a couple of minutes in the donut pan, then remove and place them on a cooling rack while you make the Salted Caramel Pumpkin Spice Glaze.
  6. Salted Caramel Pumpkin Spice Glaze:
  7. To make the donut glaze, simply place all your ingredients (coconut sugar, coconut cream, vanilla extract, Himalayan pink sea salt, pumpkin puree and pumpkin spice) in your KitchenAid Stainless Steel 3-Qt. Sauce Pan over medium-high heat.
  8. Bring to a rolling boil, and constantly whisk for about 10 minutes until the glaze starts to thicken and caramelize and turns to a dark brown color (be careful to constantly watch and stir, and not let the caramel burn – reducing heat to medium-low if needed). Let the glaze cool to the side for a few minutes after it is done to allow it to thicken a little more.
  9. Spoon the glaze over the donuts on a baking sheet covered in foil or parchment paper and garnish with flaky sea salt. You can also top the donuts with some crushed nuts if you like too (hazelnuts or pecans would be amazing!)

Notes

Glaze can be made ahead of time and will keep in the refrigerator for up to 1 week. It can also be reheated in the microwave or let it come to room temperature before glazing the mini donuts.

https://www.theartfulgourmet.com/2016/11/mini-vegan-chocolate-donuts-w-salted-caramel-pumpkin-spice-glaze/

Elderberry Lime Chicken & Veggie Kabobs + Heirloom Tomato, Peach & Mozzarella Salad

Grilled Chicken and Veggie Kabobs

I love grilling in the Summertime – and there’s nothing easier, tastier and healthier than Grilled Chicken and Vegetable Kabobs!

Heirloom Tomato, Peach & Mozzarella Salad

I also love a delicious salad using the fruits and veggies of the season – try my Heirloom Tomato, Peach & Mozzarella Salad which is bursting with fresh flavors!

Grilled Chicken & Veggie Kabobs

I developed these recipes for my client Seven Barrels, who makes spectacular infused olive oils and vinegars. I wanted to create a refreshing recipe for their Summer promotion, so I created a marinade for the kabobs and a vinaigrette dressing for the salad using their Elderberry Balsamic Vinegar and Lime Olive Oil – a delicious combination!

Heirloom Tomato Peach Mozzarella Salad

Hope you’re enjoying your Summer and enjoy these recipes at your next cookout! 🙂

Check out Seven Barrels website for more product information

Grilled Chicken & Veggie Kabobs

Prep Time: 1 hour

Cook Time: 15 minutes

Total Time: 1 hour

Yield: 4 to 6

Grilled chicken and summer veggie kabobs in an Elderberry Lime Marinade - perfect for Summer!

Ingredients

  • Grilled Chicken & Veggie Kabobs:
  • 2 pounds boneless chicken thighs (skinless), cut into 1-inch chunks
  • 2 bell peppers (red, yellow, orange or green), cut into 1-inch chunks
  • 1 large red onion, cut into large chunks
  • 1 large zucchini, cut into large chunks
  • 1 large yellow squash, cut into large chunks
  • 1 cup Elderberry Lime Marinade (recipe follows)
  • Sea salt and freshly ground pepper, to taste
  • Elderberry Lime Marinade:
  • ½ cup Seven Barrels Lime Olive Oil
  • ½ cup Seven Barrels Extra Virgin Olive Oil
  • ¼ cup Seven Barrels Elderberry Balsamic Vinegar
  • 2 tablespoons low sodium soy sauce
  • 2 tablespoons honey
  • 2-3 cloves garlic, minced
  • 2 tablespoons fresh basil or parsley, minced
  • 1 teaspoon garlic salt
  • 1 teaspoon freshly ground black pepper, to taste

Instructions

  1. Grilled Chicken & Veggie Kabobs:
  2. Place chicken and vegetables in large plastic ziplock bags and pour 1/2 of the Elderberry Lime Marinade over each, letting marinade in the fridge for at least two hours up to eight hours.
  3. Pre-soak wooden skewers in water for at least 15-20 minutes, and preheat grill on medium-high heat.
  4. Thread the chicken and vegetables evenly spaced on separate skewers and discard the marinade except for a small amount to use while grilling.
  5. Lightly oil the grate and grill chicken skewers until opaque and juices run clear (about 12-15 minutes) and the vegetable skewers for about 8-12 minutes until soft and beginning to brown. Turn and brush with extra marinade frequently. Season with additional salt and pepper to taste.
  6. Transfer the skewers to a warm platter and serve immediately.
  7. Elderberry Lime Marinade:
  8. In a bowl, whisk together the olive oil, vinegar, soy sauce, honey, garlic, basil or parsley, garlic salt and black pepper. Cover and set aside until ready to marinade the chicken and vegetables.
  9. Makes 1 ¼ cups.
Schema/Recipe SEO Data Markup by Yummly Rich Recipes
https://www.theartfulgourmet.com/2016/08/elderberry-lime-chicken-veggie-kabobs-heirloom-tomato-peach-mozzarella-salad/

Heirloom Tomato, Peach & Mozzarella Salad

Prep Time: 30 minutes

Total Time: 30 minutes

Yield: 6-8

A gorgeous Summer salad made with heirloom tomatoes, fresh peaches, mozzarella, basil, arugula in an Elderberry Lime vinaigrette dressing topped with sunflower seeds.

Ingredients

  • Heirloom Tomato, Peach & Mozzarella Salad:
  • 2 large handfuls of baby arugula
  • 2 peaches, cut into wedges
  • 1 Heirloom tomato, cut into wedges
  • ½ cup cooked corn
  • ½ cup cucumber, cut into wedges
  • 1 cup cherry tomatoes
  • 1/3 ball of burrata or fresh mozzarella
  • 1/2 cup toasted sunflower seeds
  • Fresh basil
  • Sea Salt, to taste
  • Freshly ground black pepper, to taste
  • Elderberry Lime Vinaigrette:
  • 2 garlic cloves, finely minced
  • 1 tablespoon Dijon mustard
  • 1/4 cup Seven Barrels Elderberry balsamic vinegar
  • 2 tablespoons fresh lemon juice
  • 2 tablespoons honey
  • 1 teaspoon red pepper flakes
  • 1/2 teaspoon salt
  • 1/2 teaspoon freshly ground black pepper
  • 1/3 cup Seven Barrels Lime Olive Oil

Instructions

  1. Heirloom Tomato, Peach & Mozzarella Salad:
  2. On a large plate, arrange the arugula, peaches and heirloom tomato wedges. Sprinkle corn and cucumber over the salad.
  3. Carefully rip the ball of burrata or mozzarella into pieces and scatter on top of the salad along with the cherry tomatoes. Sprinkle with toasted sunflower seeds, salt and pepper and a few basil leaves.
  4. Drizzle with a few tablespoons of the Elderberry Lime vinaigrette and serve immediately. Serve with extra dressing and additional salt and pepper, if desired.
  5. Elderberry Lime Vinaigrette:
  6. Combine all the ingredients except the olive oil in a medium bowl and whisk together well. Once combined, stream in the olive oil and continue to whisk until the vinaigrette comes together. Taste and adjust salt and pepper as needed.
  7. Note: The dressing can be stored and refrigerated for 1 week.
  8. Makes approximately 3/4 cup.
https://www.theartfulgourmet.com/2016/08/elderberry-lime-chicken-veggie-kabobs-heirloom-tomato-peach-mozzarella-salad/


Red Curry Beef w/ Zucchini Noodles

   Red Beef Curry

Since the holidays are coming soon, we all know what THAT means..lots of holiday parties with food and drinks, and with that in mind, I’ve decided to commit to eating healthier and lighter the next few weeks.

Zucchini Noodles Action

I absolutely love my KitchenAid® Spiralizer Attachment that goes with my KitchenAid® Stand Mixer – and I’m so excited to make some healthier low-carb meals! It comes with five different blades for peeling, coring and slicing and is perfect for fresh fruits and vegetables. I love pasta and rice, but spiralized veggies are such a great substitute when I want to lighten up my recipes and eat low carb.

Red Curry Beef Zoodles

I thought a delicious comfort food dish with a healthy twist would be perfect for the cooler months, and decided to make a Red Curry  Beef with Zucchini Noodles.

Red Curry Beef ingredients

I used lots of fresh, organic ingredients: beef, sweet potatoes, onions, garlic and green beans, and then made a lovely curry sauce with coconut milk, red curry paste, fresh lime juice, fish sauce, some beef broth and a dash of Sriracha to spice it up.

Cutlery and Veggies

I used my Professional Series 3.5″ Paring Knife that came with the 7-piece Professional Series Cutlery set, for chopping my onions and garlic, Thai chilies and basil.

Chop beef into large chunks

The larger Chef’s knife was great for cutting up the large chunks of beef and sweet potatoes with its sturdier grip and large super sharp blade.

Add veggies to curry sauce

My heavy duty KitchenAid ceramic cast iron pot is perfect for making this dish – it cooks evenly and is large enough to make a large pot of curry or stew, and is ovenproof to 500 degrees!

Saute zucchini noodles

The KitchenAid spiralizer attachment is also easy to use! All you need to do is attach it to the KitchenAid mixer, and the spirals come right out perfectly cut. Then you just briefly cook them in a saucepan with some olive or peanut oil, season them with some salt and pepper.

Red Beef Curry

Top the #zoodles with this luscious and creamy curry – lots of great flavors and textures, sweet and spicy – all in one pot. Delish!

Red Beef Curry

This is such a great Winter comfort food dish to make and it’s so easy to make with all the right tools… You’ll definitely want to make this Red Curry Beef  Zucchini Noodles for dinner – tonight!

Red Beef Curry with Zucchini Noodles

Ingredients

  • INGREDIENTS
  • 3-4 medium zucchini
  • 2 1/2 pounds lean stewing beef, (chuck or round), cut into 1 1/2 inch chunks
  • 1 teaspoon Kosher salt
  • 1 teaspoon freshly ground black pepper
  • 3 tablespoons canola oil
  • 1 sweet onion, finely chopped
  • 4 garlic cloves, minced
  • 1/4 cup red curry paste
  • 2 cans (13.5 ounce) unsweetened coconut milk
  • 2 tablespoons Thai fish sauce
  • 2 tablespoons fresh lime juice
  • 2 tablespoons dark brown sugar
  • 1/4 cup beef broth
  • 1 tablespoon Sriracha hot sauce (optional)
  • 1 large handful French green beans, trimmed
  • 3 medium sweet potatoes, peeled and cut into medium chunks
  • 1 (8 ounce) can sliced bamboo shoots, drained
  • 3 tablespoons fresh basil, chopped or torn, for garnish
  • 1-2 Thai green chilies, sliced fine, for garnish
  • 1/2 cup peanuts, for garnish

Instructions

  1. Attach the KitchenAid® Spiralizer Attachment to your KitchenAid® Stand Mixer and choose your desired spiralizing blade. Attach the vegetable skewer to the Spiralizer and secure it to the zucchini. Move the spiralizing blade to the end of the zucchini and turn on the Stand Mixer to low (level 2) to make the spiralized zucchini noodles. Make sure you place a bowl underneath to catch the zucchini noodles as they fall. Set the noodles aside or keep them in the refrigerator until ready to serve.
  2. Cut the beef into 1 1/2 inch large chunks and place in a bowl. Sprinkle with kosher salt and freshly ground black pepper.
  3. Heat the oil over medium-high heat in your KitchenAid® 6.0Qt Cast Iron Cookware and brown the beef in two batches until lightly browned on all sides. Remove the beef from the pot and transfer to a bowl, set aside.
  4. Add the onion and garlic to the same pot and sauté over medium heat for about a minute. Add the curry paste, stirring into the onions and garlic, until lightly fragrant, for about 30 seconds. Add the coconut milk, and deglaze the pan, stirring up all the crispy brown bits with a wooden spoon. Stir in the fish sauce, lime juice, brown sugar, beef broth, Sriracha (if using) and bring the liquid to a boil.
  5. Add the green beans and sweet potatoes and stir into the liquid. Next add the browned beef back in and stir together well. Cover the pot, reduce the heat to low and let simmer for about an hour and 45 minutes. Add the bamboo shoots into the curry and let simmer for another 15 minutes.
  6. Meanwhile, heat a tablespoon of olive oil in your 10? Skillet from the KitchenAid® Stainless Steel 8-Piece Set over medium heat. Add the zucchini noodles, with some salt and pepper to taste, and sauté for a few minutes until the noodles are soft.
  7. Serve the noodles in bowls topped with the Red Beef Curry, garnishing with fresh chopped basil, sliced Thai green chilies and peanuts.
https://www.theartfulgourmet.com/2016/01/red-curry-beef-zucchini-noodles/

CLICK HERE TO VIEW STEP BY STEP VISUALS ON THE KITCHENTHUSIAST BLOG!

Red Beef Curry

Enjoy!