Vegan Kung Pao Noodles

Vegan Kung Pao Noodles

I recently was invited to participate in another fun #Blogger Recipe contest, this time held by Big Mountain Foods… they sent me a few of their tasty #vegan products to play with and use to create a new #recipe. I absolutely LOVE spicy Asian food and noodle dishes and had a craving for it, so I decided to create these Vegan Kung Pao Noodles for the contest and oh my GOODNESS. They are super delish you guys!

Vegan Kung Pao NoodlesHey, it’s a New Year, so why not try to lighten up a little with some healthier recipes that are meat-free and dairy-free but still have tons of flavor? There’s so many good things in this dish that you won’t even miss the meat, I promise.

Lion's Mane Mushroom Crumbles


Big Mountain Foods is an all women-owned company based out of Vancouver, BC. They offer a superb lineup of fresh, vegan, #plant-based products that are flavorful, #gluten-free and #non-GMO/#organic. I used their Lion’s Mane Mushroom Crumbles in this recipe which has a blend of organic lion’s mane, portobello and shiitake mushrooms along with a mixture of other healthy ingredients like carrots, pea protein, yellow split peas, hemp seeds, sunflower seeds and coconut oil. They are absolutely delicious and a perfect substitution for ground beef, or ground chicken, with a great umami flavor and nice texture.

Prep ingredients

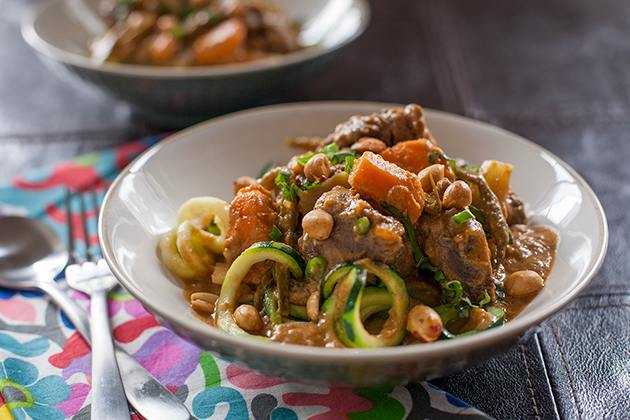
This recipe for Vegan Kung Pao Noodles is a fun twist on a traditional Asian favorite, Kung Pao. I made it with buckwheat soba noodles, sautéed Lion’s Mane mushroom crumbles, fresh ginger, shallots, red peppers, and water chestnuts tossed in a sweet and spicy Kung Pao sauce (soy sauce, sesame oil, apple cider vinegar and coconut palm sugar and Asian chile garlic sauce) topped with sesame seeds, crunchy peanuts and crispy fried garlic. Oh, the flavors!!!

Stir Fry veggies

First, heat oil in a wok or large pan and sauté the shallots, ginger, water chestnuts and red bell peppers for a few minutes until soft.

Add Mushroom Crumbles

Add the Lion’s Mane Mushroom Crumbles to the pan and cook a few minutes more until heated through.

Add Kung Pao Sauce

Stir in the Kung Pao sauce and let it simmer on low heat for a few more minutes to infuse all the delicious flavors together. Add a little corn starch slurry to thicken the sauce even more.

Stir Noodles and Veggies with Sauce

Toss in the cooked soba noodles and stir to coat. Add in the sesame seeds, peanuts and crispy garlic; mix together into a big pot of sweet and spicy, crunchy goodness.

Vegan Kung Pao Noodles

Serve immediately and enjoy with a glass of white wine (like a Sauvignon Blanc).

Vegan Kung Pao Noodles

Feel free to substitute other pasta for the soba noodles: rice noodles, spaghetti or linguine noodles work great. You can also add an extra teaspoon of chili garlic sauce or drizzle Sriracha sauce on top to kick the heat up a notch…(I absolutely did!!)

Vegan Kung Pao Noodles

If you want to experiment with some other veggies, try adding broccoli, carrots, snow peas, or sliced green onions to the stir fried noodles.

Vegan Kung Pao Noodles

If you add more veggies, you may need to make a little extra sauce depending on how much you add, so the noodles don’t get too dry. Just play with it and get it to the consistency and flavor you like.

Vegan Kung Pao Noodles

Prep Time: 15 minutes

Cook Time: 15 minutes

Total Time: 30 minutes

Yield: 6

This is a fun twist on a traditional Asian favorite, Kung Pao, with buckwheat soba noodles tossed with sautéed Lion's Mane mushroom crumbles, fresh ginger, shallots, red peppers, and water chestnuts in a spicy savory sauce topped with sesame seeds, peanuts and crispy fried garlic.

Ingredients

  • 1 package buckwheat soba noodles (12 oz)
  • 2 teaspoons sesame oil, divided
  • 1 tablespoon peanut or vegetable oil
  • 1 package Big Mountain Foods Lion's Mane Mushroom Crumbles
  • 2 tablespoons fresh ginger, julienned
  • 1 shallot, minced
  • 1 (5 oz) can water chestnuts, diced
  • 1 small red pepper, sliced thin
  • 1/2 cup soy sauce or tamari
  • 2 tablespoons sesame oil
  • 4 tablespoons apple cider vinegar or rice vinegar
  • 2 tablespoons coconut palm sugar
  • 2 tablespoons Asian chili garlic sauce
  • 1/3 cup cold water
  • 1 tablespoon corn starch
  • 1/4 cup dry roasted peanuts
  • 1 tablespoon sesame seeds
  • 2 tablespoons crispy fried garlic

Instructions

  1. Cook soba noodles in boiling water for approximately 5 minutes, until soft. Drain and toss with 1 teaspoon sesame oil; set aside.
  2. Heat additional teaspoon of sesame oil and 1 tablespoon of peanut oil in a large skillet or wok over medium heat.
  3. Add ginger, shallot, water chestnuts and red pepper; sauté for about 2-3 minutes until soft. Stir in the Lion's Mane Mushroom Crumbles and cook for another 2-3 minutes, then lower heat to medium-low.
  4. In a medium bowl, whisk together the soy sauce (or tamari), sesame oil, apple cider (or rice) vinegar, coconut palm sugar, chili garlic sauce and pour into the skillet with the Mushroom veggie mixture, stir and toss to coat.
  5. Whisk the corn starch and water together and pour into the wok/skillet and mix together well. Let mixture cook for an additional minute or so until the sauce thickens.
  6. Toss in the peanuts, sesame seeds and fried garlic, stir together.
  7. Serve hot immediately, top with additional peanuts and crispy garlic if desired, for garnish.

Notes

Feel free to substitute other pasta for the soba noodles: rice noodles, spaghetti or linguine noodles work great. Add extra tablespoon of chili paste to kick the heat up a notch. You can also add extra vegetables to the stir fried noodles but you may need to make extra sauce so the noodles don't get too dry if adding them.

https://www.theartfulgourmet.com/2022/01/vegan-kung-pao-noodles/

Vegan Kung Pao Noodles

Any way you make these Kung Pao noodles they are absolutely delish and a #healthy vegan dish to kick off the New Year with!

You can find all of Big Mountain’s products online and also in the fresh section of the grocery store, as well as specialty food stores (Sprouts, Whole Foods, etc.) And check out @bigmountainfoods social media pages and website for more info, a store locator and more great recipes!

Website: https://bigmountainfoods.com/

Facebook: https://www.facebook.com/bigmountainfoods/

Instagram: https://www.instagram.com/bigmountainfoods/

Twitter: https://twitter.com/bigmountainfood

#BigMountainFoodsRecipeChallenge #BigMountainFoods #Veganrecipes

——–

Other recipes you may enjoy:

Spicy Pork Udon Noodle Soup

Thai Chicken Peanut Noodles

Sweet + Spicy Shrimp Noodle Salad


Savory Pan-Seared Chicken Thighs {#Keto / #LowCarb}

Savory Pan-Seared Chicken

Savory Chicken 4

Hey folks, happy Tuesday! Just another chilly January day here…I had a serious craving for some seriously good chicken today so I made these Savory Pan-Seared Chicken Thighs for lunch. You guys – these are the BOMB. And seriously tasty.

Dale's Seasoning
photo credit: Dale’s Seasoning

Dale’s Steak Seasoning is my secret ingredient in this recipe – it’s a savory marinade made with a blend of exotic spices, originating in Birmingham AL. I discovered in the early 90’s while living in Atlanta GA when my ex introduced me to it… we were grilling burgers out with some friends and let’s just say I got quite addicted to this delicious sauce verrryyy quickly – it was love at first sight actually. Now I use it on almost EVERYTHING: chicken, steak, pork, burgers, and even grilled lamb or quail! It’s gives such a rich flavor to anything you put it on, really so you don’t need a lot of extra seasonings when using it.

Savory Chicken

The recipe is super easy too – I poured about 1/4 cup of the Dale’s Seasoning marinade over the chicken thighs into a mixing bowl and then added 2 tablespoons olive oil, a dash of black pepper and red pepper flakes, a tablespoon of dried chives, a little garlic powder…

Mushroom & Company Multipurpose Umami Seasoning Blend
photo credit: Trader Joe’s

and then a dash of my other secret ingredient, Trader Joe’s Mushroom + Co Multipurpose Umami Seasoning, which is a blend of porcini and white button mushroom powder, sea salt, dried onion powder, ground mustard seed, crushed red pepper, black pepper, and dried thyme, that add tons of #UMAMI to the dish that I can’t even describe.

Savory Chicken 2

Poke a few holes on each chicken thigh and mush it all over the chicken with tongs and then let it all marinate in a large plastic baggie or mixing bowl in the fridge for about 30 mins.  Then, pan-sear the chicken thighs in a large sauté pan over medium-high for 5 minutes on each side until crispy and browned, and the sauce gets a little syrupy and caramelized. (You can also bake or grill them of course if you prefer.) The final crown touch was I topped the chicken with some crispy fried garlic flakes for extra crunch and flavor (the kind you find in an Asian market..if you can’t find these, you can sub crispy fried onions or shallots crushed up or make your own)…. oh my goodness, this is truly the best #chicken I have EVER tasted!

Savory Chicken

You can use my marinade recipe on any protein or veggies you prefer, it’s that versatile and full of flavor. And like I mentioned it’s super delish on grilled burgers too. I can’t even tell you how much I love this stuff. So with that said, here’s the actual recipe below. Feel free to use it on anything and everything and I promise you will never go back to dry, bland, tasteless chicken ever again and you will be as hooked on this stuff as I am..I promise!

Savory Chicken 3

Enjoy. 🙂

Savory Pan-Seared Chicken Thighs {#Keto / #LowCarb}

Prep Time: 35 minutes

Cook Time: 10 minutes

Total Time: 45 minutes

Yield: Serves 4

Serving Size: 1 piece

This recipe for Savory Pan-Seared Chicken Thighs is my go-to recipe for all around full flavored delicious chicken! Marinated in Dale's Seasoning along with Trader Joe's Umami Seasoning, olive oil, black and red pepper, chives and topped with crispy garlic flakes. Easy peasy and totally amazing.

Ingredients

  • 1 pound skinless, boneless chicken thighs
  • 1/4 cup Dale's Steak Seasoning
  • 2 tablespoons olive oil
  • 1/4 teaspoon black pepper
  • 1/2 teaspoon red pepper flakes
  • 1 tablespoon dried chives (or 2 tablespoon fresh minced)
  • 1/2 teaspoon garlic powder
  • 1/2 teaspoon Trader Joe's Umami Seasoning
  • Crispy garlic flakes, for garnish

Instructions

  1. Pour 1/4 cup of the Dale's Seasoning marinade over the chicken thighs into a medium mixing bowl. Add 1/8 cup olive oil, a dash of black pepper and red pepper flakes, a tablespoon of dried chives, a dash of garlic powder and Trader Joe's Umami Seasoning.
  2. Mush it all together over the chicken and let it marinate in the fridge for 30 mins.
  3. Heat a saute pan or grill over medium-high heat. Add the chicken thighs and cook for 5 minutes on each side until crispy and browned.
  4. Top chicken with crispy garlic flakes for garnish. Serve immediately.
https://www.theartfulgourmet.com/2021/01/savory-pan-seared-chicken-thighs-keto-lowcarb/

Savory Chicken 6

Other marinade recipes you may enjoy: 

Best Chicken Marinade

7 Best Chicken Marinades

The Best Chicken Marinade

Paleo “Smashed” Sweet Potatoes w/ Honey + Thyme

Paleo Smashed Sweet Potatoes w/ Honey + Thyme

Paleo Smashed Sweet Potatoes w/ Honey + Thyme

These Paleo “Smashed” Sweet Potatoes with Honey + Thyme are a fantastic alternative to regular sweet potato casseroles that are laden with calories, carbs, sugar, and all the other things that can be problematic on a #paleo, #low-carb, #whole30 or #ketogenic diet.

I created this recipe for my client #Ketologic, made with their #FBOMB Macadamia Oil which gives you the health benefits of sweet potatoes along with quality fats from premium oil and grass-fed butter. Full of vitamins, packed with minerals, and utterly delicious.

Sweet potatoes are a rich source of fiber, vitamins, minerals, and phytosterol, which promotes a healthy digestive system. They also contain beta carotene, which supports eye health along with high amounts of antioxidants that help defend the body of free radicals.

But sweet potatoes are high carb and starchy, even before adding sugar. 

Traditional sweet potato recipes send your blood sugar on a rollercoaster ride that leaves you feeling sluggish and bloated in the hours and days afterward. Neither brown sugar nor marshmallows offer much in the way of nutrition besides a hefty dose of sugar. They’re the very definition of “empty carbs.”

Just one serving of a side dish like that is enough to give you an epic sugar hangover. Don’t be surprised if you wake up from your post-Thanksgiving meal nap and start reaching for even more sweets. Luckily, sweet potatoes are sweet enough without having to add candy. They’re called “sweet” potatoes for a reason, you know.

Smashed Roasted Sweet Potatoes

This recipe swaps out the burnt marshmallows in traditional sweet potato casseroles for a topping that’s far healthier but just as delicious: Pecans.

These high-fat, low-carb nuts deliver a wonderful caramelized flavor that balances out the sweetness of the sweet potato and honey. The fats perfectly pair with the omega-7-packed macadamia oil, delivering a satisfying, satiating side that will stop you from reaching for that extra slice of pie after dinner.

Pecans are awesome for reasons beyond just being low-carb and high in quality fats. They’re also:

  • Antioxidant-rich. Pecans are full of antioxidants, which work to combat free radicals in the body, protecting and repairing your cells.
  • Promote heart health. Research shows that consuming pecans may help manage cholesterol, promoting a healthy heart.
  • Satiating. The high-fat content in nuts provides stable energy and satiety, which can assist with weight loss by reducing hunger and cravings.

These sweet potatoes are so delicious, healthy, and easy to make! First, the sweet potatoes are cut into 1½-inch thick slices and roasted in the oven with some FBOMB Macadamia Oil, cinnamon and nutmeg, pecans, sea salt and black pepper. Then they are “smashed” with a fork (or glass) and topped with a dab of grass-fed butter, drizzled honey, and fresh thyme. Easy, simple, and full of flavor, crunch, and healthy ingredients!

Smashed Roasted Sweet Potatoes w/ Honey + Thyme

Prep Time: 10 minutes

Cook Time: 35 minutes

Total Time: 45 minutes

Yield: 4

Serving Size: 2-3 potato rounds

Calories per serving: 379

Fat per serving: 26.5g

These sweet potatoes are so delicious, healthy, and easy to make! First, the sweet potatoes are cut into 1½-inch thick slices and roasted in the oven with some FBOMB Macadamia Oil, cinnamon and nutmeg, pecans, sea salt and black pepper. Then they are “smashed” with a fork (or glass) and topped with a dab of grass-fed butter, drizzled honey, and fresh thyme. Easy, simple, and full of flavor, crunch, and healthy ingredients!

Ingredients

  • 2 large sweet potatoes (or 3 medium)
  • 3 tablespoons FBOMB Macadamia Oil
  • ½ teaspoon cinnamon
  • 1/4 teaspoon nutmeg
  • Sea salt and freshly ground black pepper, to taste
  • ½ cup pecans, chopped
  • 2-3 tablespoons grass-fed organic butter
  • ¼ cup organic honey
  • 1 tablespoon thyme leaves

Instructions

  1. Preheat oven to 400 degrees F.
  2. Slice the sweet potatoes into five 1½-inch thick slices (or quarters for medium size) and place in a large mixing bowl.
  3. Drizzle the FBOMB Macadamia Oil over the potatoes and toss to coat evenly.
  4. Add the cinnamon, nutmeg, salt, and pepper to the potatoes and stir together.
  5. Place sweet potatoes in an even layer on a large baking sheet, about 1-inch apart.
  6. Bake potatoes until fork-tender, 25 to 30 minutes. Remove from oven and turn oven broiler to medium. Using a fork, potato masher, or the flat bottom of a glass, smash potato slices. Sprinkle with chopped pecans and broil for 3 to 5 minutes, until potatoes are golden brown.
  7. When potatoes are done, add a dab of butter to the center of each one, and drizzle with honey. Sprinkle the potatoes with the fresh thyme over the top.
  8. Serve hot.

Notes

You can also swap out other nuts like walnuts or hazelnuts. If you want to go low-sugar use a sweetener alternative like Stevia, low carb agave or brown sugar substitute (like Swerve) for sweetness without the calories and sugar spikes. If you want to make the recipe dairy-free, use only the macadamia oil or olive oil for drizzling at the end.

Nutritional Information Per Serving:

Calories: 379 •Fat: 26.5g •Protein: 2.5g •Total Carbohydrates: 32.5g •Fiber: 3g •Net Carbs: 29.5g

Macros: •Fat: 63% •Protein: 3% •Carbohydrates: 34%

Schema/Recipe SEO Data Markup by Yummly Rich Recipes
https://www.theartfulgourmet.com/2020/05/paleo-smashed-sweet-potatoes-w-honey-thyme/

Paleo Smashed Sweet Potatoes w/ Honey + Thyme

Hello Pretties. 

You can also swap out other nuts like walnuts or hazelnuts. If you want to go low-sugar use a sweetener alternative like Stevia, low carb agave or brown sugar substitute (like Swerve) for sweetness without the calories and sugar spikes. If you want to make the recipe dairy-free, use only the macadamia oil or olive oil for drizzling at the end. And they’re not just for Thanksgiving! Serve them as a healthy snack or side dish for a weeknight dinner. Super easy and delish.

Just look at these yummy bites of roasted goodness. 

Nutritional Information Per Serving:

Calories: 379
Fat: 26.5g
Protein: 2.5g
Total Carbohydrates: 32.5g
Fiber: 3g
Net Carbs: 29.5g

Macros:
Fat: 63%
Protein: 3%
Carbohydrates: 34%

Other Sweet Potato Recipes you may enjoy: 

Roasted Sweet Potatoes, Bon Appetit

Baked Sweet Potatoes, Skinny Taste

Mashed Sweet Potatoes, Delish

Sweet Potato Souffle, Southern Living

Hasselback Herbed Garlic Butter Sweet Potatoes, Cafe Delights

Sweet Potato Wedges, Martha Stewart

Mississippi Pot Roast + Cheesy Cauliflower Mash

Mississipi Pot Roast

I was craving some serious comfort food yesterday – specifically some roast beef and potatoes with gravy like my mom used to make when I was a kid. As part of my effort to eat low carb/keto for awhile,  I went on a search for a new recipe without all the potatoes, carrots and onions – which although are delicious and healthy, not necessarily low carb.

Mississipi Pot Roast

My friend sent me a link to a low carb Mississippi Pot Roast made in the crockpot which sounded intriguing, because it’s totally zero carbs and I’ve heard rumors that this recipe is the BOMB. I decided to make it with a little twist of my own and seriously guys, you have to try this one.

Mississippi Pot Roast

It’s so easy to make – all you do is get a 3-4 pound pot roast (chuck roast or outside round), throw it in a crockpot with some butter, beef broth, pepperoncini and spices along with some of the pepperoncini juice. I added little bit of Chardonnay white balsamic vinegar to it as well for a touch of sweetness to  balance out the tangy, vinegary butter broth.

Homemade Ranch seasonings

And instead of using the recommended Hidden Valley Ranch dressing mix (which has a lot of carbs in it), I made my own spice mix with onion powder and garlic salt, some dried Italian seasoning, dried dill seasoning, and freshly cracked black pepper. I added a dash of Everglades Heat seasoning (the spicy one) for little extra flavor and heat but you can totally leave this out if you prefer or just add a little cayenne or Creole seasoning like Tony Chacere’s.

Mississippi Pot Roast

You cook it on low for about 8 hours in the crockpot (or 4-5 hours on high) and then remove the roast from the crockpot, shred it into chunks with a fork, then put it back into the juices (you can add a little cornstarch or xanthan gum to thicken the gravy too) and you have a big pot of melt-in-your-mouth, buttery deliciousness.

Cheesy Cauliflower Mash

And instead of mashed potatoes I made some buttery Cheesy #Cauliflower Mash – which is so easy –

Cauliflower

Simply cut your cauliflower into large chunks, then microwave it with some cream and butter for about 12 minutes, stirring to coat halfway through. You can also steam the cauliflower too if you wish.

Blitz in a blender

Then blitz it in a blender with some butter and shredded cheese and you’ll forget what mashed potatoes even are, for reals. So good!

Mississippi Pot Roast

I seriously think I’ve discovered my favorite recipe of the century. OMG. This stuff is crack in a crockpot. I could eat this meal forever. Well, maybe not forever, but repeatedly, with no shame.

Enjoy – and you’re welcome 🙂

Mississippi Pot Roast + Cheesy Cauliflower Mash

Prep Time: 15 minutes

Cook Time: 8 hours, 15 minutes

Total Time: 8 hours, 30 minutes

Serving Size: Serves 6-8.

This is a melt in your mouth delicious Pot Roast recipe for the slow cooker, made with a buttery, pepper and vinegar beef broth served over mashed cheesy cauliflower. It's totally low carb, keto and gluten-free and absolutely delicious and worth the wait!

Ingredients

  • Pot Roast:
  • 3-4 pounds beef roast (chuck or outside round)
  • 10 ounces beef broth
  • 6 pepperoncini peppers
  • 1/4 cup pepperoncini pepper juice
  • 1/4 cup white balsamic vinegar
  • 1 stick unsalted butter
  • 1 teaspoon dried Italian seasoning
  • 1/2 teaspoon onion powder
  • 1/2 teaspoon garlic salt
  • 1/2 teaspoon dill seasoning (dried)
  • Dash of Everglades spicy seasoning (optional)
  • freshly cracked black pepper, to taste
  • Cheesy Mashed Cauliflower:
  • 1 head of cauliflower
  • 2 tablespoons half and half or cream
  • 2 tablespoons unsalted butter
  • 1/2 cup shredded Cheddar cheese
  • garlic salt, to taste
  • freshly ground black pepper, to taste

Instructions

  1. Pot Roast:
  2. Combine all the dried seasonings in a small mixing bowl.
  3. Coat the beef and rub on all sides with the spices. Place in slow cooker.
  4. Pour the broth into the slow cooker and add the pepperoncini, pepperoncini juice, and balsamic vinegar over the beef.
  5. Place a stick of butter on top of the beef, cover and cook on low for 8 hours or on high for 4-5 hours (lower is better but you can do on high if you don't have the time to wait!)
  6. Remove the beef from the crockpot onto a large plate or baking pan and shred the meat with 2 forks.
  7. Stir a little bit of cornstarch or no starch thickener (low carb/gluten free) into the juices to thicken it up a little bit.
  8. Place the beef back into the pot with the juices and serve over Cheesy Mashed Cauliflower (recipe follows).
  9. Cheesy Mashed Cauliflower:
  10. Clean and trim the cauliflower, break up into small to medium-sized pieces. Place in a microwave-safe dish.
  11. Add the cream and butter and microwave the cauliflower on high for 6 minutes.
  12. Stir the cauliflower with the cream and melted butter, and microwave again for another 6 minutes.
  13. Place the cauliflower in a power blender or food processor, add a little more butter and some shredded cheddar cheese and blitz it until you get a smooth creamy puree.
  14. Season with garlic salt and pepper to taste.

Notes

You can substitute any cheese you like for the mashed cauliflower, and if you prefer to use pre-made Ranch salad dressing mix you can save time by using that but it has carbs so it won't be low carb if you do.

https://www.theartfulgourmet.com/2019/01/mississippi-pot-roast-cheesy-cauliflower-mash/

Bacon, Onion + Cheese Frittata for the New Year

Frittata hero

Bacon Onion Cheese Frittata

So the New Year has arrived, and we all know what that means…time for resolutions and committing to good habits and breaking bad ones, including our diets and fitness routines, getting rid of the old and bringing in the new.

So I’ve decided to start with my #lowcarb #keto diet this week and I’m so excited about it – really! Every time I eat this way, everything else seems to fall into place…working out, sleeping better, more energy, better moods, less aches and pains and just feeling fantastic overall.

One of my other goals this year is to cook meals that can last throughout the week so I’m not cooking every meal from scratch every day..and making food with less ingredients (but still quality!), and preferably in one pot for easier prep and cleanup – ovenproof sauté pans, Dutch ovens, my Crock pot and Instant pot. So here goes my recipe for Low Carb/Keto Diet Day 1 – a simple and delicious Bacon, Onion and Cheese Frittata.

Bacon Onion Cheese Frittata

This baby will last me at least a couple of days – just cook it up in a big pan, slice it and it’s perfect for breakfast-on-the-go. AND it’s low carb/keto and #gluten-free made with only #eggs, half and half, sweet onion, #bacon, butter, cheddar #cheese, salt and pepper and some dill seasoning. Super delicious, filling and full of protein (and yes, fat, butter, bacon and cheese are totally fine on low carb (like Atkins and South Beach diets) and the Keto diet (which is pretty much the same except super high fat, medium protein and super low carb)…so no shame there, friends 🙂

BOOM! #2019, I’m ready for ya…bring it on!

Bacon, Onion + Cheese Frittata

Prep Time: 40 minutes

Cook Time: 25 minutes

Total Time: 1 hour, 5 minutes

Yield: Serves 6-8

Serving Size: 1 slice (1/6 or 1/8 of frittata)

An easy, delicious frittata made with eggs, cream, bacon, sautéed sweet onions and cheddar cheese, baked in the oven - perfect for breakfast or brunch or an alternative to dinner. Low carb, keto and gluten-free!

Ingredients

  • 5-6 pieces natural smoked, uncured bacon
  • 2 tablespoons butter
  • 1/2 sweet onion, diced
  • 6 eggs
  • 1 cup half and half or whole milk
  • Deliciously Dill Spice Blend (The Spice Hunter)
  • sea salt
  • freshly ground black pepper
  • 1 cup shredded Cheddar cheese

Instructions

  1. Preheat oven to 375 F.
  2. Place bacon on a baking rack over a foil lined baking sheet and bake for 25 minutes- flip bacon after 15 minutes and bake an additional 10 minutes until bacon is crispy. Drain the bacon grease on paper towels, chop into pieces. Reduce oven to 350 degrees.
  3. Melt butter in a large ovenproof sauté pan over medium heat and cook onions for about 5 minutes or so until lightly golden and translucent and soft. Add bacon back into the pan and stir together.
  4. Whisk eggs with the half and half or milk, dill spice blend, salt and pepper in a large mixing bowl.
  5. Add eggs into the pan with the bacon and onions, stir in the shredded cheese. Cook over medium low heat for about a minute or so.
  6. Bake the frittata in the oven uncovered for 25-30 minutes or until a knife inserted into the center comes out clean.

Notes

You can also substitute prosciutto, pancetta or canadian bacon or ham for the bacon (or turkey bacon!) Feel free to experiment with other cheeses as well such as mozzarella, monterey jack, colby or parmesan. You can also add some sautéed peppers or mushrooms to add more veggies into the mix (or make it totally vegetarian by skipping the bacon altogether!)

https://www.theartfulgourmet.com/2019/01/bacon-onion-cheese-frittata-for-the-new-year/


Sweet + Spicy Meyer Lemon Shrimp Stir Fry

Sweet + Spicy Meyer Lemon Shrimp Stir Fry

Hey guys! Oh my gosh, it’s almost the end of the year! Can you believe it? Where does time fly? I’m so ready for a New Year though – #2019 can’t come soon enough! 🙂

I was invited to participate in the #Steviva #Holiday #Keto #Blogger #Recipe Challenge this year and made a Sweet and Spicy Meyer Lemon Shrimp Stir Fry. With all the #holidays going on and the rich, delectable #food I’ve been enjoying this month, I wanted to make a recipe a little bit lighter and healthier, and on the lower carb side…(before it all happens again this weekend for New Years!)

Sweet + Spicy Meyer Lemon Shrimp Stir Fry

I love Steviva products because they are lower in carbs, low glycemic, low calorie and they use all natural ingredients in their products. Their line of good-for-you all natural alternative sweeteners are terrific options for cooking and baking without sugar. Whether you need a granulated sweetener to replace table sugar, a powdered sweetener to replace confectionery sugar or a liquid sweetener to replace corn syrup, they have carefully developed safe, low glycemic, low caloric sweeteners that taste and act just like sugar.

Steviva + Nectevia Marinade

This dish is super easy and quick to make and has great flavors using fresh Meyer Lemon juice, soy sauce, sesame, Nectevia Agave Stevia Blend, Steviva Erythritol Blend, a dash of ginger and #Sriracha for some spiciness to make a delicious sticky marinade to go with the shrimp and fresh veggies. And it’s low carb and low cal! BONUS*** 🙂

Marinate Shrimp

Simply make your marinade for the shrimp with all the ingredients and put it in the fridge in a ziplock baggie for 1/2 an hour. Then stir fry the shrimp for a few minutes until they are no longer pink and remove the shrimp from the pan.

Saute the shrimp and veggies in marinade

Add the veggies and stir fry those for about 5-7 minutes until tender crisp and the sauce starts to thicken. Add the cooked shrimp back in and toss together for another minute or so.

Sweet + Spicy Meyer Lemon Shrimp Stir Fry

Serve immediately over brown or cauliflower rice, zucchini noodles or soba noodles and spoon the rest of the spicy and sweet sauce on top and garnish with a few more sesame seeds and even some green onions if you wish.

Sweet + Spicy Meyer Lemon Shrimp

Sweet + Spicy Meyer Lemon Shrimp Stir Fry

Prep Time: 40 minutes

Cook Time: 10 minutes

Total Time: 1 hour

Yield: 4

A super easy and delicious stir fry made with shrimp and fresh veggies, marinated in a spicy and sweet sauce made with Meyer lemon juice, soy sauce, Sriracha, Steviva Blend and Nectevia. Great for a weeknight dinner or special occasion. Best served over brown rice, cauliflower rice, zucchini noodles or soba noodles.

Ingredients

  • 4 tablespoons Steviva Blend
  • 4 tablespoons Nectevia agave syrup
  • 1/4 cup soy sauce
  • 1 tablespoon minced garlic
  • juice of one Meyer lemon
  • 1 teaspoon sesame oil
  • 1 tablespoon sesame seeds
  • 1 tablespoon Sriracha
  • dash of red pepper flakes (optional)
  • dash of ginger (fresh minced or dried)
  • 1 pound medium shrimp, peeled and deveined
  • 2 tablespoons butter
  • 2 cups fresh sliced veggies (broccoli florets, red pepper, snap peas)
  • white pepper, to taste

Instructions

  1. Whisk together Steviva Blend, Nectevia agave nectar, soy sauce, garlic, lemon juice, sesame oil, sesame seeds, Sriracha, red pepper flakes and ginger in a small mixing bowl.
  2. Add half of the sauce to the shrimp and let marinade in the refrigerator for 30 minutes or more.
  3. Heat butter in a medium sized skillet over medium high heat. Add the shrimp, discard marinade from the bag (save the other unused half for making the sauce). Saute for about 3-5 minutes until shrimp is no longer pink.
  4. Remove shrimp from the pan and add the fresh vegetables. Saute for about 5 minutes or so until soft.
  5. Add the reserved marinade and pour over the vegetables. Cook for another few minutes until sauce thickens.
  6. Add the cooked shrimp back into the pan and toss together with the vegetables and the sauce. Season with pepper, to taste.
  7. Serve immediately, garnish with additional sesame seeds and green onions if desired over brown rice, cauliflower rice, soba noodles or zucchini noodles.

Notes

You can also use this marinade for scallops or chicken or beef, just increasing the cook time appropriate for the protein (about 10-12 mins for chicken or beef until cooked through). Vegetables can be swapped out as well whatever you prefer!

https://www.theartfulgourmet.com/2018/12/sweet-spicy-meyer-lemon-shrimp-stir-fry/

Sweet + Spicy Meyer Lemon Shrimp

I’d love to hear your comments on this recipe below if you decide to make it! Please make sure to tag @stevivabrands and @artfulgourmet with a link back to this original post on my blog if you do share any recipes or photos on social media!

For more information on #Steviva Brands products and more recipes, please visit their website and social media pages:

Facebook

Twitter

Pinterest

Instagram

—–

Note: I received products from Steviva Brands to experiment with recipes for the Blogger Challenge Recipe Contest. All opinions, recipes, photos and text are my own. 

Porcini Linguine w/ Spicy Beef + Mushroom Ragu

Porcini Pasta

So Fall is finally here guys! My absolute favorite time of the year – cooler temperatures, the leaves changing, sweaters, jeans and boots, leather jackets, crickets late in the day along with spectacular sunsets… and especially the FOOD!

Porcini Pasta

I had some gorgeous porcini linguine that I bought at the Rochester Downtown Farmer’s Market on hand, and thought a Spicy Beef and Mushroom Ragu sauce would be the perfect compliment for a savory tasty Fall pasta dish.

Porcini Pasta

I added some Crushed Hot Chili Pepper Spread  to the beef and mushroom mixture sautéed with shallots and garlic, which took the flavor and heat up just a notch…then added a little spicy marinara sauce, but not too much…

Porcini Pasta

After I cooked the pasta, I mixed the beef and mushroom ragu back into the pot, and tossed it all together with some of the reserved pasta water and  lots of parmesan cheese, just because.

Porcini Pasta

Of course I topped it all of with a generous sprinkle of fresh parsley and torn mozzarella cheese, salt and pepper… and it happily made my day.

Porcini Linguine w/ Zesty Beef + Mushroom Ragu

Prep Time: 15 minutes

Cook Time: 25 minutes

Yield: 4-6

This pasta dish has a savory umami flavor from the porcini mushroom linguine, along with a spicy beef and mushroom ragu zested up with some red chile pepper paste, shallots and garlic. Super healthy and delicious with some crusty Italian bread and olive oil and a glass of red wine.

Ingredients

  • * 1 pound porcini mushroom linguine
  • * 2 tbsp olive oil
  • * 3/4 pound ground beef
  • * 6-8 baby bella mushrooms, sliced
  • * 2 shallots, sliced thin
  • * 2 cloves garlic, minced
  • * 2 tablespoons spicy hot chili pepper paste (Colavita)
  • * 3/4 cup marinara sauce
  • * 1/4 teaspoon kosher salt
  • * Freshly ground black pepper, to taste
  • * 2-3 slices fresh mozzarella cheese, torn into pieces
  • * 2 tablespoons chopped fresh parsley

Instructions

  1. Cook pasta in salted boiling water for about 9-10 minutes until al dente, drain, reserving 1 cup of pasta water, and set aside.
  2. Heat 1 tablespoon of olive oil in a sauce pan over medium heat, cook the ground beef, about 5-7 minutes, drain and set aside.
  3. Add the additional tablespoon of olive oil and cook garlic, mushrooms and shallots for another 5 minutes or so until soft and cooked through. Mix into the cooked ground beef mixture and add spicy chili pepper paste and marinara sauce with some of the reserved pasta water until it's soft and mixes together into a sauce (but not overly saucy). Feel free to add more sauce and water to your liking for the desired consistency and thickness / thinness of the sauce.
  4. Toss the meat ragu in with the cooked pasta, add parmesan cheese. Season with salt and pepper to taste.
  5. Serve pasta with fresh torn mozzarella and chopped fresh parsley.
https://www.theartfulgourmet.com/2017/09/porcini-linguine-w-spicy-beef-mushroom-ragu/

Porcini Pasta

So easy and delicious with all the flavors of Fall. Enjoy!

Red Curry Beef w/ Zucchini Noodles

   Red Beef Curry

Since the holidays are coming soon, we all know what THAT means..lots of holiday parties with food and drinks, and with that in mind, I’ve decided to commit to eating healthier and lighter the next few weeks.

Zucchini Noodles Action

I absolutely love my KitchenAid® Spiralizer Attachment that goes with my KitchenAid® Stand Mixer – and I’m so excited to make some healthier low-carb meals! It comes with five different blades for peeling, coring and slicing and is perfect for fresh fruits and vegetables. I love pasta and rice, but spiralized veggies are such a great substitute when I want to lighten up my recipes and eat low carb.

Red Curry Beef Zoodles

I thought a delicious comfort food dish with a healthy twist would be perfect for the cooler months, and decided to make a Red Curry  Beef with Zucchini Noodles.

Red Curry Beef ingredients

I used lots of fresh, organic ingredients: beef, sweet potatoes, onions, garlic and green beans, and then made a lovely curry sauce with coconut milk, red curry paste, fresh lime juice, fish sauce, some beef broth and a dash of Sriracha to spice it up.

Cutlery and Veggies

I used my Professional Series 3.5″ Paring Knife that came with the 7-piece Professional Series Cutlery set, for chopping my onions and garlic, Thai chilies and basil.

Chop beef into large chunks

The larger Chef’s knife was great for cutting up the large chunks of beef and sweet potatoes with its sturdier grip and large super sharp blade.

Add veggies to curry sauce

My heavy duty KitchenAid ceramic cast iron pot is perfect for making this dish – it cooks evenly and is large enough to make a large pot of curry or stew, and is ovenproof to 500 degrees!

Saute zucchini noodles

The KitchenAid spiralizer attachment is also easy to use! All you need to do is attach it to the KitchenAid mixer, and the spirals come right out perfectly cut. Then you just briefly cook them in a saucepan with some olive or peanut oil, season them with some salt and pepper.

Red Beef Curry

Top the #zoodles with this luscious and creamy curry – lots of great flavors and textures, sweet and spicy – all in one pot. Delish!

Red Beef Curry

This is such a great Winter comfort food dish to make and it’s so easy to make with all the right tools… You’ll definitely want to make this Red Curry Beef  Zucchini Noodles for dinner – tonight!

Red Beef Curry with Zucchini Noodles

Ingredients

  • INGREDIENTS
  • 3-4 medium zucchini
  • 2 1/2 pounds lean stewing beef, (chuck or round), cut into 1 1/2 inch chunks
  • 1 teaspoon Kosher salt
  • 1 teaspoon freshly ground black pepper
  • 3 tablespoons canola oil
  • 1 sweet onion, finely chopped
  • 4 garlic cloves, minced
  • 1/4 cup red curry paste
  • 2 cans (13.5 ounce) unsweetened coconut milk
  • 2 tablespoons Thai fish sauce
  • 2 tablespoons fresh lime juice
  • 2 tablespoons dark brown sugar
  • 1/4 cup beef broth
  • 1 tablespoon Sriracha hot sauce (optional)
  • 1 large handful French green beans, trimmed
  • 3 medium sweet potatoes, peeled and cut into medium chunks
  • 1 (8 ounce) can sliced bamboo shoots, drained
  • 3 tablespoons fresh basil, chopped or torn, for garnish
  • 1-2 Thai green chilies, sliced fine, for garnish
  • 1/2 cup peanuts, for garnish

Instructions

  1. Attach the KitchenAid® Spiralizer Attachment to your KitchenAid® Stand Mixer and choose your desired spiralizing blade. Attach the vegetable skewer to the Spiralizer and secure it to the zucchini. Move the spiralizing blade to the end of the zucchini and turn on the Stand Mixer to low (level 2) to make the spiralized zucchini noodles. Make sure you place a bowl underneath to catch the zucchini noodles as they fall. Set the noodles aside or keep them in the refrigerator until ready to serve.
  2. Cut the beef into 1 1/2 inch large chunks and place in a bowl. Sprinkle with kosher salt and freshly ground black pepper.
  3. Heat the oil over medium-high heat in your KitchenAid® 6.0Qt Cast Iron Cookware and brown the beef in two batches until lightly browned on all sides. Remove the beef from the pot and transfer to a bowl, set aside.
  4. Add the onion and garlic to the same pot and sauté over medium heat for about a minute. Add the curry paste, stirring into the onions and garlic, until lightly fragrant, for about 30 seconds. Add the coconut milk, and deglaze the pan, stirring up all the crispy brown bits with a wooden spoon. Stir in the fish sauce, lime juice, brown sugar, beef broth, Sriracha (if using) and bring the liquid to a boil.
  5. Add the green beans and sweet potatoes and stir into the liquid. Next add the browned beef back in and stir together well. Cover the pot, reduce the heat to low and let simmer for about an hour and 45 minutes. Add the bamboo shoots into the curry and let simmer for another 15 minutes.
  6. Meanwhile, heat a tablespoon of olive oil in your 10? Skillet from the KitchenAid® Stainless Steel 8-Piece Set over medium heat. Add the zucchini noodles, with some salt and pepper to taste, and sauté for a few minutes until the noodles are soft.
  7. Serve the noodles in bowls topped with the Red Beef Curry, garnishing with fresh chopped basil, sliced Thai green chilies and peanuts.
https://www.theartfulgourmet.com/2016/01/red-curry-beef-zucchini-noodles/

CLICK HERE TO VIEW STEP BY STEP VISUALS ON THE KITCHENTHUSIAST BLOG!

Red Beef Curry

Enjoy!

Shrimp, Basil & Corn Zucchini Noodles w/ Meyer Lemon Cream Sauce

Zucchini Noodles 1

Hello Summer! And hello to the season for lighter food and flavors and quality time at the beach and the pool (READ: also time for shorts and sundresses and to lose a few to fit into the bathing suit!)

Zucchini Noodles 10

I’ve been craving pasta lately because i’ve been cutting down on carbs a bit, but I’ve had this cool Veggetti noodle tool in my pantry for a few months and thought it would be the perfect opportunity to make some Zucchini Noodles (AKA “zoodles”), and tie in some fresh ingredients from the season such as shrimp and corn and basil.

Zucchini Noodles 8

This dish screams creamy comfort food, but is balanced out with a clean, citrus-y brightness with a Meyer Lemon cream sauce made with mascarpone cheese, Meyer lemon juice and zest, lemongrass chicken broth, white wine, sweet basil olive oil and garlic. The lightness of these zucchini noodles are also totally amazing, rather than a heavy pasta that will put you to sleep in .02 seconds.

Zucchini Noodles 3

I love Meyer lemons because they are delicate and less sour than regular lemons and almost mimic the flavor of lemon and orange juice mixed together, which you can absolutely do if you can’t find Meyer lemons or they aren’t in season. I ordered mine on Fresh Direct which always has everything in stock and delivers on top of that!

Zucchini Noodles

Prep your zucchini noodles with a Veggetti or Spiralizer on a cutting board or over a large mixing bowl. I suggest squeezing out any excess water from them before sauteing (you can let them sit in a colander to extract water for about 15 minutes or so). You might also want to cut the strand piles in half to make them easier to manage and eat. Sauté the noodles in some olive oil with red pepper flakes and garlic for a few minutes and set aside.

LemonZest-Juice

Zest and juice one Meyer lemon to add to the cream sauce. Look at that vivid color! LOVE.

Prep Shrimp

Sprinkle some salt and pepper over the shrimp and sauté in some olive oil for couple minutes until they are pink and set aside. Don’t overcook them though because you will add them back in to the sauce later on and you don’t want tough rubbery shrimp.

Lemon Sauce Ingredients

Prep ingredients for the Meyer Lemon Cream sauce and add the white wine, chicken broth, Meyer lemon juice and zest to the saute pan with leftover juices from the shrimp. Stir and simmer over medium heat for until the liquid reduces by half.

Meyer Lemon Sauce

Add the corn, red pepper flakes, salt and pepper and cook for a few minutes until heated through. I used frozen sweet corn but you can use fresh corn too which might take a little longer to cook (or you can precook the fresh corn and add the kernels into the sauce).

Add Mascarpone, Shrimp and Basil

Stir in the mascarpone cheese and blend together until it turns into a gorgeous, silky and creamy sauce. Toss in the shrimp and basil. Isn’t that pretty?

Zucchini Noodles 6

Serve over the zucchini noodles with additional basil and lemon zest and get ready to DEVOUR.

Zucchini Noodles 7

Alternatively you can toss the zucchini noodles in to the pan with the sauce and shrimp and corn and mix it all together to serve as a one pot dish. I prefer keeping the noodles separate from the sauce so they don’t get too mushy, personally.

Zucchini Noodles 5

Garnish with some extra basil and lemon zest and serve with a glass of white wine (I particularly like McBride Sisters Truvee Chardonnay who were kind enough to send me a sample which I LOVED), and some crusty bread to mop up that yum sauce, if you wish. Light, bright, healthy and delicious!

Shrimp, Basil & Corn Zucchini Noodles w/ Meyer Lemon Cream Sauce

Prep Time: 30 minutes

Cook Time: 15 minutes

Total Time: 45 minutes

Yield: Serves 4

Serving Size: 1 cup of noodles with sauce

This is a super healthy and totally delicious low carb option to pasta. It features sautéed zucchini noodles smothered in a Meyer Lemon cream sauce with shrimp, corn and fresh basil. It's light and bright and the perfect dish for Summer with a glass of white wine and some toasty bread to mop up the sauce.

Delicious!!

Ingredients

  • Zucchini Noodles:
  • 2 tablespoons olive oil (7 Barrels Basil olive oil)
  • 1 tablespoon minced garlic
  • 2 medium zucchini
  • 1/4 teaspoon crushed red pepper
  • Salt and Pepper, to taste
  • Shrimp:
  • 1 tablespoon olive oil
  • 1/2-3/4 pounds medium shrimp, shelled and deveined
  • 1/4 teaspoon crushed red pepper
  • Garlic salt and Pepper, to taste
  • Meyer Lemon Cream Sauce:
  • 6 tablespoons unsalted butter
  • 1 tablespoon minced garlic
  • Zest and juice of 1 Meyer Lemon
  • 1/2 cup white wine (Truvee Chardonnay)
  • 1/2 cup chicken broth (Pacific Foods Lemongrass Bone Both)
  • 2/3 cup Mascarpone cheese
  • 3/4 cup sweet corn kernels (frozen or fresh)
  • Salt and Pepper, to taste
  • Fresh Basil, for garnish
  • Additional lemon zest, for garnish

Instructions

  1. Make the Zucchini Noodles:
  2. Using a Veggeti or Spiralizer vegetable cutter, cut both zucchini into medium large noodles over a cutting board or large bowl.
  3. Form the vegetable pasta into two piles and cut each in half to create shorter, easy to manage strands.
  4. Heat olive oil in a large sauce pan over medium heat and sauté the garlic for a minute or so, being careful not to burn.
  5. Add the zucchini noodles, crushed red pepper, salt and pepper and cook for a few minutes to your desired consistency.
  6. Remove noodles from the heat into a medium bowl and set aside while you cook the shrimp.
  7. Prepare the Shrimp:
  8. In the same sauce pan, heat another tablespoon of olive oil over medium heat.
  9. Sprinkle some garlic salt and pepper on to the shrimp, and add shrimp to the pan cooking for about 3 minutes, stirring often so they cook evenly.
  10. Remove the shrimp with a slotted spoon and transfer to a small bowl while you make the Meyer Lemon cream sauce.
  11. Meyer Lemon Cream Sauce:
  12. Melt 6 tablespoons of butter in the same large sauce pan over medium heat.
  13. Add the additional garlic and cook for about 2 minutes.
  14. Add the lemon juice, zest, chicken broth and wine and let simmer down until reduced, about 3 minutes.
  15. Add the corn kernels, salt and pepper and heat through another minute or two, then stir in the Mascarpone cheese until you get a silky, creamy sauce.
  16. Add the cooked shrimp, zucchini noodles and basil; toss to coat. (You can also keep the zucchini noodles separate from the shrimp, corn and basil with Meyer Lemon sauce and spoon it over the noodles in bowls which keeps the noodles from getting mushy in the sauce which is how i prefer serving them.)
  17. Serve with additional basil and lemon zest, and a glass of Chardonnay or dry Italian wine and some crusty bread to mop up the sauce.

Notes

This would also be a delicious sauce over any pasta, and if you're a vegetarian you could substitute the shrimp for another vegetable or legumes for some protein. If you can't find Meyer lemons or they aren't in season, simply mix some orange juice into the lemon juice to give it a similar flavor.

Schema/Recipe SEO Data Markup by Yummly Rich Recipes
https://www.theartfulgourmet.com/2015/07/shrimp-basil-corn-zucchini-noodles-w-meyer-lemon-cream-sauce/
Zucchini Noodles with Shrimp, Basil and Corn in Meyer Lemon Cream SauceZucchini Noodles 9

—————-

Other similar recipes you might enjoy:

Shrimp Scampi Pasta

Shrimp and Zucchini with Tomatoes 

Basil Shrimp Zucchini Pasta

Shrimp and Zucchini Risotto

Fettuccine with Shrimp and Zucchini

Note: I received a sample of McBride Sisters Truvee Chardonnay for tasting which inspired me to create this recipe and share with my readers. All opinions of the product are my own and I was not compensated for this post.

Rustic Pizza with Ham, Grapes, Shallots, Honey & Thyme

Rustic Pizza with Grapes, Shallots, Ham & Thyme

So it’s Friday. And a lovely Spring day. I was in the mood to make something lovely to eat, preferably with a sweet and savory twist. I’ve also been on a baking kick lately, not sure why but I’m loving experimenting with different flavors and textures of pizzas and tarts and pies.

Rustic Pizza with Grapes, Shallots, Ham & Thyme

I decided to make a delicious rustic pizza made with some red grapes, shallots, sharp white cheddar and mozzarella cheese, and some thin cut Italian ham. I simply rolled out some refrigerated pizza dough and then topped it off with some olive oil, all the pizza ingredients, and some fresh thyme.

Rustic Pizza with Grapes, Shallots, Ham & Thyme

I popped it into a 450 degree oven for about 20 minutes until all the cheese and crust was bubbly and golden brown, then finished this beauty off with some sea salt, freshly cracked black pepper, some fresh basil and drizzles of honey.

Rustic Pizza with Grapes, Shallots, Ham & Thyme

This is the best thing I have ever tasted in my life. Seriously. The contrast of the sweet grapes, shallots and honey with the sharp and tangy cheddar cheese and salty, crispy ham are like a true love affair…in Paris.

I’m thinking the only thing better than this would be an actual trip to Paris..on the top of the Eiffel Tower at sunset. With a chocolate croissant and cafe au lait in hand. With a really cute French guy. Ooh La La.

Aaah – a girl can dream, can’t she? (Happy Friday!)

Rustic Pizza with Grapes, Shallots, Ham & Thyme

Rustic Pizza with Ham, Grapes, Shallots, Cheese, Honey & Thyme

Prep Time: 15 minutes

Cook Time: 20 minutes

Total Time: 10 minutes

Yield: 6-8

Serving Size: 1 slice/wedge

Ingredients

  • 1 package of refrigerated pizza dough (or homemade if you prefer)
  • 2 tablespoons olive oil
  • 1 shallot, sliced thin
  • 1/2 cup shredded Gruyere or Mozzarella cheese
  • 1/2 cup shredded extra sharp White Cheddar cheese
  • 4-6 thin slices Italian ham or prosciutto
  • 1/2 cup red seedless grapes, cut in half
  • Red pepper flakes (optional)
  • Fresh thyme
  • Fresh basil leaves
  • Sea salt and freshly ground black pepper, to taste
  • Honey for drizzling

Instructions

  1. Preheat oven to 450 degrees F.
  2. Spray a pizza sheet with oil and stretch out pizza dough to the edges making a thin crust.
  3. Drizzle the dough with olive oil and sprinkle with the shredded Mozzarella cheese. Add the sliced shallots, ham, grapes and White cheddar cheese on to the dough evenly. Top with some fresh thyme leaves and red pepper flakes.
  4. Bake for about 20 minutes until cheese is bubbly and the crust is golden brown.
  5. Top with fresh basil, sea salt, freshly cracked black pepper and drizzle with honey.
  6. Cut into wedges and serve immediately.

Notes

You can also substitute prosciutto or bacon for the ham, and top with some fresh ricotta cheese if desired.

https://www.theartfulgourmet.com/2015/04/rustic-pizza-with-ham-grapes-shallots-cheese-honey-thyme/