This is such an easy recipe, and perfect for a weeknight at the end of Summer; especially when you have lots of zucchini left over! This Garlic Basil Parmesan Chicken and Zucchini Bake features chicken breasts seasoned with garlic, basil, Trader Joe’s Italian Soffrito, salt and pepper.
Then drizzled with melted butter (or ghee) and Basil Parmesan olive oil (I love Harry and David’s brand!) and sprinkled with Parmesan cheese over the top.
The chicken is roasted together in one pan with chunks of zucchini that get super tender and caramelized in the oven, especially with the baked crunchy Parmesan cheese on top. You guys… this recipe is soooo good…and it’s healthy, #lowcarb and gluten-free too…(bonus!)
To serve, I topped the chicken and zucchini with some fresh parsley, red pepper flakes (optional) and a squeeze of lemon juice to give the dish bright, tangy flavors with a little extra heat just before serving.
It’s perfect served with some crusty bread, mashed potatoes or cauliflower, or pasta to soak up the savory juices, (but just as good served alone!) and you’ve got a delicious end-of-Summer meal that’s fresh, full of flavor and super easy to make!
This is such an easy recipe, and perfect for a weeknight at the end of Summer; especially when you have lots of zucchini left over! This Garlic Basil Parmesan Chicken and Zucchini Bake features chicken breasts seasoned with garlic, basil, Italian soffrito and Parmesan cheese, drizzled with melted butter and Basil Parmesan olive oil and topped with Parmesan cheese; which are roasted with chunks of tender caramelized zucchini.
Ingredients
4 skinless, boneless chicken breasts
Sea salt and freshly ground black pepper
2 medium zucchini, sliced into 1-inch chunks
2 garlic cloves, finely minced
2 teaspoons dried basil
1 teaspoon Trader Joe’s Italian Style Soffrito Seasoning
2 tablespoons Harry and David Basil Parmesan olive oil
2 tablespoons melted butter or ghee
½ cup grated Parmesan cheese
½ cup torn fresh parsley, for serving
2 tablespoons lemon juice, for serving
¼ teaspoon red pepper flakes, for serving
Instructions
Heat oven to 425 degrees. Pat chicken dry with paper towels, and season all over with 1 teaspoon salt and 1/2 teaspoon black pepper. Place zucchini on a rimmed baking pan, and season with a little more salt and pepper.
In a small bowl, combine garlic, dried basil and Italian Soffrito.
Place chicken on the baking pan with the zucchini pieces and brush the melted butter/ghee and olive oil over the top. Sprinkle evenly with garlic, basil, soffrito mixture then top with Parmesan cheese.
Roast in the oven until chicken is cooked through and zucchini is browned and caramelized, 30 to 40 minutes.
Remove the pan from the oven, and drizzle lemon juice on top. Garnish with fresh parsley and red pepper flakes.
Notes
You can substitute chicken thighs if you wish and also do bone-in chicken, adding an extra 10 minutes to the cooking time.
This recipe serves four people, so justdouble the ingredients for a larger crowd (making it on two sheet trays instead of one). Feel free to use chicken thighs if you prefer, or bone-in chicken (just add a little extra cooking time to the recipe).
The holidays are here and I’m full swing in baking mode! It’s the best time of year for making dishes for parties and special occasions and one of my favorite things to make is adelicious, cheesy, #pasta dish.
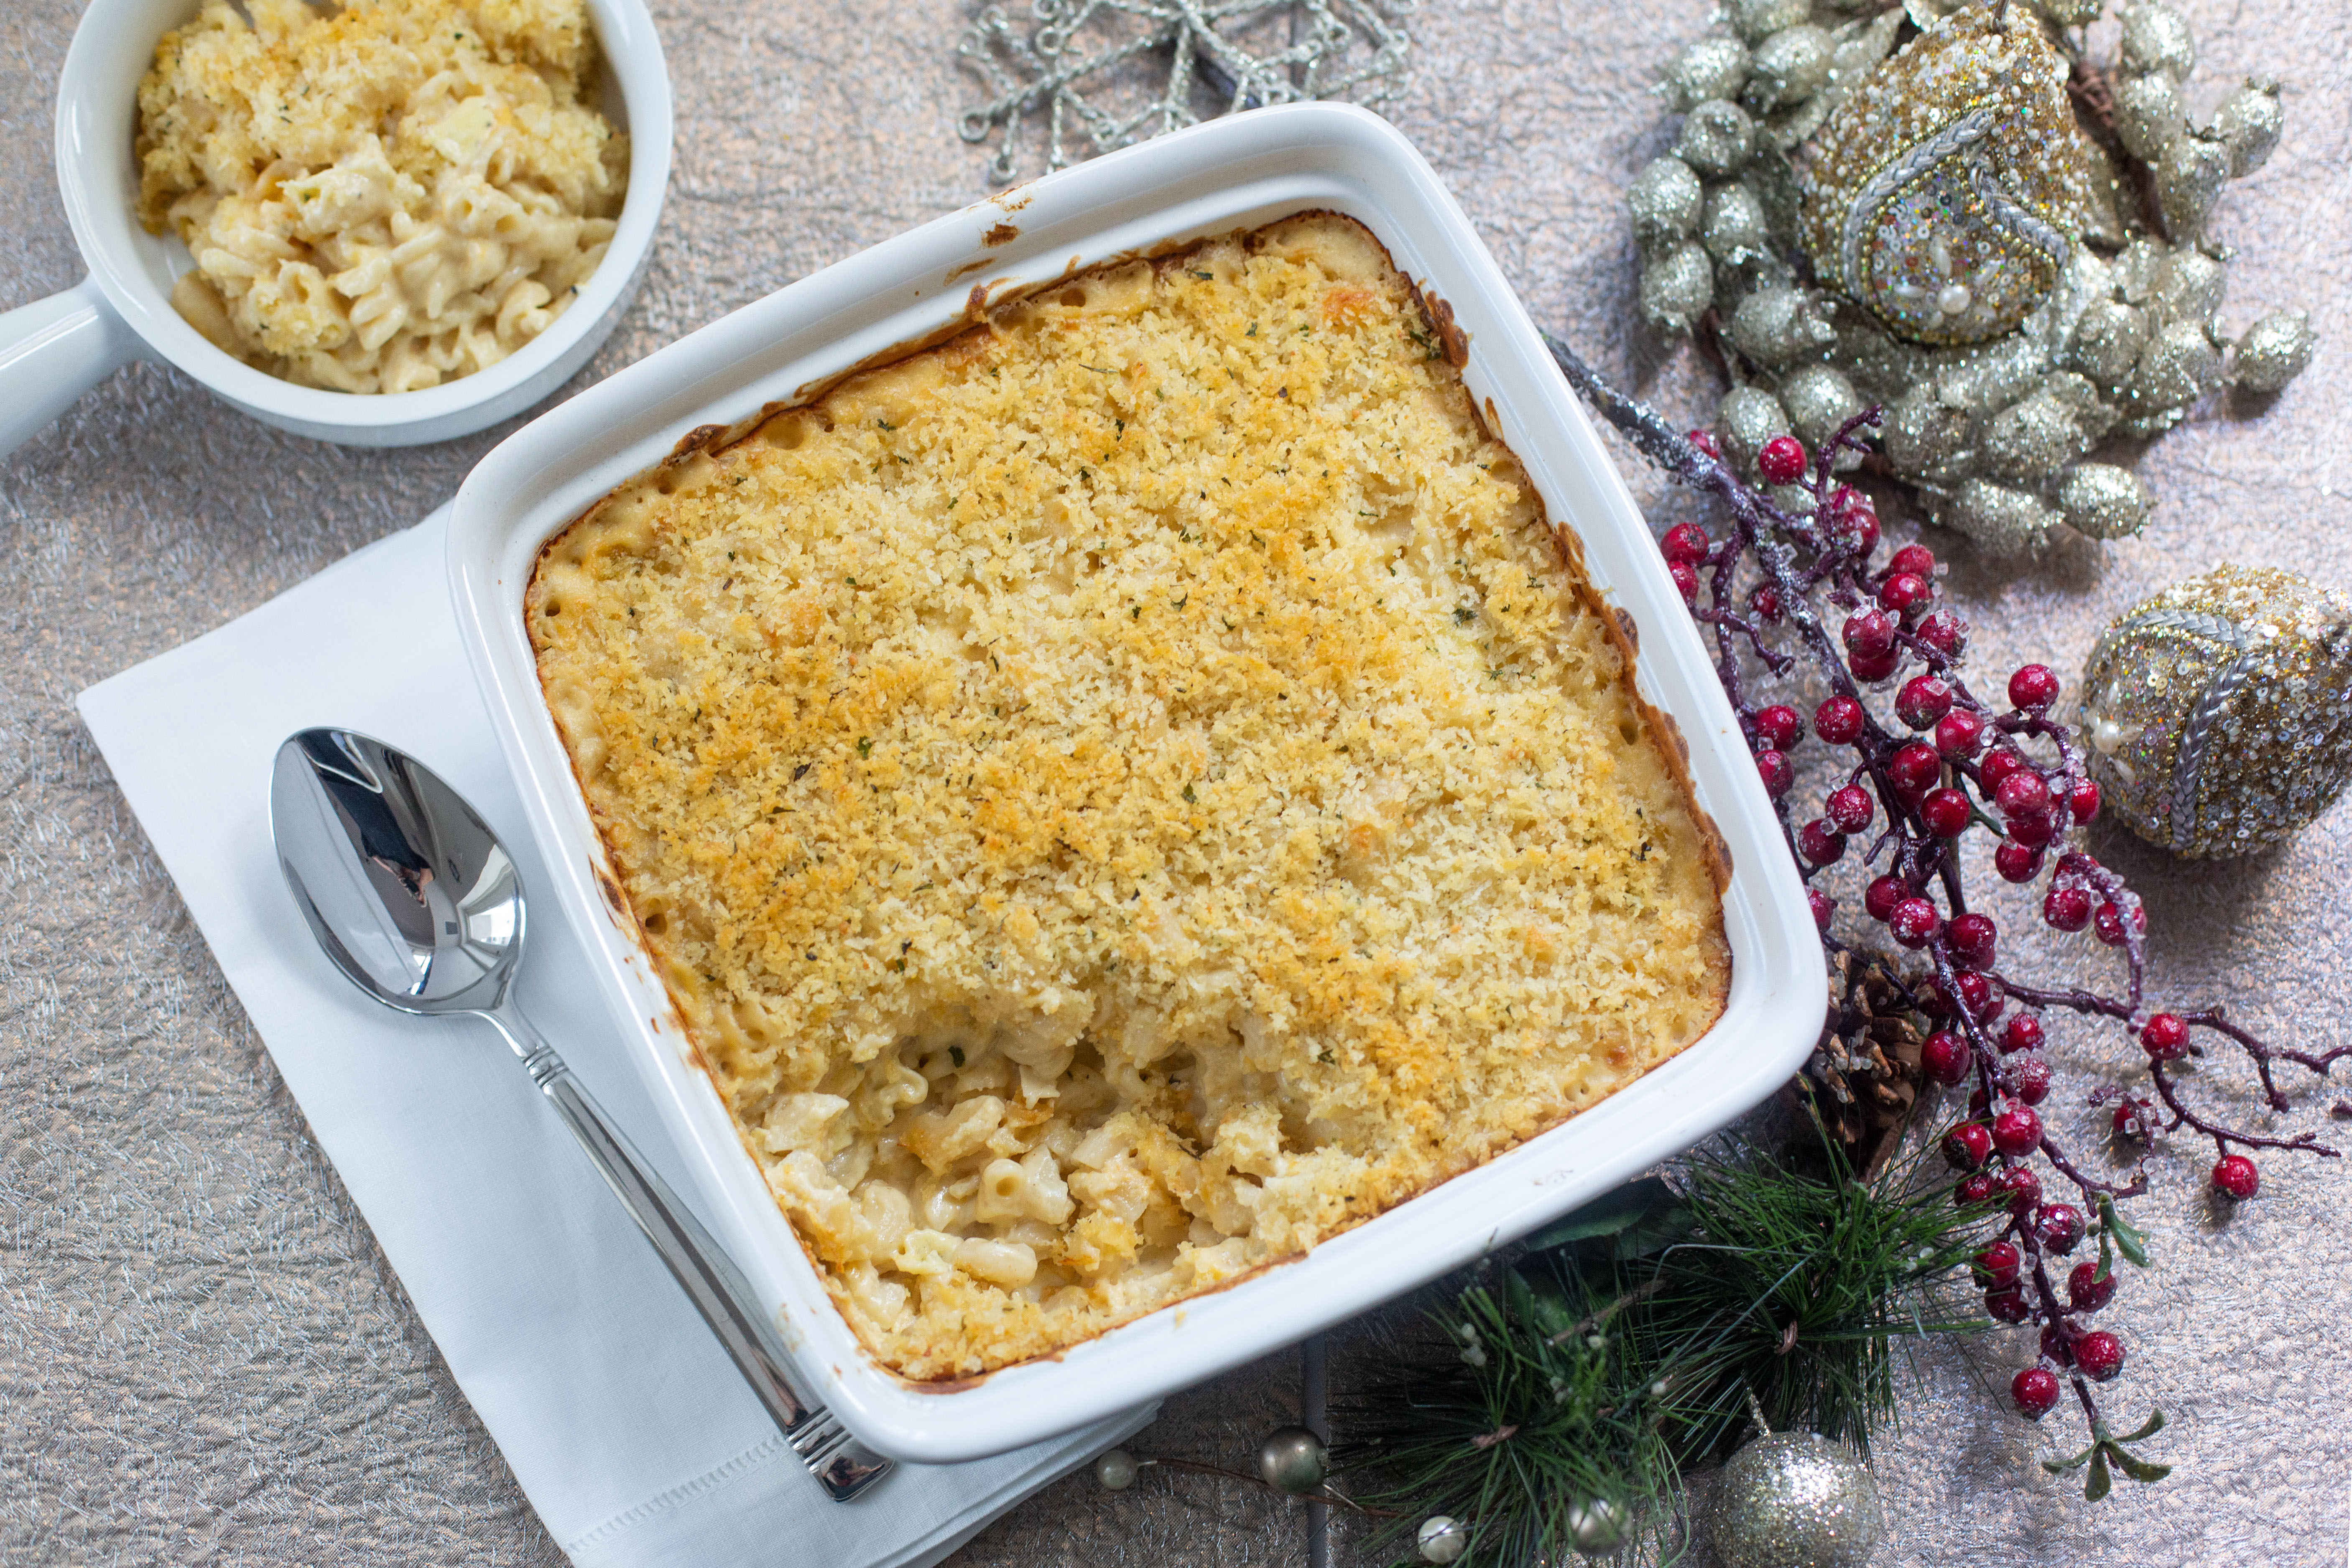
I was invited to participate in to compete in the 2nd Annual Tresomega “Organics For Life” Blogger Recipe Challenge again this year, and I decided to make a Luscious Truffle Macaroni and Cheese recipe using their gluten-free Quinoa pasta using a combination of the Elbows and Fusilli.
This recipe is super delicious, easy to make and is super creamy made with five cheeses (Truffle Brie, Mascarpone, Cheddar, Monterey Jack and Parmesan), half and half, truffle butter, a dash of truffle oil and truffle salt, onion and garlic, italian seasoning all topped with crunchy, buttery Panko bread crumbs.
I baked it in a large casserole dish for 30 minutes at 375 until golden brown, and let it cool for a few minutes before DEVOURING it’s luscious, cheesy, truffle-y self.
TresOmega gluten-free quinoa pasta is totally organic, non GMO, wheat and corn free, and tastes delicious just like regular pasta. And the elbows and fusilli shapes are perfect for holding all that cheesy delicious sauce!
It’s the perfect cozy, heartwarming dish made for the #holidays…or any time you just need a dash of comfort on a cold, dreary Winter day.
This recipe is super delicious, easy to make and is super creamy made with five cheeses (Truffle Brie, Mascarpone, Cheddar, Monterey Jack and Parmesan), half and half, truffle butter, a dash of truffle oil and truffle salt, onion and garlic, italian seasoning all topped with crunchy, buttery Panko bread crumbs. Perfect comfort food dish for the holidays!
Ingredients
8 ounces TresOmega Fusilli pasta
8 ounces TresOmega Elbows pasta
1 tablespoon Black Truffle Oil
3/4 cup Panko breadcrumbs
6 tablespoons unsalted butter, divided
1 tablespoon Black Truffle butter
1/4 cup Parmesan cheese
2 teaspoons dried Italian seasoning
1/2 teaspoon sweet paprika
1 tablespoon minced garlic
4 tablespoons minced onions
1 bay leaf
1/4 cup flour (gluten-free or all-purpose)
1/8 teaspoon cayenne (optional)
2 1/2 cups half and half
1/2 cup water or skim milk
1 cup shredded White cheddar
1 cup shredded Monterey Jack
1/2 cup Mascarpone cheese
1 cup Truffle Brie cheese, rinds removed
Truffle salt, to taste
Freshly ground black pepper, to taste
Instructions
Preheat oven to 375 and spray a large casserole dish with olive oil spray.
Bring a large saucepan of salted water to a boil. Add TresOmega pasta and cook halfway through (about 6 minutes) and drain. Drizzle Black Truffle oil on to cooked pasta, stir through and set aside.
Melt 3 tablespoons butter in the microwave or on stovetop and mix into Panko breadcrumbs. Add Parmesan cheese, Italian seasoning and stir together, set aside.
Heat another large saucepan or Dutch oven over medium heat and begin making roux for the cheese sauce. Melt the remaining 3 tablespoons of butter, a tablespoon of Black Truffle butter, paprika, garlic, onions and bay leaf, cooking for about 5 minutes until onions are soft and lightly translucent.
Add the flour and cayenne pepper (if using) and stir in with the butter until a roux forms and the mixture thickens for about a minute.
Whisk in the half and half and water (or skim milk), stirring and whisking constantly until the sauce thickens, for about 8-10 minutes. Discard bay leaf.
Remove the pot from the heat and stir in the white cheddar, Monterey Jack, Mascarpone and Truffle Brie cheeses, stirring constantly with a whisk until smooth. Finish with a dash of truffle salt and freshly black ground pepper, to taste.
Add the cooked pasta into the greased casserole dish and pour the cheese sauce over the pasta, mixing together. Top the pasta with the buttered bread crumbs.
Bake the pasta for 30 minutes until bubbly and browned and the cheese is super melty.
Let cool for about 5-10 minutes and serve immediately.
Notes
You can also substitute other cheeses that are great for melting: Gruyere, Fontina, Emmental
Feel free to comment and share this post with your followers and be sure to tag #tresomega, #organicsforlife in your post with a link back to this original post on my blog, with a credit to me, @artfulgourmet.
I recently did some recipes for my client 7 Barrels for their holiday promotional marketing and social media campaign. Featuring their Traditional Balsamic Vinegar, White Balsamic Vinegar and White Truffle Extra Virgin Olive Oil, I created this delicious Truffle Steak Au Poivre and some amazing Cheesy Truffle Potato Stacks. Perfect for a chilly Winter evening, special occasion or holiday celebration! This steak is so tender and melts in your mouth! This Truffle Steak Au Poivre has a crust made with crushed black peppercorns, cooked in butter and 7 Barrels White Truffle Oil, then drizzled with a luscious pan sauce made with 7 Barrels traditional balsamic vinegar, shallots, beef broth and more butter, sprinkled with coarse sea salt and chopped fresh herbs. Divine! These Cheesy Truffle Potato Stacks are so delicious and cute you won’t be able to eat just one. Thin sliced potatoes stacked and roasted in a muffin tin with luscious butter, truffle oil, parmesan cheese, cheddar cheese and garlic, topped with a sprinkle of fresh thyme and coarse sea salt. YUM!
Truffle Steak Au Poivre + Cheesy Truffle Potato Stacks
Prep Time: 30 minutes
Cook Time: 30 minutes
Total Time: 1 hour
Yield: 4
These delicious steaks and cheesy potato stacks are made with luscious 7 Barrels truffle oil, traditional balsamic and white balsamic vinegar. The perfect combination for an elegant holiday dinner or special occasion.
Ingredients
Truffle Steak Au Poivre Ingredients:
2 (8-ounce) NY Strip Steaks, 1 inch thick, trimmed
1 teaspoon coarse sea salt (Maldon or Fleur de Sel)
2 tablespoons cracked peppercorns (black or mixed)
1 tablespoon Seven Barrels Truffle Olive Oil
2 tablespoons unsalted butter, divided
1/3 cup shallots, finely chopped
½ cup low-sodium beef broth
2 tablespoons Seven Barrels Traditional Dark Balsamic vinegar
Coarse sea salt and chopped herbs, for garnish (optional)
2 tablespoons fresh herbs, chopped, for garnish (thyme, parsley or rosemary)
1/4 cup Seven Barrels White Balsamic, for drizzling
Instructions
Make the Steak:
Heat a large cast iron skillet over high heat. Pat steaks dry with paper towels and sprinkle with salt evenly.
Crack the peppercorns with the back of a heavy skillet or spice grinder (coarsely ground) and press onto both sides of the steaks.
Add Seven Barrels Truffle olive oil and 1 tablespoon of butter to the cast iron skillet; swirl to melt and coat the pan.
Place the steaks in the heated skillet and cook 3 minutes on each side (for medium-rare), drizzling olive oil and butter from the pan over the top of the steaks with a spoon while cooking to get a nice brown sear. Remove the steaks from the pan and let rest for 5 minutes to let juices resettle, then cut each steak in half.
While the steaks are resting, add the shallots to the pan and sauté for a minute or two until slightly tender and golden.
Stir in the beef broth and Seven Barrels Traditional Dark Balsamic vinegar, scraping the pan to loosen the browned bits. Bring to a boil and cook for 2 minutes and reduce liquid by half. Remove from heat; stir in remaining tablespoon of butter to make the balsamic pan sauce. Garnish with additional coarse sea salt and fresh herbs, if desired.
Serve immediately with a side of vegetables (mashed potatoes, sautéed asparagus or green beans), a simple mixed greens salad with Seven Barrels olive oil and balsamic vinegar, and a glass of full-bodied red wine (Cabernet Sauvignon).
Make the Cheesy Truffle Potato Stacks:
Preheat the oven 400 degrees F.
Wash potatoes and cut them into very thin slices (about 1/8-inch), leaving skins on. You can do this by hand, or use a mandolin to make slicing easier and faster.
In a large mixing bowl, add the potatoes, dried Italian seasoning, garlic, melted butter, Seven Barrels Truffle Olive Oil, kosher salt and black pepper, grated Parmesan cheese and gently toss together.
Layer half the potatoes stacked in layers into a non-stick 12-cup muffin pan (or lightly grease a muffin pan), sprinkle half the shredded cheddar on top. Then layer the other half of the potatoes, stacking them to the top and add remaining shredded cheddar on top.
Cover with foil and place on a baking sheet. Transfer to the oven and roast for 30 minutes. Remove the foil and continue cooking another 20-25 minutes or until the potatoes are crispy golden brown on edges and cooked through. Run a small knife around the edges of the of each stack to release them from the muffin pan.
Serve potatoes hot with a sprinkle of sea salt and chopped herbs, and drizzle them with Seven Barrels White Balsamic vinegar. Note: You can pre-bake these a day or two ahead and reheat them in the oven for 10-15 minutes on 350 degrees F.
So Fall is finally here guys! My absolute favorite time of the year – cooler temperatures, the leaves changing, sweaters, jeans and boots, leather jackets, crickets late in the day along with spectacular sunsets… and especially the FOOD!
I had some gorgeous porcini linguine that I bought at the RochesterDowntown Farmer’s Market on hand, and thought a Spicy Beef and Mushroom Ragu sauce would be the perfect compliment for a savory tasty Fall pasta dish.
I added someCrushed Hot Chili Pepper Spread to the beef and mushroom mixture sautéed with shallots and garlic, which took the flavor and heat up just a notch…then added a little spicy marinara sauce, but not too much…
After I cooked the pasta, I mixed the beef and mushroom ragu back into the pot, and tossed it all together with some of the reserved pasta water and lots of parmesan cheese, just because.
Of course I topped it all of with a generous sprinkle of freshparsley and torn mozzarella cheese, salt and pepper… and it happily made my day.
This pasta dish has a savory umami flavor from the porcini mushroom linguine, along with a spicy beef and mushroom ragu zested up with some red chile pepper paste, shallots and garlic. Super healthy and delicious with some crusty Italian bread and olive oil and a glass of red wine.
Ingredients
* 1 pound porcini mushroom linguine
* 2 tbsp olive oil
* 3/4 pound ground beef
* 6-8 baby bella mushrooms, sliced
* 2 shallots, sliced thin
* 2 cloves garlic, minced
* 2 tablespoons spicy hot chili pepper paste (Colavita)
* 3/4 cup marinara sauce
* 1/4 teaspoon kosher salt
* Freshly ground black pepper, to taste
* 2-3 slices fresh mozzarella cheese, torn into pieces
* 2 tablespoons chopped fresh parsley
Instructions
Cook pasta in salted boiling water for about 9-10 minutes until al dente, drain, reserving 1 cup of pasta water, and set aside.
Heat 1 tablespoon of olive oil in a sauce pan over medium heat, cook the ground beef, about 5-7 minutes, drain and set aside.
Add the additional tablespoon of olive oil and cook garlic, mushrooms and shallots for another 5 minutes or so until soft and cooked through. Mix into the cooked ground beef mixture and add spicy chili pepper paste and marinara sauce with some of the reserved pasta water until it's soft and mixes together into a sauce (but not overly saucy). Feel free to add more sauce and water to your liking for the desired consistency and thickness / thinness of the sauce.
Toss the meat ragu in with the cooked pasta, add parmesan cheese. Season with salt and pepper to taste.
Serve pasta with fresh torn mozzarella and chopped fresh parsley.
Ah, it’s almost the end of Summer and I keep thinking, where has it gone? Along with Summer comes lots of fresh veggies like zucchini, bell peppers, mushrooms and yellow squash that I just can’t get enough of!
I recently received a lovely care package from my client Colavita, who sent me some delicious pasta, sauces, olive oils and vinegars to sample, which inspired me to make this Cheesy Baked Pasta with Sausage and Summer Veggies.
I used their Colavita Tomato Basil sauce mixed in to the pasta and veggies along with fresh oregano and basil. AND it has three (3!!) cheeses: ricotta, parmesan/asiago and mozzarella to make it super creamy and cheesy – all baked into a big pot of bubbly goodness.
Look. At. This. Cheesy Baked Pasta Goodness. YUM.
It’s the perfect dish for a quick and healthy weeknight dinner – and is great served with a green salad and some crusty Italian bread (dipped in Colavita olive oil and vinegar of course!) Enjoy!
This is a tasty and healthy twist on traditional Baked Ziti, using Colavita Rotini pasta with Italian Sausage and lots of colorful summer veggies like zucchini, squash, mushrooms, onions and garlic! It also features Colavita Tomato Basil sauce mixed with three cheeses: ricotta, parmesan/asiago and mozzarella to make it super creamy and cheesy baked into a big pot of bubbly goodness. Perfect for a quick weeknight dinner served with a green salad and crusty Italian bread.
Ingredients
1 pound Colavita Fusilli pasta, uncooked
1 pound sweet Italian sausage, ground
2 tablespoons Colavita Extra Virgin olive oil, divided
1 tablespoon Colavita Chardonnay White Balsamic vinegar
1 cup yellow squash, chopped
1 cup zucchini, chopped
1 cup mushrooms, chopped
1 red bell pepper, chopped
3 garlic cloves, minced
1-16 ounce jar Colavita Tomato Basil sauce
1 cup mozzarella cheese, shredded
1 cup Parmesan/Asiago cheese, grated
1 cup part-skim ricotta cheese
1 large egg, beaten
2 tablespoons fresh basil, chopped
2 teaspoons fresh oregano, chopped
1 teaspoon sea salt (add more to taste)
1/2 teaspoon freshly ground black pepper (add more to taste)
1/2 teaspoon red pepper flakes
Instructions
Cook pasta according to package directions (about 9 minutes for al dente), drain.
Preheat oven to 400 degrees F.
Heat a large skillet over medium-high heat and add one tablespoon of olive oil to the pan. Cook sausage until no longer pink, drain fat and set aside.
Add additional tablespoon of olive oil to the pan, and add squash, zucchini, mushrooms and bell pepper. Saute for 5-7 minutes until soft. Add minced garlic and balsamic vinegar and cook for another minute or two. Add the cooked sausage back into the pan.
Stir in the tomato sauce, 1/2 cup of mozzarella and 1/2 cup of Parmesan/Asiago cheese and reduce heat to medium-low. Cover and cook for another 5 minutes until cheese is melted.
Meanwhile, add the ricotta cheese to a mixing bowl and stir in beaten egg, fresh herbs, salt, pepper and red pepper flakes.
Place the cooked pasta in a large pot and add the sausage-veggie-tomato sauce mixture, stirring well. Fold in the ricotta-egg-herbs mixture until thoroughly combined.
Spoon the pasta mixture into an 8x8 square glass or ceramic baking dish. Sprinkle with remaining mozzarella and Parmesan/Asiago cheese evenly over the top.
Bake at 400 degrees F for 15 minutes until cheese is bubbly and browned.
Let cool for a few minutes, serve hot with a green salad and crusty Italian bread.
Notes
You can also substitute Colavita penne, shells, farfalle or ziti for the fusilli pasta.
Colavita has a great line of Italian gourmet food, olive oils, vinegars, pastas, condiments and other specialty foods, which makes them one of my favorite brands for quality Italian cooking.
Note: I received complimentary products from Colavita but was not compensated for this post. All photos, copy, recipes and opinions are my own. Please do not share, distribute or use any content without my permission.
It’s summer and OH. SO. HOT. And I honestly haven’t really been in the mood to cook or do anything lately except lie down in the AC or chill on the beach – but a girl’s gotta eat, right?
I’ve also been a bit blue because my Dad is in the hospital and having double bypass heart surgery on Monday morning which is a bit scary..and too much to deal with.
So I decided I needed a dose of some comfort food this weekend to cheer me up and bring me a little closer to home with Dad. 🙂
I had a few samples of RedPack petite diced tomatoes on hand and thought they would be perfect for a comforting baked pasta dish – something that reminded me of what Mom used to make for us for dinner.
So I whipped up a Cheesy Skillet Beef Goulash – made with ground beef, tomatoes, onion, garlic, elbow macaroni and three cheeses – all cooked together in one skillet, then baked into a pot of bubbly, cheesy goodness.
Super simple to make and definitely comforting at that. I think I’ll get through the weekend and Dad’s surgery just fine…after I have some of this deliciousness..and maybe a nap in the A/C. 🙂
This is a classic cheesy baked pasta dish made with macaroni, ground beef, diced tomatoes, onion and garlic, topped with Parmesan and shredded cheddar cheese.
Ingredients
1 package elbow macaroni
2 tablespoons cooking oil
1 medium onion, chopped
3-4 large garlic cloves, minced
1 pound lean ground beef
1- 28 ounce can RedPack petite diced tomatoes
1 cup tomato sauce
1/2 cup grated Parmesan cheese, plus extra for garnish
1 tablespoon Italian seasoning
1 teaspoon red pepper flakes
Kosher salt, to taste
Fresh ground black pepper, to taste
1/2 cup shredded mild cheddar cheese
1 cup shredded extra sharp cheddar cheese
Instructions
Bring a large pot of water to a boil and cook the macaroni, drain and set aside.
Meanwhile, In a large nonstick skillet, add oil and heat until it's shimmering. Add onion, and cook over medium heat until onion is soft, about 5-7 minutes. Add garlic and cook for about 30 seconds.
Add the ground beef and brown until no longer pink, stirring and breaking it up as you cook.
Add the diced tomatoes and tomato sauce to the skillet and stir. Cook the mixture for about 5 minutes or so until heated through.
Stir in the cooked pasta and Parmesan cheese, Italian seasoning, red pepper flakes, salt and pepper, mixing well. Adjust seasonings to your taste buds accordingly...:)
Top the pasta mixture with both shredded cheeses and bake in the oven for about 10 minutes until the cheese is melted and bubbly.
Top with additional grated Parmesan cheese if desired and serve hot immediately.
Notes
Goes great with a green salad and garlic bread and a crisp white wine like Pinot Grigio or a light fruity red table wine.
So this is where I’m supposed to go on and on about how delicious this grilled cheese sandwich is. And what’s in it. And why it’s a rockstar recipe that nobody else has. And why you need to make it now.
But guess what? I just did a food photo shoot for a NYC catering company and bakery for the past 2 days and shot at least 1000 photos that need to be culled through and selected to share with my clients and it’s enough to make your head spin faster than Linda Blair in The Exorcist. AND the fact that the Mad Men finale is coming on in less than 2 hours and I have some catching up to do and some last savoring moments of Don Draper to hold on to while I can.
OK – so now that I got that off my chest, here’s a little ditty of a recipe that I whipped up on Friday afternoon for a grilled cheese contest I entered for Wisconsin Cheese. It’s actually quite lovely and spring-y and full of good things. Homemade Strawberry-Rhubarb Compote, strawberries, granny smith apples, grilled chicken paillards, kale with lemon and parmesan, honey dijon mustard, melted sharp white cheddar and gooey mozzarella cheese – all grilled on a whole wheat pita (actually 2 of them).
It’s called California Dreamin’ Grilled Cheese because all the good things inside remind me of a sunny, breezy day on Pacific Beach in San Diego watching the sunset with a margarita in my hand with my toes in the sand, salty sea mist on my face, while basking in the glow and enjoying everything in life there is to offer. So here you go. Whether I win the contest or not – it’s absolutely fabulous, and will make you want to hop on a plane to the west coast and catch a few rays yourself.
Now back to my Sauvignon Blanc and Don Draper fix. Enjoy and Happy Sunday! 🙂
1 chicken breast, cut in half lengthwise and pounded thin
1/2 cup strawberries, sliced
1/2 cup green apple, sliced
1 cup kale, chopped
1 tbsp lemon juice
2 tbsp Wisconsin Parmesan, shredded
Sea salt
Fresh cracked black pepper
2 tbsp Dijon mustard
1 tbsp honey
4 slices Wisconsin Sharp Cheddar, sliced
4 slices Wisconsin Mozzarella
4 tablespoons Strawberry-Rhubarb compote
Strawberry-Rhubarb Compote:
1 cup strawberries, sliced or chopped
1 stalk rhubarb, sliced into small chunks
1/4 cup sugar
1 tablespoon lemon juice
1 tablespoon water
Instructions
Strawberry-Rhubarb Compote:
Stir strawberries, 1/8 cup sugar, and 1/2 tbsp lemon juice and 1/2 tbsp of water in a small nonreactive pan; bring to a simmer over medium heat. Cook, stirring often, until softened, about 3 minutes. Remove from pan and set aside.
Add the rhubarb, 1/8 cup sugar, and 1/2 tbsp lemon juice and 1/2 tbsp of water back into same pan and simmer for about 6 minutes until rhubarb is tender and soft. Transfer rhubarb to same bowl as strawberries and add all liquid to the pan through a strainer.
Raise heat to medium high and simmer until liquid thickens and reduces to almost half.
Return strawberries and rhubarb to liquid and let cool.
Make sandwich:
Preheat olive oil in a grill pan or sauté pan to medium/high heat.
Mix honey and mustard together in a small bowl and set aside.
Rub chicken with olive oil, sprinkle with salt and pepper, and grill chicken pieces for about 6-8 minutes until cooked through, remove from pan.
Spread both pitas on one side with butter.
Spread each pita on reverse side with honey Dijon mustard on a cutting board or piece of plastic wrap.
Top with sliced mozzarella cheese slices.
In a small bowl, toss kale, lemon juice, salt and pepper and place on top of each pita over Mozzarella.
Top one pita with both pieces of grilled chicken.
Drizzle Strawberry-Rhubarb Compote over the chicken.
Layer on the sliced strawberries, apples and top with cheddar cheese slices.
Top the sandwich with other piece of pita bread (butter side up) and place in preheated grill pan.
Smash the sandwich together with a heavy spatula or panini press and grill on both sides until cheese is melted and pita is crispy.
Cut in half and serve with additional Strawberry-Rhubarb Compote and Honey Dijon for dipping.
Makes one sandwich.
Note: you can make the Strawberry-Rhubarb Compote ahead of time and store in an airtight container in the fridge. You can also double the recipe to make more for other uses (great over vanilla ice cream, pancakes, whipped cream or greek yogurt and granola!!)
Whenever the holidays roll around, I love to bake and experiment with luscious pies and savory tarts. Puff pastry is such an easy way to make appetizers fit for a crowd, especially when you buy it pre-made from the grocery store. (I especially like Dufour brand which I get from Whole Foods and Fairway stores in NYC, it’s super flaky and buttery and light.) You simply roll them out on to a floured surface or a non-stick silicone baking mat (try Silpat), score the edges and prick a few holes in it and pre-bake it for about 15 minutes. Then, you can top it with any sweet or savory topping you like and bake it into a buttery, crispy delightful tart (or cut the pastry into smaller rounds with a biscuit cutter) to feed a crowd for brunch or a holiday appetizer.
I decided to top this one with some sauteed baby asparagus and garlic with red chile flakes along with three creamy melty cheeses: ricotta, gruyere and parmesan and a hint of lemon zest. All you gotta do is create your masterpiece, pop it in the oven and cut it into squares and you’ve got a crowd-pleaser waiting to happen and a party in your mouth. If you’re not a big asparagus fan, try experimenting with some other veggies: broccoli, mushrooms, brussels sprouts, butternut squash, spinach – whatever you fancy, and play with other cheeses, as long as they are good for melting such as Monterey Jack, Brie, Gorgonzola or Mozzarella. The ricotta base I wouldn’t substitute though – it gives it a creamy layer of flavor and texture that’s just too good to give up and protects the pastry base from getting soggy from the vegetables and cheese. Throw some cooked bacon, ham or prosciutto on it too if you really want to add some savory flavor. And if you want to go the extra mile and make your own pastry dough, go for it – but it takes a lot longer and a little more elbow grease to get it perfect. Happy Holidays!
Heat olive oil over medium heat and saute asparagus spears with the shallots for about 5-7 minutes until they get soft. Add minced garlic and red pepper flakes and saute for another 1-2 minutes. Remove pan from heat and set aside.
In a large mixing bowl, add ricotta, whisked egg, half of the Parmesan cheese, thyme, lemon zest, sea salt and pepper.
Roll out pastry sheet into a 16"x10" rectangle on to a Silpat (silicone baking mat) or parchment paper. Score around the edges 1 inch border and prick the base of the pastry with a fork in several places. Bake the pastry in oven for 15 minutes. Remove from oven and let cool for a few minutes before adding toppings.
Spread the ricotta and cheese mixture over the base of the puff pastry evenly. Top with sauteed asparagus, shallots and garlic, laying out asparagus spears in a flat row across the pastry.
Sprinkle over the top the shredded Gruyere cheese and the rest of the Parmesan cheese. Sprinkle additional fresh thyme if desired.
Place the tart (on the Silpat or parchment paper base) on a rectangle baking sheet into the oven and bake for 20-25 minutes until pastry is crisp and golden brown and the cheese on top is bubbly.
Remove from oven and let cool for about 5-10 minutes. Cut tart into squares and serve.
Notes
Delicious for a holiday brunch or appetizer (you can always cut tart into bite size pieces to feed a crowd).
Serve with a crisp white wine such as Pinot Grigio or Chenin Blanc.
Pizza is probably one of my most favorite things on the planet. Seriously. Who can resist that crispy crunchy crust topped with melted gooey cheese and fresh, savory baked toppings? A pizza is a creative endeavor that is only limited to your imagination. The pizza dough is like a blank canvas just waiting for the artist to paint a masterpiece on.
Speaking of dough, you can certainly take a stab at making your own – here is a basic pizza dough recipe that’s easy enough to make. If you don’t want to bother making your own and want to save time, you can use pre-made refrigerated pizza dough from the grocery store (I get mine from Fairway stores, or you can try Pillsbury pizza dough which is inexpensive and easy to use. They even have Artisan, thin and gluten-free crusts now which is kinda cool.)
I made these rustic pizzas the other day in an attempt to use up some fresh veggies, pizza dough and ingredients from my kids cooking show I taped last week – we made all kinds of fun pizza on set but i couldn’t bear to waste the leftovers!
So here’s how easy these babies are to make…I divided the pizza dough and patted out the dough on to pizza pans to make four rustic pizzas – one of them topped with sauteed garlic, spinach, olive oil, savory chicken, sun dried tomatoes and plenty of mozzarella gooey cheese. The other one I made with sauteed bell peppers in different colors, broccoli, pepperoni, ham, tomato sauce and two gooey cheeses – mozzarella and muenster, great for melting. The trick to a great pizza in my experience is to saute your veggies in some olive oil and garlic BEFORE you put them on the pizza (the chicken too!). This gives them a deeper flavor and keeps them from drying out in the oven when you bake the pizzas. Throw them in a preheated oven on 400 degrees for about 15-17 minutes, let them cool on a baking rack for about 5 minutes, and then top them with some fresh torn basil, some extra parmesan cheese and pepper flakes and you’ve got some serious deliciousness going on.
Chicken, Spinach, Garlic and Sundried Tomato Pizza
Prep Time: 15 minutes
Cook Time: 15 minutes
Total Time: 30 minutes
Yield: 2-4
This is a tasty and healthy pizza made with sauteed garlic and spinach, red pepper flakes, sauteed chicken breast, sundried tomatoes and Parmesan and Mozzarella cheese.
Ingredients
1 package refrigerated pizza dough (or handmade)
4 tablespoons extra virgin olive oil, divided
1/2 cup shredded Parmesan cheese
1 tablespoon garlic, minced
1 teaspoon red pepper flakes
1/2 package fresh spinach, chopped
6-8 thin chicken cutlets, cut into 1" chunks
1 tablespoon seasoned salt or poultry seasoning
Fresh ground black pepper, to taste
1/4 cup sundried tomatoes, julienned (thin strips)
1 cup shredded Mozzarella cheese
Instructions
Preheat oven to 400 degrees.
Divide pizza dough in half and shape into two oval or rectangular pizzas on a greased pizza pan.
Drizzle 1 tablespoon of olive oil and 1/4 cup of Parmesan cheese on to the base of each pizza dough.
Heat an additional tablespoon of olive oil over medium heat in a large saute pan and saute minced garlic and red pepper flakes for about a minute.
Add chopped spinach and stir. Saute together for another 3-4 minutes until spinach starts to wilt.
Remove spinach garlic mixture from pan and set aside in a mixing bowl.
Heat additional 2 tablespoons olive oil in the same pan, add seasonings and saute the chicken for approximately 8 minutes until golden brown. Remove pan from heat.
Top pizza crusts with spinach-pepper-garlic mixture, sundried tomatoes and sauteed chicken (divided into equal portions for both pizzas).
Top both pizzas with shredded mozzarella cheese and place pizza pan in oven.
Bake for 15-17 minutes until cheese starts to get bubbly and golden brown.
This is a healthy and hearty version of classic pizza made with sauteed garlic, bell peppers and broccoli with diced ham and pepperoni topped with gooey mozzarella and muenster cheese.
Ingredients
1 package refrigerated pizza dough (or handmade)
2 tablespoons extra virgin olive oil, divided
1 tablespoon garlic, minced
1/4 cup red bell pepper, diced
1/4 cup orange bell pepper, diced
1/4 cup yellow pepper, diced
1/4 cup green bell pepper, diced
1/2 cup broccoli florets, chopped
Sea salt and pepper to taste
1 cup tomato sauce or puree
2 tablespoons tomato paste
1 teaspoon Italian seasoning
1 teaspoon garlic salt
1/4 cup pepperoni, chopped
1/4 cup ham, chopped
1 cup shredded Mozzarella cheese
1/2 cup Muenster cheese, torn into pieces
1 tablespoon garlic salt
Instructions
Preheat oven to 400 degrees.
Divide pizza dough in half and shape into two oval or rectangular pizzas on a greased pizza pan.
Heat olive oil over medium heat in a large saute pan and saute minced garlic for about a minute.
Add diced bell peppers, chopped broccoli, salt and pepper and stir. Saute together for 5-7 minutes until vegetables get tender and soft.
Remove pan from heat.
In a small mixing bowl, mix together tomato sauce, tomato paste, Italian seasoning and garlic salt to make tomato sauce for pizzas.
Top pizza crusts with tomato sauce, pepperoni, ham and sauteed vegetables (divided into equal portions for both pizzas).
Top both pizzas with shredded mozzarella and muenster cheeses, sprinkle with garlic salt and place pizza pan in oven.
Bake for 15-17 minutes until cheese starts to get bubbly and golden brown.
Channels: Time Warner 34/ Cablevision 67/ RCN 82/ Verizon 42 and the Internet: Channel 1
BCAT TV Network cablecasts in all five boroughs of NYC on Verizon FIOS cable.
Summer has quickly arrived and it’s that time of year again to shed a few pounds and hit the beach. I’ve decided to muster up some will power and started experimenting with a low carb diet with grand visions of lazy days on the beach in that bikini I need to fit back into. The bad news is whenever I decide to go on a diet, my brain automatically starts thinking about all the evil foods I CAN’T eat – pizza being one of the first things I start craving.
I decided to make a low-carb pizza using a parmesan garlic cauliflower crust. It sounds weird, but it’s absolutely delicious and healthy and a great substitute for traditional pizza dough when you want a healthier option to cut some carbs out of your diet (while satisfying your cravings for pizza which are absolutely NOT allowed when you’re doing low carb!) I’m absolutely in LOVE with spinach artichoke dip and thought I would make a lighter version mixed with some fresh ricotta, garlic, onion and parmesan cheese to top the pizza.
I found a gorgeous head of bright yellow Carnival cauliflower and simply shredded and chopped it into a fine crumble (you can also do this in a food processor or blender). Then I chopped up some garlic and threw them both in the microwave for about 8 minutes, then drained and let cool.
You simply need to mix in some grated parmesan cheese (or any other shredded cheese you like), an egg, garlic, dried minced onion, herbs de Provence (or dried oregano or basil), a few sesame or chia seeds (optional), some yeast, almond flour and sea salt and black pepper. Then pat the mixture on to a greased pizza sheet or Silpat mat, then bake for about 10-15 minutes until the crust is lightly golden brown.
In the meantime, to make the luscious (and healthy) spinach, artichoke and ricotta topping – simply sauté the spinach with some garlic and olive oil, mix in some chopped up artichoke hearts (precooked), fresh minced garlic, ricotta cheese and shredded parmesan cheese, then top the pizza crust spreading the mixture in an even layer. Top with some additional shredded cheese (I used sharp white cheddar but you can use mozzarella or Monterey jack or any other cheese you like that melts well), and then scoop some light and fluffy ricotta cheese on top of the mixture and bake for another 7-10 minutes until the cheeses are melted and bubbly.
In my experiment I found that you shouldn’t spread the pizza crust out on the pan too thin, as it is more fragile than a traditional dough crust and needs to be a bit thick to hold up the ingredients. So try to keep the crust about ¾” to 1 inch thick evenly all around to the edges or it will burn.
Also, let the pizza cool for about 5 minutes or so before slicing it. Top with additional salt and pepper, red pepper flakes if desired, and grated parmesan cheese.
Devour. Repeat.
Preheat the oven to 425. Prepare the cauliflower crust ingredients and pat down on a greased pizza pan.
Bake at 425 degrees for about 10-15 minutes until it starts to get golden brown around the edges.
Top pizza crust with spinach artichoke mixture, shredded cheese and ricotta. Bake for another 10 minutes.
Let pizza cool down for 5-10 minutes and cut into slices.
Garnish with additional salt and pepper, parmesan cheese and red pepper flakes.
½ teaspoon herbs de provence (or dried basil or oregano)
½ teaspoon dried minced onion
sea salt and fresh ground black pepper
red pepper flakes (optional)
Instructions
Preheat the oven to 425.
Grease a 9-10” round pizza pan or place Silpat mat on a rectangular baking sheet.
Shred and chop cauliflower into fine crumbles (either by hand with a large Chef’s knife or with a food processor).
Mince the garlic and add to the cauliflower in a microwave-safe large bowl.
Microwave covered with plastic wrap for about 7-8 minutes.
Uncover, drain and let cool for about 5-10 minutes.
Add the next nine ingredients and mix together well.
Bake the crust for about 10-15 minutes until golden brown. Remove the crust from oven and set aside.
Notes
In my experiment I found that you shouldn't spread the pizza crust out on the pan too thin, as it is more fragile than a traditional dough crust and needs to be a bit thick to hold up the ingredients. So try to keep the crust about ¾” to 1 inch thick evenly all around to the edges or it will burn.
1 package frozen artichokes, defrosted (or 1-14 oz can, drained)
1-15 oz container ricotta cheese, divided in half
1 cup parmesan cheese, grated
sea salt and fresh ground black pepper, to taste
½ cup white cheddar cheese (can sub Monterey jack or mozzarella), shredded
dash of red pepper flakes (optional)
Instructions
Preheat a large sauté pan over medium-low heat.
Place the spinach in a large microwave-safe bowl and cover with plastic wrap. Cook for about 8 minutes on HIGH.
Mince the shallots and garlic cloves and drain the spinach (pressing out extra liquids).
Add one tablespoon of olive oil and sauté the shallots for about 5 minutes. Add the garlic and sauté for another minute.
Add the additional tablespoon of olive oil and sauté the spinach for another few minutes, mixing all ingredients together. Remove from heat and let cool for about 5 minutes.
Microwave the artichokes in a large microwave-safe bowl and cover with plastic wrap. Cook for about 5-6 minutes on HIGH and drain. (if using canned artichokes, simply drain).
Chop the artichokes up into small pieces and place into a large mixing bowl.
Add half of the container of ricotta cheese, 1 cup parmesan cheese, salt and pepper and mix well.
Stir in the spinach, shallots and garlic mixture.
Drizzle or spray some olive oil lightly on to the parbaked cauliflower pizza crust.
Spread the spinach, artichoke and ricotta mixture evenly over the crust.
Sprinkle with shredded cheddar cheese, salt and pepper, red pepper flakes and scoop out a few large tablespoons of ricotta cheese and place on top of the pizza.
Bake at 425 degrees for another 7-10 minutes until the cheeses are melted and bubbly and the crust edges are light golden brown. (Watch crust edges to make sure they don't burn).
Remove pizza from oven and let cool for about 5 minutes.
Slice into wedges (or squares if making rectangular pizza) and top with additional red pepper flakes and parmesan cheese.
Notes
In my experiment I found that you shouldn't spread the pizza crust out on the pan too thin, as it is more fragile than a traditional dough crust and needs to be a bit thick to hold up the ingredients. So try to keep the crust about ¾” to 1 inch thick evenly all around to the edges or it will burn.