Spicy Korean Chicken Lettuce Wraps

Spicy Korean Chicken Lettuce Wraps

Spicy Korean Chicken Lettuce Wraps

I was recently invited to participate in another great blogger recipe challenge– this time for Lucky Foods, a family-owned business and premiere Asian food brand. For the contest, I decided to make some Spicy Korean Chicken Lettuce Wraps made with two of their popular sauces – Gochujang chili paste and Kimchi Mayo.

Spicy Korean Chicken Lettuce Wraps

These delicious spicy chicken lettuce wraps are full of flavor, light on carbs and the perfect mixture of sweet and spicy, crunchy and creamy all in one bite! The gochujang chili paste gives it a nice kick of heat and the kimchi mayo rounds out the flavor with some creamy tangy goodness to top it all off.

Lucky Foods Gochujang

Gochujang is a Korean chili pepper paste made from fermented red chili peppers and it has a nice spicy bite with a subtle sweetness and umami flavor from the fermented soybeans.. It’s great on noodles, in fried rice, as a marinade, or drizzling on soups, stews and salad bowls.

Lucky Foods Kimchi Mayo

Their Kimchi mayo is also a delicious condiment made with spicy fermented kimchi (cabbage) and vegan mayonnaise.

Spicy Korean Chicken Lettuce Wraps

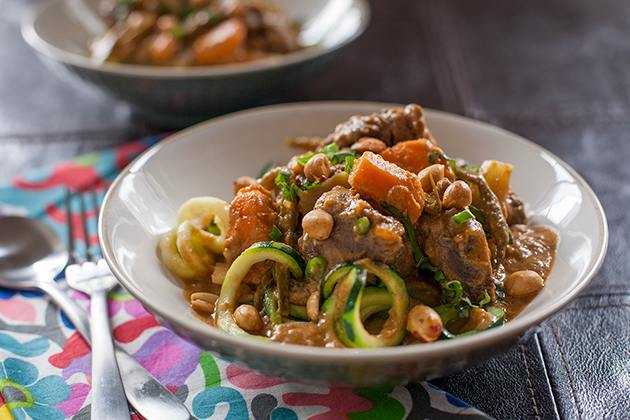
First I sautéed some fresh garlic, sliced scallions and ginger over medium heat until softened, about 2 minutes. Then I increased the heat to medium high and added the diced chicken and zucchini and sprinkled with sesame seeds and some salt and pepper, sautéing for about 4 minutes until browned.

Spicy Korean Chicken Lettuce Wraps

To make the spicy sauce, I whisked together the Gochujang chili paste, hot honey, soy sauce and rice vinegar, then added it into the pan with the chicken and zucchini. Then I tossed in the cooked cauliflower rice, honey roasted peanuts and sliced carrots and let the mixture cook for another 4-5 minutes until the sauce thickened and liquid was reduced.

Spicy Korean Chicken Lettuce Wraps

To serve, I spooned the spicy chicken mixture inside the lettuce leaves, then garnished the wraps with more grated carrots, cilantro, sesame seeds,  and a drizzle of spicy Kimchi Mayo with extra on the side.

Spicy Korean Chicken Lettuce Wraps

You guys – this is the most delicious thing I have ever tasted! The balance of spicy / sweet / umami flavors along with the crunchy and creamy textures is absolutely DIVINE.  And these sauces will go great with any protein you choose – try it with tofu or shrimp or beef. And it’s low carb, paleo and keto-friendly too!

Spicy Korean Chicken Lettuce Wraps

Prep Time: 25 minutes

Cook Time: 20 minutes

Total Time: 45 minutes

Yield: Serves 8.

Serving Size: 2-3 lettuce wraps

These delicious spicy chicken lettuce wraps are full of flavor, light on the carbs and the perfect mixture of sweet and spicy, crunchy and creamy all in one bite! The gochujang chili paste gives it a nice kick of heat and the kimchi mayo rounds out the flavor with some creamy tangy goodness to top it all off.

Ingredients

  • 2 tablespoons vegetable oil
  • 1 tablespoon sesame oil
  • 3 scallions, thinly sliced
  • 3 cloves garlic, minced
  • 4 teaspoons finely chopped fresh ginger
  • 1 medium zucchini, sliced into half-moon wedges
  • 1 pound chicken thighs, fat trimmed, cut into 1-inch chunks
  • 2 teaspoons sesame seeds, plus additional for garnish
  • Kosher salt and freshly ground black pepper
  • 4 teaspoons Lucky Foods Gochujang chili paste
  • 2 tablespoons hot honey
  • 1/3 cup soy sauce
  • 3 tablespoons rice vinegar
  • 1 package frozen cauliflower rice, cooked
  • 1 cup honey roasted or spicy peanuts
  • 6 baby carrots, sliced
  • Butter lettuce leaves, for serving
  • Grated carrots, for garnish
  • Cilantro leaves, for garnish
  • Lucky Foods Kimchi Mayo, for drizzling/dipping

Instructions

  1. Heat vegetable and sesame oil in a large nonstick skillet over medium heat. Add the fresh garlic, sliced scallions and ginger and cook over medium heat until softened, about 2 minutes.
  2. Increase the heat to medium high and add the chicken thighs and zucchini, sprinkle with sesame seeds and some salt and pepper, to taste, sautéing for about 5-6 minutes until chicken is browned and cooked through. 
  3. Whisk together the Gochujang chili paste, hot honey, soy sauce and rice vinegar to make a spicy sauce, then add it into the pan with the chicken and zucchini. Stir to coat with the sauce.
  4. Add in the cooked cauliflower rice, peanuts and sliced carrots and stir; let mixture cook for another 5 minutes until the sauce thickened and liquid mostly evaporated. 
  5. To serve, scoop the spicy chicken mixture inside the lettuce leaves, then garnish the wraps with more grated carrots, cilantro, sesame seeds, and a drizzle of spicy Kimchi Mayo with extra on the side for dipping.

Notes

Feel free to substitute tofu, shrimp or beef for the chicken or use chicken breasts instead of thighs.

https://www.theartfulgourmet.com/2021/08/spicy-korean-chicken-lettuce-wraps/

Spicy Korean Chicken Lettuce Wraps

To get more info on Lucky Foods products, check out their website. Their product line ranges from traditional and gluten-free spring rolls to Asian fusion sauces and BBQ sauces, kimchi and Korean pancakes. All of their products are free from MSG, GMOs, and added colors and preservatives. Their products only feature wholesome produce and fresh, aromatic spices, which is something I absolutely love!

They have more great recipe ideas on their Instagram & Facebook pages, and you can buy their products online or find them locally at Whole Foods, Giant, Acme and Food Lion.

#luckyfoodsrecipechallenge #eatluckyfoods

Note: I received complimentary products to use and try out for this Blogger recipe challenge. All opinions, writing, recipes and photos are my own.


A Mini-Thanksgiving Dinner

Mini Thanksgiving Dinner


Hey guys! Happy #Thanksgiving! I hope everyone is enjoying their holiday despite the crazy #quarantine travel restrictions and COVID-19 mania – and hoping that you are able to spend time with family or friends…no matter how small the gathering might be.

Thanksgiving Dinner


This year I decided to make a super delicious mini-Thanksgiving dinner for myself since I wasn’t able to spend it with my family and friends up in New York. I actually didn’t mind having a little time alone to cook and drink wine and relax, watching some holiday movies and snuggling under a blanket with kitty and some Christmas lights!

Cornish Hen


I made a juicy Roasted Cornish hen, seasoned with a homemade spice rub, some fresh squeezed lemon juice and extra virgin olive oil, roasted on top of a bed of onions, garlic and celery. You could also use some additional herbs and veggies to stuff the hen / add to the roasting pan such as sliced lemons, rosemary, thyme, carrots or turnips for extra flavor.

Delicata Squash


I also made this sweet and spicy roasted Delicata squash, made with a delicious glaze of olive oil, brown sugar, Sriracha, apple cider vinegar, garlic powder and salt with a dab of butter to make it caramelized and luscious.

Balsamic Brussels with Bacon


And of course I made my favorite Thanksgiving side dish of all time – Roasted Brussels sprouts with bacon and shallots and a drizzle of spicy balsamic glaze for serving..crispy, savory and sweet with a touch of heat..delicious!

Mashed Potatoes and Gravy


I served them with some luscious mashed potatoes with butter and heavy cream topped with turkey gravy…two staples I couldn’t resist (even though I planned on making mashed cauliflower originally and decided to cave and make the real thing…lol)

Kristen Hess The Artful Gourmet


and of course I paired my dinner with a crisp, light and fruity white wine – #Matua Sauvignon Blanc, which is one of my favorite varieties from Marlborough NZ.


I am #thankful for so many things and especially this year. Not being able to be with my friends and family up in New York is not the same, but I am blessed and grateful for them and happy we are all safe and sound, with food on the table…and #love all around,  no matter how far apart we are.


Happy Thanksgiving. XO

A Mini-Thanksgiving Dinner

Rating: 51

Prep Time: 30 minutes

Cook Time: 1 hour, 30 minutes

Total Time: 2 hours

Yield: 2

This is a super easy and delicious mini-Thanksgiving dinner for 1 or 2 people. A spiced juicy roasted Cornish hen along with some sweet and spicy roasted Delicata squash, Balsamic Brussels sprouts with bacon and shallots. All served together with some creamy buttery mashed potatoes and turkey gravy and of course a light and fruity white wine such as Sauvignon Blanc to go with!

Feel free to add additional herbs and veggies to stuff the Cornish hen or add to the roasting pan such as lemons, rosemary, thyme, carrots or turnips while baking for extra flavor.

Ingredients

  • Roasted Cornish Hen:
  • 1 whole Cornish hen, about 1 1/2 lbs
  • 1 onion, peeled and cut in quarters
  • 4 celery stalks, cut in thirds
  • 5 cloves garlic
  • 2 tablespoons extra virgin olive oil
  • 4 tablespoons fresh lemon juice
  • Dry Rub:
  • 1/2 teaspoon kosher salt
  • 1/2 teaspoon black pepper
  • 1/2 tablespoon Italian seasoning
  • 1/2 teaspoon dried tarragon
  • 1/2 teaspoon garlic powder
  • 1/2 teaspoon Tony Chacere's Creole seasoning (optional, can sub paprika)
  • 1/2 teaspoon Penzey's Bicentennial seasoning (optional, can sub poultry rub)
  • Sweet and Spicy Roasted Delicata Squash:
  • 1 large Delicata squash
  • 2 tablespoons extra virgin olive oil
  • 1/4 cup Stevia Brown Sugar
  • 1 tablespoon Sriracha
  • 1/2 tablespoon apple cider vinegar
  • 1 teaspoon garlic powder
  • 1/2 teaspoon Sea salt
  • Freshly cracked black pepper, to taste
  • 2 tablespoons unsalted butter
  • Balsamic Bacon Brussels Sprouts:
  • 1 1/2 pounds brussels sprouts, trimmed and halved
  • 1-2 tablespoons extra virgin olive oil
  • Sea salt and freshly cracked black pepper, to taste
  • 1/2 teaspoon red pepper flakes
  • 4 slices of bacon, chopped
  • 1/2 large shallot, minced (or 2 cloves garlic, minced)
  • 1 -2 tablespoons balsamic glaze

Instructions

  1. Roasted Cornish Hens:
  2. Preheat oven to 425 degrees F.
  3. Combine all the dry ingredients together in a small mixing bowl. Pat the hen dry with paper towels and season generously with the rub all over, inside and out.
  4. Place the onions, celery, and garlic on the bottom of a medium roasting pan. Place the hen over the vegetables and drizzle olive oil and lemon juice over the top, brushing it on to the hen evenly.
  5. Bake in the oven for 1 hour, or until a thermometer registers 165 degrees F in the thickest part of the thigh.
  6. Remove the hen from the oven and let rest, covered loosely with foil for about 20 minutes. Carve and serve with side dishes.
  7. Sweet and Spicy Roasted Delicata Squash:
  8. Wash the squash and cut off both ends. Cut in half length-wise and scoop out the seeds; discard.
  9. Slice the squash into 1/2-inch pieces and place on to a baking sheet in a single layer.
  10. Whisk together in a small bowl all the glaze ingredients until smooth and blended. Brush all over both sides of the squash. Dab the squash with bits of butter all over the pan.
  11. Bake for about 30 minutes at 425 until squash is cooked through and caramelized, turning halfway through cooking time to ensure even browning.
  12. Raise heat to a broil, and cook for an additional 2-3 minutes. Remove from oven and serve.
  13. Balsamic Bacon Brussels Sprouts:
  14. Preheat oven to 425 degrees.
  15. Place the brussels sprouts on to a sheet pan and drizzle with olive oil, salt and pepper and red pepper flakes, toss together to coat evenly.
  16. Add the bacon and shallots to the pan and stir together with the sprouts, making a single layer.
  17. Roast the sprouts for about 12 minutes then remove from oven and toss them together to get the other side crispy. Place them back in the oven and roast for another 12-15 minutes until the sprouts and bacon are crispy and browned.
  18. Remove from the oven and toss everything together. Place in a serving bowl and drizzle balsamic glaze over the top and garnish with some additional flaky sea salt and pepper.

Notes

You can also double the recipe for the Cornish Hens if you are having a couple more people over. The sides are plenty for two people, maybe 3 or 4, depending on how big your servings are!

https://www.theartfulgourmet.com/2020/11/a-mini-thanksgiving-dinner/

Keto Chicken Tikka Masala Flatbread

Keto Chicken Tikka Masala Flatbread

Keto Chicken Tikka Masala Flatbread

I was recently invited to participate in a recipe challenge for Kevin’s Natural Foods and I am so excited to try these delicious #organic sauces! They are all sugar/dairy/soy/gluten-free as well as paleo and keto-friendly, made with non-GMO/clean ingredients, super tasty and easy to cook with. And since I am currently doing a #keto and #low-carb lifestyle, I thought this would be the perfect opportunity to experiment with some fun recipes for the contest.

Keto Chicken Tikka Masala Flatbread

Chicken Tikka Masala is one of my favorite Indian dishes EVER – so I jumped at the opportunity to create a Keto Chicken Tikka Masala Flatbread – an absolute flavor explosion which is also guilt-free and MAJORLY delicious!

KNF Tikka Masala Sauce


I used Kevin’s Natural Foods Tikka Masala Sauce – a delicious blend of bright tomato curry made with coconut milk, ginger, and Indian spices, with some roasted cauliflower, sweet caramelized onions, and juicy savory chicken thighs over homemade Keto Garlic “Naan” Flatbread.

Keto Garlic Naan Flatbread Ingredients


I started first by making the keto garlic naan flatbreads using mozzarella cheese, almond flour, cream cheese, garlic powder, baking powder and a pinch of Himalayan Pink sea salt and microwaving it for about a minute until cheeses are melted.

Keto Garlic Naan Flatbread


Then I stirred in the egg and kneaded it gently into a dough and shaped them into ovals on to the baking sheets, and brushed them with olive oil, fresh garlic, paprika and some chopped cilantro. I baked them for 15-17 minutes until browned and let them cool on parchment paper while making the Chicken Tikka Masala topping.

Roasted Cauliflower


Next, I chopped up a head of cauliflower into small florets and drizzled them with olive oil, garlic salt and freshly cracked black pepper, and roasted them in a 400 degree oven for about 20-25 minutes until crispy and browned (but made sure not to overcook because it will simmer in the sauce later with the other ingredients).

Caramelized Onions


I sliced up some sweet onion and sautéed them in a large pan with some more olive oil, sea salt and paprika for about 25-30 minutes over low heat until they were soft, golden and caramelized. YUM!!

Pour Sauce over ingredients


In the same saute pan, I sautéed the chicken thighs over medium-high heat until cooked through and no longer pink. Then I added the chicken back in the pan along with the cauliflower and onions, a pinch of red pepper flakes for additional heat, and poured the Chicken Tikka Masala sauce over the top.

Chicken TIkka Masala


I let this big pot of curry goodness simmer over medium-low heat for about 10 minutes to let all the delicious flavors meld together with the sauce.

Chicken Tikka Masala


Once done, I topped the Keto flatbreads with some of the mixture..LOOK AT THIS GORGEOUS COLOR.

Keto Chicken Tikka Masala Flatbread


…then sliced the flatbread into wedges and topped it off with some fresh cilantro and black pepper.

Keto Chicken Tikka Masala Flatbread


OMG – you guys. This is the most delicious thing ever – and it’s so easy! The garlic flatbreads are literally super low carb and the chicken, cauliflower and sweet onions go so good with the Tikka Masala curry sauce – it literally melts in your mouth!

Keto Chicken Tikka Masala Flatbread

I can’t wait try their other great sauces out – stay tuned for more recipes this month that I’ll be creating for the same challenge with their Korean BBQ, Lemongrass Basil and Thai Coconut flavors which you can find online!

Keto Chicken Tikka Masala Flatbread

Prep Time: 30 minutes

Cook Time: 30 minutes

Total Time: 1 hour

Yield: 2-4

Serving Size: 1/2 to 1 flatbread

These Keto Chicken Tikka Masala Flatbreads are a flavor explosion! Made with Kevin's Natural Foods Tikka Masala Sauce (organic, gluten free), roasted cauliflower, caramelized onions, and juicy chicken thighs over Keto Garlic Naan Flatbread. Guilt-free and absolutely delicious!

Ingredients

  • Chicken Tikka Masala:
  • 1 pound boneless chicken thighs, cut into 1-inch chunks
  • 2 cups cauliflower florets
  • 4 tablespoons ghee or olive oil, divided
  • Kosher salt and pepper
  • 1 large onion, julienned
  • 1 tablespoon paprika
  • 1 teaspoon red pepper flakes, optional
  • 1 pouch Kevin’s Chicken Tikka Masala Sauce
  • Fresh torn cilantro, for garnish
  • ------------------------------
  • Garlic Naan Flatbread:
  • 2 cups shredded mozzarella
  • 1 cup almond flour
  • 4 tablespoons cream cheese
  • 2 tablespoons garlic powder
  • 2 teaspoons baking powder
  • Kosher salt
  • 2 large eggs
  • 2 tablespoons ghee or olive oil
  • 2 cloves garlic, minced
  • 2 tablespoons fresh cilantro, minced

Instructions

  1. Garlic Naan Flatbread:
  2. Preheat oven to 400 degrees and line two large baking sheets with parchment paper or silicone baking mats.
  3. In a medium microwave-safe bowl, add mozzarella, almond flour, cream cheese, garlic powder, baking powder and a large pinch of salt. Microwave on high until cheeses are melted for about 1 minute; stir in eggs.
  4. Shape the dough into two 1/2-inch thick ovals and place on two large baking sheets.
  5. Mix ghee or oil with garlic and cilantro, brush over top of the bread.
  6. Bake each flatbread for 15-17 minutes. Set aside while making Chicken Tikka Masala.
  7. Chicken Tikka Masala:
  8. Drizzle 2 tablespoons of ghee or olive oil over cauliflower and season with garlic salt and pepper on a large baking sheet.
  9. Roast cauliflower for 20-25 minutes, until browned and crispy. Remove tray from oven and set aside.
  10. Heat an additional tablespoon of ghee or oil in a large sauté pan over medium-high heat, sprinkle paprika over the onions and sauté for about 3-5 minutes. Reduce heat to low and let cook for about 20-25 minutes until caramelized and brown. Set aside into a small bowl while cooking the chicken.
  11. Bump up the heat to medium-high and add the chicken to the same sauté pan with one tablespoon ghee or olive oil. Saute for about 6-8 minutes until cooked through and no longer pink.
  12. Pour in the pouch of Jason’s Chicken Tikka Masala Sauce to the pan along with the cooked onions and cauliflower. Toss in a few red pepper flakes if desired. Bring sauce to a boil and reduce heat to a simmer and let cook over low heat for 5-8 minutes. If the sauce is too thick, add a little water or chicken broth until desired consistency.
  13. Remove from heat to cool and let flavors meld together.
  14. Top each keto naan flatbread with 1/2 the Chicken Tikka Masala mixture and garnish generously with fresh cilantro and freshly cracked black pepper.
  15. Slice flatbreads into wedges and serve immediately.

Notes

You can also substitute chicken breast instead of chicken thighs if you prefer. Try adding other veggies in if you like - peas, green beans, carrots...if you want to spice up the heat, garnish with a few jalapeños or sliced red chilies.

https://www.theartfulgourmet.com/2020/11/keto-chicken-tikka-masala-flatbread/

Chicken Tikka Masala Flatbread


#eatcleanlivehappy #kevinsnaturalfoods #kevinsrecipechallenge

Check out more of Kevin’s Natural Foods Products and Recipes Online!

Facebook: https://www.facebook.com/Kevins-Natural-Foods-111435896926979/

Instagram: https://www.instagram.com/kevins.natural.foods/

Pinterest: https://www.pinterest.com/KevinsNaturalFoods/

Roasted Eggplant Zucchini Noodles w/ Blood Orange + Black Currant Vinaigrette

Zucchini Noodles

Zucchini Noodles

This is a lovely recipe that I wanted to share with you all because it’s one of my absolute favorites and perfect for Spring! ?????

Roasted Eggplant Zucchini Salad

This Roasted Eggplant Zucchini Noodle Salad is made with some roasted eggplant, quinoa, feta cheese, mint and pomegranate seeds which are all lightly drizzled in this gorgeous vinaigrette dressing I made with Seven Barrels Blood Orange Olive Oil + Black Currant Balsamic Vinegar which makes the salad even more #delish!

Roasted Eggplant Zucchini Salad

Start out by first cutting up your eggplant into medium size chunks, drizzle with olive oil, salt and pepper. Roast in the oven on a sheet pan for about 25 minutes until soft and golden. Cook quinoa according to package directions and drain, fluff with a fork. Make your zucchini spirals with a spiralizer (or you can shave long, thin slices with a mandoline) and drizzle with a little olive oil and salt and pepper and sauté for a few minutes.

Roasted Eggplant Zucchini Noodles

Then toss the roasted eggplant and cooked quinoa in a bowl with the zucchini noodles. Top with feta cheese, pomegranate arils, and mint leaves. Drizzle with the Blood Orange Black Currant vinaigrette dressing and toss together with the salad. Season the zucchini noodles with salt and pepper to taste. 

Roasted Eggplant Zucchini Noodles

Feel free to substitute crumbly queso cheese, goat cheese, burrata, mozzarella or any other mild cheese you like. You can also use cooked wild rice, farro or any other ancient grain you like (amarynth, teff, etc.) for the quinoa – or leave it out all together to make the recipe #keto/#lowcarb/#atkins-friendly. If you can’t find fresh pomegranate arils, the salad would be delicious with either some fresh baby tomatoes or roasted red peppers. Soooo good and #healthy!

Have a great weekend everyone, stay safe, stay healthy and enjoy 🙂

Roasted Eggplant Zucchini Noodles w/ Blood Orange + Black Currant Vinaigrette

Prep Time: 30 minutes

Cook Time: 45 minutes

Total Time: 1 hour, 15 minutes

Yield: 4

Serving Size: 1 cup

Calories per serving: 221

Fat per serving: 13.6g

Roasted Eggplant Zucchini Noodles w/ Blood Orange + Black Currant Vinaigrette

This Roasted Eggplant Zucchini Noodle Salad with roasted eggplant, quinoa, feta, pomegranate + mint is super #fresh and #healthy and the perfect light meal to start off the weekend! Drizzled in a @7Barrels Blood Orange + Black Currant balsamic vinaigrette makes this even more absolutely #delish!

Ingredients

  • 1 medium Italian eggplant
  • ¼ cup plus 1 tablespoon Seven Barrels Blood Orange Olive Oil, divided
  • 1-2 tablespoons Seven Barrels Black Currant Balsamic Vinegar
  • Sea salt, to taste, plus more for serving
  • Freshly ground black pepper, to taste
  • 1-2 tablespoons fresh parsley, chopped
  • ½ cup water
  • ¼ cup dry quinoa
  • 2 zucchinis spiral sliced or made into ribbons with a wide peeler
  • 1 tablespoon lemon juice
  • 1 teaspoon grainy Dijon mustard
  • 1 teaspoon honey
  • Ground black pepper, to taste
  • ½ cup pomegranate arils or cherry tomatoes, halved
  • ½ cup feta cheese, for garnish
  • Handful fresh mint, roughly chopped, for garnish

Instructions

  1. Preheat oven to 475ºF.
  2. Cut eggplant into 1-inch cubes. On a rimmed baking sheet, toss eggplant with ¼ cup Seven Barrels Blood Orange Olive Oil and season with salt and pepper. Roast until browned and tender, about 25 minutes. Toss with 1-2 tablespoons Seven Barrels Black Currant Balsamic Vinegar and chopped parsley.
  3. Meanwhile, bring salted water and quinoa to a boil in a medium saucepan. Reduce to a simmer, cover, and cook for 15 minutes. Remove from heat and let steam with cover on for 5 minutes. Fluff with a fork.
  4. For the dressing, in a small bowl, combine 1 tablespoon of Seven Barrels Blood Orange Olive Oil, lemon juice, grainy Dijon mustard, honey, and ground pepper. Season with salt, to taste.
  5. Squeeze any excess water out of the zucchini noodles with a tea towel or paper towels. Add 1 tablespoon of Seven Barrels Blood Orange Olive Oil in a large sauté pan and cook the noodles for about 2-3 minutes, toss in the cooked quinoa and mix together.
  6. Pour the dressing over the cooked quinoa and zucchini; toss well to combine and transfer to a serving bowl. Top with roasted eggplant, pomegranate arils or cherry tomatoes, feta cheese and mint, to serve. Drizzle with an additional small amount of dressing, and additional salt and pepper to taste, if desired.

Notes

Feel free to substitute cojita cheese, goat cheese, burrata, mozzarella or any other mild cheese you like.

You can also substitute wild rice or farro or any other ancient grain you like (amarynth, teff, etc.) for the quinoa (or leave it out all together to make the recipe keto/low carb/atkins friendly.

Schema/Recipe SEO Data Markup by Yummly Rich Recipes
https://www.theartfulgourmet.com/2020/05/roasted-eggplant-zucchini-noodles-w-blood-orange-black-currant-vinaigrette/

Other Zucchini Noodles #recipes you may enjoy: 

Shrimp, Basil & Corn Zucchini Noodles w/ Meyer Lemon Cream Sauce

Garlic Zucchini Noodles

Zucchini Pasta

Red Curry Beef Zucchini Noodles

Zucchini Noodle Carbonara

Ham, Cheese, Broccoli + Mushroom Frittata {#Keto}

Keto Ham, Cheese, Mushroom + Broccoli Frittata

Who loves #brunch besides me? One of my favorite recipes around the holidays is a big egg casserole, quiche or frittata made with lots of delicious ingredients like ham or bacon, cheese, veggies all baked together into a hot, bubbling dish of goodness.

This Ham, Cheese, Broccoli + Mushroom Frittata is also #lowcarb, #keto and #Whole30 diet friendly – something we all are looking for to eat lighter and shed a few pounds after an indulgent holiday filled with rich, carb-laden, sugar-filled foods.

Mix ingredients in large casserole dish

I made the frittata with some cooked smoked ham, broccoli, mozzarella and cheddar cheese, sautéed buttery mushrooms, eggs and a touch of light cream, dried leeks, a dash of onion salt and a little garlic.  It’s all layered together in a casserole dish then baked in the oven for 40-45 minutes, then served at room temperature.

Feel free to experiment with different ingredients and cheeses – some crumbled breakfast sausage or bacon instead of ham. Sub some halved cherry tomatoes, or bell peppers or asparagus, and use some creamy brie or swiss or gruyere cheese would all be equally delicious! Or leave out the meat altogether and make it a #vegetarian egg casserole instead.

The frittata can also be cooked in a cast iron pan on the stove for a few minutes and finished in the oven until cooked through. It can also be made ahead of time and reheated, or served room temperature. Great served with a side salad or fruit salad for brunch. Yum!

Frittata

Happy New Year #2020! 

Keto Ham, Cheese, Broccoli + Mushroom Frittata

Prep Time: 20 minutes

Cook Time: 40 minutes

Yield: 8

Serving Size: 1 square (1/8 of frittata)

Ingredients

  • Olive oil cooking spray
  • 5 cups broccoli
  • 2 tablespoons butter
  • 1 cup sliced mushrooms
  • 1 tablespoon minced garlic
  • 1 cup cooked ham, diced
  • 2 cups mozzarella cheese, shredded
  • 1 cup cheddar cheese, shredded
  • 12 large eggs
  • 1/4 cup light cream
  • 1 tablespoons dried leeks
  • Onion salt
  • Freshly ground black pepper
  • Fresh or dried parsley, for garnish

Instructions

  1. Preheat oven to 375 degrees, Spray a 9x13 or medium round baking dish with cooking spray.
  2. Blanch the broccoli for a few minutes, drain and run under cool water, set aside.
  3. Melt butter in a small sauté pan and cook mushrooms for 5-6 minutes until tender and browned. Add minced garlic and cook for another minute.
  4. Layer the broccoli, mushrooms and ham in the baking dish.
  5. Beat the eggs in a large mixing bowl and add cream, dried leeks and season with onion salt and pepper.
  6. Pour the egg mixture over the cooked veggies and ham and stir ingredients together.
  7. Sprinkle the cheese over the top, mixing it through the casserole.
  8. Bake for 40-45 minutes or until eggs are set and the top is lightly browned. Remove from oven and let cool.
  9. Serve warm, cut into squares.

Notes

Feel free to experiment with different ingredients and cheeses - some cooked sausage or bacon instead of ham, tomatoes, peppers or asparagus would also be equally delicious and nutritious. The frittata can also be cooked in a cast iron pan on the stove for a few minutes and finished in the oven until cooked through. Can be made ahead of time and reheated, or served room temperature. Great with a side salad or fruit salad for brunch.

https://www.theartfulgourmet.com/2019/12/ham-cheese-broccoli-mushroom-frittata-keto/

Some other frittata/quiche/egg casseroles you might wanna try!

Bacon, Onion + Cheese Frittata

Summer Veggie Frittata

Italian Frittata w/ Potato, Red Pepper + Bacon

Mushroom, Ham + Cheese Strata

Holiday Strata

Spinach, Cheese + Green Onion Quiche

Bacon, Onion + Cheese Frittata for the New Year

Frittata hero

Bacon Onion Cheese Frittata

So the New Year has arrived, and we all know what that means…time for resolutions and committing to good habits and breaking bad ones, including our diets and fitness routines, getting rid of the old and bringing in the new.

So I’ve decided to start with my #lowcarb #keto diet this week and I’m so excited about it – really! Every time I eat this way, everything else seems to fall into place…working out, sleeping better, more energy, better moods, less aches and pains and just feeling fantastic overall.

One of my other goals this year is to cook meals that can last throughout the week so I’m not cooking every meal from scratch every day..and making food with less ingredients (but still quality!), and preferably in one pot for easier prep and cleanup – ovenproof sauté pans, Dutch ovens, my Crock pot and Instant pot. So here goes my recipe for Low Carb/Keto Diet Day 1 – a simple and delicious Bacon, Onion and Cheese Frittata.

Bacon Onion Cheese Frittata

This baby will last me at least a couple of days – just cook it up in a big pan, slice it and it’s perfect for breakfast-on-the-go. AND it’s low carb/keto and #gluten-free made with only #eggs, half and half, sweet onion, #bacon, butter, cheddar #cheese, salt and pepper and some dill seasoning. Super delicious, filling and full of protein (and yes, fat, butter, bacon and cheese are totally fine on low carb (like Atkins and South Beach diets) and the Keto diet (which is pretty much the same except super high fat, medium protein and super low carb)…so no shame there, friends 🙂

BOOM! #2019, I’m ready for ya…bring it on!

Bacon, Onion + Cheese Frittata

Prep Time: 40 minutes

Cook Time: 25 minutes

Total Time: 1 hour, 5 minutes

Yield: Serves 6-8

Serving Size: 1 slice (1/6 or 1/8 of frittata)

An easy, delicious frittata made with eggs, cream, bacon, sautéed sweet onions and cheddar cheese, baked in the oven - perfect for breakfast or brunch or an alternative to dinner. Low carb, keto and gluten-free!

Ingredients

  • 5-6 pieces natural smoked, uncured bacon
  • 2 tablespoons butter
  • 1/2 sweet onion, diced
  • 6 eggs
  • 1 cup half and half or whole milk
  • Deliciously Dill Spice Blend (The Spice Hunter)
  • sea salt
  • freshly ground black pepper
  • 1 cup shredded Cheddar cheese

Instructions

  1. Preheat oven to 375 F.
  2. Place bacon on a baking rack over a foil lined baking sheet and bake for 25 minutes- flip bacon after 15 minutes and bake an additional 10 minutes until bacon is crispy. Drain the bacon grease on paper towels, chop into pieces. Reduce oven to 350 degrees.
  3. Melt butter in a large ovenproof sauté pan over medium heat and cook onions for about 5 minutes or so until lightly golden and translucent and soft. Add bacon back into the pan and stir together.
  4. Whisk eggs with the half and half or milk, dill spice blend, salt and pepper in a large mixing bowl.
  5. Add eggs into the pan with the bacon and onions, stir in the shredded cheese. Cook over medium low heat for about a minute or so.
  6. Bake the frittata in the oven uncovered for 25-30 minutes or until a knife inserted into the center comes out clean.

Notes

You can also substitute prosciutto, pancetta or canadian bacon or ham for the bacon (or turkey bacon!) Feel free to experiment with other cheeses as well such as mozzarella, monterey jack, colby or parmesan. You can also add some sautéed peppers or mushrooms to add more veggies into the mix (or make it totally vegetarian by skipping the bacon altogether!)

https://www.theartfulgourmet.com/2019/01/bacon-onion-cheese-frittata-for-the-new-year/


Kung Pao Beef w/ Cauliflower Rice (Sugar + Gluten Free)

Kung Pao Beef

Kung Pao Beef w/ Cauliflower Rice

I recently was approached by Steviva to compete in the Sweetin It-Up Blogger Recipe Challenge and decided to make a sugar free, gluten free Kung Pao Beef with Cauliflower Rice. I love Asian food, but oftentimes it has many hidden sugars in the sauce, so I thought it would be cool to make this savory dish for the challenge.

Steviva Recipe Ingredients

Steviva has a wide range of stevia-based products and I chose to use Nectevia and Erysweet for my recipe to replace the normal sugar in the sauce. Erysweet is a pure, non-GMO erythritol that is naturally derived and can be substituted cup-for-cup for sugar in recipes. Nectevia is an organic blue agave nectar infused with premium 100% pure stevia extract – and has only 1/4 the calories, carbs and sugars of regular agave, or table sugar with a warm honey flavor.

Kung Pao Beef w/ Cauliflower Rice

Kung Pao is made with chicken or beef marinated in soy sauce, sesame oil, and rice wine, which is then sautéed in a wok on high heat with crunchy bell peppers, water chestnuts, garlic, ginger, green onions and hot chilies.

Kung Pao Beef w/ Cauliflower Rice

I made a sweet and spicy sauce made with more soy sauce, rice wine, Chinese black vinegar, chicken broth, Erysweet and Nectevia in the pan with the cooked meat and veggies and tossed in some spicy peanuts, which was thickened into a luscious sweet/spicy/savory pot of yum. To serve, I topped the dish with fresh cilantro and more crunchy peanuts along with some yellow cauliflower rice sautéed with soy sauce and sesame oil and some fresh cilantro tossed in to keep it gluten free.  Absolutely delicious without all the sugar and carbs!

Kung Pao Beef w/ Cauliflower Rice (Sugar + Gluten Free)

Prep Time: 20 minutes

Cook Time: 20 minutes

Total Time: 40 minutes

Yield: 4-6

Serving Size: 1 cup

Ingredients

  • MARINADE:
  • 1 3/4 pounds boneless beef sirloin
  • 1 tablespoon soy sauce
  • 2 tablespoons sesame oil
  • 1 tablespoon rice wine
  • 1 egg white, lightly beaten
  • 1/2 teaspoon kosher salt
  • 1/2 teaspoon freshly ground black pepper
  • KUNG PAO:
  • 2 tablespoons peanut oil
  • 4-6 dried red chilies
  • 1 tablespoon garlic, minced
  • 1/2 tablespoon ginger, grated (or ginger paste)
  • 1 teaspoon red chile flakes
  • 3 scallions, sliced on the bias, 1/2-inch pieces
  • 1/2 red bell pepper, sliced into strips
  • 1 can water chestnuts, sliced in half
  • 2 tablespoons soy sauce
  • 3 tablespoons rice wine
  • 1 tablespoon Chinese black vinegar (or balsamic)
  • 2 tablespoons Nectevia Original
  • 2 teaspoons Erysweet
  • 1 cup chicken broth
  • 1 tablespoon cornstarch mixed with 2 tablespoons water
  • 3/4 cup roasted spicy peanuts
  • 1/4 cup cilantro, chopped
  • Cauliflower rice sautéed with soy sauce, sesame oil and cilantro

Instructions

  1. MARINADE:
  2. Trim the fat from the steak all over and cut into 1-inch cubes. Combine the marinade ingredients in a large bowl and mix in the beef. Stir together to coat well, and place covered in the fridge for at least an hour to overnight.
  3. KUNG PAO:
  4. Heat the peanut oil in a wok or large sauce pan over medium heat, add chilies and cook for a minute until they begin to brown. Add garlic, ginger and cook for another minute. Turn heat up to high and add scallions, peppers, water chestnuts and chile flakes; saute for about 5 minutes until they begin to get soft and lightly browned. Add steak (remove from marinade and discard excess) and cook for about 3 minutes or so until beef begins to brown. Add soy sauce, rice wine, Chinese vinegar, Erysweet, Nectevia and chicken broth. Mix in the cornstarch, stirring well, to thicken the sauce. Toss in the roasted peanuts and serve over cauliflower rice with chopped cilantro, additional peanuts if desired.
https://www.theartfulgourmet.com/2017/10/kung-pao-beef-w-cauliflower-rice-sugar-gluten-free/

Kung Pao Beef w/ Cauliflower Rice

Hope you enjoy making this recipe – please let me know what you think if you made it in the comments below! And feel free to share this post on social media tagging #theartfulgourmet and #steviva with a link back to the original post on this blog.

For more info on Steviva products, check them out online and social media:

Website: https://www.steviva.com/

Facebook: https://www.facebook.com/steviva

Twitter: https://twitter.com/steviva

Instagram: https://www.instagram.com/stevivabrands/

Pinterest: https://www.pinterest.com/stevivabrands/

Disclaimer: This was a sponsored post by Steviva Brands and I received products to create recipes and photos for this post. All opinions, images, and text are my own. 

Red Curry Beef w/ Zucchini Noodles

   Red Beef Curry

Since the holidays are coming soon, we all know what THAT means..lots of holiday parties with food and drinks, and with that in mind, I’ve decided to commit to eating healthier and lighter the next few weeks.

Zucchini Noodles Action

I absolutely love my KitchenAid® Spiralizer Attachment that goes with my KitchenAid® Stand Mixer – and I’m so excited to make some healthier low-carb meals! It comes with five different blades for peeling, coring and slicing and is perfect for fresh fruits and vegetables. I love pasta and rice, but spiralized veggies are such a great substitute when I want to lighten up my recipes and eat low carb.

Red Curry Beef Zoodles

I thought a delicious comfort food dish with a healthy twist would be perfect for the cooler months, and decided to make a Red Curry  Beef with Zucchini Noodles.

Red Curry Beef ingredients

I used lots of fresh, organic ingredients: beef, sweet potatoes, onions, garlic and green beans, and then made a lovely curry sauce with coconut milk, red curry paste, fresh lime juice, fish sauce, some beef broth and a dash of Sriracha to spice it up.

Cutlery and Veggies

I used my Professional Series 3.5″ Paring Knife that came with the 7-piece Professional Series Cutlery set, for chopping my onions and garlic, Thai chilies and basil.

Chop beef into large chunks

The larger Chef’s knife was great for cutting up the large chunks of beef and sweet potatoes with its sturdier grip and large super sharp blade.

Add veggies to curry sauce

My heavy duty KitchenAid ceramic cast iron pot is perfect for making this dish – it cooks evenly and is large enough to make a large pot of curry or stew, and is ovenproof to 500 degrees!

Saute zucchini noodles

The KitchenAid spiralizer attachment is also easy to use! All you need to do is attach it to the KitchenAid mixer, and the spirals come right out perfectly cut. Then you just briefly cook them in a saucepan with some olive or peanut oil, season them with some salt and pepper.

Red Beef Curry

Top the #zoodles with this luscious and creamy curry – lots of great flavors and textures, sweet and spicy – all in one pot. Delish!

Red Beef Curry

This is such a great Winter comfort food dish to make and it’s so easy to make with all the right tools… You’ll definitely want to make this Red Curry Beef  Zucchini Noodles for dinner – tonight!

Red Beef Curry with Zucchini Noodles

Ingredients

  • INGREDIENTS
  • 3-4 medium zucchini
  • 2 1/2 pounds lean stewing beef, (chuck or round), cut into 1 1/2 inch chunks
  • 1 teaspoon Kosher salt
  • 1 teaspoon freshly ground black pepper
  • 3 tablespoons canola oil
  • 1 sweet onion, finely chopped
  • 4 garlic cloves, minced
  • 1/4 cup red curry paste
  • 2 cans (13.5 ounce) unsweetened coconut milk
  • 2 tablespoons Thai fish sauce
  • 2 tablespoons fresh lime juice
  • 2 tablespoons dark brown sugar
  • 1/4 cup beef broth
  • 1 tablespoon Sriracha hot sauce (optional)
  • 1 large handful French green beans, trimmed
  • 3 medium sweet potatoes, peeled and cut into medium chunks
  • 1 (8 ounce) can sliced bamboo shoots, drained
  • 3 tablespoons fresh basil, chopped or torn, for garnish
  • 1-2 Thai green chilies, sliced fine, for garnish
  • 1/2 cup peanuts, for garnish

Instructions

  1. Attach the KitchenAid® Spiralizer Attachment to your KitchenAid® Stand Mixer and choose your desired spiralizing blade. Attach the vegetable skewer to the Spiralizer and secure it to the zucchini. Move the spiralizing blade to the end of the zucchini and turn on the Stand Mixer to low (level 2) to make the spiralized zucchini noodles. Make sure you place a bowl underneath to catch the zucchini noodles as they fall. Set the noodles aside or keep them in the refrigerator until ready to serve.
  2. Cut the beef into 1 1/2 inch large chunks and place in a bowl. Sprinkle with kosher salt and freshly ground black pepper.
  3. Heat the oil over medium-high heat in your KitchenAid® 6.0Qt Cast Iron Cookware and brown the beef in two batches until lightly browned on all sides. Remove the beef from the pot and transfer to a bowl, set aside.
  4. Add the onion and garlic to the same pot and sauté over medium heat for about a minute. Add the curry paste, stirring into the onions and garlic, until lightly fragrant, for about 30 seconds. Add the coconut milk, and deglaze the pan, stirring up all the crispy brown bits with a wooden spoon. Stir in the fish sauce, lime juice, brown sugar, beef broth, Sriracha (if using) and bring the liquid to a boil.
  5. Add the green beans and sweet potatoes and stir into the liquid. Next add the browned beef back in and stir together well. Cover the pot, reduce the heat to low and let simmer for about an hour and 45 minutes. Add the bamboo shoots into the curry and let simmer for another 15 minutes.
  6. Meanwhile, heat a tablespoon of olive oil in your 10? Skillet from the KitchenAid® Stainless Steel 8-Piece Set over medium heat. Add the zucchini noodles, with some salt and pepper to taste, and sauté for a few minutes until the noodles are soft.
  7. Serve the noodles in bowls topped with the Red Beef Curry, garnishing with fresh chopped basil, sliced Thai green chilies and peanuts.
https://www.theartfulgourmet.com/2016/01/red-curry-beef-zucchini-noodles/

CLICK HERE TO VIEW STEP BY STEP VISUALS ON THE KITCHENTHUSIAST BLOG!

Red Beef Curry

Enjoy!

Summer Veggie Frittata + Time to Relax.

Summer Veggie Frittata

Summer is that time of year when we get to take some time off from our crazy busy lives, at least for a little while, to clear our heads, visit with friends and family, go to the beach, have a backyard cookout, or simply lie in a hammock and read a book or take a good, long nap.

Summer Veggie Frittata

It’s also a time when i tend to get a little lazy because it’s so hot outside. Or because I actually have some time on my hands to just, well do nothing. Or sleep in a little longer.

Summer Veggie Frittata 5

Because I’m constantly cooking as a profession, the last thing I feel like doing on vacation is well, cooking. Even though I get to stay at my parent’s house with a huge kitchen and backyard patio that actually has a grill and some room to move. And I always have all these big plans to make all this delicious food when I’m here but really just want to do – well, not much. You know – relax a little bit. 🙂

Summer Veggie Frittata 3

I decided to make something easy for breakfast today. And healthy. All in one big pan. A Summer Veggie Frittata that’s full of spinach and onions and fresh zucchini with some shredded cheese that’s lovely and light and just tasty and good all around. Yes, I threw in a tablespoon or two of cooked bacon because I just can’t help myself but if you’re a vegetarian feel free to leave it out.

Summer Veggie Frittata 4

I think I could get used to these lazy Summer vacation days. Don’t you agree?

Summer Veggie Frittata

Prep Time: 15 minutes

Cook Time: 10 minutes

Total Time: 25 minutes

Yield: 4-6

Serving Size: 1 wedge

Ingredients

  • 2 tablespoons light cream or half and half
  • 1 teaspoon dill seasoning
  • kosher salt
  • freshly cracked black pepper
  • dash of red pepper flakes
  • 6 large eggs
  • 1-2 slices of cooked bacon, crumbled
  • 1 tablespoon olive oil or butter
  • 1/2 cup minced onion
  • 1 package frozen spinach, defrosted and drained well (or 2 cups fresh spinach leaves)
  • 1 cup shredded cheese (Jack, Cheddar, Mozzarella)
  • 1 small zucchini, sliced

Instructions

  1. Preheat broiler to high.
  2. Meanwhile, combine cream, eggs, salt, pepper, cooked bacon and seasonings in a mixing bowl, whisking well.
  3. Heat a medium-large ovenproof skillet over medium heat. Add oil or butter to the pan and saute onions for a few minutes until soft and translucent.
  4. Add spinach and cook for a few more minutes until heated through (or wilted if using fresh spinach).
  5. Pour the egg mixture into the pan and cook for about 5 minutes until eggs are slightly set.
  6. Sprinkle half of the cheese over the top evenly.
  7. Top the frittata with the zucchini slices over the egg and cheese mixture.
  8. Sprinkle the remaining cheese over the top and place in the oven.
  9. Broil for about 3-5 minutes until the top is lightly browned and cheese is melted.
  10. Remove from oven and cut into wedges.
  11. Serve with additional fresh veggies or a green salad.

Notes

You can also add a little extra protein by mixing in some cooked ham or sausage. Feel free to substitute the veggies by adding in summer squash, peppers, tomatoes, whatever you have on hand. Goes great with a green salad and a glass of white wine if you're in the mood!

Schema/Recipe SEO Data Markup by Yummly Rich Recipes
https://www.theartfulgourmet.com/2015/06/summer-veggie-frittata-time-to-relax/


Sunday Supper: Pan-Roasted Chicken w/ Rosemary & Caramelized Garlic | Roasted Lemon Asparagus Almondine


Rosemary Chicken AsparagusLast Sunday on a cold rainy night last week, I started craving some homey pan-roasted chicken. And since I had some fresh asparagus from the farmer’s market I wanted to make some roasted asparagus to go with.

I found a recipe on Food.com‘s website by Rachael Ray for Garlic Roasted Chicken with Rosemary and Lemon that looked pretty delicious and decided to make my own version by tweaking the recipe and the cooking method a little bit.

Pan-Roasted Rosemary Chicken

Rachael’s recipe uses boneless chicken breasts and lemon along with the rosemary and garlic, and is roasted in the oven for about 25 minutes. It’s a simple recipe but I wanted to change it up a bit by using boneless chicken thighs for a richer, meatier flavor, and I added some paprika and cayenne pepper for some extra zing and savory flavor. I started out by pan-searing the chicken and garlic cloves in a Rosemary-Garlic infused olive oil for 20 minutes until they got caramelized and browned, then added the rosemary and finished the dish in the oven for another 20 minutes or so until cooked through and a lovely, golden brown. Then I made a savory pan sauce made with chicken broth, wine, lemon juice and butter to top the chicken, giving it a silky luscious sauce to bathe in.

Roasted Lemon Asparagus Almondine

I also made some lovely roasted asparagus to go with it simply made with olive oil, salt and pepper, some fresh lemon juice, sliced toasted almonds and a dash of dill seasoning and lemon zest to give it some bright flavor at the end.

The result? Crispy, savory chicken with tons of roasted caramel-y flavor and a fresh, lemony side dish of spring green asparagus topped with crunchy almonds and a hint of dill. Perfect for a Spring Sunday Supper!

Sunday Supper: Pan-Roasted Chicken w/ Rosemary & Caramelized Garlic | Roasted Lemon Asparagus Almondine

Prep Time: 15 minutes

Cook Time: 30 minutes

Total Time: 45 minutes

Yield: Serves 4.

Ingredients

  • Pan-Roasted Chicken with Rosemary and Caramelized Garlic:
  • 2 tablespoons Rosemary Garlic infused olive oil
  • 4-5 boneless chicken thighs
  • 6-8 cloves of garlic, unpeeled
  • 2-3 sprigs of fresh rosemary
  • Sea salt and fresh ground black pepper, to taste
  • Pinch of cayenne pepper
  • Pinch of sweet paprika
  • 1/4 cup white wine
  • 1/2 cup chicken broth
  • 2 tablespoons fresh lemon juice
  • 2 tablespoons butter
  • Roasted Lemon Asparagus Almondine:
  • 1 bunch of fresh asparagus, thick woody stems trimmed
  • 2 tablespoons olive oil
  • Sea salt
  • White pepper
  • 2 tablespoons fresh lemon juice
  • 1 teaspoon fresh or dried dill seasoning
  • 1/2 cup unsalted almonds, thin sliced
  • 1 tablespoon lemon zest

Instructions

  1. Pan-Roasted Chicken w/ Rosemary & Caramelized Garlic:
  2. Preheat oven to 475 degrees and heat olive oil in a cast iron or large skillet.
  3. Season chicken thighs with salt and pepper, cayenne and paprika, and sear over high heat skin side down for about 2-3 minutes. Lower heat to medium-high, add the garlic cloves and rosemary sprigs; cook for another 10 minutes until golden brown.
  4. Turn off the heat, turn chicken over in the skillet, baste with some of the pan juices, and broil in the oven for another 10-12 minutes until chicken is crispy and cooked through.
  5. Turn chicken over once more (skin side up) and continue cooking for another 5 minutes or so.
  6. Remove chicken, garlic and rosemary sprigs from the skillet, reserving the drippings in the pan. Add chicken broth, white wine, lemon juice and bring to a boil, then reduce to a simmer until sauce has reduced by half. Swirl in the butter at the end to make a silky sauce. Serve sauce over the chicken and caramelized garlic.
  7. Roasted Asparagus Almondine:
  8. Preheat oven to 425 degrees.
  9. Wash and trim asparagus and place on a roasting sheet or in a baking dish.
  10. Drizzle with olive oil, sprinkle with salt and pepper, add lemon juice and dill. Add sliced almonds over the asparagus
  11. Roast in the oven for 7-10 minutes until asparagus and almonds are a toasty, golden brown. Sprinkle some additional lemon zest for garnish, if desired, and serve immediately with the Pan-Roasted Rosemary Chicken and Caramelized Garlic.
https://www.theartfulgourmet.com/2014/04/sunday-supper-pan-roasted-chicken-with-rosemary-and-caramelized-garlic-roasted-lemon-asparagus-almondine/

Rosemary Chicken and Asparagus