Pork Chops w/ Caramelized Pear & Ginger Sauce

Pork Chops w/ Caramelized Pear + Ginger Sauce

Hey guys! I’m so excited that Fall is finally here! I absolutely love Summer, but Fall cooking is one of my favorites with all the gorgeous produce, herbs, spices and warm flavors that come along with the season. 

Ingredients

I was invited to participate in the Keystone Pantry Allulose Blogger Recipe Challenge this year and decided to make a gorgeous recipe for Pork Chops with Caramelized Pear and Ginger Sauce.  

Pork Chops

I used some boneless pork chops which were sautéed in a skillet until lightly browned.

Caramel Sauce in the making

Then I made a simple caramel sauce using some Banyuls vinegar and Allulose (in place of regular white sugar) until it was a dark amber caramel color,

Pour in wine and broth

and added some white wine and chicken broth to make the base for the sauce.

Stir in ginger and cinnamon and pears

Next I simmered the sliced pears and ginger in the broth with a dash of cinnamon until they were soft and tender,Stir in cornstarch slurryand stirred in a cornstarch slurry to thicken the sauce and added a few sprigs of thyme for some fresh herb flavors. Pork Chops in Pear Ginger Sauce
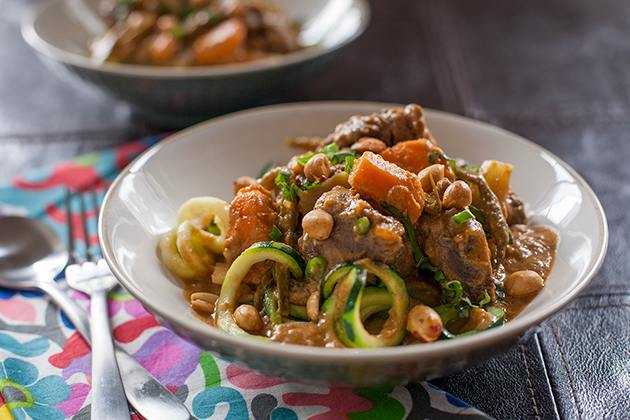
As a complimentary side dish, I sautéed butternut squash noodles with fresh garlic in some butter with a dash of lemon juice to serve with the pork chops and then drizzled the sauce over the top of the dish. OMG – it was absolutely delicious! (And sugar-free and low-carb to boot!)

Pork Chops with Caramelized Pear + Ginger Sauce

So what exactly is Allulose anyways? It is a rare natural sugar found in very small quantities in dates, dried figs, raisins and wheat, and also in other brown caramelized products such as caramel sauce, maple syrup and brown sugar. 

Keystone Pantry Allulose

It’s better for you than regular sugar and is a very low-calorie natural sweetener that is Non-GMO, Gluten Free, and works with Keto, Low-Carb, Paleo and Vegan diets. 

Allulose has the same chemical formula as fructose but because it isn’t metabolized by the body, it does not raise blood sugar or insulin levels (and studies show it can reduce blood sugar levels!) and has zero net carbs and only 21 calories per teaspoon.

It provides a taste and texture similar to sugar, and doesn’t have a bitter aftertaste like most non-sugar sweeteners. But, you will need to use a little more than regular sugar because it isn’t as sweet. It does have the same volume and browning characteristics as white sugar when used in baking, but browns faster than regular sugar so it may require a slightly lower temperature when cooking with it. It also comes in powdered/crystalline forms or as a liquid syrup.

For more inspiration and information about Allulose, check out Lang’s Chocolate and Keystone Pantry products on FacebookTwitterInstagram, and Pinterest.  #Keystonepantry #Alluloserecipe

Pork Chops w/ Caramelized Pear + Ginger Sauce

Pork Chops w/ Caramelized Pear & Ginger Sauce

Prep Time: 15 minutes

Cook Time: 20 minutes

Total Time: 35 minutes

Yield: 4

Serving Size: 1 pork chop with 1/4 pear ginger sauce

A gorgeous Fall dish of sautéed pork chops in a caramelized pear and ginger sauce is perfect for an easy weeknight dinner. Made with Keystone Pantry Allulose in place of regular sugar, this meal is gluten free, Paleo and low carb/Keto friendly and healthy.

Ingredients

  • 4 (4 ounce) boneless pork chops, 1 inch thick, trimmed
  • Garlic salt
  • Freshly ground black pepper
  • 1 tablespoon olive oil
  • 3 tablespoons Banyuls vinegar (or apple cider vinegar)
  • 3 tablespoons Keystone Pantry Allulose
  • 1 cup white wine
  • 1 cup low sodium chicken broth
  • 1 firm ripe pear (Bosc or Anjou), cored and cut into eighths
  • 1/4 cup fresh ginger, peeled and cut into thin julienne strips
  • 1/2 teaspoon ground cinnamon
  • 2 teaspoons cornstarch mixed with 2 teaspoons water (to make slurry)
  • 2 sprigs of fresh thyme, plus extra chopped for garnish

Instructions

  1. Heat olive oil in a large skillet over medium-high heat. Season pork chops with garlic salt and pepper and cook until browned and slightly cooked through, about 3 to 4 minutes per side. Transfer to a plate and keep warm with tented foil.
  2. Add the vinegar and Allulose to the skillet and stir to dissolve. Continue to cook over medium-high heat until a syrup forms and turns a dark caramel amber color, about 10-15 seconds (be careful not to burn!)
  3. Pour in the wine and bring to a simmer, stirring often. Add the chicken broth, pears, ginger and cinnamon and cook uncovered for about 5 minutes at a steady simmer until the pears are soft and tender.
  4. Add the cornstarch slurry mixture and stir, cooking for another few minutes until the sauce starts to thicken. Add the fresh thyme sprigs and reduce to the heat to low.
  5. Return the cooked pork chops to the pan (along with any juices) and toss with the sauce in the pan.
  6. Serve with the pear and ginger sauce on top of the pork chops alongside a vegetable dish and garnish with additional fresh thyme if desired.
https://www.theartfulgourmet.com/2018/09/pork-chops-w-caramelized-pear-ginger-sauce/

Pork Chops with Caramelized Pears + Ginger Sauce

Kung Pao Beef w/ Cauliflower Rice (Sugar + Gluten Free)

Kung Pao Beef

Kung Pao Beef w/ Cauliflower Rice

I recently was approached by Steviva to compete in the Sweetin It-Up Blogger Recipe Challenge and decided to make a sugar free, gluten free Kung Pao Beef with Cauliflower Rice. I love Asian food, but oftentimes it has many hidden sugars in the sauce, so I thought it would be cool to make this savory dish for the challenge.

Steviva Recipe Ingredients

Steviva has a wide range of stevia-based products and I chose to use Nectevia and Erysweet for my recipe to replace the normal sugar in the sauce. Erysweet is a pure, non-GMO erythritol that is naturally derived and can be substituted cup-for-cup for sugar in recipes. Nectevia is an organic blue agave nectar infused with premium 100% pure stevia extract – and has only 1/4 the calories, carbs and sugars of regular agave, or table sugar with a warm honey flavor.

Kung Pao Beef w/ Cauliflower Rice

Kung Pao is made with chicken or beef marinated in soy sauce, sesame oil, and rice wine, which is then sautéed in a wok on high heat with crunchy bell peppers, water chestnuts, garlic, ginger, green onions and hot chilies.

Kung Pao Beef w/ Cauliflower Rice

I made a sweet and spicy sauce made with more soy sauce, rice wine, Chinese black vinegar, chicken broth, Erysweet and Nectevia in the pan with the cooked meat and veggies and tossed in some spicy peanuts, which was thickened into a luscious sweet/spicy/savory pot of yum. To serve, I topped the dish with fresh cilantro and more crunchy peanuts along with some yellow cauliflower rice sautéed with soy sauce and sesame oil and some fresh cilantro tossed in to keep it gluten free.  Absolutely delicious without all the sugar and carbs!

Kung Pao Beef w/ Cauliflower Rice (Sugar + Gluten Free)

Prep Time: 20 minutes

Cook Time: 20 minutes

Total Time: 40 minutes

Yield: 4-6

Serving Size: 1 cup

Ingredients

  • MARINADE:
  • 1 3/4 pounds boneless beef sirloin
  • 1 tablespoon soy sauce
  • 2 tablespoons sesame oil
  • 1 tablespoon rice wine
  • 1 egg white, lightly beaten
  • 1/2 teaspoon kosher salt
  • 1/2 teaspoon freshly ground black pepper
  • KUNG PAO:
  • 2 tablespoons peanut oil
  • 4-6 dried red chilies
  • 1 tablespoon garlic, minced
  • 1/2 tablespoon ginger, grated (or ginger paste)
  • 1 teaspoon red chile flakes
  • 3 scallions, sliced on the bias, 1/2-inch pieces
  • 1/2 red bell pepper, sliced into strips
  • 1 can water chestnuts, sliced in half
  • 2 tablespoons soy sauce
  • 3 tablespoons rice wine
  • 1 tablespoon Chinese black vinegar (or balsamic)
  • 2 tablespoons Nectevia Original
  • 2 teaspoons Erysweet
  • 1 cup chicken broth
  • 1 tablespoon cornstarch mixed with 2 tablespoons water
  • 3/4 cup roasted spicy peanuts
  • 1/4 cup cilantro, chopped
  • Cauliflower rice sautéed with soy sauce, sesame oil and cilantro

Instructions

  1. MARINADE:
  2. Trim the fat from the steak all over and cut into 1-inch cubes. Combine the marinade ingredients in a large bowl and mix in the beef. Stir together to coat well, and place covered in the fridge for at least an hour to overnight.
  3. KUNG PAO:
  4. Heat the peanut oil in a wok or large sauce pan over medium heat, add chilies and cook for a minute until they begin to brown. Add garlic, ginger and cook for another minute. Turn heat up to high and add scallions, peppers, water chestnuts and chile flakes; saute for about 5 minutes until they begin to get soft and lightly browned. Add steak (remove from marinade and discard excess) and cook for about 3 minutes or so until beef begins to brown. Add soy sauce, rice wine, Chinese vinegar, Erysweet, Nectevia and chicken broth. Mix in the cornstarch, stirring well, to thicken the sauce. Toss in the roasted peanuts and serve over cauliflower rice with chopped cilantro, additional peanuts if desired.

https://www.theartfulgourmet.com/2017/10/kung-pao-beef-w-cauliflower-rice-sugar-gluten-free/

Kung Pao Beef w/ Cauliflower Rice

Hope you enjoy making this recipe – please let me know what you think if you made it in the comments below! And feel free to share this post on social media tagging #theartfulgourmet and #steviva with a link back to the original post on this blog.

For more info on Steviva products, check them out online and social media:

Website: https://www.steviva.com/

Facebook: https://www.facebook.com/steviva

Twitter: https://twitter.com/steviva

Instagram: https://www.instagram.com/stevivabrands/

Pinterest: https://www.pinterest.com/stevivabrands/

Disclaimer: This was a sponsored post by Steviva Brands and I received products to create recipes and photos for this post. All opinions, images, and text are my own. 

Red Curry Beef w/ Zucchini Noodles

   Red Beef Curry

Since the holidays are coming soon, we all know what THAT means..lots of holiday parties with food and drinks, and with that in mind, I’ve decided to commit to eating healthier and lighter the next few weeks.

Zucchini Noodles Action

I absolutely love my KitchenAid® Spiralizer Attachment that goes with my KitchenAid® Stand Mixer – and I’m so excited to make some healthier low-carb meals! It comes with five different blades for peeling, coring and slicing and is perfect for fresh fruits and vegetables. I love pasta and rice, but spiralized veggies are such a great substitute when I want to lighten up my recipes and eat low carb.

Red Curry Beef Zoodles

I thought a delicious comfort food dish with a healthy twist would be perfect for the cooler months, and decided to make a Red Curry  Beef with Zucchini Noodles.

Red Curry Beef ingredients

I used lots of fresh, organic ingredients: beef, sweet potatoes, onions, garlic and green beans, and then made a lovely curry sauce with coconut milk, red curry paste, fresh lime juice, fish sauce, some beef broth and a dash of Sriracha to spice it up.

Cutlery and Veggies

I used my Professional Series 3.5″ Paring Knife that came with the 7-piece Professional Series Cutlery set, for chopping my onions and garlic, Thai chilies and basil.

Chop beef into large chunks

The larger Chef’s knife was great for cutting up the large chunks of beef and sweet potatoes with its sturdier grip and large super sharp blade.

Add veggies to curry sauce

My heavy duty KitchenAid ceramic cast iron pot is perfect for making this dish – it cooks evenly and is large enough to make a large pot of curry or stew, and is ovenproof to 500 degrees!

Saute zucchini noodles

The KitchenAid spiralizer attachment is also easy to use! All you need to do is attach it to the KitchenAid mixer, and the spirals come right out perfectly cut. Then you just briefly cook them in a saucepan with some olive or peanut oil, season them with some salt and pepper.

Red Beef Curry

Top the #zoodles with this luscious and creamy curry – lots of great flavors and textures, sweet and spicy – all in one pot. Delish!

Red Beef Curry

This is such a great Winter comfort food dish to make and it’s so easy to make with all the right tools… You’ll definitely want to make this Red Curry Beef  Zucchini Noodles for dinner – tonight!

Red Beef Curry with Zucchini Noodles

Ingredients

  • INGREDIENTS
  • 3-4 medium zucchini
  • 2 1/2 pounds lean stewing beef, (chuck or round), cut into 1 1/2 inch chunks
  • 1 teaspoon Kosher salt
  • 1 teaspoon freshly ground black pepper
  • 3 tablespoons canola oil
  • 1 sweet onion, finely chopped
  • 4 garlic cloves, minced
  • 1/4 cup red curry paste
  • 2 cans (13.5 ounce) unsweetened coconut milk
  • 2 tablespoons Thai fish sauce
  • 2 tablespoons fresh lime juice
  • 2 tablespoons dark brown sugar
  • 1/4 cup beef broth
  • 1 tablespoon Sriracha hot sauce (optional)
  • 1 large handful French green beans, trimmed
  • 3 medium sweet potatoes, peeled and cut into medium chunks
  • 1 (8 ounce) can sliced bamboo shoots, drained
  • 3 tablespoons fresh basil, chopped or torn, for garnish
  • 1-2 Thai green chilies, sliced fine, for garnish
  • 1/2 cup peanuts, for garnish

Instructions

  1. Attach the KitchenAid® Spiralizer Attachment to your KitchenAid® Stand Mixer and choose your desired spiralizing blade. Attach the vegetable skewer to the Spiralizer and secure it to the zucchini. Move the spiralizing blade to the end of the zucchini and turn on the Stand Mixer to low (level 2) to make the spiralized zucchini noodles. Make sure you place a bowl underneath to catch the zucchini noodles as they fall. Set the noodles aside or keep them in the refrigerator until ready to serve.
  2. Cut the beef into 1 1/2 inch large chunks and place in a bowl. Sprinkle with kosher salt and freshly ground black pepper.
  3. Heat the oil over medium-high heat in your KitchenAid® 6.0Qt Cast Iron Cookware and brown the beef in two batches until lightly browned on all sides. Remove the beef from the pot and transfer to a bowl, set aside.
  4. Add the onion and garlic to the same pot and sauté over medium heat for about a minute. Add the curry paste, stirring into the onions and garlic, until lightly fragrant, for about 30 seconds. Add the coconut milk, and deglaze the pan, stirring up all the crispy brown bits with a wooden spoon. Stir in the fish sauce, lime juice, brown sugar, beef broth, Sriracha (if using) and bring the liquid to a boil.
  5. Add the green beans and sweet potatoes and stir into the liquid. Next add the browned beef back in and stir together well. Cover the pot, reduce the heat to low and let simmer for about an hour and 45 minutes. Add the bamboo shoots into the curry and let simmer for another 15 minutes.
  6. Meanwhile, heat a tablespoon of olive oil in your 10? Skillet from the KitchenAid® Stainless Steel 8-Piece Set over medium heat. Add the zucchini noodles, with some salt and pepper to taste, and sauté for a few minutes until the noodles are soft.
  7. Serve the noodles in bowls topped with the Red Beef Curry, garnishing with fresh chopped basil, sliced Thai green chilies and peanuts.

https://www.theartfulgourmet.com/2016/01/red-curry-beef-zucchini-noodles/

CLICK HERE TO VIEW STEP BY STEP VISUALS ON THE KITCHENTHUSIAST BLOG!

Red Beef Curry

Enjoy!