Celebrating Fall Flavors: Buckwheat Bucatini w/ Truffled Wild Mushroom Sauce

Buckwheat Bucatini with Truffled Wild Mushroom Sauce

Now that Fall is finally here, I’m so excited to start cooking comfort food again with flavorful seasonal ingredients like wild mushrooms, truffles, sage, prosciutto, toasted nuts, hearty greens, whole grains…yum. Fall is definitely my favorite season of the year when it comes to food 🙂

Buckwheat Bucatini

In particular, I love making homemade pasta and one-pot dishes, which is so easy to do with my KitchenAid® Gourmet Pasta Press that attaches to my KitchenAid® Stand Mixer.

KitchenAid Gourmet Pasta Press

It makes six different types of pasta in a snap: Bucatini, Spaghetti, Rotini, small and large Macaroni, and Rigatoni simply by swapping out a different disc for each pasta cut…how cool is that?!?

Sauce Ingredients

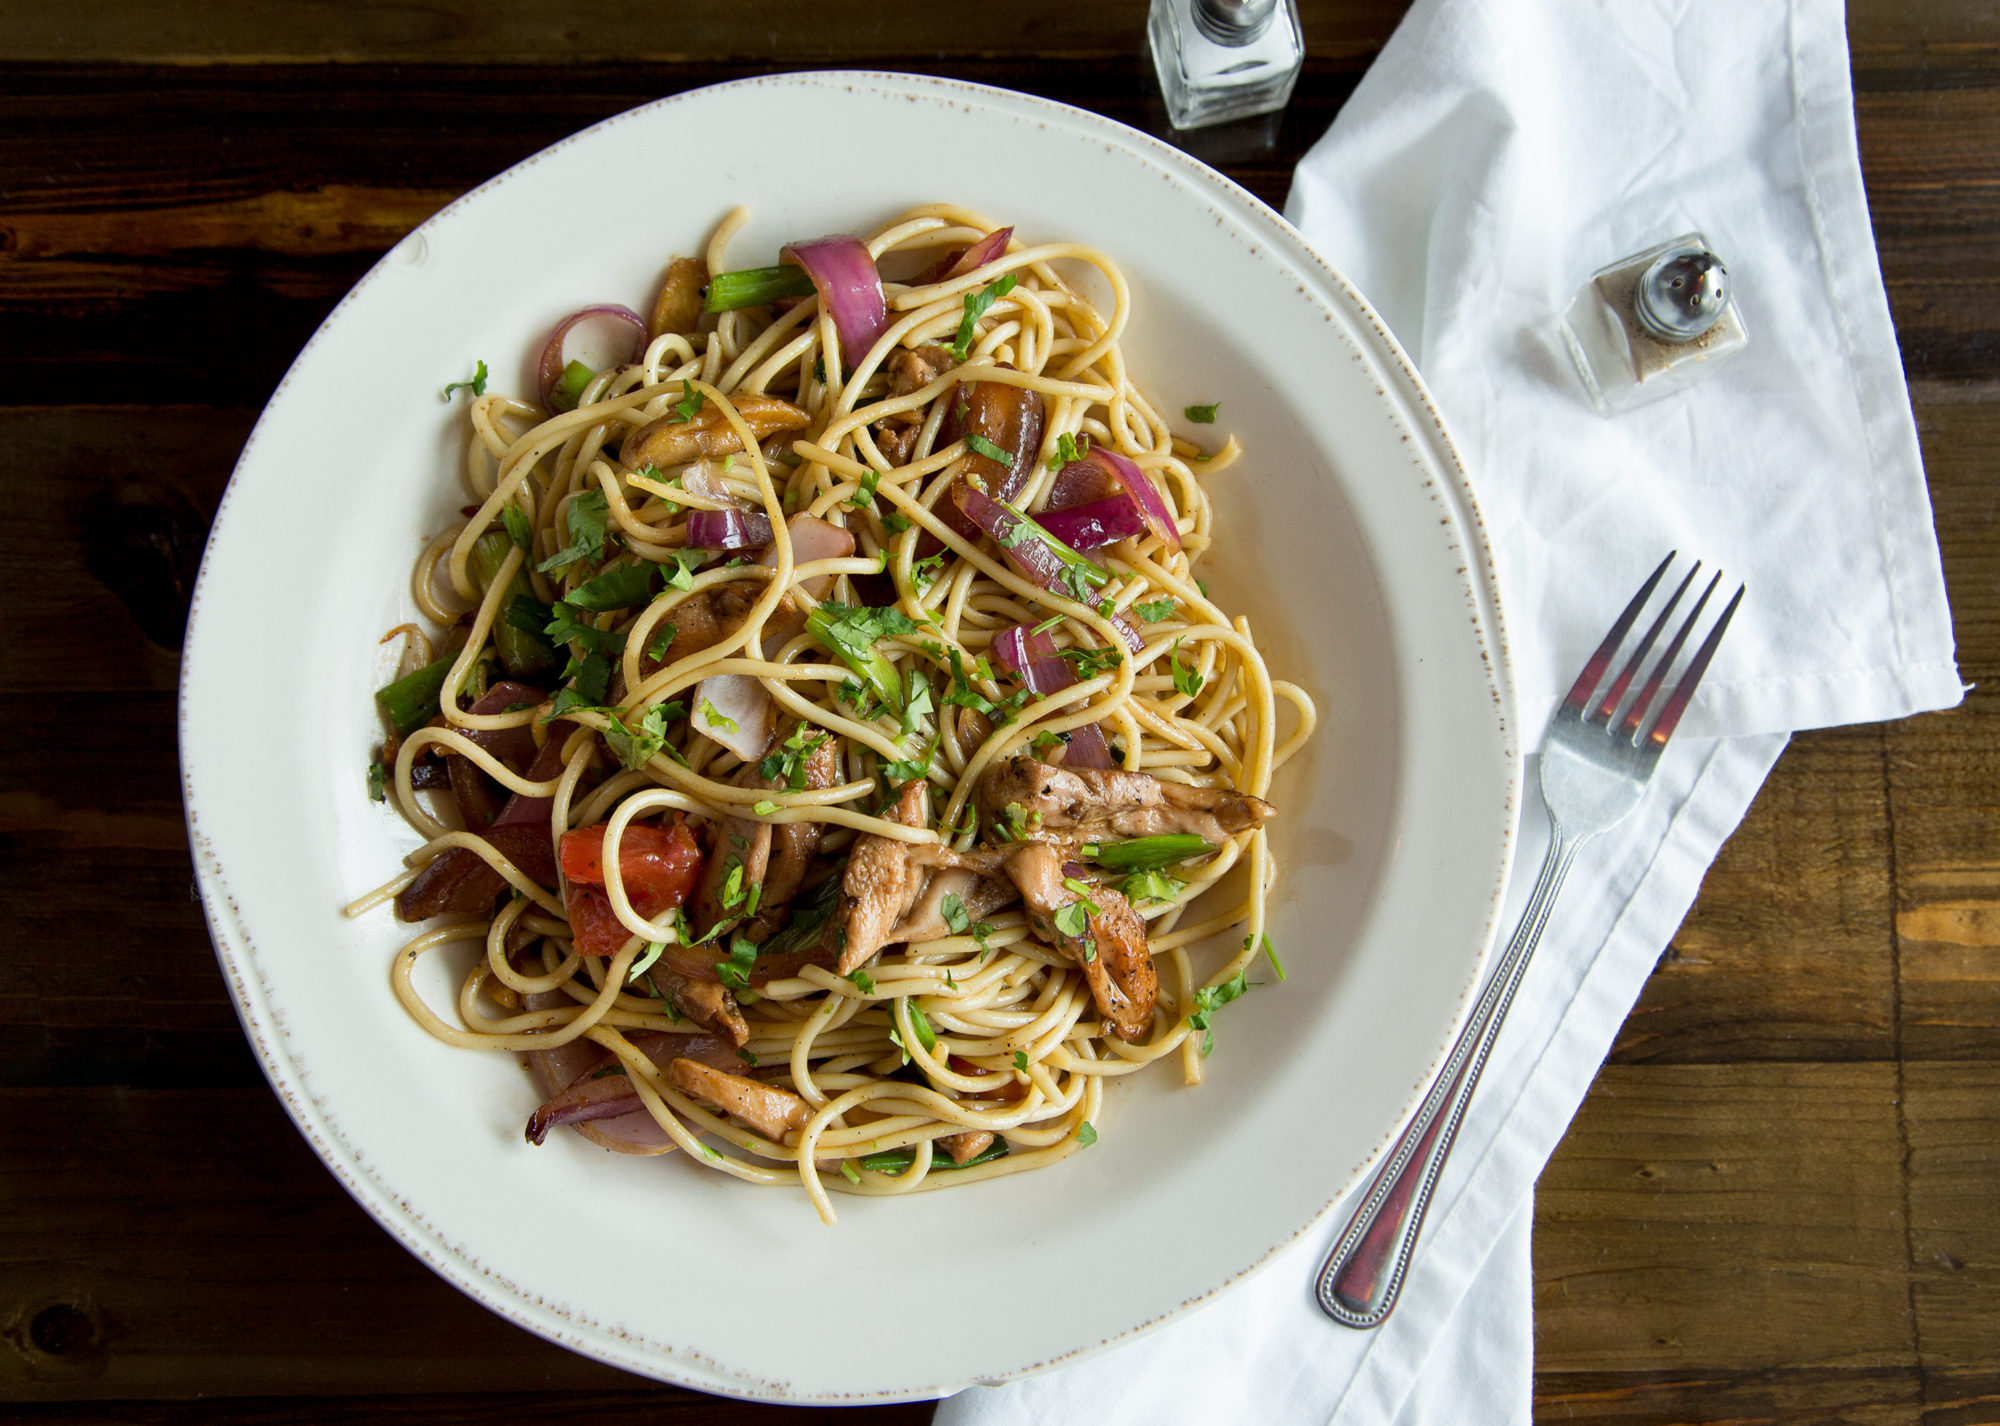
I decided to make a homemade Buckwheat Bucatini with Truffled Wild Mushroom Sauce, Prosciutto, Spinach, Pecans and Sage. I love Buckwheat pasta because of its rustic flavor, and it’s perfect for fall pasta dishes. Similar to the traditional Italian Pizzoccheri (flat buckwheat fettuccine), buckwheat noodles have hearty depth of flavor, and pair perfectly with warm fall flavors and ingredients like wilted greens, potatoes, cabbage, cheese and garlic.

Truffled Wild Mushroom Sauce

My pasta dish is topped with a luscious savory sauce made with crispy prosciutto and sage, nutty toasted pecans, garlic, shallots and wild mushrooms (portabella, porcini, oyster, beech, cremini, and shiitake) that I sautéed in olive oil and butter, then made into a luscious sauce with chicken broth and truffle oil.

Buckwheat Bucatini with Truffled Wild Mushroom Sauce

Celebrating Fall Flavors: Buckwheat Bucatini w/ Truffled Wild Mushroom Sauce

Yield: Serves 6.

This homemade pasta dish is topped with a luscious savory sauce made with crispy prosciutto and sage, nutty toasted pecans, garlic, shallots and wild mushrooms (portabella, porcini, oyster, beech, cremini, and shiitake) that I sautéed in olive oil and butter, then made into a luscious sauce with chicken broth and truffle oil.

Ingredients

  • Buckwheat Pasta Dough
  • Ingredients:
  • 1 cup buckwheat flour
  • 1 cup bread flour
  • 1 teaspoon fine sea salt
  • 1 teaspoon garlic pepper
  • ¼ cup hot water
  • 2 large eggs, room temperature
  • Method:
  • To make the fresh Bucatini pasta, measure out equal parts buckwheat and cake flour, sea salt and garlic pepper; blend together in your KitchenAid 14-cup Food Processor. Then beat the eggs into the hot water and add to the flour mixture through the tube with the food processor running, and turn it off. Give the dough about ten 3-second pulses until it gathers into a ball and clears the side of the bowl.
  • Then lightly knead the dough on a work surface for a couple of minutes until it’s smooth and supple, and wrap the disk in plastic film to rest for about 20 minutes before cutting into quarters and using the pasta press.
  • To make the buckwheat Bucatini, you need to attach your KitchenAid Gourmet Pasta Press (with the Bucatini pasta cutter inserted) to your KitchenAid Artisan Stand Mixer by unscrewing the black knob and removing the front silver cap. Pop in the attachment and secure it tightly with the knob until it stays in place.
  • Remove the dough from the plastic wrap and press it out on to a floured work surface, then cut the pasta dough into 3 or 4 portions. Turn your stand mixer on the highest setting (speed 10), and slowly feed walnut-sized balls of dough into the hopper; dough should self-feed through the auger – just wait until the auger is visible before adding the next piece. Use the combo tool to push dough only if the dough becomes caught and no longer self-feeds.
  • Once the dough starts coming through the bottom of the press, use the attached cutter to cut pasta at desired length as it exits the press (for Bucatini approx. 9.5 inches long).
  • Separate the pasta after extrusion, and place long noodles on a drying rack or in a single layer on a tea towel placed on a baking sheet or flat surface. Dry the pasta for about 30 minutes, turning them occasionally.
  • Next, bring some salted water to a boil in your KitchenAid Stainless Steel Stockpot with Strainer and cook the fresh pasta for about 3-4 minutes.
  • Drain and toss into your KitchenAid Ceramic Mixing Bowl with a little olive oil and set aside while you prepare the pasta sauce.
  • Makes about 1 pound of fresh pasta, cooked. You can also double the recipe and freeze a portion of it to use later.
  • ------
  • PHOTO: PastaHero1.jpg
  • Truffled Wild Mushroom Sauce with Prosciutto, Spinach, Pecans and Sage
  • Ingredients:
  • 3 tablespoons extra-virgin olive oil, divided
  • 3 tablespoons chilled butter, divided
  • 6 thin slices aged Prosciutto de Parma, torn into large pieces
  • 1 cup pecans, coarsely chopped
  • 12 whole fresh sage leaves
  • 2 pounds assorted fresh wild mushrooms (Portabella, Porcini, Oyster, Beech, Cremini, and Shiitake), sliced
  • 2 cloves fresh garlic, minced
  • 2 large shallots, minced
  • 1 cup fresh baby spinach leaves
  • 2 cups low-sodium chicken broth
  • 1 teaspoon black truffle oil
  • Sea salt and garlic pepper, to taste
  • ¾ cup freshly grated Parmesan cheese

Instructions

  1. To make the Truffled Wild Mushroom Sauce with Prosciutto, Spinach, Pecans and Sage, begin by prepping your fresh ingredients (shallots and garlic) on your KitchenAid Wood Cutting Board. Measure out the other ingredients (prosciutto, sage, wild mushrooms, spinach, chicken stock, olive oil, butter, truffle oil, and grated Parmesan cheese) in small bowls and set aside.
  2. Heat a tablespoon of olive oil in your KitchenAid Anodized Nonstick 12” skillet over medium-high heat, and cook the prosciutto in batches for a few minutes until crispy and browned, drain on paper towels and set aside.
  3. Add the pecans to the skillet and toast for a few minutes until lightly browned with a nutty aroma (being careful not to burn); remove nuts from pan and set aside.
  4. Add a tablespoon of butter to the skillet and sauté the sage leaves until crisp, about 1 minute per side. Transfer to paper towels.
  5. Heat remaining 2 tablespoons of olive oil and 2 tablespoons of butter in the same pot over medium-high heat. Add the mushrooms, shallots, garlic and sauté until mushrooms are brown and liquid evaporated, about 10 minutes. Add the spinach and sauté for another 2 minutes until wilted and transfer mixture to a mixing bowl.
  6. Pour in the chicken stock to the same pot and bring the liquid to a boil. Scrape up the browned bits and cook until liquid is reduced by half, about 7 minutes. Remove from the heat and add truffle oil, mushroom mixture, cooked prosciutto, pecans and sage. Mix together well, season with sea salt and garlic pepper to taste.
  7. Serve the cooked bucatini pasta tossed with the sauce and garnish with shaved Parmigiano-Reggiano cheese.
  8. Sauce can be made up to 2 hours ahead; let stand at room temperature.
https://www.theartfulgourmet.com/2016/10/buckwheat-bucatini-w-truffled-wild-mushroom-sauce/

I’d love to hear how you would use the KitchenAid Pasta Press and what recipes you would make! Share your take on my Buckwheat Bucatini & Truffled Wild Mushroom Sauce recipe on KitchenAid’s Instagram page using #MadeWithKitchenAid for a chance to be featured.

Cheesy Baked Pasta w/ Sausage & Summer Veggies

Cheesy Baked Pasta with Sausage and Summer Veggies

Ah, it’s almost the end of Summer and I keep thinking, where has it gone? Along with Summer comes lots of fresh veggies like zucchini, bell peppers, mushrooms and yellow squash that I just can’t get enough of!

Colavita

I recently received a lovely care package from my client Colavita, who sent me some delicious pasta, sauces, olive oils and vinegars to sample, which inspired me to make this Cheesy Baked Pasta with Sausage and Summer Veggies. 

Cheesy Baked Pasta with Sausage and Summer Veggies

It’s a tasty and healthy twist on traditional Baked Ziti, using Colavita Fusilli pasta with sweet Italian sausage and lots of colorful summer veggies like zucchini, squash, bell peppers, mushrooms, onions and garlic. I sautéed everything in Colavita Extra Virgin olive oil with a splash of Colavita Chardonnay White Balsamic vinegar for some extra sweet and tangy flavor.

Cheesy Baked Pasta with Sausage and Summer Veggies

I used their Colavita Tomato Basil sauce mixed in to the pasta and veggies along with fresh oregano and basil. AND it has three (3!!) cheeses: ricotta, parmesan/asiago and mozzarella to make it super creamy and cheesy – all baked into a big pot of bubbly goodness.

Cheesy Baked Pasta with Sausage and Summer Veggies

Look. At. This. Cheesy Baked Pasta Goodness. YUM.

Cheesy Baked Pasta with Sausage and Summer Veggies

It’s the perfect dish for a quick and healthy weeknight dinner – and is great served with a green salad and some crusty Italian bread (dipped in Colavita olive oil and vinegar of course!) Enjoy!

Cheesy Baked Pasta w/ Sausage and Summer Veggies

Prep Time: 30 minutes

Cook Time: 30 minutes

Total Time: 1 hour

Yield: 6-8

This is a tasty and healthy twist on traditional Baked Ziti, using Colavita Rotini pasta with Italian Sausage and lots of colorful summer veggies like zucchini, squash, mushrooms, onions and garlic! It also features Colavita Tomato Basil sauce mixed with three cheeses: ricotta, parmesan/asiago and mozzarella to make it super creamy and cheesy baked into a big pot of bubbly goodness. Perfect for a quick weeknight dinner served with a green salad and crusty Italian bread.

Ingredients

  • 1 pound Colavita Fusilli pasta, uncooked
  • 1 pound sweet Italian sausage, ground
  • 2 tablespoons Colavita Extra Virgin olive oil, divided
  • 1 tablespoon Colavita Chardonnay White Balsamic vinegar
  • 1 cup yellow squash, chopped
  • 1 cup zucchini, chopped
  • 1 cup mushrooms, chopped
  • 1 red bell pepper, chopped
  • 3 garlic cloves, minced
  • 1-16 ounce jar Colavita Tomato Basil sauce
  • 1 cup mozzarella cheese, shredded
  • 1 cup Parmesan/Asiago cheese, grated
  • 1 cup part-skim ricotta cheese
  • 1 large egg, beaten
  • 2 tablespoons fresh basil, chopped
  • 2 teaspoons fresh oregano, chopped
  • 1 teaspoon sea salt (add more to taste)
  • 1/2 teaspoon freshly ground black pepper (add more to taste)
  • 1/2 teaspoon red pepper flakes

Instructions

  1. Cook pasta according to package directions (about 9 minutes for al dente), drain.
  2. Preheat oven to 400 degrees F.
  3. Heat a large skillet over medium-high heat and add one tablespoon of olive oil to the pan. Cook sausage until no longer pink, drain fat and set aside.
  4. Add additional tablespoon of olive oil to the pan, and add squash, zucchini, mushrooms and bell pepper. Saute for 5-7 minutes until soft. Add minced garlic and balsamic vinegar and cook for another minute or two. Add the cooked sausage back into the pan.
  5. Stir in the tomato sauce, 1/2 cup of mozzarella and 1/2 cup of Parmesan/Asiago cheese and reduce heat to medium-low. Cover and cook for another 5 minutes until cheese is melted.
  6. Meanwhile, add the ricotta cheese to a mixing bowl and stir in beaten egg, fresh herbs, salt, pepper and red pepper flakes.
  7. Place the cooked pasta in a large pot and add the sausage-veggie-tomato sauce mixture, stirring well. Fold in the ricotta-egg-herbs mixture until thoroughly combined.
  8. Spoon the pasta mixture into an 8x8 square glass or ceramic baking dish. Sprinkle with remaining mozzarella and Parmesan/Asiago cheese evenly over the top.
  9. Bake at 400 degrees F for 15 minutes until cheese is bubbly and browned.
  10. Let cool for a few minutes, serve hot with a green salad and crusty Italian bread.

Notes

You can also substitute Colavita penne, shells, farfalle or ziti for the fusilli pasta.

Schema/Recipe SEO Data Markup by Yummly Rich Recipes
https://www.theartfulgourmet.com/2016/08/cheesy-baked-pasta-w-sausage-summer-veggies/

Cheesy Baked Pasta with Sausage and Summer Veggies

Cheesy Baked Pasta with Sausage and Summer Veggies

Colavita has a great line of Italian gourmet food, olive oils, vinegars, pastas,  condiments and other specialty foods, which makes them one of my favorite brands for quality Italian cooking.

Check out their Facebook page, Twitter page, Pinterest and Instagram pages for more great recipes and cooking ideas!

Note: I received complimentary products from Colavita but was not compensated for this post. All photos, copy, recipes and opinions are my own. Please do not share, distribute or use any content without my permission.

Homemade Spring Fettuccine with Pancetta, Peas & Asparagus

PastaHero1

Spring is finally here in full bloom, and I’m so excited to cook with fresh, seasonal ingredients! One of my favorite pasta dishes to make for spring is this tasty and fresh  Homemade Spring Fettuccine with Pancetta, Peas & Asparagus. 

PrepFreshIngredients

It features homemade fresh spinach and egg fettuccine made with flour, eggs and olive oil, topped with crispy pancetta, fresh scallions, garlic, baby green peas and asparagus in a tasty parmesan cream sauce.

FoodProcessor

You simply make the dough in your KitchenAid 14-cup food processor,

CutDough

knead it and cut it into a few pieces,

RollPasta

then use the KitchenAid pasta attachment to roll it out the pasta sheets

CutFettuccine2

and cut into lovely fresh fettuccine

PastaNests

AddBrothCream

served with a gorgeous Parmesan cream sauce with fresh veggies all tossed around with the pasta and cheese right in the pan.

PastaHero2

It’s so delicious and easy to make and tastes like Spring in a bowl!

Homemade Spring Fettuccine with Pancetta, Peas & Asparagus

Yield: Serves 6 to 8.

This Spring-forward recipe features homemade fresh spinach and egg fettuccine made with flour, eggs and olive oil, topped with crispy pancetta, fresh scallions, garlic, baby green peas and asparagus in a tasty parmesan cream sauce. It's light, easy to make and totally delicious!

Ingredients

  • Basic Egg Pasta Dough:
  • 1 ½ cups all-purpose flour
  • 2 large eggs
  • Generous pinch of sea salt
  • 1 tablespoon of olive oil, optional
  • Spinach Pasta Dough:
  • 1 ½ cups all-purpose flour
  • 2 large eggs
  • 1/3 package frozen chopped spinach, defrosted and drained
  • Generous pinch of sea salt
  • 1 tablespoon of olive oil, optional
  • Pancetta, Peas and Asparagus Parmesan Cream Sauce:
  • Sea Salt for pasta water
  • 4 ounces Pancetta (Italian-style bacon), cubed
  • 4 scallions, trimmed and sliced length-wise
  • 2 cloves fresh garlic, minced
  • 2 tablespoons extra-virgin olive oil
  • ½ cup shelled fresh peas, blanched or frozen baby peas, defrosted
  • 6-8 stalks fresh asparagus, trimmed and halved
  • 2/3 cup chicken stock, low sodium
  • ½ cup heavy cream or half and half
  • ½ pound fresh egg fettuccine pasta
  • ½ pound fresh spinach fettuccine pasta
  • ¾ cup freshly grated Parmesan cheese
  • 2 to 3 tablespoons fresh parsley, chopped, for garnish
  • Freshly ground black pepper, for garnish

Instructions

  1. Basic Egg Pasta Dough:Place the eggs in KitchenAid 14-cup food processor and pulse to beat. Add 1 cup of the flour, salt and olive oil and process on speed 2, adding more flour until a ball forms on the blade. If you add too much flour, the dough will break into pellets. If this happens, turn the mixture on to a pastry board and gather it into a ball, adding a touch of water, if necessary. If the dough becomes too soft, knead it on the board, adding more flour. Knead the dough until smooth and elastic, 5 to 8 minutes then cover with plastic wrap and let it rest for about 20 minutes until ready to roll and cut with the pasta attachment.
  2. Divide dough into 3 or 4 pieces and process with the KitchenAid pasta roller until pasta sheets are flattened to desired thickness, starting with setting 1, processing several times up to setting 3 or 4. Next, feed the dough sheets through the KitchenAid fettuccine pasta cutter and toss fresh pasta with flour or cornmeal to dry, covered with plastic wrap until ready to cook.
  3. Once ready to cook, bring a large pot of salted water to a boil, and cook the fresh pasta for 2 to 3 minutes, until the pasta floats to the top. Drain and toss with a small amount of olive oil to avoid pasta from sticking together, while preparing Pancetta, Peas and Asparagus Parmesan Cream Sauce (recipe follows).
  4. Makes about ½ pound. You can also double the recipe for a full pound and freeze a portion of it to use later.
  5. Spinach Pasta Dough:
  6. Place the eggs in your KitchenAid 14-cup food processor and pulse to beat. Add 1 cup of the flour, spinach, salt and olive oil and process on speed 2, adding more flour until a ball forms on the blade. If you add too much flour, the dough will break into pellets. If this happens, turn the mixture on to a pastry board and gather it into a ball, adding a touch of water, if necessary. If the dough becomes too soft, knead it on the board, adding more flour. Knead the dough until smooth and elastic, 5 to 8 minutes then cover with plastic wrap and let it rest for about 20 minutes until ready to roll and cut with the pasta attachment.
  7. Divide dough into 3 or 4 pieces and process with the KitchenAid pasta roller until pasta sheets are flattened to desired thickness, starting with setting 1, processing several times up to setting 3 or 4. Next, feed the dough sheets through the KitchenAid fettuccine pasta cutter and toss fresh pasta with flour or cornmeal to dry, covered with plastic wrap until ready to cook.
  8. Once ready to cook, bring a large pot of salted water to a boil, and cook the fresh pasta for 2 to 3 minutes, until the pasta floats to the top. Drain and toss with a small amount of olive oil to avoid pasta from sticking together, while preparing Pancetta, Peas and Asparagus Parmesan Cream Sauce (recipe follows).
  9. Makes about ½ pound. You can also double the recipe for a full pound and freeze a portion of it to use later.
  10. Pancetta, Peas and Asparagus Parmesan Cream Sauce:
  11. Bring a large pot of salted water to a boil over high heat. Cook the fresh egg pasta for about 2 to 3 minutes and drain. Cook the fresh spinach pasta for about 2 to 3 minutes and drain. Toss lightly with olive oil and set aside while making sauce.
  12. Prep the fresh ingredients (trim and slice scallions length-wise into thin strips, mince garlic, measure out peas, trim and halve fresh asparagus, chop parsley) with your KitchenAid paring knife and Chef’s knife and place on your KitchenAid Bamboo Cutting Board.
  13. Measure out the other ingredients (chicken stock, cream, and grated Parmesan cheese) in small bowls and set aside.
  14. Heat your KitchenAid Copper Core large skillet over medium-high heat, cook pancetta for a few minutes until crispy and browned, drain and set aside.
  15. Drain the fat from the skillet and add the olive oil and heat over medium heat. Add the scallions and cook until wilted about 2 minutes. Scatter in the peas and asparagus and cook until just tender, about 3 more minutes. Add the garlic and cook for another minute.
  16. Pour in the chicken stock and bring the liquid to a boil. Reduce the sauce to a simmer and cook until liquid is reduced by half.
  17. Add the heavy cream or half and half, and continue to simmer until liquid thickens a bit, about 2 to 3 minutes.
  18. Stir the cooked pasta with a little olive oil, and add it directly to the sauce in the large skillet, stirring to coat the pasta with the sauce.
  19. Cook over high heat until liquid is reduced to make a creamy sauce. Remove from the heat and toss in the grated Parmesan cheese, and garnish with fresh parsley and freshly ground black pepper, serving immediately in warm bowls.
https://www.theartfulgourmet.com/2016/04/homemade-spring-fettuccine-pancetta-peas-asparagus/

Chicken, Spinach & Mushroom Fettuccine Alfredo

Chicken Spinach Mushroom Alfredo Fettuccine

Chicken Spinach Mushroom Fettuccine


I made myself a pledge to focus on being healthier and happier since the New Year has started… getting more sleep, balancing work and life better, focusing on my business and my brand with a revived passion, reaching out to friends and family more often, traveling more, eating healthier and getting more walking around the city in, and just choosing to be happy every day, no matter what. NO EXCUSES.

Chicken Spinach Mushroom Fettuccine


BUT, see the thing is…I hate diets. They never last (at least not for long), and I slowly grow tired of counting calories and feeling deprived and end up eating like a maniac and ruining all the good i just did by torturing myself on the diet in the first place. So I’ve decided to go in a different direction by simply cutting sugar out of my diet, eating more healthy lean proteins and fresh veggies and cutting DOWN on carbs, not fully out. It seems to lessen the pain of a diet and I truly feel better and am more conscious of what I eat by tracking the amount of carbs I’m taking in.  So far, so good. 

Chicken Spinach Mushroom Fettuccine

So I decided I wouldn’t fully deprive myself of the carb-laden pasta dishes I crave in the Winter and that I’ve been missing out on, and made a Chicken, Spinach, Mushroom & Bacon Fettuccine Alfredo that’s absolutely to die for. I used some lower-carb fettuccine pasta (Carba-Nada, which I got on Amazon for $10 and it only has 17 grams of carbs in 1.5 cups of pasta...LOVE IT). I sautéed some chicken breasts, shallots, garlic, bacon and added some spinach and mushrooms to make the base for the pasta. Then I made a delicious Alfredo sauce with half and half, unsalted butter, whipped cream cheese and shredded Parmesan cheese, thinned down with some water to make a semi-healthier version of this luscious, velvety (and usually super rich and fattening) pasta sauce.

I hope you’re getting through the Winter OK yourselves, and if not, whip up a batch of this deliciousness. Guilt-Free. You’ll be just fine, I promise. 😉

Chicken Mushroom Spinach Fettuccine

Chicken, Spinach & Mushroom Alfredo Fettucine

Ingredients

  • CHICKEN, SPINACH & MUSHROOM PASTA
  • 1 package fresh or dried fettuccine pasta
  • 4 slices center cut bacon
  • 1-2 tablespoons olive oil
  • 1 pound chicken breasts (3-4 pieces)
  • 6 tablespoons butter, divided
  • 2 shallots, sliced thin
  • 3 garlic cloves, minced
  • 1 package frozen spinach (or a few handfuls fresh baby spinach)
  • 8 ounces fresh mushrooms, sliced (baby bella, porcini, chanterelle)
  • Kosher salt and pepper, to taste
  • ALFREDO SAUCE
  • 4 tablespoons unsalted butter
  • 1/3 cup heavy cream or half and half
  • 3/4 cup whipped cream cheese
  • 5 ounces shredded parmesan cheese
  • freshly ground black pepper, to taste
  • 1/4 cup - 1/2 cup water, as needed for desired sauce consistency

Instructions

  1. CHICKEN, SPINACH & MUSHROOM PASTA
  2. Cook pasta in salted boiling water according to package directions, drain and set aside. Reserve some of the pasta water to add back in to the pasta sauce later on, for consistency.
  3. Meanwhile, in a large saute pan, cook bacon over medium heat until crispy and cooked through. Drain on paper towels, crumble and set aside.
  4. Rinse and pat dry chicken breasts, brush olive oil on and season with kosher salt and pepper to taste.
  5. Drain bacon grease from saute pan and raise heat to medium high. Saute chicken breasts, about 6 minutes per side, until a nice browning occurs and chicken is cooked through. Set aside, and keep warm with tented foil. (NOTE: You may also grill the chicken if desired at the same cooking time).
  6. In the same pan, add 2 tablespoons of butter and saute shallots for a few minutes. Add garlic and cook for another 30 seconds. Add sliced mushrooms and saute for another few minutes until they are soft.
  7. Defrost frozen spinach in microwave for 5 minutes, drain and then add spinach (you can also add fresh spinach now) to the pan with the shallots, garlic and mushrooms. Cook for a few minutes until all cooked through, add crumbled bacon and season with freshly ground black pepper. Turn heat to low and keep warm while making the Alfredo sauce.
  8. ALFREDO SAUCE
  9. In a medium saucepan, melt butter, cream and whipped cream cheese over medium-low heat.
  10. Add shredded Parmesan cheese and season with freshly ground black pepper. If sauce seems too thick, add some of the reserved pasta water to the sauce to thin it down to desired consistency.
  11. Pour the Alfredo sauce into the pan with the spinach and mushroom mixture, slice the chicken into slices or chunks and add to the sauce and stir together well.
  12. Serve hot over the pasta (or you can mix the pasta into the sauce ahead of serving, whatever you prefer).
  13. Serves 4-6.
Schema/Recipe SEO Data Markup by Yummly Rich Recipes
https://www.theartfulgourmet.com/2016/02/chicken-spinach-mushroom-fettuccine-alfredo/

The Most Popular Posts of 2015 :: Happy New Year 2016!

2015 Happy New Year

So here it is, the last day of the year 2015..oh how time flies, and so much has happened! I’m so thankful for all the wonderful opportunities that have come into my life and the lessons learned along the way.  Here are some of my Top / Most Popular posts from The Artful Gourmet blog this year — and wishing everyone a safe and Happy New Year 2016!

Neapolitan Pizza

The Secrets to Making Neapolitan Pizza like a Master Pizzaiolo –https://www.theartfulgourmet.com/2013/08/11/neapolitan-pizza-making-with-the-pros/

Crab Salad

Refreshingly Light Get in My Bikini Salad – https://www.theartfulgourmet.com/2012/05/21/refreshingly-light-get-in-my-bikini-crab-salad/

Beef Stroganoff

Beef Stroganoff – https://www.theartfulgourmet.com/2011/11/02/classic-comfort-food-beef-stroganoff/

Homemade Rustic Pizzas

Homemade Rustic Pizzas: Chicken, Spinach, Garlic & Sundried Tomato Pizza & Pepperoni, Ham & Sautéed Veggies Pizza – https://www.theartfulgourmet.com/2013/10/02/homemade-rustic-pizzas-chicken-spinach-garlic-sundried-tomato-pizza-pepperoni-ham-sauteed-veggie-pizza/

holiday dinner menu

An Intimate Gathering Holiday Dinner Party Menu: https://www.theartfulgourmet.com/2010/11/28/an-intimate-gathering-holiday-dinner-party-menu/

Chicken French & Lemon Broccolini

Rochester-Style Chicken French & Lemon Broccolini – https://www.theartfulgourmet.com/2013/03/17/rochester-style-chicken-french-lemon-broccolini/

Mario Lopez & Avocados from Mexico

Food Styling for Mario Lopez and Avocados from Mexico – https://www.theartfulgourmet.com/2013/12/17/food-styling-mario-lopez-avocados-mexico-nbc-live-bethenny-shows/

pasta fagioli soup

Big Pot O’Goodness: Pasta Fagioli – https://www.theartfulgourmet.com/2011/12/11/big-pot-o-goodness-pasta-fagioli/

Truffle-Pancetta-3Cheese-Pasta

Truffled 3-Cheese Pasta with Pancetta and Garlic – https://www.theartfulgourmet.com/2011/10/25/crazy-good-truffle-oil-pancetta-three-cheese-pasta/

BDTChowder

Black Dog Tavern’s Quahog Chowderhttps://www.theartfulgourmet.com/2011/09/24/a-taste-of-marthas-vineyard-the-black-dog-taverns-quahog-chowder/

Asparagus-Garlic-3-Cheese Tart

Baby Asparagus, Garlic & Three Cheese Tart – https://www.theartfulgourmet.com/2013/11/24/asparagus-three-cheese-tart/

Spicy Cajun Chili
Spicy Cajun Chilihttps://www.theartfulgourmet.com/2013/11/09/spicy-cajun-chili/

Shrimp Scampi Pasta

Shrimp Scampi Pasta with Lemon Butter Sauce – https://www.theartfulgourmet.com/2012/05/13/shrimp-scampi-pasta/

Spinach Artichoke Pizza with Cauliflower Crust

Spinach Artichoke Pizza with Cauliflower Crusthttps://www.theartfulgourmet.com/2013/06/03/spinach-artichoke-ricotta-pizza-with-parmesan-garlic-cauliflower-crust/

Recipes Worth Sharing Cookbook

Recipes Worth Sharing: A Collection of Favorite Regional Recipes – https://www.theartfulgourmet.com/2012/03/21/recipes-worth-sharing-a-collection-of-favorite-regional-recipes/

Sun Noodle Ramen Lab

Top Ten {Things I Love} :: Spring 2013 – https://www.theartfulgourmet.com/2013/04/07/top-ten-things-i-love-spring-2013/

Southern Feast

A Dose of Southern Comfort & Down-Home Recipes – Part 1 – https://www.theartfulgourmet.com/2012/05/08/a-dose-of-southern-comfort-down-home-recipes-part-1/

spicy fish tacos and wine

Cool off with some Spicy Fish Tacos & Summer Wine Pairings – https://www.theartfulgourmet.com/2012/06/01/cool-off-with-some-spicy-fish-tacos-summer-wine-pairings/

Hope you enjoyed these posts and looking forward to sharing more fun stories with you in the New Year!

Classic Comfort Food :: Beef Bourguignon

Beef Bourguignon

So Old Man Winter is finally back in town, despite the crazy warm weather we’ve been having lately in New York City. Temperatures drop and there’s nothing better than a big pot of comfort food and a bottle of red to make a girl happy, right? Sometimes it’s the simple things in life that make everything OK…(*sigh). So I did just that this weekend, and made a huge batch of some classic Beef Bourguignon..you know, the classic French braised beef stew with veggies and red wine that Julia Child made famous.

Beef Bourguignon

I made it in a large 6-quart ceramic Dutch oven (KitchenAid brand is my fav!), and it’s chock full of savory deliciousness – sautéed pancetta, braised beef, shallots, garlic and carrots sautéed into a roux with some flour, flambeed brandy (my secret ingredient!), a whole bottle of red (yes, really!) and some beef stock, along with a bouquet garni of fresh herbs (1 bay leaf, 2 sprigs of fresh thyme, 3 sprigs of rosemary wrapped in cheesecloth) slow cooked in the oven for 2 hours.

Beef Bourguignon

The finishing touch of mushrooms and caramelized Cippolini onions sautéed in butter are added in at the end to add tons of buttery, savory flavor to the stew. YUM.

Beef Bourguignon

I don’t think I’ve ever tasted anything so delicious in my life – and I’m quite sure if Julia was still alive, I would make her damn proud, if I do say so myself.

Beef Bourguignon

It’s a flavor bomb in a bowl, my friends, and perfect for a lovely  holiday dinner party for a crowd. Serve in big bowls garnished with fresh Italian parsley over mashed potatoes, polenta or egg noodles, of course accompanied with a bottle of red (Pinot Noir or Burgundy) and some crusty French bread to mop up the sauce. All around a big table of friends and family to partake in all the goodness.

Happy Holidays! 

Beef Bourguignon

Prep Time: 30 minutes

Cook Time: 2 hours, 30 minutes

Total Time: 3 hours

Yield: 10 to 12 servings

This is a delicious heartwarming French Beef Stew made with beef chuck, red wine, brandy, fresh herbs, shallots, garlic, cippolini onions, carrots and pancetta. Perfect one-pot dish for Winter or the holidays!

Ingredients

  • 5 pounds beef chuck, cut into medium-large cubes
  • Kosher salt and freshly ground black pepper
  • 1/2 pound pancetta, diced
  • 1/4 cup vegetable oil
  • 5 large shallots, finely diced
  • 3 large carrots, finely diced
  • 4 cloves garlic, finely diced
  • 1/4 cup brandy
  • 1/3 cup all-purpose flour
  • 1 bottle dry red wine (Pinot Noir or Burgundy)
  • 4 cups beef or veal stock
  • 1 bouquet garni (1 bay leaf, 2 sprigs thyme, 3 sprigs Italian parsley)
  • 3 tablespoons unsalted butter (divided)
  • 5-7 small to medium Cippolini onions, quartered
  • 1 pound mushrooms, sliced (White button or Cremini)
  • Flat leaf Italian Parsley, minced, for garnish

Instructions

  1. Preheat oven to 350 degrees.
  2. Place beef in a single layer on a rimmed baking sheet and season with a couple teaspoons of Kosher salt and freshly ground black pepper.
  3. Heat a large Dutch oven or stockpot over medium-high heat for several minutes to get it hot.
  4. Add pancetta and cook until crispy and browned, drain on paper towels and set aside.
  5. Increase the heat to high and add the beef in to the pot in a single layer and brown on all sides, turning with tongs (be careful not to crowd or overfill the pot as you will need to cook beef in batches to get a nice browning).
  6. Place the browned beef back on to the baking sheet and set aside.
  7. Add the oil and diced shallots and carrots to the Dutch oven and cook for a few minutes. Lower the heat to medium-high and continue to saute until they begin to soften, about 10 minutes.
  8. Add the brandy and flambe (light it in the pan with a long lighter or match) and let the flames keep going for as long as possible, until they go out to burn off alcohol.
  9. Reduce heat to medium, add flour and stir together with the vegetables for a few minutes to make a roux base for the stew.
  10. Next deglaze the pan by pouring in the red wine, a little bit at a time, stirring well to incorporate and remove any lumps, scraping the brown bits off the bottom of the pan (these babies are full of flavor!)
  11. Add 3 3/4 cups of the stock, browned meat and bouquet garni and bring to a boil over high heat.
  12. Remove pot from the heat, cover and cook the stew in the oven for 2 hours, until meat is fork tender. (The meat should shred/fall apart easily when you pierce it with a fork - if not, place it back in the oven for another 15-20 minutes).
  13. While stew is cooking, caramelize the onions in a medium saute pan with 1 tablespoon of butter and salt and pepper, until the onions are lightly browned.
  14. Add the remaining 1/4 cup stock and cover, reduce heat to medium-low, and cook for about 15-20 minutes, stirring occasionally, until the onions are soft and glazed and liquid is evaporated.
  15. Transfer onions to a bowl and set aside.
  16. In the same pan, turn the heat up to high. Melt 2 tablespoons of butter, the mushrooms, salt and pepper to taste, sear over high heat until mushrooms are lightly browned, about 5 minutes. Remove from the pan and mix into the caramelized onions, set aside.
  17. Remove the stew from the oven and gently stir in cooked pancetta, mushrooms and onions. Adjust seasonings (salt and pepper to taste).
  18. Serve the stew in bowls with a sprinkling of fresh parsley over mashed potatoes, polenta or egg noodles, with a glass of red and crusty bread to mop up the sauce of course!

Notes

Recipe adapted from Mother's Best Comfort Food Cookbook.

Schema/Recipe SEO Data Markup by Yummly Rich Recipes
https://www.theartfulgourmet.com/2015/12/classic-comfort-food-beef-bourguignon/

Beef Bourguignon

Other Beef Bourguignon recipes you may enjoy:

Julia Child’s Beef Bourguignon

Slow-Cooked Beef Bourguignon The Kitchn

Martha Stewart Beef Bourguignon

Wine-Braised Chicken w/ Bacon, Veggies & Herbs

Wine-Braised Chicken with Bacon, Veggies & Herbs

As the weather cools down in the late fall season, there’s nothing I love more than cooking a big one-pot comforting dish on a Sunday afternoon. One-pot dishes are so easy to make, and the enticing smells from the oven are enough to wipe out any winter blues that might be coming on. Welcome my Wine-Braised Chicken with Bacon, Veggies and Herbs. 

KitchenAid 6 Qt Ceramic Dutch Oven

I love making hearty braised dishes with meat and vegetables because they’re easy and so good, especially in my KitchenAid® 6.0Qt Cast Iron Cookware. It’s big enough to make a meal for a crowd, and it’s enameled with cast iron inside which makes it the perfect vessel to cook slow braised dishes, roasts, stews, soups, chilis and any one-pot meals. It even has a grill pan inside the lid! How cool is that?

Wine-Braised Chicken with Bacon, Veggies and Herbs

My Wine-Braised Chicken has tons of goodness inside: chicken thighs, shallots, bacon, cipollini onions, garlic, fresh rosemary and thyme, bacon and carrots. It’s slow-cooked into a big pot of deliciousness with white wine, chicken broth, and then a reduced  au jus cream sauce served over the top.

Wine-Braised Chicken with Bacon, Veggies and Herbs

This is such a delicious and easy recipe to make and it’s pure comfort food perfect for a chilly Winter day. The best part is you only have to cook and clean in one pot, which is awesome. (More time to snuggle under the blankets and watch movies by the fireplace!)

I’d love to hear what you would make in your KitchenAid® Cast Iron Cookware by experimenting with my recipe. Would you use a different meat, like beef or pork? What vegetables would you substitute or add? Would you try a different sauce for the recipe?

Share your take on this Wine-Braised Chicken recipe on the KitchenAid Instagram page using #MadeWithKitchenAid for a chance to be featured!

CLICK HERE FOR THE FULL RECIPE AND STEP-BY-STEP INSTRUCTIONS ON THE KITCHENAID BLOG!

Beef Enchilada Tortilla Casserole for Game Day!


Beef Enchilada Tortilla Casserole


It’s finally Fall (Yay!) and football season is in full force which means fun tailgating and parties with friends mixed with lots of delicious football party food and drinks! My favorite time of year.

Beef Enchilada Tortilla Casserole

I’ve partnered with Mission Foods to create a delicious Game Day recipe for serving a crowd with their awesome flour tortillas, and I present to you my Beef Enchilada Tortilla Casserole.

Beef Enchilada Tortilla Casserole


It’s made with ground beef and taco seasoning, onions, garliccorn, jalapeños, chopped tomatoes, beef broth and LOTS of cheese, all baked in layers of spicy, cheesy, ooey-gooey goodness with the flour tortillas in a 9-inch pie pan. Then it’s served cut into wedges and topped with some fresh green onions. You can also serve it with some sour cream and cilantro for extra garnish, if you like, on the side.

Beef Enchilada Tortilla Casserole


I love making casseroles and one-pot dishes in the Fall, and especially for parties with friends because they’re easy to make and easy to transport and serve, and they are usually a huge hit on the food table! This one will disappear fast so you might want to double the recipe for a big crowd – trust me!

Group8_Soft_Flour_Tortillas

I’m also hosting a giveaway for my readers to win 2 packs of Mission Foods Tortillas – all you need to do is leave a comment and your email below telling me how you would use the tortillas to make a delicious recipe for your Fall Football party! A winner will be chosen at random.

Beef Enchilada Tortilla Casserole

Hope you enjoy my super yum recipe and enter for a chance to win tortillas to make your party more delicious and fun too!

Mission Foods Football Party Food

Beef Enchilada Tortilla Casserole

Beef Enchilada Tortilla Casserole for Game Day!

Prep Time: 30 minutes

Cook Time: 10 minutes

Total Time: 40 minutes

Yield: 6-8

Serving Size: 1 wedge

This Beef Enchilada Tortilla Casserole is a super easy and tasty dish to make for Football season! Made with Mission Foods flour tortillas, all layered with a spicy enchilada beef, mixed with onions, garlic, corn, tomatoes, broth and jalapeño and lots of cheese in the layers and on top! Garnished with scallions, sour cream and cilantro if desired...and DIG IN!

Ingredients

  • 1 pound ground beef
  • 1/2 onion, chopped
  • 1 tablespoon butter
  • 2 garlic cloves, minced
  • 1 1/2 tablespoons all-purpose flour
  • 1 cup beef broth
  • 1/2 packet taco seasoning
  • 1 cup petite diced tomatoes and juice (or 1 8-ounce can tomato sauce)
  • 1 cup frozen corn
  • 1 jalapeno, chopped
  • 4 large Mission Foods flour tortillas
  • 1 6-ounce package shredded Mexican Blend cheese (Colby, Monterey Jack and Cheddar)
  • 1-2 scallions, sliced, for garnish
  • 1/2 cup sour cream, for garnish (optional)
  • 2-3 tablespoons cilantro, chopped, for garnish (optional)

Instructions

  1. Preheat oven to 400 degrees F.
  2. Heat a large nonstick skillet over medium-high heat. Add ground beef and onion to pan and cook for about 5-6 minutes until browned and crumbled.
  3. In a separate medium saucepan, melt the butter and sauce the garlic for 1 minute until lightly golden, sprinkle with flour and stir, cooking for 30 seconds.
  4. Add broth, taco seasoning, tomatoes, corn and jalapeños to the saucepan and bring to a boil.
  5. Reduce heat and simmer for about 5 minutes.
  6. Add 1 1/2 cups of the tomato-corn-jalapeno mixture to the cooked ground beef and onions in the large saute pan, mixing together and reserving the rest for the top layer of the casserole.
  7. In a 9-inch pie plate, place 1 tortilla on the bottom. Top with 1 cup of the beef mixture, and sprinkle with a layer of the shredded cheese. Repeat layers 2 more times, ending with the 4th tortilla on top.
  8. Spread the reserved tomato mixture over the tortilla and top with the rest of the shredded cheese.
  9. Bake at 400 degrees for about 10 minutes until cheese is melted and golden.
  10. Let cool slightly, then cut into wedges and serve with sliced green onions, and sour cream and cilantro (if desired).

Notes

You can also substitute ground turkey or chicken for the ground beef. For a large crowd, I suggest doubling the recipe to make two casseroles as this one will disappear fast!

Schema/Recipe SEO Data Markup by Yummly Rich Recipes
https://www.theartfulgourmet.com/2015/10/beef-enchilada-tortilla-casserole-for-game-day/

STEP-BY-STEP PHOTOS

This slideshow requires JavaScript.

Check out Mission Foods website for all their great products!
Mission Foods

Join Mission Foods Insiders Club for special deals and rewards:
Mission Insiders!

Disclosure: I’m required to disclose a sponsored partnership between our site and Mission Foods. I have been compensated in exchange for this post in the form of payment, product or experiences. #spon


Cheesy Skillet Beef Goulash

Cheesy Skillet Beef Goulash


It’s summer and OH. SO. HOT. And I honestly haven’t really been in the mood to cook  or do anything lately except lie down in the AC or chill on the beach – but a girl’s gotta eat, right?

Cheesy Skillet Beef Goulash

I’ve also been a bit blue because my Dad is in the hospital and having double bypass heart surgery on Monday morning which is a bit scary..and too much to deal with.

Kristen and Dad

So I decided I needed a dose of some comfort food this weekend to cheer me up and bring me a little closer to home with Dad. 🙂

Cheesy Skillet Beef Goulash

I had a few samples of RedPack petite diced tomatoes on hand and thought they would be perfect for a comforting baked pasta dish – something that reminded me of what Mom used to make for us for dinner.

Cheesy Skillet Beef Goulash

So I whipped up a Cheesy Skillet Beef Goulash – made with ground beef, tomatoes, onion, garlic, elbow macaroni and three cheeses – all cooked together in one skillet, then baked into a pot of bubbly, cheesy goodness.

Cheesy Skillet Beef Goulash

Super simple to make and definitely comforting at that. I think I’ll get through the weekend and Dad’s surgery just fine…after I have some of this deliciousness..and maybe a nap in the A/C. 🙂

Kristen and Dad

Cheesy Skillet Beef Goulash

Prep Time: 10 minutes

Cook Time: 20 minutes

Total Time: 30 minutes

Yield: 6-8

This is a classic cheesy baked pasta dish made with macaroni, ground beef, diced tomatoes, onion and garlic, topped with Parmesan and shredded cheddar cheese.

Ingredients

  • 1 package elbow macaroni
  • 2 tablespoons cooking oil
  • 1 medium onion, chopped
  • 3-4 large garlic cloves, minced
  • 1 pound lean ground beef
  • 1- 28 ounce can RedPack petite diced tomatoes
  • 1 cup tomato sauce
  • 1/2 cup grated Parmesan cheese, plus extra for garnish
  • 1 tablespoon Italian seasoning
  • 1 teaspoon red pepper flakes
  • Kosher salt, to taste
  • Fresh ground black pepper, to taste
  • 1/2 cup shredded mild cheddar cheese
  • 1 cup shredded extra sharp cheddar cheese

Instructions

  1. Bring a large pot of water to a boil and cook the macaroni, drain and set aside.
  2. Meanwhile, In a large nonstick skillet, add oil and heat until it's shimmering. Add onion, and cook over medium heat until onion is soft, about 5-7 minutes. Add garlic and cook for about 30 seconds.
  3. Add the ground beef and brown until no longer pink, stirring and breaking it up as you cook.
  4. Add the diced tomatoes and tomato sauce to the skillet and stir. Cook the mixture for about 5 minutes or so until heated through.
  5. Stir in the cooked pasta and Parmesan cheese, Italian seasoning, red pepper flakes, salt and pepper, mixing well. Adjust seasonings to your taste buds accordingly...:)
  6. Top the pasta mixture with both shredded cheeses and bake in the oven for about 10 minutes until the cheese is melted and bubbly.
  7. Top with additional grated Parmesan cheese if desired and serve hot immediately.

Notes

Goes great with a green salad and garlic bread and a crisp white wine like Pinot Grigio or a light fruity red table wine.

Schema/Recipe SEO Data Markup by Yummly Rich Recipes
https://www.theartfulgourmet.com/2015/08/cheesy-skillet-beef-goulash/


Veggie, Bacon & Cheese Tarts in a Toasted Quinoa Crust

Veggie, Bacon & Cheese Quinoa Tarts

I love making savory tarts and pies, but unfortunately I don’t love the carbs and calories that come along with them. It’s also Summertime, and I’m trying to cook and eat lighter than usual…and the Fall season will come soon enough with all that yummy comfort food!

Quinoa Tart 1

I’ve been experimenting lately with alternatives to pasta and dough – things like zucchini, cauliflower, almond flour, and quinoa. Not only are they lighter, but also , gluten-free and less carbs than traditional flours and equally as satisfying and tasty!

Veggie, Bacon & Cheese Quinoa Tarts

I found a recipe on Cooking Light for a savory Fall tart made in a toasted quinoa crust and decided to experiment a little with the crust, fillings and flavors. MISSION ON.

Toasted Quinoa

I love the flavor of the nutty toasted quinoa, which is done in the oven and gives a nice depth of flavor and crunch to the tart crust.

Toasted Quinoa Tart Shells

I mixed in some Bob’s Red Mill almond flour, corn starch, Parmesan cheese and an egg for binding the quinoa, then added a little garlic salt and olive oil to bring it all together for the crust. Then I pressed the quinoa mixture into four small tart pans and baked for about 10 minutes before filling them and baking again.

Mascarpone & Cheddar

While the tart crusts were baking, I made a savory filling with mascarpone and cheddar cheese and spooned in this delightful cheesy goodness on to the par-baked crusts.

Crispy Cooked Bacon

I also cooked up some crispy gorgeous bacon in the oven while the tarts were baking..(for about 20 minutes or so)..

Top with Crispy Bacon

then chopped it to pieces and layered it on top of the cheeses. HELLO PRETTIES. Come to me.

Blanched Cauliflower and Peas

Next I started filling the tarts with my blanched cauliflower and baby peas,

Veggie Tart fillings

more Parmesan cheese and a drizzle of olive oil,

Ready to bake the tarts again

popped them back in the oven..

Tarts Cooling

and baked these cuties for another 5-10 minutes and let them cool on a wire rack for a few…

Tarts cooling

the anticipation of these delicious things in my mouth is MOUNTING.

Cooked Quinoa Tarts

Once the tarts were cooled a bit, I garnished them with some fresh chopped basil, chives and freshly cracked black pepper and a few red pepper flakes. Mini Green Goddesses!

Veggie, Bacon & Cheese Quinoa Tarts

And Oh Holy Delicious.

Veggie Bacon & Cheese Tarts in a Toasted Quinoa Crust

This is a great base recipe for any savory tart really – feel free to substitute different fillings for the tarts depending on the season..butternut squash and spinach in the Fallcorn, tomatoes and zucchini in the Summer… roasted carrotspotatoes and Gruyere in the Winter..asparagus and leeks in the Spring…oh, the ideas are endless!

Veggie Bacon & Cheese Tarts in a Toasted Quinoa Crust

Veggie, Bacon & Cheese Tarts in a Toasted Quinoa Crust

Prep Time: 30 minutes

Cook Time: 30 minutes

Total Time: 1 hour

Yield: Makes four 4 5/7-inch tarts

Serving Size: 1 tart

This is a gluten-free tart recipe made with a toasted quinoa crust, filled with a savory filling of mascarpone and cheddar cheese, bacon, cauliflower, peas topped with Parmesan, and fresh basil and chives.

Ingredients

  • Toasted Quinoa Tart Crust:
  • 1 cup uncooked quinoa
  • 1/2 cup almond meal flour
  • 1 tablespoon cornstarch
  • 2 tablespoons Parmesan cheese
  • 1/4 teaspoon garlic salt
  • 2 tablespoons olive oil
  • 1 large egg, beaten
  • Cooking spray
  • Tart Filling:
  • 1 cup cauliflower florets
  • 1 cup baby green peas, frozen
  • 4-5 slices of bacon, cooked and chopped
  • 1/2 cup mascarpone cheese, softened
  • 1/2 cup shredded cheese (Cheddar, Jack, or Gouda)
  • 4 tablespoons grated Parmesan cheese
  • 1 tablespoon olive oil, divided
  • 1/2 teaspoon coarsely ground black pepper
  • 2 tablespoons chopped fresh basil, for garnish
  • 1 tablespoon finely minced chives, for garnish

Instructions

  1. Make the Toasted Quinoa Tart Crusts:
  2. Preheat oven to 350°.
  3. Place quinoa on a baking sheet. Bake at 350° for 10 minutes or until golden brown; cool.
  4. Place half of quinoa in a food processor; pulse 30 seconds.
  5. Transfer to a large bowl. Add remaining toasted quinoa, almond meal, cornstarch, and salt to bowl; stir to combine.
  6. Add oil and egg; stir until mixture is crumbly but holds together when pressed.
  7. Press into bottom and up sides of four 4 5/7-inch removable-bottom fluted tart pans coated with cooking spray.
  8. Bake at 350° for 10 minutes or until golden, but not completely cooked (you will put them back in the oven later after you fill them with the veggies, bacon and cheese.)
  9. Prep the Tart fillings:
  10. While the tart crusts are baking, chop the cauliflower into small florets and measure out the baby peas.
  11. Blanch the veggies in boiling water for about 2-3 minutes, then drain and rinse them in very cold water or shock them in an ice bath, set aside.
  12. Cook the bacon and drain, chop into small chunks, set aside.
  13. Measure out the mascarpone, Cheddar and Parmesan cheese, and chop basil and chives, set aside.
  14. Fill the Tart Crusts:
  15. Spread the mascarpone cheese evenly in bottom of each tart crust.
  16. Top each tart with shredded cheese, then crumbled bacon.
  17. Arrange cauliflower and peas evenly over cheese and bacon mixture on the tarts and drizzle with some olive oil, Parmesan cheese and black pepper.
  18. Bake tarts for another 5-7 minutes in the oven.
  19. Remove tarts from the pans; cool completely on a wire rack.
  20. Garnish with fresh chopped basil and chives, serve warm.

Notes

Recipe adapted from Cooking Light, Nov 2014.

Schema/Recipe SEO Data Markup by Yummly Rich Recipes
https://www.theartfulgourmet.com/2015/07/veggie-bacon-cheese-tarts-in-a-toasted-quinoa-crust/

Other Tart Recipes you might enjoy:

Savory Harvest Fall Tart

Quinoa Tart with Zucchini & Sundried Tomato Dressing

Gluten-Free Tomato Tart

Gluten-Free Spinach and Onion Tart