It’s that love-ly time of year again folks, when love is in the air and a romantic dinner and evening in with your significant other is on the menu. And we all know what Valentine’s Day is all about…wine, chocolate, strawberries and a special sweet dessert!
I created this recipe for a Blood Orange Olive Oil Cake with Strawberry Chocolate Balsamic Sauce that will impress your sweetie and top off a romantic dinner along with a glass of champagne..hope you enjoy and indulge on this special day 😉
A LOVELY dessert made with Blood Orange olive oil and Chocolate Balsamic Vinegar and fresh strawberries and LOTS OF LOVE <3
Ingredients
BLOOD ORANGE OLIVE OIL CAKE:
1 tablespoon butter, for greasing pan
¼ cup sugar
2 eggs
1/3 cup Seven Barrels Blood Orange Olive Oil
1 teaspoon vanilla extract
Juice from 1 blood orange
1 ¼ cups all-purpose flour
1 teaspoon baking powder
½ teaspoon baking soda
½ teaspoon salt
CHOCOLATE BALSAMIC STRAWBERRY SAUCE:
½ cup Seven Barrels Chocolate Balsamic Vinegar
1 cup chocolate syrup
1 pint strawberries, stemmed and sliced
Instructions
BLOOD ORANGE OLIVE OIL CAKE:
Preheat oven to 350 degrees F. Grease a 9-inch round cake pan or 8-inch loaf pan with butter.
In a stand mixer or large bowl with hand mixer, mix together the sugar and eggs on medium speed until lightly blended.
Drizzle in the Seven Barrels Blood Orange olive oil and vanilla and mix together until smooth. Add the blood orange juice in and mix into the batter.
Sift the flour into a mixing bowl and add baking powder, soda and salt. Add to the wet batter in small increments and mix on low to incorporate. Scrape the sides with a spatula and make sure all wet and dry ingredients are blended well.
Pour the batter into the cake pan and bake for 25-30 minutes. Let the cake cool on a wire rack for 5 minutes or so, then remove cake from the pan and let cool completely on the wire rack before serving.
CHOCOLATE BALSAMIC STRAWBERRY SAUCE:
Add the Seven Barrels Chocolate Balsamic vinegar and chocolate syrup to a medium saucepan over medium-low heat and cook for about 5 minutes until heated through and blended.
Add the sliced strawberries to the chocolate sauce and mix together. Serve the sauce warm over Blood Orange Olive Oil cake or over ice cream.
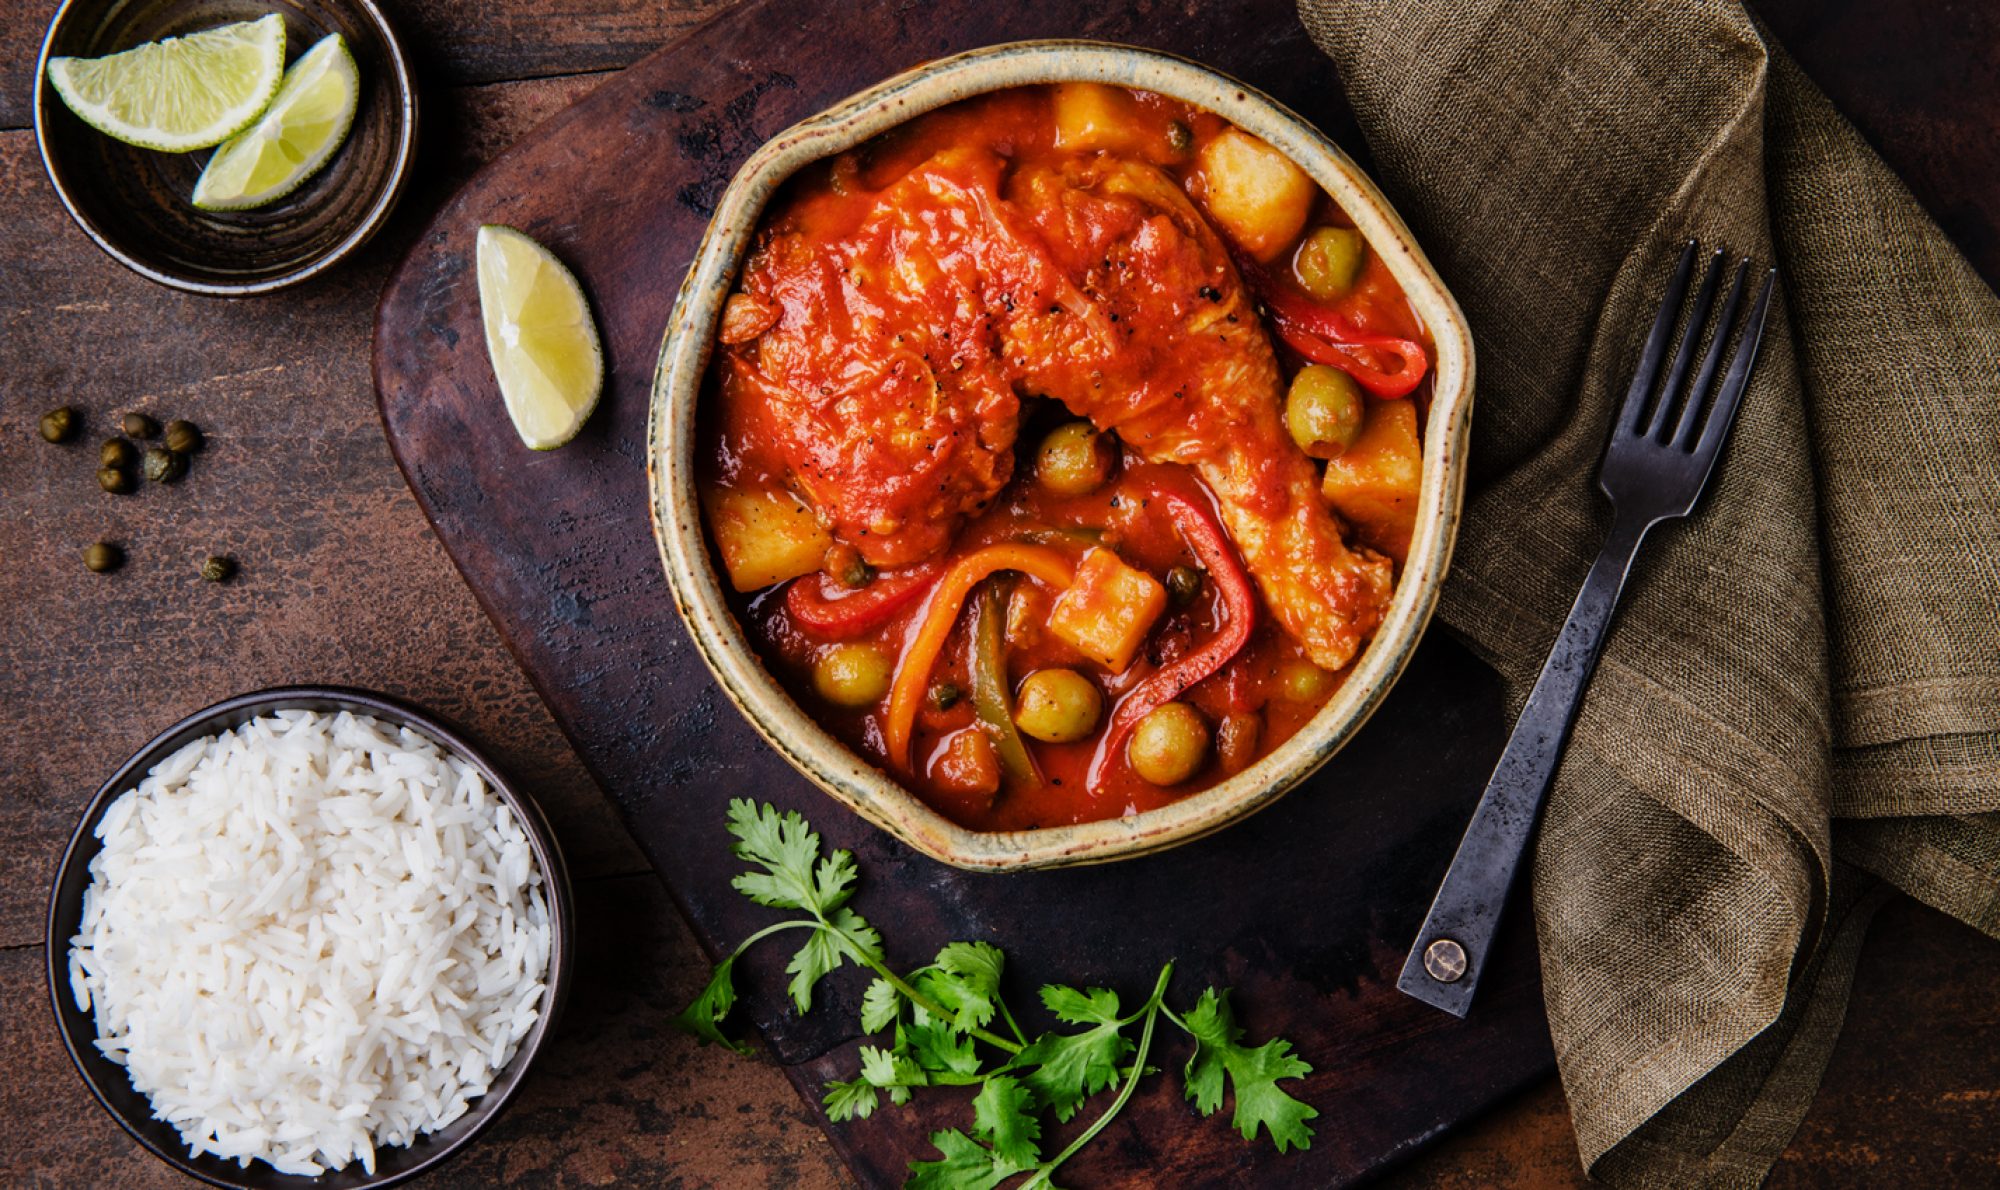
There’s nothing more comforting and heartwarming on a crazy cold day than braised short ribs with roasted veggies and mashed potatoes. Can we say heaven in a bowl?
These short ribs take a while to make but they’re worth the wait (I promise!) – I made them a little bit spicy with dried chile peppers,garlic and onions, fresh rosemary and thyme, and a chipotle infused olive oil (I love 7 Barrels brand!) along with a dash of cocoa powder (the super intense Dutch red kind made by Guittard is my fav). They’re braised in broth, a full bottle of red wine (you’re welcome), and topped with fresh parsley.
Once they’re done cooking they will be falling off the bone – then I made a reduced sauce with a knob of butter at the end to make it super silky and delicious. I served these with roasted brussels sprouts and cauliflower (simply roast them in olive oil and sea salt on 375 for about 45 minutes, tossing them every 15 minutes until crispy and delicious), but I recommend serving them with some creamymashed potatoes or egg noodles as well (or even some crusty French bread) to mop up that delicious spicy-savory-chocolate-chile-wine sauce. OMG.
Go ahead, indulge. You can always work it off tomorrow. Besides, a big bowl of comfort food and Netflix is more fun anyways 🙂
A classic Winter comfort food dish, these delicious braised short ribs are made with chile peppers, chocolate, red wine and lots of fresh garlic, onions and herbs. Super savory and tasty, served with roasted veggies, and either mashed potatoes or egg noodles.
Ingredients
2 large dried chile peppers, stemmed and deseeded
1 cup boiling water
5 1/2 pounds center cut short ribs, on the bone
Kosher salt and freshly ground black pepper
3 tablespoons chipotle olive oil (or regular EVOO if you prefer less spicy)
3 cups beef stock
2 tablespoons tomato paste
2 teaspoons Dutch red cocoa powder (Guittard)
4-5 cloves garlic, smashed
3 small onions, chopped
One bottle red wine (Pinot Noir or Merlot or Cab Sauv)
2 tablespoons balsamic vinegar
A few sprigs of fresh herbs (rosemary and thyme)
Knob of unsalted butter (1-2 tablespoons)
Fresh parsley, chopped for garnish
Roasted cauliflower and brussels sprouts, for serving
Mashed potatoes or egg noodles, for serving
Instructions
Preheat oven to 325 degrees. Adjust rack to lower third.
Cover chopped chile peppers with boiling water and let sit, covered for about 20 minutes until soft.
Meanwhile, sprinkle short ribs on both sides generously with kosher salt and pepper and let rest to room temperature about 15 minutes while peppers are soaking.
Heat olive oil in a large Dutch oven over medium-high heat and cook short ribs in batches, searing evenly on both sides until golden brown crust forms (about 7 minutes per side/15 minutes per batch).
Once all short ribs are seared, place on a platter tented with foil and set aside.
In a blender or food processor, add the chiles, water, stock, tomato paste, cocoa, garlic, onions, and a little dash of salt and mix thoroughly together until smooth.
Pour the red wine in the Dutch oven and scrape the brown bits up from the bottom of the pan (deglazing the pan) and turn heat up to high bringing to a boil for 2-3 minutes, then reducing heat to a simmer, letting wine reduce by half (about 20 minutes).
Add the pureed chile-onion mixture, balsamic vinegar and fresh herbs to the pot and boil together for a few minutes. Return the short ribs to the pot, cover tightly with a lid and braise in the oven for about 2 1/2 hours until meat is tender and falls off the bone.
Place the ribs back on to a large platter and tent with foil to keep warm while making the sauce.
Put the Dutch oven on the stove and heat over medium-high for another 10 minutes or so until sauce thickens and reduces. Remove from heat and add a knob of butter into the sauce to make it extra silky and smooth.
Add the ribs back into the sauce and coat thoroughly. Serve on plates with sauce on top along side roasted veggies and mashed potatoes or egg noodles. Garnish with fresh parsley and additional salt and pepper to taste.
Notes
You can also substitute hard cider or a dark lager beer for the red wine.
Well the holidays have finally arrived – my favorite time of year! I love having some time to rest and relax and enjoy quality time with friends and family, especially around the table sharing delicious food and wine. So to celebrate the season, I’ve rounded up some of my favorite holiday recipes that I’ve created over the years – either for myself or a few of my clients (KitchenAid, Colavita and Seven Barrels), that I wanted to share with all of you. From appetizers, to salads, to desserts, entrees and cocktails, they all have that special magic touch perfect for the holidays.
I’d love to hear in the comments below what some your favorite holiday recipes are too – feel free to post them and share a link below, and if you want to share my recipes online please include a link back to my site and credit to Kristen Hess / The Artful Gourmet and @artfulgourmeton social media (Facebook, Twitter, Instagram, Pinterest and Tumblr).
Wishing you all a Merry Christmas, Happy Hanukkah and a joyous and prosperous New Year 2017!
They’re a perfect fall dessert, and healthy too! These doughnuts are made with all natural vegan ingredients – red kidney beans, unsweetened soy milk, vanilla extract, coconut sugar, cocoa powder, flour and baking powder – and you wouldn’t believe how good they taste.
They are so delicious (and cute!) and easy to make with the help of my KitchenAid® Diamond Blender and Mini Doughnut Pans – and they bake in only 10 minutes in my Convection Countertop Oven!
The glaze is super easy to make too – made in my KitchenAid Stainless Steel sauce pan with fresh pumpkin puree, coconut cream and coconut sugar and pumpkin pie spice all cooked into a gooey luscious caramel sauce then topped with flaky sea salt – it’s the most lovely combination of Fall flavors in one tiny bite!
ooh…aren’t they lovely and delicious? Oh, and they’re vegan and gluten-free too! Isn’t that wonderful.
Mini Vegan Chocolate Donuts w/ Salted Caramel Pumpkin Spice Glaze
Yield: Makes about 16-18 mini donuts and 1 cup of glaze.
These mini vegan donuts are a perfect fall dessert, and healthy too! Made with all natural vegan ingredients – red kidney beans, unsweetened soy milk, vanilla extract, coconut sugar, cocoa powder, flour and baking powder – and you wouldn’t believe how good they taste.
Ingredients
Donuts:
1 (15-ounce) can red kidney beans
1 cup unsweetened soy milk (or almond milk)
1 tablespoon pure vanilla extract
½ cup coconut sugar
1 cup cocoa powder (Guittard Cocoa Rouge)
2 teaspoons baking powder
1-2 tablespoons coconut or vegetable oil (if needed, for dough)
Salted Caramel Pumpkin Spice Glaze:
1 cup coconut sugar
¾ cup coconut cream (top thick layer from full-fat coconut milk), refrigerated
1 ½ teaspoons pure vanilla extract
¾ teaspoon Himalayan pink sea salt
¼ cup pumpkin puree
½ teaspoon pumpkin pie spice
Flaky sea salt (such as Maldon), for garnish
Instructions
Donuts:
First, rinse and drain the kidney beans and place them in your KitchenAid Diamond blender along with the soy milk, coconut sugar and cocoa powder, blending them together on Mix (3) setting.
Then, transfer the mixture to your large KitchenAid Ceramic Mixing Bowl and stir in the flour, baking powder and vanilla until the dough comes together smoothly and thoroughly mixed. If it seems a little dry, add a little more soy milk or a tablespoon or two of coconut or vegetable oil.
Spoon a couple tablespoons of dough into the donut pan (fill to the top and smooth). This recipe makes approximately 16-18 donuts so you’ll need at least 2 mini donut pans or make them in 3 batches.
Bake the donuts in your preheated KitchenAid Convection Countertop Oven on 350 degrees for 10 minutes, then let them cool for a couple of minutes in the donut pan, then remove and place them on a cooling rack while you make the Salted Caramel Pumpkin Spice Glaze.
Salted Caramel Pumpkin Spice Glaze:
To make the donut glaze, simply place all your ingredients (coconut sugar, coconut cream, vanilla extract, Himalayan pink sea salt, pumpkin puree and pumpkin spice) in your KitchenAid Stainless Steel 3-Qt. Sauce Pan over medium-high heat.
Bring to a rolling boil, and constantly whisk for about 10 minutes until the glaze starts to thicken and caramelize and turns to a dark brown color (be careful to constantly watch and stir, and not let the caramel burn – reducing heat to medium-low if needed). Let the glaze cool to the side for a few minutes after it is done to allow it to thicken a little more.
Spoon the glaze over the donuts on a baking sheet covered in foil or parchment paper and garnish with flaky sea salt. You can also top the donuts with some crushed nuts if you like too (hazelnuts or pecans would be amazing!)
Notes
Glaze can be made ahead of time and will keep in the refrigerator for up to 1 week. It can also be reheated in the microwave or let it come to room temperature before glazing the mini donuts.
So the big day is right around the corner – the Super Bowl, yay! I’m not really partial to either team and am not even a huge football fan, but i LOVE LOVE LOVE the Super Bowl simply because of the fun parties, the commercials, and the food and drinks, of course.
So in spirit of the football party season, I’ve rounded up some of my favorite game day recipes that are perfect for a crowd. Finger foods, appetizers, dips and spreads and small bites to party in style!
Check out this link for some amazing Football Snack Stadiums like the one above
Here’s to #FOOTBALL #FOOD and may the best team win! 🙂
Happy Mother’s Day! What a gorgeous day it is today to celebrate Mom and all the awesome things she does every day of the year.
I’m posting this recipe today in honor of MY Mom, who loves Chocolate and Orange, in any form, and who I promised to make this delicious thing for when I go home to see her in June.
This gorgeous Chocolate Orange Tart is something I made recently for a photography event at Drift Studio in NYC hosted by eyeFi, a really cool app that allows photographers to upload their photos to the internet via a WiFi enabled SIM card, directly from their DSLR cameras.
They asked me to bring some food and style a lovely still life for the photographers to shoot at the event and it was quite the hit that people actually started eating the tart off the still life set! (LOL- Who can blame them?!)
The tart is made with luscious semi-sweet chocolate and cream with a dash of orange flower water and baked in a graham cracker and cocoa crust,then topped with a gorgeous shiny chocolate glaze and homemade candied orange peel made from a Cara Cara orange, for extra citrus zing that balances out the richness of the creamy chocolate center.
I’m wishing all the Moms out there an amazing Mother’s Day today and hope you’re indulging in something sweet and lovely, just like YOU.
Chocolate Glazed Orange Tart w/ Candied Orange Peel
Prep Time: 30 minutes
Cook Time: 45 minutes
Total Time: 2 hours, 45 minutes
Yield: 8-10 servings
Serving Size: 1 piece
Ingredients
Chocolate Tart Shell:
1 package of graham crackers (9 total)
1/4 cup unsweetened cocoa
5 tablespoons unsalted butter, melted
Tart Filling:
1/4 cup sugar
1 1/4 cups heavy cream
9 ounces bittersweet chocolate chips (or chopped)
2 large eggs
1 teaspoon orange flower extract or Grand Marnier liqueur
1/4 teaspoon salt
Chocolate Glaze:
2 tablespoons heavy cream
1 3/4 ounces bittersweet chocolate chips or chunks
1 teaspoon corn syrup
1 tablespoon warm water
Candied Orange Peel:
1 orange (Cara Cara is what I used)
2 tablespoons water
1/4 cup sugar
Instructions
Preheat oven to 350 degrees.
Make the chocolate tart shell:
In a food processor, crush the graham crackers into a fine crumb, add the cocoa and pour into a large mixing bowl.
Add the melted butter to the cracker cocoa crumbs and stir together until mixed well with no lumps.
Press the crumbs evenly into a 9-inch tart pan, about 3/4 inch up the side of the pan.
Bake for about 10 minutes and let cool in the pan on a baking rack.
To make the filling:
Bring the cream to a boil then pour over the chocolate chips into a large mixing bowl and let stand for about 5 minutes until the chocolate starts to melt, then stir together until smooth.
Whisk the eggs, orange flower extract and salt in a separate bowl, then fold into the melted chocolate.
Pour the filling into the cooled crust and bake until the filling is set about 3 inches form the edge, about 20-25 minutes. (The center should still be a bit wobbly).
Cool the tart in the pan on a cooling rack for about an hour.
To make the chocolate glaze:
Pour the cream into a saucepan and bring to a boil, remove from heat.
Pour in the chocolate chips or chunks and stir until melted and smooth.
Stir in the corn syrup and then the warm water.
Pour the glaze over the cooled tart, then tilt the glaze to evenly cover the top. Let stand until glaze is set about 1 hour.
To make the candied orange peel:
Using a vegetable peeler, peel off the skin of the orange into long strips, then cut into thin matchstick pieces.
Place the orange peel in a saucepan and cover with cold water, bring to a boil for about 30 seconds. Remove from heat and drain the peel, rinse out the saucepan.
Add the peel back into the saucepan and add the sugar and water, stirring everything together and bring to a boil. Reduce the heat to medium-low and cook for about 20 minutes until the peel becomes translucent and the sugar water becomes thick and syrupy.
Remove from heat and place the orange peel with a fork on to a plate and let cool. The orange peel will cool and harden with a sugary coating when ready. Place the candied orange peel on top of the chocolate tart and serve.
Note: orange peel can be made a day ahead and stored in an airtight container until ready to top the chocolate tart. Tart can also be made a day ahead without the chocolate glaze, covered loosely with foil and stored in the fridge. Bring to room temperature before topping with the chocolate glaze if making ahead.
Notes
Note: orange peel can be made a day ahead and stored in an airtight container until ready to top the chocolate tart. Tart can also be made a day ahead without the chocolate glaze, covered loosely with foil and stored in the fridge. Bring to room temperature before topping with the chocolate glaze if making ahead.
Recipe adapted from Epicurious
‘Baking for Friends’ Cookbook by Kathleen King, Tate’s Bake Shop
If you haven’t heard of Tate’s Bake Shop before or experienced their amazing line of desserts and cookies and baked goods, well you absolutely need to. I remember the first time I tried some of their chocolate chip cookies (the ones on the cover of their cookbook), I almost died and went to heaven. They’re light, crispy and thin, and filled with loads of gooey chocolate chips that melt in your mouth for days. They are still my favorite chocolate chip cookies (other than mine, of course), and I can’t resist them any time I spot them at the store.
Kathleen King, Chef and Author
Author Kathleen King is the creator and owner of the nationally acclaimed Tate’s Bake Shopin the Hamptons, known for her delicious baked goods made with wholesome yet elegant ingredients.
BAKING FOR FRIENDS isa gorgeous cookbook with over 120 scrumptious recipes and mouthwatering photos.With the holidays just around the corner, this is the perfect cookbook to read for all your holiday baking. The book features recipes that are perfect for both special occasions and everyday baking. Chapters include Scones & Shortcakes; Pies, Tarts & Crisps; Tea Loaves & Quick Bread; Party Cakes & Cupcakes; and Cookies. The book also offers delectable, taste-tested recipes for readers with dietary restrictions, including gluten-free, low-fat, vegan, and nut-free. Each chapter also features Kathleen’s innovative baking tips and tricks, designed to help save precious time and energy in the kitchen.
Holiday Cookie and Bar Tower Giveaway! (a $48 value)
Holiday Cookie and Bars Tower
**THIS GIVEAWAY HAS ENDED. CONGRATULATIONS TO TERI TROCKWOOD, THE WINNER OF THE TATE’S BAKE SHOP HOLIDAY COOKIE AND BARS TOWER! (Teri, please send me your shipping address so I can get this prize out to you this week!) ENJOY!**
Just to celebrate the holidays, I’ve teamed up with Tate’s Bake Shop who is giving away one of their Holiday Cookie and Bar Towers (a $48 value)! It includes three 7-oz boxes of cookies – one each of chocolate chip, oatmeal raisin and white chocolate chip macadamia nut. It also includes two rich and buttery raspberry bars, two chocolate chip and walnut-loaded blondies, and two rich, dense and fudgy plain brownies. Each 7-oz box contains approximately 12 cookies, and the bars are a generous size..and all wrapped in pretty holiday packaging! HOW TO ENTER THE GIVEAWAY
All you have to do to enter for a chance to win is tell me your favorite holiday dessert in the comments section below for one (1) entry. For extra chances to win, follow/like me on all or one of my social hangouts : twitter, facebook, pinterest, google +, and/or sign up for my monthly newsletter (see box at the top of this page), and tell me that you did at the end of this post. You have to be connected to Facebook to enter comments on this post. If you don’t have a Facebook profile, just send me an email for your entries at kristen (at) theartfulgourmet (dot) com. The giveaway begins on Saturday Dec 1st and ends on Sunday December 12 at midnight EST, where one person will be picked by random from the comments below. Don’t forget to tell your friends about the giveaway by sharing this page at the end of the post and letting me know in the comments below for extra entries!
Thumbprint cookies are traditionally flavored with vanilla and filled with fruit jam, but these are chocolate cookies stuffed with more chocolate! They will be a welcome treat on your holiday cookie platter, and they are a perfect hostess gift.
Ingredients
Cookies
2 ounces unsweetened chocolate, finely chopped
2 cups unbleached all-purpose flour
¼ teaspoon salt
½ pound (2 sticks) salted butter, at room temperature
½ cup granulated sugar
1/3 cup firmly packed dark brown sugar
2 large eggs, separated, at room temperature
1 teaspoon pure vanilla extract
3 cups finely chopped pecans
Filling
8 ounces semisweet chocolate, finely chopped
2 teaspoons vegetable oil
Instructions
To make the cookies: Heat the chocolate in a microwave-safe medium bowl on Medium (50% power), stirring at 30-second intervals, until fully melted and smooth. Let stand, stirring occasionally, until tepid, but still fluid.
In a medium bowl, whisk together the flour and salt. In a large bowl, beat the butter, granulated sugar, and brown sugar with an electric mixer set on high speed until combined, about 1 minute. One at a time, beat in the egg yolks, followed by the tepid chocolate and the vanilla. With the mixer on low speed, mix in the flour mixture, just until combined. Divide the dough in half and shape each half into a thick disk. Wrap in plastic wrap and refrigerate until chilled, about 2 hours.
Position the oven racks in the top third and center of the oven and preheat the oven to 350°F. Line 2 large rimmed baking sheets with parchment paper or silicone baking mats.
Using a heaping teaspoon for each, roll the dough into 78 marble-sized balls, putting them in a baking pan or platter. (If you wish, you can cover the balls with plastic wrap and refrigerate for up to 2 days.) Beat the egg whites in a small bowl until foamy. One at a time, dip each ball in the whites, roll in the pecans, and arrange 1 ½ inches apart on the prepared baking sheets. Refrigerate the remaining balls until ready to bake. Using your thumb (or, if you have long fingernails, the end of a wooden spoon), press an indentation into the center of each cookie.
Bake, rotating the positions of the sheets from top to bottom and front to back halfway through baking, until the edges of the cookies look set, about 10 minutes. Remove the baking sheets from the oven, and, using your thumb (or the end of the wooden spoon), reform the center indentation in each cookie. Return to the oven and continue baking until the cookies are crisp, about 10 minutes more. Let cool on the baking sheets for 5 minutes. Transfer to wire cooling racks and let cool completely. Repeat with the remaining balls, egg whites, and pecans, on cooled baking sheets.
To make the filling: Heat the chocolate and oil together in a microwave-safe bowl on Medium (50% power), stirring at 30-second intervals, until fully melted and smooth. Let stand, stirring occasionally, until tepid but still fluid.
Using a teaspoon, fill the indentations with the chocolate mixture. Let stand until the chocolate sets (you can refrigerate them to speed things up).
Notes
Recipe from Tate’s Bakeshop ‘Baking with Friends’ Cookbook, pp 116-118.
Monday through Friday, my friend Hakan Ciling designs for the textile and fashion industries. On the weekend, he is an equally talented baker, as this moist, fruit studded cake shows. If you are serving it for an evening dessert, top it with shipped cream flavored with ground cinnamon or nutmeg.
Ingredients
Softened butter and all-purpose flour for the pan
3 cups unbleached all-purpose flour
1 teaspoon baking soda
1 ¾ cups sugar
1 ¼ cups vegetable or grapeseed oil
3 large eggs, at room temperature
1 tablespoon pure vanilla extract
1 cup very coarsely chopped walnuts
1 cup dried cranberries
1 cup pitted dates or dried plums (prunes), cut in half
1 cup golden or dark raisins
12 ripe figs, tips trimmed and cut lengthwise into quarters (about 1 ½ cups)
Instructions
Position an oven rack in the center of the oven and preheat the oven to 350 degrees F. Lightly butter and flour a 9-inch tube pan with a removeable bottom (such as angel food cake pan) and tap out the excess flour.
In a medium bowl, whisk together the flour, baking soda, and salt. In a large bowl, beat the sugar and oil with an electric mixer set on high speed until the mixture is very pale, about 5 minutes. One at a time, beat in the eggs, followed by vanilla, scraping down the sides of the bowl as needed. Fold in the walnuts, cranberries, dates and raisins. The batter will be very thick.
Spread half of the batter in the prepared pan. Arrange half of the figs in a ring in the pan, pressing them lightly into the batter. Repeat with the remaining batter and figs.
Bake until a long bamboo skewer inserted in the center of the cake comes out clean, about 1 ¼ hours. Let cool in the pan on a wire cooling rack for 15 minutes. Run a knife around the inside of the pan and the tube and lift out the insert. Invert the cake onto the rack, unmold and let cool completely.
Notes
Recipe from Tate’s Bakeshop ‘Baking with Friends’ Cookbook, pp 56-57.
When all the local farm stands are stocked with big baskets of berries, I can't resist buying them. I love the way blackberries cook up and hold their shape, with their sweet/tart taste. And the blackberries against the yellow hue of the cornmeal in the crust make a beautiful presentation. Serve this the day it's made, with fresh whipped cream or ice cream - it's lovely on its own too!
Ingredients
DOUGH
1 cup unbleached all-purpose flour, plus more for rolling the dough
1/2 cup fine yellow cornmeal (not coarse or polenta)
1 tablespoon sugar
1/4 teaspoon salt
6 tablespoons (3/4 stick) cold salted butter, cut into pieces
1 large egg yolk
2 tablespoons cold water
FILLING
1 teaspoon unbleached all-purpose flour
2 cups fresh blackberries
3 tablespoons sugar
1 tablespoon cold salted butter, cut into small pieces
1 tablespoon sugar for sprinkling (optional)
Instructions
To make the dough:
In a medium bowl, mix together the flour, cornmeal, sugar and salt. Work in the butter with a pastry blender, 2 knives, or your fingertips until the mixture resembles coarse meal with small pea-sized pieces of butter. In a small bowl, mix together the egg yolk and water. Add to the flour mixture and stir gently with a fork until the mixture is moist enough to hold together.
Gather the dough into a thick disk. Wrap in plastic wrap and refrigerate until chilled but not hard, at least 30 minutes, or up to 2 hours. (The dough can be refrigerated for up to 2 days, but let it stand for 15 minutes before rolling out. It can also be frozen for up to 1 month.)
Preheat the oven to 400 degrees F. Line a large rimmed baking sheet with a silicone baking mat or parchment paper.
On a ligthly floured work surface, roll out the dough into a 10-inch round about 1/8 inch thick. Fold the dough in half, and then reopen on the prepared baking sheet. The dough cracks easily, but just press it back together if it does and don't worry, as the look of the dessert is very rustic.
For the filling:
Sprinkle 1 teaspoon of flour over the dough leaving a 2-inch border all around. Spread the berries over the floured section of the dough. Sprinkle them with the sugar and dot with butter. Fold the uncovered dough up over fruit, pleating it as necessary. If the dough cracks, not to worry - just seal the tears. If you wish, brush the edges of the dough with a pastry brush dipped in water and sprinkle with the tablespoon of sugar.
Bake until the crust starts to brown a bit and the fruit bubbles, about 40 minutes. Let the galette cool on the baking sheet. Transfer the galette to a serving platter with a wide spatula or pick up the baking mat and slide it off onto the platter.
Notes
Recipe from Tate’s Bakeshop ‘Baking with Friends’ Cookbook, pp 92-94.
Tate’s Bake Shop also has some holiday exclusives (see below) which are super delicious and seasonal, available for purchase online and at the Southampton store location.
Disclosure: All opinions expressed here are my own and for participating in Tate’s Bake Shop Holiday Giveaway Promotion, I received a copy of their new cookbook “Baking with Friends”.
We had the opportunity to create our own Baci chocolate confections, including
Baci Chocolates,
Baci Pie,
Chocolate Cups,
and Chocolate Dessert Pasta
while sampling bubbly Italian Prosecco.
Baci, which means “kisses” in Italian, are still made from a coveted original recipe and consist of a dark, silky chocolate exterior that envelopes gianduia, a sensuous whipped chocolate filling blended with finely chopped hazelnuts, then topped with a whole hazelnut.
Baci was created by Luisa Spagnoli, co-founder of Perugina in 1922. Inspired by pure passion, she set out to create a unique confection as grand as her deep feelings of love for a special someone. Legend says that Luisa would lovingly wrap secret love messages around the Baci she created for her lover. Once introduced to the public, Baci became extremely popular, appealing to young lovers browsing sweet shops of Perugia, Italy. Nearly 100 years later, the original recipe remains unchanged, and each Baci remains ensconced in a love note that reflects the sentiments of love, affection and friendship – and is the Italian way to say “I Love You” worldwide.
Check out the great photos and recipes from the class below and keep scrolling to enter to win the Baci chocolate giveaway (2 lucky winners will receive a 15-piece box of Baci Dark Chocolates!)
In a food processor, blend the Gianduia chocolate and ground hazelnuts together at low speed until they are well blended and a paste is created.
Roll the paste into a rope about the width of a wine cork. Cut into 12 cylindrical pieces.
Melt dark chocolate and heat to 104 degrees F. Drop 3/4 of the dark chocolate on to a marble or steel table. Temper the chocolate by melting it continuously with 2 spatulas until the temperature has reached 80.6 degrees F.
Add the cooler tempered chocolate to the 1/4 tempered chocolate and mix well. The combined chocolate should have a temperature of 87.8 degrees F.
Place a whole hazelnut on top of each cylinder of gianduia.
With a fork, dip each confection into the dark chocolate twice before placing it on a piece of wax paper. Let it rest for about 5 minutes until the shininess has disappeared and the chocolate looks darker and crisp.
Baci are tossed with hot pasta, creating a rich, silky sauce, which pops with roasted hazelnut flavor. It's wonderful plain, but you can dress it up with a splash of hazelnut liqueur and a dollop of whipped cream.
Ingredients
1/2 pound spaghetti
12 Perugina Baci candies
Whipped cream or mascarpone cheese; hazelnut liqueur such as Frangelico (optional)
Instructions
Cook the pasta according to package directions. Drain.
Put 1 whole Baci in each of 4 coffee cups, wine glasses or dessert bowls.
Divide the hot pasta among them and top each with 2 more coarsely crushed Baci.
Serve immediately, topped with a dollop of whipped cream or mascarpone cheese and splash with some hazelnut liqueur.
*THIS GIVEAWAY HAS ENDED – CONGRATULATIONS TO OUR 2 WINNERS, TROY AND SIMON!
I’m proud to host a giveaway for 2 lucky winners to receive a 15-piece box of Baci Perugina Dark Chocolates courtesy of Baci Perugina and Bender Hammerling Group! All you need to do is leave a comment below telling me why you love chocolate and your favorite chocolate recipe idea.
*For additional entries,follow Artful Gourmet on Facebook and Twitter and let me know you’ve done so.
**Follow Baci Perugina on Facebook and Pinterest for even more giveaway entries, leaving separate comments below that you have done so.
Make sure to enter your email address (not public) with your comments so I can contact the winners to receive their Baci chocolates.
***Giveaway begins on Saturday, October 20th and 2 winners will randomly be chosen from the comment entries below on Thursday, November 1st at 12 pm EST.
Good luck and enjoy the recipes!
Look for Perugina and Baci Chocolate at Eataly and other fine shops, or online at Colavitastore.com
THIS GIVEAWAY IS NOW CLOSED FOR ENTRIES. CONGRATULATIONS TO OUR WINNER,
***(Check back for our next awesome cookbook giveaway in the next week!)***
Enter now for a chance to win a copy of La Tartine Gourmande Cookbook! Starting today (5/3/2012), I am running a giveaway for one (1) La Tartine Gourmande Cookbook, courtesy of Roost Books. The giveaway runs until 5/13/2012 at 12:00 AM EST.
To enter the giveaway (open to US/Canadian residents only):
Comment on this post: Tell me what is your favorite Spring dish or ingredient to cook with, and why you would like to win the cookbook to receive one (1) entry;
Share this post on Twitter, Facebook or Pinterest with your followers and get an additional entry for each post;
*** VERY IMPORTANT! ***Leave a separate comment for EACH of your entries or only one entry will be counted.For example, leave your first comment about your Spring dish or ingredient and why you want to win the cookbook, then add another comment to say “I follow you on Twitter”, another to say “I follow you on Pinterest”, etc. If you already follow me on Twitter, Pinterest and/or Facebook let me know as well, since this counts as an entry.
*NOTE:Please make sure to provide your current email address (which won’t be visible on the blog) so I can reach you if you win.
I will randomly draw one lucky winner on Sunday, May 13 at 12AM EST. Good Luck and enjoy the recipes and video from La Tartine Gourmande below!
Beatrice Peltre
If you haven’t seen the food blog LaTartineGourmande.com or heard about the author Beatrice Peltre – Chef, Writer, Recipe Developer and Photographer, then you absolutely need to continue reading on! I recently purchased a copy of her new cookbook La Tartine Gourmande: Recipes for an Inspired Life, which is a delicious, full-color cookbook filled with beautiful, fresh, simple recipes and gorgeous food photography. She has been such an inspiration to me as a Chef, food writer and photographer, and I’ve been following her site for a few years now — I was so excited when her new cookbook came out that I wanted to do a review and giveaway to share her fabulous recipes and photos with my readers.
The cookbook is full of amazing recipes made with whole, fresh ingredients based on French-based techniques. The recipes are beautifully simple and easy enough to make at home or for entertaining friends and family. The book is written in an honest and down-to-earth voice, with stories and recipes based on Bea’s French background and other places she has lived or traveled to such as Denmark, New Zealand and Boston. Bea brings a creative twist to everyday recipes and uses only the freshest ingredients and gluten-free whole grains such as millet, quinoa, buckwheat, and nut flours. She shares stories of cooking with her daughter (Lulu) and takes you inside her kitchen with tales of culinary delight.
Her inspiring recipes are full of bright flavors and colorful fruits and vegetables and tantalizing baked goods. Organized by Breakfast/Brunch, Lunch, Dinner and Desserts, she offers menus within each category for different occasions: The Picnic, Casual Lunch with Friends, The Party with Small Bites, Sophisticated and Elegant Dinners, etc. You’ll find mouthwatering recipes such as Cherry Tomato Tartlets Tatin, Saffron-flavored Crab and Watercress Souffle, and Tagliatelle with Zucchini, Lime and Parmesan. Her gorgeous desserts include Chocolate and Plum Almond Cake with Cinnamon and Apple and Pear Verrines with Millet Crumble and Vanilla Custard and many more luscious creations. Bea has been generous enough to share two of her recipes from the new cookbook below: her lovely Summer Vegetable Tian, and tantalizing dessert Cardamom Chocolate Creme Caramel. Enjoy!
Summer Vegetable Tian
Summer Vegetable Tian
Oh the joy of a melt-in-the-mouth vegetable tian! I have a true weakness for this dish. Originally from the South of France, a tian is a dish in which summer vegetables —similar to those used in a ratatouille — are layered and baked slowly in a low-heated oven. The result is melting layers of flavors and scents that transport you to the Mediterranean. During the summer, when I can get wonderfully aromatic vegetables at the farmers’ market, this is a meal we enjoy weekly. Also, to simplify dinner when you’re busy, prepare the dish ahead of time, or even the day before.
Ingredients
1 tablespoon chopped lemon thyme or regular thyme
¼ cup chopped basil
5 garlic cloves, minced
2 Italian eggplants (280 g; 10 oz), sliced into thin rounds
Sea salt
Olive oil
2 zucchini (400 g; 14 oz), thinly sliced (use a mandoline if you have one)
3 to 4 ripe tomatoes (550 g; 19 ½ oz), thinly sliced
2 fennel bulbs (280 g; 10 oz), thinly sliced (use a mandolin if you have one)
Pepper
Preparation
In a small bowl, combine the chopped herbs and garlic. Place the eggplant slices in a colander and sprinkle them with sea salt. Let them rest for 30 minutes so the moisture releases. Pat dry with paper towels.
Preheat the oven to 320 degrees F (160 degrees C).
Brush a large oven dish with oil and layer your vegetables into it in this order: 1 layer of tomatoes, 2 layers of zucchini, 1 of eggplant, 1 of fennel; repeat this pattern until you run out of vegetables, adding some of the chopped herbs and garlic each time between layers. Season with sea salt and pepper and drizzle generously with oil.
Place the tian in the oven and cook for 1 hour and 15 minutes to 1 hour and 30 minutes, until the vegetables are tender when pierced with a fork. Check regularly to make sure that they do not brown too quickly, covering the dish with a piece of foil paper if that’s the case. Serve warm with a green salad and grilled meat or fish.
Serves 4.
—–
Cardamom Chocolate Creme Caramel
Cardamom Chocolate Crème Caramel
This attractive dessert is made for people like me and Philip who cannot resist anything described with words like “dark chocolate” and “custard.” Maybe you are one of these people too? It offers a rich silky aromatic chocolate flan-like cream balanced by a light caramel sauce that you’ll want to dip your fingers into.
You will need:
Six 6-ounce ramekins
Canola oil, for the ramekins
For the caramel:
½ cup (100 g: 3 ½ oz) fine granulated white sugar
2 tablespoons cold water
1 tablespoon hot water
For the chocolate custard:
2 ¼ cups (530 ml) whole milk
1 vanilla bean, split open and seeds scraped out
5 green cardamom pods, crushed
3 oz (90 g) dark chocolate (70% cocoa)
3 large eggs
2 tablespoons blond cane sugar
Unsweetened cocoa powder, to dust
Preparation
Oil six 6-ounce ramekins; set aside.
To prepare the caramel: Heat the sugar and cold water in a small pot. Swirl the pot in a circular movement so that the sugar absorbs the water. Bring to a boil, then simmer at a medium heat — do not stir the sugar at this point, although you can swirl the pot occasionally — and watch the caramel develop. It will be ready when it’s golden in color, which takes about 8 to 10 minutes. Remove from the heat, add the hot water, and stir quickly. Pour the caramel into the oiled ramekins, making sure to coat the bottom and sides; set aside.
Preheat the oven to 300ºF (150ºC).
To prepare the custard: In a pot, combine the milk with the vanilla bean and seeds and cardamom pods and bring to a boil, making sure that it doesn’t overflow. When it boils, remove from the heat and add the chocolate, whisking quickly so that the chocolate melts evenly. Cover and let infuse for 20 minutes. Discard the vanilla bean and cardamom, and using a fine sieve or chinois, strain the chocolate milk.
In the meantime, using a stand mixer, beat the eggs with the sugar for 1 minute. Pour the chocolate milk in and stir quickly. With a spoon, remove any foam that might have formed at the surface. Divide the chocolate custard among the 6 caramel- filled ramekins and place them in a water bath (see Basic Cooking Techniques, page 27, for instructions). Place the custards in the oven and cook for about 50 minutes. To check if they are ready, jiggle the ramekins a little —the center of the cream should be almost set but not fully (they’ll finish setting once they cool down). Remove the ramekins from the oven and let cool completely. Cover each ramekin with plastic wrap and refrigerate for a few hours, or overnight, until the custard is completely set.
To unmold the crème caramel easily, dip the ramekins in boiling water for 1 to 2 minutes, taking care to not let the water spill in. Run the blade of a knife between the custard and the edge of the ramekins. Turn onto a plate and serve with dusted cocoa on top.
Watch the premiere book trailer for the new La Tartine Gourmande cookbook.Music: “The Winter Song” by the band Au Revoir Simone: www.aurevoirsimone.comVideo: Margaret Singer & Max Freeman of Unusually Fine: www.unusuallyfine.com
For more great recipes and inspiration, visit Bea’s website La Tartine Gourmande
Click here to order your copy of Bea’s Cookbook La Tartine Gourmande
This is a non-paid sponsored post and cookbook giveaway courtesy of Beatrice Peltre and Roost Books.
It’s that time of year again when love is in the air and we’re looking for a romantic dinner to make at home for Valentine’s Day. This is a sinfully delicious dinner menu that will surely impress your loved one – it’s fairly easy and quick to make too. After all, who wants to be slaving away in the kitchen when your sweetie’s in the other room?
You’ll love this savory steak recipe – sauteed and served with a cognac, cream and mustard sauce with a side of roasted garlic and roasted potatoes with garlic and herbs. The mixed greens salad is topped with a creamy shallot vinaigrette dressing and for dessert I’ve included a recipe for a sinfully delicious Chocolate Souffle with Grand Marnier, which can also be made with a splash of dark rum or raspberry Frambois liqueur. Who needs to go out in the cold when you can make a yummy dinner at home? Simply LOVE-LY.
Steak with Cognac Mustard Cream Sauce
Sauteed Steak with Cognac Mustard Cream
Two 3/4 lb steaks (3/4 inch thick) – Delmonico, T-bone, Porterhouse, Sirloin, Strip
1 tbsp vegetable oil
Salt and fresh ground black pepper
4 tbsp cognac
4 tbsp heavy cream
1 1/2 tbsp plus 1 tsp Dijon mustard
Cut excess fat from the steaks and make small incisions around the outside where there is gristle to prevent steaks from curling.
Heat oil in a large skillet over medium high heat, and season steak on both sides with salt and pepper. When oil is hot, add the steaks and saute 2-3 minutes per side (rare) or 4 minutes per side (medium) and remove steaks to a platter, tenting with foil to keep warm.
Remove pan from the heat and discard any fat. Add the cognac, stirring with the juices and scraping brown bits from the bottom of the pan.
Return the pan to high heat and reduce the pan juices and cognac by half, about 3-5 minutes. Add the cream and continue to boil sauce until reduced by half again, about 3 minutes.
Stir in the mustard and remove from the heat. Slice the steak and pour the mustard cream sauce over the steak. Serve with roasted potatoes, garlic and mixed greens salad. A hearty bold red would be delicious to sip along with it!!
Roasted Potatoes with Garlic and Herbs
Roasted Potatoes with Garlic and Herbs
8-10 medium potatoes (Yukon Gold, Fingerlings or New Potatoes)
2-3 tbsp extra virgin olive oil
4 garlic cloves, minced
2-3 tbsp chopped herbs (parsley, chervil, tarragon, chives or rosemary)
Kosher salt
Cut potatoes in quarters or eighths and drizzle them with olive oil. Sprinkle them with chopped garlic and herbs and some kosher salt. Place the potatoes on a baking sheet and bake at 350 degrees until golden brown about 45 minutes.
Roasted Garlic
Roasted Garlic
1-2 heads of garlic
1-2 tbsp extra virgin olive oil
Kosher salt
If you want to roast some garlic along with the steak and potatoes, simply chop up the top of the garlic head to expose the cloves, drizzle with olive oil and sprinkle some salt over them. Wrap in aluminum foil and roast until soft, about 40 minutes. Squeeze the garlic from the skin and mix in with the roasted potatoes and sauteed steak (or rub over toasted crusty French bread as a creamy garlic topping – YUM!)
Mixed Greens Salad
Mixed Greens with Creamy Shallot Vinaigrette
1 egg yolk
2 tbsp wine vinegar (red, white or champagne)
1 tbsp Dijon mustard
2 tbsp minced shallots
3/4 cup extra virgin olive oil
Salt and pepper
4-6 cups mixed greens (arugula, endive, escarole or chicory)
In a small bowl, beat 1 egg yolk with 2 tablespoons of wine vinegar, Dijon mustard and minced shallot. Add olive oil in a slow and steady stream to the mixture and blend well with a whisk to emulsify into a vinaigrette. Add salt and pepper to taste. Add some fresh chopped herbs to the dressing if desired.
Note: Vinaigrette can be stored in the refrigerator for up to a week in an airtight container. Makes 8 servings.
Chocolate Souffle
Chocolate Souffle
7 oz semisweet chocolate, coarsely chopped
4 tbsp Grand Marnier (can substitute Raspberry Framboise liqueur or Dark Rum)
4 egg yolks
1/4 c sugar
8 egg whites, room temp
Preheat oven to 400 degrees. Butter 6 individual souffle molds and coat with sugar.
Bring 2 inches of water to a boil in a medium saucepan and remove from the heat. Place chocolate and liqueur in a heatproof bowl and set it on top of the saucepan. Stir occassionally to melt the chocolate evenly. When the chocolate has melted, remove the pan and cool the chocolate mixture to room temperature.
In a medium bowl, beat the yolks to break up and add 2 tablespoons of the sugar gradually, and beat until the ribbon is formed. Add to the chocolate and blend. (Reserve some of the chocolate sauce for pouring into the center before serving).
Beat the egg whites with a whisk, adding the remaining sugar by tablespoons, to the stiff peak stage. Fold into the chocolate mixture and fill the molds 2/3 of the way full.
Place the molds on a baking sheet and bake until well puffed, 15 to 20 minutes. Crack the centers of the souffles and pour additional chocolate sauce into the center. Serve immediately while still warm.
Makes 6 servings.
Recipes from the Institute of Culinary Education, Techniques of Fine Cooking.