Red Curry Beef w/ Zucchini Noodles

   Red Beef Curry

Since the holidays are coming soon, we all know what THAT means..lots of holiday parties with food and drinks, and with that in mind, I’ve decided to commit to eating healthier and lighter the next few weeks.

Zucchini Noodles Action

I absolutely love my KitchenAid® Spiralizer Attachment that goes with my KitchenAid® Stand Mixer – and I’m so excited to make some healthier low-carb meals! It comes with five different blades for peeling, coring and slicing and is perfect for fresh fruits and vegetables. I love pasta and rice, but spiralized veggies are such a great substitute when I want to lighten up my recipes and eat low carb.

Red Curry Beef Zoodles

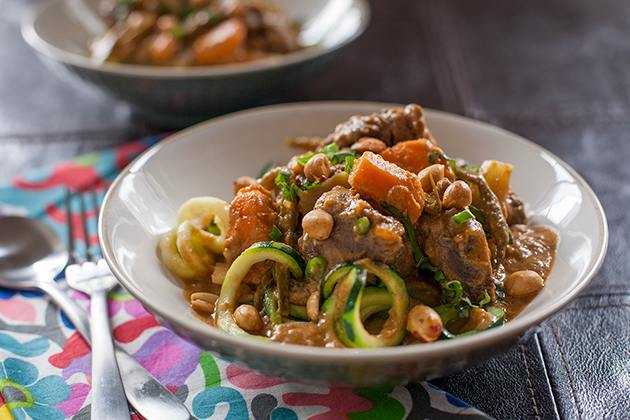
I thought a delicious comfort food dish with a healthy twist would be perfect for the cooler months, and decided to make a Red Curry  Beef with Zucchini Noodles.

Red Curry Beef ingredients

I used lots of fresh, organic ingredients: beef, sweet potatoes, onions, garlic and green beans, and then made a lovely curry sauce with coconut milk, red curry paste, fresh lime juice, fish sauce, some beef broth and a dash of Sriracha to spice it up.

Cutlery and Veggies

I used my Professional Series 3.5″ Paring Knife that came with the 7-piece Professional Series Cutlery set, for chopping my onions and garlic, Thai chilies and basil.

Chop beef into large chunks

The larger Chef’s knife was great for cutting up the large chunks of beef and sweet potatoes with its sturdier grip and large super sharp blade.

Add veggies to curry sauce

My heavy duty KitchenAid ceramic cast iron pot is perfect for making this dish – it cooks evenly and is large enough to make a large pot of curry or stew, and is ovenproof to 500 degrees!

Saute zucchini noodles

The KitchenAid spiralizer attachment is also easy to use! All you need to do is attach it to the KitchenAid mixer, and the spirals come right out perfectly cut. Then you just briefly cook them in a saucepan with some olive or peanut oil, season them with some salt and pepper.

Red Beef Curry

Top the #zoodles with this luscious and creamy curry – lots of great flavors and textures, sweet and spicy – all in one pot. Delish!

Red Beef Curry

This is such a great Winter comfort food dish to make and it’s so easy to make with all the right tools… You’ll definitely want to make this Red Curry Beef  Zucchini Noodles for dinner – tonight!

Red Beef Curry with Zucchini Noodles

Ingredients

  • INGREDIENTS
  • 3-4 medium zucchini
  • 2 1/2 pounds lean stewing beef, (chuck or round), cut into 1 1/2 inch chunks
  • 1 teaspoon Kosher salt
  • 1 teaspoon freshly ground black pepper
  • 3 tablespoons canola oil
  • 1 sweet onion, finely chopped
  • 4 garlic cloves, minced
  • 1/4 cup red curry paste
  • 2 cans (13.5 ounce) unsweetened coconut milk
  • 2 tablespoons Thai fish sauce
  • 2 tablespoons fresh lime juice
  • 2 tablespoons dark brown sugar
  • 1/4 cup beef broth
  • 1 tablespoon Sriracha hot sauce (optional)
  • 1 large handful French green beans, trimmed
  • 3 medium sweet potatoes, peeled and cut into medium chunks
  • 1 (8 ounce) can sliced bamboo shoots, drained
  • 3 tablespoons fresh basil, chopped or torn, for garnish
  • 1-2 Thai green chilies, sliced fine, for garnish
  • 1/2 cup peanuts, for garnish

Instructions

  1. Attach the KitchenAid® Spiralizer Attachment to your KitchenAid® Stand Mixer and choose your desired spiralizing blade. Attach the vegetable skewer to the Spiralizer and secure it to the zucchini. Move the spiralizing blade to the end of the zucchini and turn on the Stand Mixer to low (level 2) to make the spiralized zucchini noodles. Make sure you place a bowl underneath to catch the zucchini noodles as they fall. Set the noodles aside or keep them in the refrigerator until ready to serve.
  2. Cut the beef into 1 1/2 inch large chunks and place in a bowl. Sprinkle with kosher salt and freshly ground black pepper.
  3. Heat the oil over medium-high heat in your KitchenAid® 6.0Qt Cast Iron Cookware and brown the beef in two batches until lightly browned on all sides. Remove the beef from the pot and transfer to a bowl, set aside.
  4. Add the onion and garlic to the same pot and sauté over medium heat for about a minute. Add the curry paste, stirring into the onions and garlic, until lightly fragrant, for about 30 seconds. Add the coconut milk, and deglaze the pan, stirring up all the crispy brown bits with a wooden spoon. Stir in the fish sauce, lime juice, brown sugar, beef broth, Sriracha (if using) and bring the liquid to a boil.
  5. Add the green beans and sweet potatoes and stir into the liquid. Next add the browned beef back in and stir together well. Cover the pot, reduce the heat to low and let simmer for about an hour and 45 minutes. Add the bamboo shoots into the curry and let simmer for another 15 minutes.
  6. Meanwhile, heat a tablespoon of olive oil in your 10? Skillet from the KitchenAid® Stainless Steel 8-Piece Set over medium heat. Add the zucchini noodles, with some salt and pepper to taste, and sauté for a few minutes until the noodles are soft.
  7. Serve the noodles in bowls topped with the Red Beef Curry, garnishing with fresh chopped basil, sliced Thai green chilies and peanuts.
https://www.theartfulgourmet.com/2016/01/red-curry-beef-zucchini-noodles/

CLICK HERE TO VIEW STEP BY STEP VISUALS ON THE KITCHENTHUSIAST BLOG!

Red Beef Curry

Enjoy!

Classic Comfort Food :: Beef Bourguignon

Beef Bourguignon

So Old Man Winter is finally back in town, despite the crazy warm weather we’ve been having lately in New York City. Temperatures drop and there’s nothing better than a big pot of comfort food and a bottle of red to make a girl happy, right? Sometimes it’s the simple things in life that make everything OK…(*sigh). So I did just that this weekend, and made a huge batch of some classic Beef Bourguignon..you know, the classic French braised beef stew with veggies and red wine that Julia Child made famous.

Beef Bourguignon

I made it in a large 6-quart ceramic Dutch oven (KitchenAid brand is my fav!), and it’s chock full of savory deliciousness – sautéed pancetta, braised beef, shallots, garlic and carrots sautéed into a roux with some flour, flambeed brandy (my secret ingredient!), a whole bottle of red (yes, really!) and some beef stock, along with a bouquet garni of fresh herbs (1 bay leaf, 2 sprigs of fresh thyme, 3 sprigs of rosemary wrapped in cheesecloth) slow cooked in the oven for 2 hours.

Beef Bourguignon

The finishing touch of mushrooms and caramelized Cippolini onions sautéed in butter are added in at the end to add tons of buttery, savory flavor to the stew. YUM.

Beef Bourguignon

I don’t think I’ve ever tasted anything so delicious in my life – and I’m quite sure if Julia was still alive, I would make her damn proud, if I do say so myself.

Beef Bourguignon

It’s a flavor bomb in a bowl, my friends, and perfect for a lovely  holiday dinner party for a crowd. Serve in big bowls garnished with fresh Italian parsley over mashed potatoes, polenta or egg noodles, of course accompanied with a bottle of red (Pinot Noir or Burgundy) and some crusty French bread to mop up the sauce. All around a big table of friends and family to partake in all the goodness.

Happy Holidays! 

Beef Bourguignon

Prep Time: 30 minutes

Cook Time: 2 hours, 30 minutes

Total Time: 3 hours

Yield: 10 to 12 servings

This is a delicious heartwarming French Beef Stew made with beef chuck, red wine, brandy, fresh herbs, shallots, garlic, cippolini onions, carrots and pancetta. Perfect one-pot dish for Winter or the holidays!

Ingredients

  • 5 pounds beef chuck, cut into medium-large cubes
  • Kosher salt and freshly ground black pepper
  • 1/2 pound pancetta, diced
  • 1/4 cup vegetable oil
  • 5 large shallots, finely diced
  • 3 large carrots, finely diced
  • 4 cloves garlic, finely diced
  • 1/4 cup brandy
  • 1/3 cup all-purpose flour
  • 1 bottle dry red wine (Pinot Noir or Burgundy)
  • 4 cups beef or veal stock
  • 1 bouquet garni (1 bay leaf, 2 sprigs thyme, 3 sprigs Italian parsley)
  • 3 tablespoons unsalted butter (divided)
  • 5-7 small to medium Cippolini onions, quartered
  • 1 pound mushrooms, sliced (White button or Cremini)
  • Flat leaf Italian Parsley, minced, for garnish

Instructions

  1. Preheat oven to 350 degrees.
  2. Place beef in a single layer on a rimmed baking sheet and season with a couple teaspoons of Kosher salt and freshly ground black pepper.
  3. Heat a large Dutch oven or stockpot over medium-high heat for several minutes to get it hot.
  4. Add pancetta and cook until crispy and browned, drain on paper towels and set aside.
  5. Increase the heat to high and add the beef in to the pot in a single layer and brown on all sides, turning with tongs (be careful not to crowd or overfill the pot as you will need to cook beef in batches to get a nice browning).
  6. Place the browned beef back on to the baking sheet and set aside.
  7. Add the oil and diced shallots and carrots to the Dutch oven and cook for a few minutes. Lower the heat to medium-high and continue to saute until they begin to soften, about 10 minutes.
  8. Add the brandy and flambe (light it in the pan with a long lighter or match) and let the flames keep going for as long as possible, until they go out to burn off alcohol.
  9. Reduce heat to medium, add flour and stir together with the vegetables for a few minutes to make a roux base for the stew.
  10. Next deglaze the pan by pouring in the red wine, a little bit at a time, stirring well to incorporate and remove any lumps, scraping the brown bits off the bottom of the pan (these babies are full of flavor!)
  11. Add 3 3/4 cups of the stock, browned meat and bouquet garni and bring to a boil over high heat.
  12. Remove pot from the heat, cover and cook the stew in the oven for 2 hours, until meat is fork tender. (The meat should shred/fall apart easily when you pierce it with a fork - if not, place it back in the oven for another 15-20 minutes).
  13. While stew is cooking, caramelize the onions in a medium saute pan with 1 tablespoon of butter and salt and pepper, until the onions are lightly browned.
  14. Add the remaining 1/4 cup stock and cover, reduce heat to medium-low, and cook for about 15-20 minutes, stirring occasionally, until the onions are soft and glazed and liquid is evaporated.
  15. Transfer onions to a bowl and set aside.
  16. In the same pan, turn the heat up to high. Melt 2 tablespoons of butter, the mushrooms, salt and pepper to taste, sear over high heat until mushrooms are lightly browned, about 5 minutes. Remove from the pan and mix into the caramelized onions, set aside.
  17. Remove the stew from the oven and gently stir in cooked pancetta, mushrooms and onions. Adjust seasonings (salt and pepper to taste).
  18. Serve the stew in bowls with a sprinkling of fresh parsley over mashed potatoes, polenta or egg noodles, with a glass of red and crusty bread to mop up the sauce of course!

Notes

Recipe adapted from Mother's Best Comfort Food Cookbook.

Schema/Recipe SEO Data Markup by Yummly Rich Recipes
https://www.theartfulgourmet.com/2015/12/classic-comfort-food-beef-bourguignon/

Beef Bourguignon

Other Beef Bourguignon recipes you may enjoy:

Julia Child’s Beef Bourguignon

Slow-Cooked Beef Bourguignon The Kitchn

Martha Stewart Beef Bourguignon

Sweet & Savory Mini Tarts

Sweet & Savory Mini Tarts

With the holidays approaching, it’s time to start thinking about fun food to make for all the parties and get togethers with family and friends. I love making appetizers, mini tarts, and small bites for potlucks and parties because it’s fun to experiment with different flavor combinations and they’re generally easy to transport.

One of my favorite things to make are  Sweet and Savory Mini Tarts, and I’ve used my KitchenAid® Professional-Grade Nonstick Mini Pie Pan to whip up two delicious tarts that you can bring to your next holiday soiree. I love this pie pan because its nonstick professional-grade construction and removable bottoms make it easy to work with. And the pre-engraved ridges for the crust ensure that all of your tarts and mini pies come out looking perfect!

Cranberry Almond Mini Tarts

My Mini Cranberry Apple Almond Tarts are super delicious – sweet and tangy with a little bit of crunch, made with fresh cranberries, orange juice, honey, apples, cinnamon and chopped almonds.

Mini Savory Tarts

I also made some savory Mini Bacon, Veggie and Cheese Tarts that are great for a holiday brunch or even a small evening get together with friends and family. They’ve got tons of good stuff inside too – eggs, cream, shredded cheese, crispy bacon and lots of fresh sautéed veggies like zucchini, mixed bell peppers, green onion and garlic with a touch of fresh thyme for garnish.

Mini Sweet & Savory Tarts

So easy to make and so delicious and fun for a holiday party!

I’d love to hear in the comments below what you would make in the mini pie pan for your holiday party – sweet or savory? Or both? What flavors and ingredients would you use? How would you change up the crust? Be sure to share your take on these sweet and savory tart recipes with us on Instagram using #MadeWithKitchenAid for a chance to be featured.

Happy holidays!

Check out how i made them with my KitchenAid mini pie pan Stainless Steel cookware and get the #recipes on the Kitchenthusiast blog HERE!

Disclaimer: As a Kitchenthusiast Contributor, I have been compensated by KitchenAid for this post, but this post represents my own opinion.*

Wine-Braised Chicken w/ Bacon, Veggies & Herbs

Wine-Braised Chicken with Bacon, Veggies & Herbs

As the weather cools down in the late fall season, there’s nothing I love more than cooking a big one-pot comforting dish on a Sunday afternoon. One-pot dishes are so easy to make, and the enticing smells from the oven are enough to wipe out any winter blues that might be coming on. Welcome my Wine-Braised Chicken with Bacon, Veggies and Herbs. 

KitchenAid 6 Qt Ceramic Dutch Oven

I love making hearty braised dishes with meat and vegetables because they’re easy and so good, especially in my KitchenAid® 6.0Qt Cast Iron Cookware. It’s big enough to make a meal for a crowd, and it’s enameled with cast iron inside which makes it the perfect vessel to cook slow braised dishes, roasts, stews, soups, chilis and any one-pot meals. It even has a grill pan inside the lid! How cool is that?

Wine-Braised Chicken with Bacon, Veggies and Herbs

My Wine-Braised Chicken has tons of goodness inside: chicken thighs, shallots, bacon, cipollini onions, garlic, fresh rosemary and thyme, bacon and carrots. It’s slow-cooked into a big pot of deliciousness with white wine, chicken broth, and then a reduced  au jus cream sauce served over the top.

Wine-Braised Chicken with Bacon, Veggies and Herbs

This is such a delicious and easy recipe to make and it’s pure comfort food perfect for a chilly Winter day. The best part is you only have to cook and clean in one pot, which is awesome. (More time to snuggle under the blankets and watch movies by the fireplace!)

I’d love to hear what you would make in your KitchenAid® Cast Iron Cookware by experimenting with my recipe. Would you use a different meat, like beef or pork? What vegetables would you substitute or add? Would you try a different sauce for the recipe?

Share your take on this Wine-Braised Chicken recipe on the KitchenAid Instagram page using #MadeWithKitchenAid for a chance to be featured!

CLICK HERE FOR THE FULL RECIPE AND STEP-BY-STEP INSTRUCTIONS ON THE KITCHENAID BLOG!

Beef Enchilada Tortilla Casserole for Game Day!


Beef Enchilada Tortilla Casserole


It’s finally Fall (Yay!) and football season is in full force which means fun tailgating and parties with friends mixed with lots of delicious football party food and drinks! My favorite time of year.

Beef Enchilada Tortilla Casserole

I’ve partnered with Mission Foods to create a delicious Game Day recipe for serving a crowd with their awesome flour tortillas, and I present to you my Beef Enchilada Tortilla Casserole.

Beef Enchilada Tortilla Casserole


It’s made with ground beef and taco seasoning, onions, garliccorn, jalapeños, chopped tomatoes, beef broth and LOTS of cheese, all baked in layers of spicy, cheesy, ooey-gooey goodness with the flour tortillas in a 9-inch pie pan. Then it’s served cut into wedges and topped with some fresh green onions. You can also serve it with some sour cream and cilantro for extra garnish, if you like, on the side.

Beef Enchilada Tortilla Casserole


I love making casseroles and one-pot dishes in the Fall, and especially for parties with friends because they’re easy to make and easy to transport and serve, and they are usually a huge hit on the food table! This one will disappear fast so you might want to double the recipe for a big crowd – trust me!

Group8_Soft_Flour_Tortillas

I’m also hosting a giveaway for my readers to win 2 packs of Mission Foods Tortillas – all you need to do is leave a comment and your email below telling me how you would use the tortillas to make a delicious recipe for your Fall Football party! A winner will be chosen at random.

Beef Enchilada Tortilla Casserole

Hope you enjoy my super yum recipe and enter for a chance to win tortillas to make your party more delicious and fun too!

Mission Foods Football Party Food

Beef Enchilada Tortilla Casserole

Beef Enchilada Tortilla Casserole for Game Day!

Prep Time: 30 minutes

Cook Time: 10 minutes

Total Time: 40 minutes

Yield: 6-8

Serving Size: 1 wedge

This Beef Enchilada Tortilla Casserole is a super easy and tasty dish to make for Football season! Made with Mission Foods flour tortillas, all layered with a spicy enchilada beef, mixed with onions, garlic, corn, tomatoes, broth and jalapeño and lots of cheese in the layers and on top! Garnished with scallions, sour cream and cilantro if desired...and DIG IN!

Ingredients

  • 1 pound ground beef
  • 1/2 onion, chopped
  • 1 tablespoon butter
  • 2 garlic cloves, minced
  • 1 1/2 tablespoons all-purpose flour
  • 1 cup beef broth
  • 1/2 packet taco seasoning
  • 1 cup petite diced tomatoes and juice (or 1 8-ounce can tomato sauce)
  • 1 cup frozen corn
  • 1 jalapeno, chopped
  • 4 large Mission Foods flour tortillas
  • 1 6-ounce package shredded Mexican Blend cheese (Colby, Monterey Jack and Cheddar)
  • 1-2 scallions, sliced, for garnish
  • 1/2 cup sour cream, for garnish (optional)
  • 2-3 tablespoons cilantro, chopped, for garnish (optional)

Instructions

  1. Preheat oven to 400 degrees F.
  2. Heat a large nonstick skillet over medium-high heat. Add ground beef and onion to pan and cook for about 5-6 minutes until browned and crumbled.
  3. In a separate medium saucepan, melt the butter and sauce the garlic for 1 minute until lightly golden, sprinkle with flour and stir, cooking for 30 seconds.
  4. Add broth, taco seasoning, tomatoes, corn and jalapeños to the saucepan and bring to a boil.
  5. Reduce heat and simmer for about 5 minutes.
  6. Add 1 1/2 cups of the tomato-corn-jalapeno mixture to the cooked ground beef and onions in the large saute pan, mixing together and reserving the rest for the top layer of the casserole.
  7. In a 9-inch pie plate, place 1 tortilla on the bottom. Top with 1 cup of the beef mixture, and sprinkle with a layer of the shredded cheese. Repeat layers 2 more times, ending with the 4th tortilla on top.
  8. Spread the reserved tomato mixture over the tortilla and top with the rest of the shredded cheese.
  9. Bake at 400 degrees for about 10 minutes until cheese is melted and golden.
  10. Let cool slightly, then cut into wedges and serve with sliced green onions, and sour cream and cilantro (if desired).

Notes

You can also substitute ground turkey or chicken for the ground beef. For a large crowd, I suggest doubling the recipe to make two casseroles as this one will disappear fast!

Schema/Recipe SEO Data Markup by Yummly Rich Recipes
https://www.theartfulgourmet.com/2015/10/beef-enchilada-tortilla-casserole-for-game-day/

STEP-BY-STEP PHOTOS

This slideshow requires JavaScript.

Check out Mission Foods website for all their great products!
Mission Foods

Join Mission Foods Insiders Club for special deals and rewards:
Mission Insiders!

Disclosure: I’m required to disclose a sponsored partnership between our site and Mission Foods. I have been compensated in exchange for this post in the form of payment, product or experiences. #spon


Zucchini & Sweet Potato Pancakes w/ Homemade Apple Sauce

Zucchini Sweet Potato Pancakes

Now that the fall season has finally arrived, it’s time to start cooking with seasonal ingredients that are richer in color and warmer in flavor. One of my favorite dishes to make in the fall are Potato Pancakes, served with applesauce and sour cream, just like my Grandma used to make.

KitchenAid Juicer


I recently got a KitchenAid® Juicer and Sauce Attachment for my Stand Mixer and decided to do a twist on this traditional family recipe by making Homemade Applesauce and making the pancakes out of zucchini and sweet potatoes to add some healthy color and fall flavors to the dish. I used my KitchenAid® Stainless Steel 3-Quart Saucepan, which was perfect for cooking the applesauce in, and a fantastic KitchenAid® Copper Core 12″ Nonstick Skillet, great for cooking the pancakes with it’s large base and even, quick heat distribution.

Homemade Apple Sauce

Homemade Apple Sauce

Zucchini Sweet Potato Pancakes

Zucchini and Sweet Potato Pancakes with Cinnamon Sour Cream

Healthy, delicious and super easy to make!

CLICK HERE FOR THE FULL RECIPE ON THE KITCHENAID BLOG

Seafood Corn Chowder

Seafood Corn Chowder

Seafood Corn Chowder

Now that summer is coming to an end, I thought it would be appropriate to make one last dish to celebrate the season. And what would be better than something with fresh seafood and something that requires minimum cooking effort in this scorching weather?

Seafood

I decided to make a delicious Seafood Corn Chowder, chock full of seafood – lobster, scallops, crabmeat, shrimp, fresh corn,

fresh veggies

and all kinds of fresh veggies – multi-colored bell peppers, onions, potatoes, garlic and spices, all cooked in a chicken stock finished with cream and garnished with fresh chives and parsley.

Seafood Corn Chowder 2

I made this chowder in my gorgeous KitchenAid® Professional Seven-Ply 8-Quart Stockpot, which is perfect for making soups, stews, chili, and one-pot dishes for a crowd.

Pour Cream

It’s extra large and made out of multi-layered stainless steel so it’s sturdy and heats up quickly and evenly. It also has optional pasta and steamer inserts, which I love, that fit right inside the large pot and lid. This is definitely one of my favorite go-to pots that I use for everything and it all fits conveniently together with a stainless steel lid to seal in moisture and heat.

Seafood Corn Chowder 3

It’s heaven in a bowl, really.

READ THE FULL STORY & GET THE RECIPE ON THE KITCHENAID BLOG HERE

Cheesy Skillet Beef Goulash

Cheesy Skillet Beef Goulash


It’s summer and OH. SO. HOT. And I honestly haven’t really been in the mood to cook  or do anything lately except lie down in the AC or chill on the beach – but a girl’s gotta eat, right?

Cheesy Skillet Beef Goulash

I’ve also been a bit blue because my Dad is in the hospital and having double bypass heart surgery on Monday morning which is a bit scary..and too much to deal with.

Kristen and Dad

So I decided I needed a dose of some comfort food this weekend to cheer me up and bring me a little closer to home with Dad. 🙂

Cheesy Skillet Beef Goulash

I had a few samples of RedPack petite diced tomatoes on hand and thought they would be perfect for a comforting baked pasta dish – something that reminded me of what Mom used to make for us for dinner.

Cheesy Skillet Beef Goulash

So I whipped up a Cheesy Skillet Beef Goulash – made with ground beef, tomatoes, onion, garlic, elbow macaroni and three cheeses – all cooked together in one skillet, then baked into a pot of bubbly, cheesy goodness.

Cheesy Skillet Beef Goulash

Super simple to make and definitely comforting at that. I think I’ll get through the weekend and Dad’s surgery just fine…after I have some of this deliciousness..and maybe a nap in the A/C. 🙂

Kristen and Dad

Cheesy Skillet Beef Goulash

Prep Time: 10 minutes

Cook Time: 20 minutes

Total Time: 30 minutes

Yield: 6-8

This is a classic cheesy baked pasta dish made with macaroni, ground beef, diced tomatoes, onion and garlic, topped with Parmesan and shredded cheddar cheese.

Ingredients

  • 1 package elbow macaroni
  • 2 tablespoons cooking oil
  • 1 medium onion, chopped
  • 3-4 large garlic cloves, minced
  • 1 pound lean ground beef
  • 1- 28 ounce can RedPack petite diced tomatoes
  • 1 cup tomato sauce
  • 1/2 cup grated Parmesan cheese, plus extra for garnish
  • 1 tablespoon Italian seasoning
  • 1 teaspoon red pepper flakes
  • Kosher salt, to taste
  • Fresh ground black pepper, to taste
  • 1/2 cup shredded mild cheddar cheese
  • 1 cup shredded extra sharp cheddar cheese

Instructions

  1. Bring a large pot of water to a boil and cook the macaroni, drain and set aside.
  2. Meanwhile, In a large nonstick skillet, add oil and heat until it's shimmering. Add onion, and cook over medium heat until onion is soft, about 5-7 minutes. Add garlic and cook for about 30 seconds.
  3. Add the ground beef and brown until no longer pink, stirring and breaking it up as you cook.
  4. Add the diced tomatoes and tomato sauce to the skillet and stir. Cook the mixture for about 5 minutes or so until heated through.
  5. Stir in the cooked pasta and Parmesan cheese, Italian seasoning, red pepper flakes, salt and pepper, mixing well. Adjust seasonings to your taste buds accordingly...:)
  6. Top the pasta mixture with both shredded cheeses and bake in the oven for about 10 minutes until the cheese is melted and bubbly.
  7. Top with additional grated Parmesan cheese if desired and serve hot immediately.

Notes

Goes great with a green salad and garlic bread and a crisp white wine like Pinot Grigio or a light fruity red table wine.

Schema/Recipe SEO Data Markup by Yummly Rich Recipes
https://www.theartfulgourmet.com/2015/08/cheesy-skillet-beef-goulash/


Veggie, Bacon & Cheese Tarts in a Toasted Quinoa Crust

Veggie, Bacon & Cheese Quinoa Tarts

I love making savory tarts and pies, but unfortunately I don’t love the carbs and calories that come along with them. It’s also Summertime, and I’m trying to cook and eat lighter than usual…and the Fall season will come soon enough with all that yummy comfort food!

Quinoa Tart 1

I’ve been experimenting lately with alternatives to pasta and dough – things like zucchini, cauliflower, almond flour, and quinoa. Not only are they lighter, but also , gluten-free and less carbs than traditional flours and equally as satisfying and tasty!

Veggie, Bacon & Cheese Quinoa Tarts

I found a recipe on Cooking Light for a savory Fall tart made in a toasted quinoa crust and decided to experiment a little with the crust, fillings and flavors. MISSION ON.

Toasted Quinoa

I love the flavor of the nutty toasted quinoa, which is done in the oven and gives a nice depth of flavor and crunch to the tart crust.

Toasted Quinoa Tart Shells

I mixed in some Bob’s Red Mill almond flour, corn starch, Parmesan cheese and an egg for binding the quinoa, then added a little garlic salt and olive oil to bring it all together for the crust. Then I pressed the quinoa mixture into four small tart pans and baked for about 10 minutes before filling them and baking again.

Mascarpone & Cheddar

While the tart crusts were baking, I made a savory filling with mascarpone and cheddar cheese and spooned in this delightful cheesy goodness on to the par-baked crusts.

Crispy Cooked Bacon

I also cooked up some crispy gorgeous bacon in the oven while the tarts were baking..(for about 20 minutes or so)..

Top with Crispy Bacon

then chopped it to pieces and layered it on top of the cheeses. HELLO PRETTIES. Come to me.

Blanched Cauliflower and Peas

Next I started filling the tarts with my blanched cauliflower and baby peas,

Veggie Tart fillings

more Parmesan cheese and a drizzle of olive oil,

Ready to bake the tarts again

popped them back in the oven..

Tarts Cooling

and baked these cuties for another 5-10 minutes and let them cool on a wire rack for a few…

Tarts cooling

the anticipation of these delicious things in my mouth is MOUNTING.

Cooked Quinoa Tarts

Once the tarts were cooled a bit, I garnished them with some fresh chopped basil, chives and freshly cracked black pepper and a few red pepper flakes. Mini Green Goddesses!

Veggie, Bacon & Cheese Quinoa Tarts

And Oh Holy Delicious.

Veggie Bacon & Cheese Tarts in a Toasted Quinoa Crust

This is a great base recipe for any savory tart really – feel free to substitute different fillings for the tarts depending on the season..butternut squash and spinach in the Fallcorn, tomatoes and zucchini in the Summer… roasted carrotspotatoes and Gruyere in the Winter..asparagus and leeks in the Spring…oh, the ideas are endless!

Veggie Bacon & Cheese Tarts in a Toasted Quinoa Crust

Veggie, Bacon & Cheese Tarts in a Toasted Quinoa Crust

Prep Time: 30 minutes

Cook Time: 30 minutes

Total Time: 1 hour

Yield: Makes four 4 5/7-inch tarts

Serving Size: 1 tart

This is a gluten-free tart recipe made with a toasted quinoa crust, filled with a savory filling of mascarpone and cheddar cheese, bacon, cauliflower, peas topped with Parmesan, and fresh basil and chives.

Ingredients

  • Toasted Quinoa Tart Crust:
  • 1 cup uncooked quinoa
  • 1/2 cup almond meal flour
  • 1 tablespoon cornstarch
  • 2 tablespoons Parmesan cheese
  • 1/4 teaspoon garlic salt
  • 2 tablespoons olive oil
  • 1 large egg, beaten
  • Cooking spray
  • Tart Filling:
  • 1 cup cauliflower florets
  • 1 cup baby green peas, frozen
  • 4-5 slices of bacon, cooked and chopped
  • 1/2 cup mascarpone cheese, softened
  • 1/2 cup shredded cheese (Cheddar, Jack, or Gouda)
  • 4 tablespoons grated Parmesan cheese
  • 1 tablespoon olive oil, divided
  • 1/2 teaspoon coarsely ground black pepper
  • 2 tablespoons chopped fresh basil, for garnish
  • 1 tablespoon finely minced chives, for garnish

Instructions

  1. Make the Toasted Quinoa Tart Crusts:
  2. Preheat oven to 350°.
  3. Place quinoa on a baking sheet. Bake at 350° for 10 minutes or until golden brown; cool.
  4. Place half of quinoa in a food processor; pulse 30 seconds.
  5. Transfer to a large bowl. Add remaining toasted quinoa, almond meal, cornstarch, and salt to bowl; stir to combine.
  6. Add oil and egg; stir until mixture is crumbly but holds together when pressed.
  7. Press into bottom and up sides of four 4 5/7-inch removable-bottom fluted tart pans coated with cooking spray.
  8. Bake at 350° for 10 minutes or until golden, but not completely cooked (you will put them back in the oven later after you fill them with the veggies, bacon and cheese.)
  9. Prep the Tart fillings:
  10. While the tart crusts are baking, chop the cauliflower into small florets and measure out the baby peas.
  11. Blanch the veggies in boiling water for about 2-3 minutes, then drain and rinse them in very cold water or shock them in an ice bath, set aside.
  12. Cook the bacon and drain, chop into small chunks, set aside.
  13. Measure out the mascarpone, Cheddar and Parmesan cheese, and chop basil and chives, set aside.
  14. Fill the Tart Crusts:
  15. Spread the mascarpone cheese evenly in bottom of each tart crust.
  16. Top each tart with shredded cheese, then crumbled bacon.
  17. Arrange cauliflower and peas evenly over cheese and bacon mixture on the tarts and drizzle with some olive oil, Parmesan cheese and black pepper.
  18. Bake tarts for another 5-7 minutes in the oven.
  19. Remove tarts from the pans; cool completely on a wire rack.
  20. Garnish with fresh chopped basil and chives, serve warm.

Notes

Recipe adapted from Cooking Light, Nov 2014.

Schema/Recipe SEO Data Markup by Yummly Rich Recipes
https://www.theartfulgourmet.com/2015/07/veggie-bacon-cheese-tarts-in-a-toasted-quinoa-crust/

Other Tart Recipes you might enjoy:

Savory Harvest Fall Tart

Quinoa Tart with Zucchini & Sundried Tomato Dressing

Gluten-Free Tomato Tart

Gluten-Free Spinach and Onion Tart

Cooking with Color 4 Kids TV Summer Edition + Recipes from Spring Show

#CookingwithColor4Kids


My #CookingwithColor4Kids TV Show Summer Edition is LIVE and what a fun show we have for you…Thanks to all the amazing kids and parents who were on the show and for cooking and sharing all your awesome Summer recipes with us, even to the little ones who came in their Bob-2016-Revolution-Flex stroller!

CWC_SummerFoods

Lily McGee & Jennifer Hess McGee made us some fresh and healthy Summer Jar Salads

Maxwell Leduc from Canada talks about his favorite Summer dishes to make and how he cooks gluten-free

Ava Llorca makes us fresh Strawberry Shortcake from scratch – her favorite Summer dish

Deborah Berg from Israel makes us a delicious Beet Salad fresh from her garden

Jacob and Cooper Nixon from Charlotte NC make Strawberry Shortcakes and Caprese Salads with fresh fruits and veggies from their Dad Jeff Nixon‘s garden

Jonathan and Nichelle Pace talk about how they make homemade Pancakes and BBQ Chicken

LIVE on our YouTube Channel at – https://youtu.be/MDVf1k-3Eng

BRIC

Also airs on Brooklyn Public Network television tomorrow Sat July 18 at 11:30 am EST in Brooklyn on:
Cablevision channel 67
Time Warner channel 34
RCN channel 82
AND in all 5 boroughs of #NYC on Verizon channel 42

VIEW ONLINE LIVE at BCAT TV Network Channel 1 Sat July 18 at 11:30 am – http://bricartsmedia.org/community-media/watch-brooklyn-public-network

COOKING WITH COLOR 4 KIDS SPRING 2015 SHOW

AND…if you missed our Spring Show from May – you can also watch it online at https://youtu.be/YYVsNgMpZig

I made some fresh and healthy Caprese Salad Skewers, Straw and Hay Pasta with Peas & Pancetta in a light creamy Parmesan Sauce and a delicious Strawberry Rhubarb Eton Mess for dessert! I also had a Guest Chef from our video crew make a big batch of Mediterranean Tabbouleh for us on the show..so good!

HealthCorps Kids

Also check out the video also on our Spring show of the HealthCorps kids from a high school in the Lower East Side, NYC cooking Fish Tacos for Cinco de Mayo – so many healthy and fresh things going on over there!

This slideshow requires JavaScript.

Cooking with Color 4 Kids was also just featured in Lodging Magazine this month – read the article online here!

Below are my #recipes from the Spring show..hope you enjoy and Happy Summer!

Caprese Salad

Caprese Salad Skewers

Ingredients
1 container of cherry tomatoes
1 bunch of fresh basil
1 container fresh mozzarella balls
1/2 cup extra virgin olive oil
1/2 cup balsamic vinegar or 1 cup for glace
Sea salt
Freshly cracked black pepper

Preparation
Assemble tomatoes, rolled basil leaves and mozzarella balls on medium-sized toothpicks or small wooden skewers.

Drizzle with olive oil, 1/4 cup of balsamic vinegar and salt and pepper.

To make balsamic glace (a thicker cooked down version of balsamic vinegar), add one cup of balsamic vinegar to a sauce pan over medium heat. Once it comes to a boil, reduce the heat to simmer and cook for about 10-15 minutes until it reduces to a syrupy consistency. Dip a spoon into the vinegar to check for thickness. As it cools the syrup will also thicken.

Drizzle balsamic glace evenly over the caprese skewers and serve immediately.

Makes 12 skewers.

Straw and Hay Pasta

Straw and Hay Pasta 

Ingredients

Kosher salt and freshly ground pepper
4 scallions
2 cloves garlic, minced
2 tablespoons olive oil
1 cup frozen baby peas, defrosted
4 ounces (1/2 cup) diced pancetta
2/3 cup chicken broth
1/2 cup heavy cream or half and half
1/2 pound dry egg fettucine or linguine
1/2 pound dry spinach fettucine or linguine
1/2 cup grated Parmesan cheese
Fresh parsley, chopped, for garnish

Preparation

Bring a large pot of salted water to a boil over high heat.

Meanwhile, heat olive oil in a large saucepan over medium heat.

Trim the scallions and slice into thin strips and then crosswise about 3 inches long. Add the scallions to the pan and cook for about 1 to 2 minutes until wilted.

Add the diced pancetta, and cook for about 5 minutes or so until it gets crispy and browned.

Pour in the broth and bring to a boil. Reduce the sauce to a simmer and cook until the liquid is reduced by half. Add the heavy cream and continue to simmer another 2-3 minutes.

Stir the pasta into the salted boiling water and let return to a boil, then cook for 9 minutes until al dente (slightly firm and chewy).

Remove the cooked pasta from the water with a slotted spoon and add to the sauce in the skillet, stirring to coat. Cook over high heat until liquid reduces to a creamy sauce.

Remove from the heat and stir in the Parmesan cheese. Garnish with black pepper and freshly chopped parsley, if desired.

Serves 6.

Strawberry Rhubarb Eton Mess

Strawberry Rhubarb Eton Mess

Ingredients

Meringues
2 egg whites
1/2 cup sugar
1/4 teaspoon vinegar
1/4 teaspoon corn starch
1/2 teaspoon vanilla extract
Strawberry Rhubarb Compote
1 cup chopped rhubarb
1 cup sliced strawberries
1/2 cup orange juice
1/4 cup sugar or honey
1 teaspoon orange or lemon zest

Whipped Cream
1 1/2 cups heavy cream
2 tablespoons sugar
1/2 teaspoon vanilla extract

Preparation

Make the Meringues:
Preheat oven to 250 degrees F. Line a large baking sheet with parchment paper or silicone mat.

Whisk the eggs with a mixer on medium speed until soft peaks form. Increase speed to medium high and slowly add the sugar, one spoonful at a time. Continue beating until sugar is completely incorporated and the stiff peaks form. Gently fold in the vinegar, cornstarch and vanilla with a spatula.

Spoon the meringue into twelve large dollops on the baking sheet.

Bake for 90 minutes or until the surface of the meringues are dull and they feel dry to the touch. Let the meringues cool for at least an hour or overnight.

Strawberry Rhubarb Compote:
Preheat a sauce pan over medium high heat, and add the rhubarb, strawberries, OJ, sugar and orange or lemon zest.

Bring to a boil and stir occasionally, then reduce the heat to low and simmer for about 10 minutes until the fruit is soft and starts to fall apart.

Set aside and let cool to room temperature (or store in an airtight container in the refrigerator if making ahead for up to 1 week).

Whipped Cream: (can also use store-bought if you prefer to not make your own)
In a large mixing bowl, whip together the heavy cream, sugar and vanilla with a whisk until soft peaks form.

Assemble the Eton Mess:
Crumble meringues into a large mixing bowl.

Top with spoonfuls of whipped cream and strawberry rhubarb compote in layers and fold until just barely combined.

Divide evenly between six dessert bowls or glasses and serve immediately.

Serves 6.

tabbouleh

Mediterranean Tabbouleh

Ingredients

1/2 cup fine bulgur
3 tablespoons olive oil
1 cup boiling hot water
2 cups finely chopped fresh parsley
1/2 cup chopped fresh mint
2 medium tomatoes, cut into 1/4 inch pieces
1/2 seedless cucumber, peeled, cored and cut into 1/4 inch pieces
3 tablespoons fresh lemon juice
Kosher salt and freshly ground black pepper, to taste

Preparation

Stir together bulgur and 1 tablespoon oil in a heatproof bowl. Pour boiling water over the bulgur, then cover bowl tightly with plastic wrap and let stand 15 minutes. Drain in a fine mesh colander, pressing on bulgur to remove any excess liquid.
Transfer bulgur to a bowl and toss with all the ingredients, and 2 tablespoons of olive oil, until combined well.
This dish can be served as a side salad or main dish, along with an assortment of grilled meats, pita bread and falafel with hummus.

Makes 4 to 6 servings.

Download the recipes below as a PDF:

CWCMay2015_CapreseRecipe

CWCMay2015_EtonMessRecipe

CWCMay2015_StrawHayPastaRecipe

CWCMay2015_TabboulehRecipe

#cookingwithcolor #cookingwithkids #kristenhess #theartfulgourmet #artfulgourmet #ediningnews #bric #foodtv #springrecipes #summerrecipes