One-pot savory dishes are one of those things I crave when it’s cold outside because it’s cozy and warming and just plain darn tasty and easy to make. I also love roasting veggies in the Winter because they’re no-fuss when I’m busy doing other things and don’t want to stand over a stove all day washing dishes for hours afterwards. (Can you tell I’m ready for a holiday vacation? lol)
This recipe for Maple-Mustard Chicken Thighs is a perfect one-pot dish with a buttery, sweet, tangy sauce made with maple syrup, Dijon mustard (Kozlik’s is my favorite!), garlic and some Indian hot red pepper and Tandoori spices (a great blend of coriander, cumin, paprika, garlic, ginger, cardamom and saffron).
It’s baked together into a big pot of savory goodness (in my new purple KitchenAid ceramic baking dish..which I LOVE!), served with some Roasted Curry Cauliflower tossed in olive oil, cumin, curry powder, and garlic salt. Super easy and super delicious. I got my Indian spices at Penzey’s at Grand Central Market in NYC and the DekalbInternational Farmer’s Market in Atlanta GA, but you can find them in almost any gourmet spice store or market or online on Amazon.com.
This is a savory Indian dish made with a buttery, maple-mustard sauce, served with roasted curry cauliflower with a hint of Tandoori spices and cumin.
Ingredients
Buttery Maple-Mustard Chicken Thighs:
8 tablespoons unsalted butter
1/2 cup maple syrup
1/4 cup Dijon mustard
1/4 teaspoon Indian red pepper
1/4 teaspoon garlic salt
1 teaspoon Tandoori spices
Freshly ground black pepper
1 - 1 1/2 pounds boneless chicken thighs
Roasted Curry Cauliflower:
4 tablespoons extra virgin olive oil
1/2 teaspoon cumin seeds
1/2 teaspoon curry powder
1/2 teaspoon garlic salt
Dash of freshly ground black pepper
1 large head cauliflower, cut into florets
Non-stick cooking spray
Instructions
Buttery Maple-Mustard Chicken Thighs:
Preheat oven to 375 degrees.
Add butter (cut into pieces), maple syrup, mustard, red pepper, garlic salt, Tandoori spices and black pepper to a ceramic or glass baking dish and melt butter with spices for about 5-7 minutes. Remove dish from oven and whisk ingredients together.
Add chicken thighs to the baking dish, coating both sides of chicken with the buttery spicy sauce and bake in the oven for about 35-40 minutes, until chicken is cooked through.
Serve chicken hot, with additional sauce drizzled over, with a side of Roasted Curry Cauliflower (recipe follows).
Roasted Curry Cauliflower:
Combine olive oil, cumin, curry, garlic salt and black pepper in a large mixing bowl.
Wash and cut cauliflower into large florets and toss with olive oil and spice mixture, coating cauliflower evenly.
Spray a large baking sheet with non-stick cooking spray and arrange cauliflower in a single layer.
Roast at 375 degrees for about 45 minutes to an hour, until cauliflower is tender and browned. Toss the cauliflower occasionally while roasting to evenly brown.
Serve hot with Maple-Mustard Chicken and some extra sauce on top, if desired.
Notes
Maple-Mustard Chicken recipe adapted from Apricot Lane Farms.
Once the holidays are over, it’s time for a break from all the super rich food and cocktails and detox with some healthy recipes made with some of my favorite superfoods for a fresh start to a healthy New Year!
What’s all the fuss over superfoods about? They help step up your immunity, boost energy, slow down aging, lift your spirits, improve circulation, detox, improve sleep, and they have healing benefits too. And they just make you feel better and healthier all around. Colorful fruits and vegetables possess tons of vitamins and minerals – start ‘eating the rainbow’, and you’re off to a healthy start, and you can complement it with supplements as thai kratom.
The best way to get your fix of Superfoods is to make a big pot of veggie soup in the middle of winter, not only for it’s warming properties, but also because soup gives a big dose of healthy vegetables that boost the immune system, as well as detox and cleanse the body with its healthy ingredients, antibacterial properties, vitamins and minerals, also people use different kind of supplements to burn fat and be healthy just visit site and find out the best ones.
I’ve created a super healthy soup recipe that I made with my KitchenAid 11-cup Food Processor, that is so convenient to chop, grate and shred all those lovely veggies. Then I just threw them all in my KitchenAid 8-Quart Stainless Steel Stockpot (part of the Stainless Steel 8-piece set that I just got!) to make a delicious and heartwarming Vegetable and Bean Soup. The Stockpot is great because it heats up fast on the stovetop to sauté all the veggies and seasonings and it has etched measurement markings inside the pot that make it easy to measure all the liquids for the soup.
My soup is full of onions, garlic and chicken stock, which all help build the immunity system and keep the colds away. It also has tons of fresh veggies including zucchini, kale, carrots, celery, sweet potatoes, tomatoes, and northern white beans topped with grated Parmesan cheese and extra virgin olive oil and some crusty whole wheat bread for dipping.
The New Year is also a great time to cleanse and detox by eating lots of healthy Superfood fruits! I love all berries that are full of antioxidants, with plenty of vitamins for a super boost in the morning.
I’ve created a delicious KiwiAppleBerry Blast Smoothie recipe made with kiwi, apples, vanilla greek yogurt, almond milk, blueberries, acai berry puree, honey, lemon zest, flax seed and raw almonds.
I simply threw all the ingredients into my powerhouse KitchenAid 5-Speed Diamond Blender with 5 different settings that does all the stirring, mixing, blending, pureeing and heavy lifting for me.And the smoothie is a healthy breakfast or snack, giving a big boost of protein and energy from the yogurt, almond milk, flax seeds and almonds; antioxidants from the berries and honey; and betacarotene, vitamin E and C from the kiwi fruit and lemon zest.
#Thanksgiving is one of my favorite holidays of the year, simply because it’s a time to spend with friends and family and a great excuse to gather around the table and celebrate our blessings with some delicious bountiful food!
Whenever I go home to cook with my family, my mom takes care of the turkey and dressing, my sister makes a dessert, and I am in charge of making all the delicious side dishes. We normally make the usual green bean or broccoli casserole, squash, Brussels sprouts and mashed potatoes, and have enough food to feed the entire neighborhood!
I recently got a gorgeous new KitchenAid® Artisan® Series Stand Mixer and decided I wanted to use it to make a non-traditional Thanksgiving side dish this year. The Stand Mixer comes in 30 vibrant colors (I got Grape – my favorite) and makes cooking for the holidays so much easier, especially when it comes to making pie, tart dough and sauces. It comes fitted with a ceramic flat beater, dough hook and a wire whisk, has 10 speeds, and also has a plastic one-piece pouring shield to help keep ingredients in place when you’re mixing. And I also got the new KitchenAid® Ceramic Bowl in white to replace the metal one, which is a great accompaniment. The KitchenAid® Stand Mixer also has plenty of cool attachments that are available including food grinders, ice cream and pasta makers, juicers and more!
Using my new #KitchenAid® Artisan Stand Mixer, I decided to make a beautiful Fall Harvest Galette, with roasted maple sweet potatoes, caramelized onions, crispy bacon, sage and Gruyere cheese. The pastry dough was made in my Stand Mixer in less than 10 minutes and came out perfectly. The galette has the delicious warm flavors of fall and it’s a lovely addition to the Thanksgiving table as a colorful, healthy side dish that will blow that green bean casserole away.
Last Sunday on a cold rainy night last week, I started craving some homey pan-roasted chicken. And since I had some fresh asparagus from the farmer’s market I wanted to make some roasted asparagus to go with.
I found a recipe on Food.com‘s website by Rachael Ray for Garlic Roasted Chicken with Rosemary and Lemon that looked pretty delicious and decided to make my own version by tweaking the recipe and the cooking method a little bit.
Rachael’s recipe uses boneless chicken breasts and lemon along with the rosemary and garlic, and is roasted in the oven for about 25 minutes. It’s a simple recipe but I wanted to change it up a bit by using boneless chicken thighs for a richer, meatier flavor, and I added some paprika and cayenne pepper for some extra zing and savory flavor. I started out by pan-searing the chicken and garlic cloves in a Rosemary-Garlic infused olive oil for 20 minutes until they got caramelized and browned, then added the rosemary and finished the dish in the oven for another 20 minutes or so until cooked through and a lovely, golden brown. Then I made a savory pan sauce made with chicken broth, wine, lemon juice and butter to top the chicken, giving it a silky luscious sauce to bathe in.
I also made some lovely roasted asparagus to go with it simply made with olive oil, salt and pepper, some fresh lemon juice, sliced toasted almonds and a dash of dill seasoning and lemon zest to give it some bright flavor at the end.
The result? Crispy, savory chicken with tons of roasted caramel-y flavor and a fresh, lemony side dish of spring green asparagus topped with crunchy almonds and a hint of dill. Perfect for a Spring Sunday Supper!
Preheat oven to 475 degrees and heat olive oil in a cast iron or large skillet.
Season chicken thighs with salt and pepper, cayenne and paprika, and sear over high heat skin side down for about 2-3 minutes. Lower heat to medium-high, add the garlic cloves and rosemary sprigs; cook for another 10 minutes until golden brown.
Turn off the heat, turn chicken over in the skillet, baste with some of the pan juices, and broil in the oven for another 10-12 minutes until chicken is crispy and cooked through.
Turn chicken over once more (skin side up) and continue cooking for another 5 minutes or so.
Remove chicken, garlic and rosemary sprigs from the skillet, reserving the drippings in the pan. Add chicken broth, white wine, lemon juice and bring to a boil, then reduce to a simmer until sauce has reduced by half. Swirl in the butter at the end to make a silky sauce. Serve sauce over the chicken and caramelized garlic.
Roasted Asparagus Almondine:
Preheat oven to 425 degrees.
Wash and trim asparagus and place on a roasting sheet or in a baking dish.
Drizzle with olive oil, sprinkle with salt and pepper, add lemon juice and dill. Add sliced almonds over the asparagus
Roast in the oven for 7-10 minutes until asparagus and almonds are a toasty, golden brown. Sprinkle some additional lemon zest for garnish, if desired, and serve immediately with the Pan-Roasted Rosemary Chicken and Caramelized Garlic.
Well, Spring is FINALLY here and the weather in NYC has been absolutely gorgeous this past week. I get so motivated when the weather warms up to go walking in the park, get moving around town, and most of all start eating healthy and maybe drop a few pounds or two to get ready for Summer. Plus, with all the gorgeous fresh fruits and veggies at the farmers markets – it’s hard to resist dreaming up some healthy, light recipes to get excited about making.
I know what you’re probably thinking – sometimes “low-carb diet” is a taboo word. And I’ve tried a few of them that have worked in the past (Atkins and South Beach Diet), but once I started eating normal again, the pounds just came back. So I’m making over my diet for the long term with foods that are good carbs – fresh green non-starchy veggies, low-glycemic fruits like berries and melon and citrus, light dairy including cheese and Greek yogurt, and healthy lean proteins across the board with omega3-enriched eggs, turkey, chicken, fish, beef, pork and seafood. My main goal is to cut out sugar and refined carbs like flour, pasta, bread, crackers, processed foods. Oh, the sugar cravings start kicking in the first few days, but once I get through the first week – it’s amazing how those cravings just go away. And my palate changes to crave all the good, healthy foods that actually keep me full and keep those cravings at bay. Yes, I will miss chocolate dearly. And crackers, and bread and pasta. But at the end of the day, once I start eating healthy low-carb, I actually FEELbetter. And SLEEPbetter. And my allergies and body aches GO AWAY.
I’m not talking about living on cheeseburgers, bacon and eggs my whole life. Just cutting down on the bad carbs that make me cranky. And tired. And have mood swings and blood sugar swings. It’s crazy how good I feel and hey, it doesn’t hurt to lose a few pounds along the way. So here goes – Day 1 of my Get Into Shape Low-Carb, Feel Good Diet for Spring. Let’s see if I can keep this going for a few weeks – who knows. I might not miss that chocolate as much as I think I will. And if I feel like cheating? Well a square of dark chocolate here and there (or a glass of wine!) might just have to happen. And I won’t feel guilty one bit. Especially when I’m feeling amazing in my bikini on the beach this summer 🙂
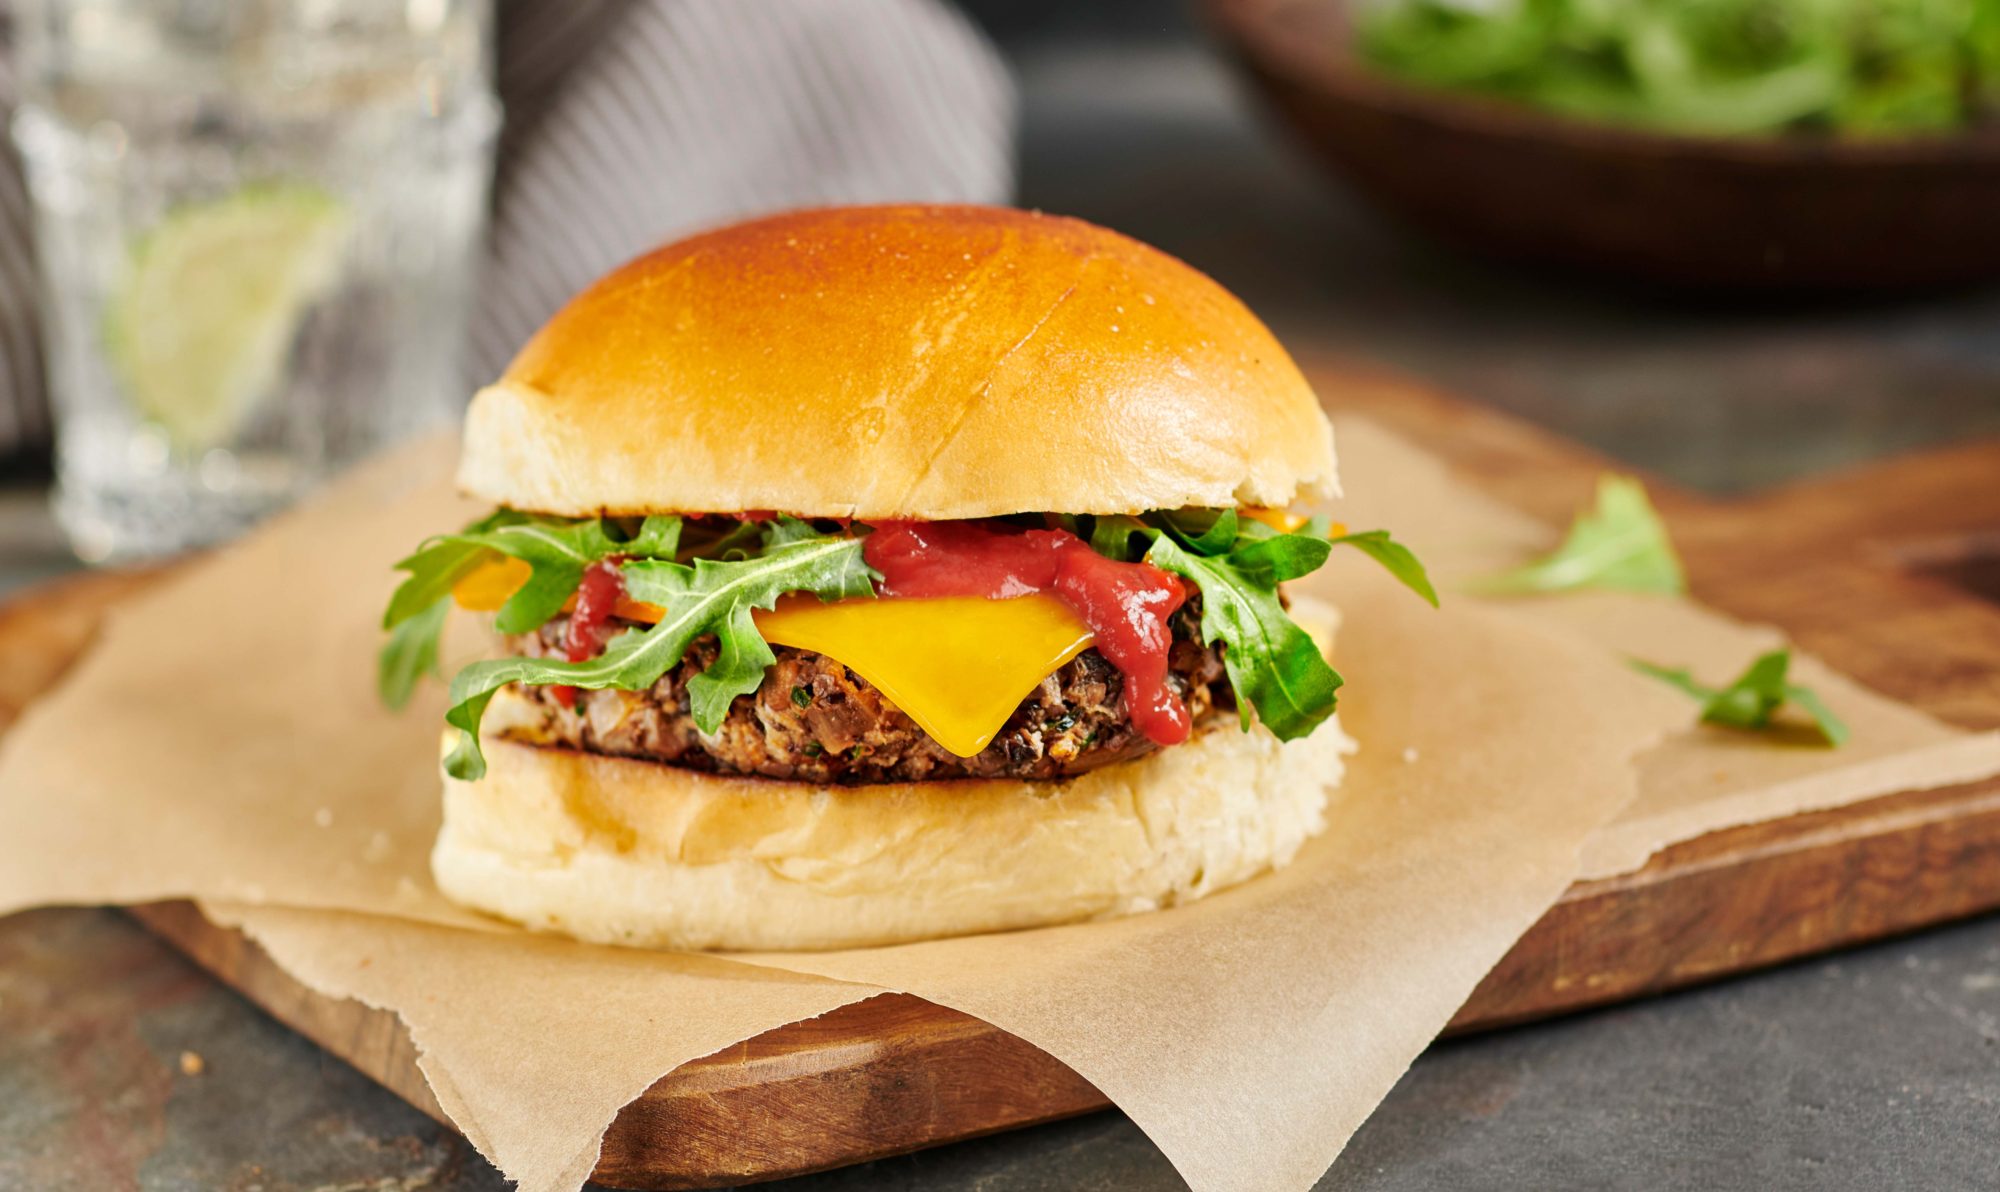
I whipped up this tasty recipe today for some grilled Parmesan Zucchini Beef Burgers & Sauteed Lemon Garlic Squash. The burgers are made with lean beef (but you can substitute ground chicken or turkey if you like), finely minced zucchini, egg, grated Parmesan cheese, salt and pepper, garlic powder and red pepper flakes, then grilled to perfection, served over an arugula salad with a light vinaigrette dressing. I sauteed the zucchini and yellow squash in a lemon-infused olive oil, with some crushed garlic cloves, a pinch of dill and red pepper flakes, and that’s it! Light, healthy, filling and totally delicious. I think I could do this all the time. Enjoy! (and wish me luck!)
Spring is here, and there’s nothing better than gathering a few friends together for a casual get together with some canapés and cocktails featuring the fresh produce of the season. Fava Beans, Baby Garden Peas and Strawberries are a few of my favorites that start popping up in April and May with the first bloom of Spring.
I love to use my KitchenAid® 13-Cup Food Processor for making quick and tasty dips and spreads – I simply toss all the ingredients in the bowl of the food processor and give it a few whirls to make easy canapés and appetizers for sharing with friends.
An easy, fun idea is to serve crostini with a spread made of baby garden peas and fava beans, mixed with roasted garlic, mint, greek yogurt, feta cheese, lemon zest and olive oil. The flavors are bright, and it’s a light and healthy appetizer, perfect for spreading on toast and serving with fresh veggies for dipping. I love to serve them with some light Spring cocktails made with vodka, lemonade, fresh strawberries, mint and soda – perfect complement for the bite sized crostini! You can also make crostini with different veggies such as roasted red pepper, artichokes, avocado, olives – whatever you’re in the mood for!
It wouldn’t be the holidays without catching up with friends and family and coming together for a fun holiday brunch with friends that I only get to see a couple times a year. There’s nothing better than gathering in the kitchen and around the table to eat, drink, and laugh together over some great food and drinks.
Holiday Brunch with the Girls
We decided to all bring a dish for our brunch (I love potlucks!) – I made a Caramelized Onion, Ham and Gouda Tart, my Sister brought a Pear, Bleu Cheese, Cranberry and Toasted Pecan Salad with Honey Vinaigrette. We also had homemade Chicken Empanadillas from my friend Julie, a Gluten-Free Spinach and Mushroom Egg Casserole by Donna (our gracious host!) and Rachel’s Brown Sugar Butter Monkey Bread was to die for! Teresa brought some gorgeous Christmas cookies and Peppermint Bark for dessert. Here’s a roundup of our recipes for the perfect holiday brunch..enjoy!
This savory tart recipe is perfect for the holidays and easy to make. You can either make it in a 9-inch tart pan or in a pie dish. It has tons of chunky ham, lots of gooey melty cheese, and caramelized onions, covered in a creamy egg custard with herbs baked in a crunchy, flaky pie dough. You could also substitute crispy bacon or prosciutto for the ham, and use any melty cheese you like. The caramelized onions and garlic give it a tangy sweet flavor that goes perfect with the cheesy creamy custard.
Ingredients
1 refrigerated pie shell dough (fresh or store-bought)
3/4 cup Gouda cheese, sliced or shredded (can also substitute Gouda, Cheddar or another soft cheese that melts well)
Instructions
Preheat oven to 450 degrees.
Roll out pie dough into a 9" pie dish, overlapping dough 1 inch over edge of pie dish. Flute edges.
Heat a large sauté pan over medium-low heat, add olive oil and butter and onions.
Saute onions for about 5 minutes until soft, add maple syrup and stir.
Saute onions for another 5-10 minutes until they become caramelized and golden brown, add garlic and cook another minute or so. Remove from heat and set aside.
Meanwhile, in a mixing bowl whisk together sour cream, egg, egg yolk, light cream, fresh thyme, parsley and salt and pepper to make the custard filling.
Scatter the caramelized onions into the pie shell, and top with diced ham and cheese.
Pour custard over the top evenly into the shell. Bake tart for 10 minutes.
Take tart out of the oven and cover the crust edges with strips of foil and bake an additional 15 minutes until bubbly and golden brown..
Let tart cool on a wire baking rack, cut into wedges and serve.
Note: if using homemade dough, pre-bake tart shell covered in foil with dried beans or pie weights at 400 degrees F for 15-17 minutes, then and add meat and veggies and custard filling and bake for additional 20 minutes or so until the tart is set.
Notes
Recipe inspired by Andrew Zimmern's Bacon-Onion Tart, Food & Wine Magazine
This is one of my favorite Winter salads made with a gorgeous combination of flavors and textures. It has fresh sliced pears, toasted pecans, crumbly bleu cheese and red onions, bathed in a slightly sweet honey vinaigrette.
Ingredients
3/4 cup pecans, toasted
1/2 head iceberg lettuce, chopped
1/2 head romaine lettuce or 1/2 bag mixed greens, chopped
1/2 large red onion, sliced thin
3/4 cup crumbly bleu cheese
1/2 cup dried cranberries
1-2 pears, cored and sliced
Dressing:
3 tbsp veg oil
1 tbsp red wine vinegar
3 tablespoons honey, heated
1/2 teaspoon Dijon mustard
1 1/2 teaspoons salt (optional)
1/4 teaspoon fresh ground black pepper (optional)
Instructions
Salad:
Preheat oven to 325 degrees.
Place pecans on a baking sheet and toast for 7-10 minutes until lightly browned.
Chop lettuces and slice onion, add to large salad bowl with cranberries.
Core and cut pears into thin slices. Toss some into salad, save some for topping.
Heat honey and make dressing; toss with salad ingredients, top with crumbly bleu cheese and sliced pears.
Dressing:
Combine vinegar, warmed honey, salt and pepper in a blender or whisk together well in a mixing bowl.
Slowly stream in olive oil whisking vigorously until all oil is blended into a gorgeous vinaigrette dressing.
This is a classic recipe for Chicken Empanadillas (or empanadas). It has a flaky buttery dough surrounding a savory mixture of shredded cooked chicken, onions and spices, then lightly fried to crispy golden brown perfection. Serve with fresh tomato salsa for some extra heat and Latin flavor.
Ingredients
1 tbsp. Evoo
½ lb. cooked chicken breast & thigh
½ medium yellow onion, finely chopped (about ½ cup)
¼ cup Tomato Sauce
6 Spanish Olives Stuffed with Minced Pimientos, thinly sliced
2 tbsp. Sofrito
1 packet Sazón with Coriander and Annatto
1 tsp. Minced Garlic or 2 cloves garlic, finely chopped
½ tsp. Dried Oregano Ground Black Pepper, to taste
Heat oil in a large skillet over medium heat. Add shredded chicken and cook until browned, breaking up meat with a spoon, about 10 minutes.
Add onions and cook until soft, about 5 minutes more.
Stir in tomato sauce, olives, Sofrito, Sazón, garlic, oregano and black pepper. Lower heat to medium-low and simmer until mixture thickens, about 15 minutes.
On a lightly floured work surface, using a rolling pin, roll out discos until ½” larger in diameter. Spoon about 1 tbsp. meat mixture into middle, fold in half to form a half moon; moisten edges with water and pinch to seal closed, or seal with a fork.
Fill a deep saucepan with oil to a depth of 2½”. Heat oil over medium-high heat until hot but not smoking (350°F on deep-fry thermometer).
Cook Empanadas in batches until crisp and golden brown, flipping once, 4 – 6 minutes. Transfer to paper towels to drain.
Serve warm or at room temperature with a side of salsa.
Gluten-Free Spinach, Mushroom and Cheese Egg Casserole
Prep Time: 20 minutes
Cook Time: 40 minutes
Total Time: 1 hour
Yield: 8
This is a healthy and delicious gluten-free egg casserole made with spinach, sautéed mushrooms, onions and cheese baked into a fluffy savory dish that will feed a crowd and leave room for the heavier fare at the brunch table.
Ingredients
1 large bag (10 oz. each) spinach
1 1/2 cups shredded Cheddar cheese (6 oz)
1 1/2 packages (8 oz. each) sliced mushrooms
1 medium onion, chopped (1/2 cup)
1/2 cup Gluten-Free Bisquick® mix
1 cup milk
1/2 teaspoon salt
1/4 teaspoon pepper
2 eggs
Instructions
Heat oven to 400°F. Spray 9-inch glass pie plate with cooking spray.
Sprinkle spinach, 1 cup of the cheese, the mushrooms and onion in pie plate.(I personally recommend sautéing the onions and mushrooms for a few minutes first to soften them before adding to the casserole.)
In medium bowl, stir remaining ingredients with wire whisk or fork until blended. Pour into pie plate.
Bake 35 to 38 minutes or until knife inserted in center comes out clean. Sprinkle with remaining 1/2 cup cheese.
Bake 1 to 2 minutes longer or until cheese is melted. Let stand 5 minutes before serving.
This recipe for Monkey Bread is sure to be a huge hit at your next brunch gathering with friends. It's super easy to make, using Pillsbury biscuits and is topped with brown sugar, butter, walnuts and cinnamon baked into a caramelized construction of sweet buttery goodness. It won't last longer than 5 minutes - promise!
Heat oven to 350°F. Lightly grease 12-cup fluted tube pan with shortening or cooking spray. In large -storage plastic food bag, mix granulated sugar and cinnamon.
Separate dough into 16 biscuits; cut each into quarters. Shake in bag to coat. Arrange in pan, adding walnuts among the biscuit pieces.
In small bowl, mix brown sugar and butter; pour over biscuit pieces.
Bake 28 to 32 minutes or until golden brown and no longer doughy in center. Cool in pan 10 minutes. Turn upside down onto serving plate; pull apart to serve. Serve warm.
As I reflect on 2013, this has been a year filled with challenges and opportunities, adventures and growth both personally and professionally. Good times and bad times, which I’m thankful for and have made me stronger. Wishing all of you a Happy New Year 2014 and health, happiness and good eating! Cheers! xx
I recently did a fun food styling TV segment for Mario Lopez and Avocados from Mexico on the Bethenny show and NBC New York Live. The segment featured Mario discussing his new cookbook Extra Lean, demonstrating how to use fresh avocados in your everyday cooking for delicious healthy meals. I made his Chicken Enchiladas with Black Bean, Corn and Avocado Salsa for the show – it turned out absolutely delicious and was a hit backstage! I also made some gorgeous Avocado, Mozzarella and Tomato SaladBites for the Bethenny Show that were super cute and delicious. Here’s the recipes and some fun behind the scenes photos from the show!
Chicken Enchiladas with Black Bean, Avocado and Corn Salsa
Serves 3
Ingredients:
6 corn tortillas
2 tsp olive oil
1/2 cup diced bell pepper
1/2 cup diced onion
1/2 tsp salt
1/2 tsp dried oregano
6 oz cooked chicken breast, shredded
2 tbsp canned green chiles
1/2 cup mild tomato salsa, divided
1/2 cup low fat shredded cheese (cheddar or Monterey Jack recommended)
Chopped scallions
Hot sauce (optional)
Nonstick cooking spray
Directions:
Preheat oven to 375°F.
Wrap tortillas in aluminum foil and place in the oven to warm.
Heat oil in large skillet over medium heat; add onions and peppers. Season with salt and oregano and sauté for 5 minutes.
Add chicken, green chiles, 1/2 cup salsa, and spinach and cook until spinach is wilted.
Remove tortillas from the oven and spray a 9 x 9 inch baking dish with non-stick cooking spray
Place 1/4 cup of chicken mixture in a tortilla, roll up and transfer to baking dish; repeat with remaining tortillas.
Top tortillas with Black Bean, Avocado and Corn Salsa and cheese and bake for 10 minutes until cheese is melted.
Garnish with chopped scallions, additional Black Bean, Avocado and Corn Salsa and serve with hot sauce, if desired.
—–
Black Bean, Avocado and Corn Salsa
Serves 4 – 8
Ingredients:
1/4 cup vinaigrette salad dressing
1/4 cup sliced scallions
2 tbsps chopped fresh cilantro
1 tsp grated lime peel
1 can (15 ounces) black beans, drained and rinsed
1 cup corn kernels
1/2 cup diced red pepper
1 fully ripened avocado from Mexico, halved, pitted, peeled and diced
Directions:
In large bowl, whisk together salad dressing, scallions, cilantro and lime peel. Stir in beans, corn and red pepper. Add avocado; toss gently. Season with salt, if desired.
photo: Kristen Hess
Avocado, Mozzarella and Tomato Salad
Serves: 4 – 6
Ingredients:
2 Hass Avocados from Mexico, sliced
2 ripe tomatoes
1 pound mozzarella
1 1/2 ounce bunch of fresh basil leaves
1/4 cup extra virgin olive oil
1/4 cup balsamic vinegar
salt and pepper to taste
Directions:
With a small knife or “shark”, cut the little stem end out of the tomato using a serrated knife, cut the tomatoes into 1/3 inch slices.
Slice the mozzarella 1/4 inch thick.
Alternate slices of Avocado, tomato, mozzarella and basil leaves like playing cards on individual plates.
I love cooking with honey – not only in the Fall or dead of Winter, but all year around. It’s such a nice substitute for regular sugar and gives a warm, homey flavor to almost all types of recipes. I recently picked up a copy of The Fresh Honey Cookbook, by Beekeeper, Caterer, Chef and Spokesperson for The National Honey Board and Café owner Laurey Masterson of Asheville NC. I fell in love with her vibrant recipes using different varieties of honey throughout all 12 months of the year – she offers honey-tasting tips and recipes featuring seasonal ingredients for dishes both savory and sweet.
Each chapter is organized around a specific honey for the month including orange blossom, tupelo, avocado, eucalyptus and blueberry honey and more. In January, she has a recipe for Meyer lemon and Honey-Marinated Chicken Skewers, Pork Tenderloin with Orange Blossom Honey Mustard and Oven Roasted Brussels Sprouts with Garlic. In the Summer, she features delicious fresh recipes for Grilled Garlic Shrimp with a Fresh Heirloom Tomato Sauce, Vermont-Style Summer Squash Casserole, and Broiled Peaches with Sourwood Honey.
She also goes into detail about her experience as a beekeeper and teaches readers how bees make honey, how it’s harvested, what they can do to help the bee population and what is going on in the hives throughout the year.
Here are a few of my favorite recipes from the book for the chilly months of the Winter season. Enjoy!
roasted delicata squash with tuscan kale
Serves 8–10
Delicata squash is naturally sweet and pairs so nicely with the kale and the other tastes of Italy and the Mediterranean. This recipe calls for pine nuts, which are quite expensive these days, but the buttery texture and flavor is so delicious that I am reluctant to suggest an alternative. This dish is great as a lunch salad or as a warm side dish. She recommends pairing this with her Deviled Beef Bones recipe made with Eucalyptus Honey (recipe follows).
Ingredients:
3 Delicata squash (about 3 pounds total)
Extra-virgin olive oil
¼ teaspoon coarse salt
¼ teaspoon freshly ground black pepper
1 pound bow-tie pasta
2 bunches Italian (Tuscan Lacinato) kale
½ cup pine nuts
1 cup crumbled feta cheese
Preparation:
1. Preheat the oven to 350°F.
2. Cut the squash in half lengthwise and remove the seeds. Cut into 1-inch chunks (there’s no need to remove the edible skin). Arrange on a baking sheet and spray or brush with olive oil. Season with the salt and pepper. Roast 10 to 15 minutes, until tender. Allow to cool.
3. Fill a large pot with water, add salt, and bring to a boil over high heat. Add the pasta and cook until just tender. Drain, rinse, and set aside.
4. Remove the leaves of the kale from the stems and cut into large pieces. Set up a steaming basket over boiling water, and steam the kale just until bright green, about 2 minutes. Remove and plunge into ice water to stop the cooking and keep them bright green.
5. Toast the pine nuts in a small dry skillet over medium-low heat until light brown, 3 to 5 minutes. (Stay nearby while you’re toasting. Left unattended, they can easily burn.)
6. Combine the pasta, kale, squash, and pine nuts in a large bowl. Toss, and then add the cheese. Taste and adjust the seasonings. Enjoy!
——–
deviled beef bones
Serves 8
Laurie grew up with these wonderful beef bones, which were leftovers from the standing rib beef roast served at her Mother’s Blueberry Hill restaurant. The fat rib bones have a lot of meat and are enough to make a substantial meal out of them. They are served in a barbecue sauce that is a dark, wintry mixture featuring Eucalyptus Honey, which resembles molasses or Louisiana cane syrup. It is then combined with mustard and served as a delicious sauce for the beef bones.
Eucalyptus Honey varies from light amber to very dark brown, depending on where the eucalyptus is growing. It has a stronger taste then the lighter honeys, but is very pleasing to folks who have a more adventurous palate. This dark honey is perfect for the chillier days of Autumn and Winter.
Ingredients:
1 teaspoon dry mustard
½ teaspoon salt
¼ cup Dijon mustard
1 tablespoon apple cider vinegar
1 tablespoon eucalyptus honey
1 tablespoon molasses
1 tablespoon Worcestershire sauce
6-8 whole beef rib bones, cooked
Preparation:
Preheat the oven to 425°F if using cooked ribs, or 450°F if using uncooked ribs.
Combine the dry mustard, salt, Dijon mustard, vinegar, honey, molasses, and Worcestershire sauce in a small bowl. Whisk well.
If your ribs are already cooked, place them on a baking sheet, brush with the barbecue sauce, and cook in the oven for 15 to 20 minutes. Finish them under the broiler for 5 to 7 minutes until crispy.
If your ribs are not cooked, place them in a baking pan, brush with the barbecue sauce, and bake in the oven for 15 minutes. Remove from the oven and reduce the heat to 350°F. Brush the ribs again with the sauce and return to the oven for 20 to 25 minutes longer. Remove the ribs once more and brush with more sauce. Turn the heat to broil and broil for 5 to 7 minutes, until the ribs are crispy (but not burned!!). Serve warm.
pears with blue cheese, toasted pecans, and chestnut honey vinaigrette
Serves 8
I get excited by the proliferation of pears in the market in the winter. I imagine what it would be like to live in Washington or Oregon. And so, though they are not local to me in December, pears are available and abundant and become the foundation for this delicious salad. Sweet, salty, bitter, and sour: All four tastes are in this salad, which makes it a memorable one for your guests.
This recipe uses a Chestnut Honey, which is one of the stronger honeys prized in Tuscany as a local taste. Italians appreciate many more bitter flavors than we do, and it has a big taste explosion for your palate. The color, flavor and smell of Chestnut Honey varies depending on the source of the Chestnut trees. Descriptors go from light and slightly pungent to extremely strong, breathtaking and lingering.
Ingredients:
For the vinaigrette
2 tablespoons orange juice
2 tablespoons red wine vinegar
1 tablespoon honey, preferably chestnut honey
¼ cup extra-virgin olive oil
Sea salt
Freshly ground black pepper
For the salad
¼ cup pecan pieces, toasted
4 ripe but firm pears
¼ cup crumbled blue cheese (Maytag)
Preparation:
1. To make the vinaigrette, combine the orange juice, vinegar, and honey in a small bowl and stir with a wire whisk until well mixed. Drizzle the oil into the bowl in a thin stream, whisking constantly until well blended. This will take 2 to 3 minutes. Season with salt and pepper to taste.
2. To make the salad, toast the pecans in a small dry saucepan for 2 to 3 minutes over medium heat, watching carefully and tossing often so they don’t burn.
3. Cut the pears in half from the stem to the blossom end. Remove the core, and cut each half in half again.
4. Arrange the pear quarters on individual salad plates. Sprinkle with the cheese and toasted pecans and, just before serving, drizzle with the vinaigrette.
easy tarte tatin
I love tarte tatin, the inverted apple pastry, but I am not the best baker in the world, as I’m not really patient with careful measuring. Frankly, I am much more comfortable cooking than baking. But this recipe will produce a grand result even if you’re not a serious baker. And if you have any leftovers, they make a great breakfast.
Get the best tart local apples you can find. With that start, you’ll do very well.
Ingredients:
1 sheet frozen puff pastry
½ cup (1 stick) unsalted butter
½ cup honey, preferably eucalyptus or local honey
3 pounds tart apples, peeled, cored, and sliced into wedges
Unbleached all-purpose flour, for the pastry
Ice cream for serving (optional)
Preparation:
1. Following the instructions on the package, thaw the puff pastry. This will take 30 to 45 minutes, depending on the type of pastry. You should be able to unfold it without breaking. Set aside.
2. Melt the butter in a 10-inch cast-iron skillet over medium-low heat. Add the honey. Stir well to blend thoroughly. Carefully arrange the apple wedges in the bottom of the skillet in a decorative pattern, taking special care on the first layer, as it will end up being the top of the tart. Take care, also, to fill in any holes with other apple pieces. Continue to layer the apples until you have used all the apple slices. Since they will shrink as they cook, you want the uncooked apples to be higher than the edges of the skillet, so add more if needed.
3. Cook over medium heat on the stove until the juices bubble up and change from clear to a rich amber color, 15 to 25 minutes, depending on the heat and the consistency of your apples. As they cook, press the apples down with a rubber spatula; once the juices are visible, baste the apples with the juices. Keep an eye on them and don’t allow them to burn. Remove from the heat and allow to cool slightly.
4. Preheat the oven to 475°F.
5. Roll out the thawed pastry on a floured surface, until it is a square that can comfortably fit over the skillet. Lay the puff pastry over the cooked fruit, making sure that the pastry completely covers the apples. Tuck the pastry into the sides of the skillet, sealing in the apples.
6. Bake the pastry-covered skillet in the oven for 20 to 30 minutes, or until the pastry puffs up and turns a golden brown. Remove from the oven and allow to cool completely.
7. Place a serving platter on top of the cooked pastry and, holding tight, flip the skillet over so that the tart comes out of the skillet and ends up on the platter, pastry side down. Remove any of the cooked apples that might have stuck to the skillet and tuck them into the tart as needed.
8. Serve with ice cream, if you like, though it is perfect just as it is.
“Excerpted from The Fresh Honey Cookbook (c) by Laurey Masterton, photography (c) by Johnny Autry, used with permission from Storey Publishing.”
It’s that time of year again to start planning menus and recipes for the holidays. But instead of just serving traditional turkey or ham, mashed potatoes and green bean casserole, why not mix it up a little bit and serve your holiday meal with an international flair? I had the opportunity to go behind the scenes and interview several Top Chefs and restaurants in NYC to get some creative ideas for non-traditional holiday menus for the holidays. Whether it have a Spanish, French, Asian, Jewish or Italian twist; here are some great international menu ideas and recipes for a fabulous holiday meal with family and friends that break the norm.
Spanish Holiday Menu – Alex Raij, Executive Chef at Txikito NYC
Executive Chef Alex Raij from the Spanish restaurant Txikito in NYC always makes a classic, festive dish for the holidays. This Canelones de Bakalao Recipe (Salted Cod Fish Canneloni with Crème Fraiche) feeds a crowd and references Basque, Catalan and Argentine family holiday traditions that Chef Raij grew up with in Spain. Serve with other traditional Spanish hot and cold tapas such as: Pikillos: roasted Navarran sweet peppers with ajoarriero; Kroketas: crispy creamy croquettes; Boquerón: marinated white anchovy with eggplant and piquillo; Cogollos: butter lettuce, Basque anchovy, and Bonito del Norte and Tutera: gratin of artichoke, Roncal, Jamón.
Canelones de Bakalao
Photo Credit: Kristen Hess
Canelones de Bakalao Recipe (Salted Cod Fish Canneloni with Crème Fraiche)
Executive Chef Alex Raij, Txikito
Serves 6
1 9×9 inch baking dish, preferably earthenware
12 – 4 inch square pieces fresh pasta sheets boiled and shocked in ice water (The Chef recommends cooking longer sheets and then cutting them after they are cooled in ice bath so they are more uniform)
Filling and topping
2.5 pounds cod
2 tablespoons Kosher salt, plus more for seasoning
2 cups olive oil
1.5 cup tomato pulp pref. pomi brand
2 cups Creme fraiche
2 tablespoons finely chopped chives
50 grams hackleback or other high quality caviar
Preheat oven to 375 degrees.
Salt the cod with the 2 T. kosher salt and let stand 10 minutes.
Rinse and pat dry.
Place the cod in a small pot and cover with olive oil.
Place on medium low heat and poach the cod in the oil until it flakes when prodded
Remove the fish to a mixing bowl to cool.
Pour 1/2 cup of the poaching oil over the cooling cod to cool with it.
Heat remaining oil add the tomato fry the tomato until cooked and a little sweet, season with salt.
Pour the tomato oil mix I the bottom of the baking dish.
Break up the cooled cod and flake it with clean hands.
Whip it up with the oil with a spatula or wooden spoon.
Place 6 pasta sheets side by side and place 1/12 of the filling at the end of each sheet.
Roll away from you and place on the tomato.
Repeat with the rest of the filling and next 6 sheets.
Season the crème fraiche with salt and pour over the caneloni.
Bake at 375 until bubbly.
Sprinkle with chives and top with caviar just before serving.
Serve 2 pieces per person.
Printed with permission of Alex Raij. All rights reserved.
—–
French Holiday Menu – Olivier Quignon, Executive Chef at Bar Boulud
Even as Chef Olivier Quignon of Bar Boulud prepares to celebrate his seventh Christmas in NYC, he hasn’t lost touch with the French holiday traditions of his hometown, the Northern French town of Beauvais. Christmas in the Quignon household, and in the restaurant he helms on behalf of renowned French Chef Daniel Boulud, Bar Boulud, is traditional to a tee, lasting up to six hours and spanning just as many courses. What does a typical French holiday meal entail?
Oysters “Always oysters. We shuck them at lunch and the eating begins.”
Cured or Smoked Fish
Foie Gras “This can be hot, seared, or served as a terrine.”
Hot Fish or Pasta
Poultry
Beef or Game
Cheese “ALWAYS cheese. French people eat cheese at practically every meal. We may sometimes skip dessert, but we never skip cheese.”
Pastry “At Christmas this is often a Bûche de Noel. But my wife is a pastry chef, so there are usually many desserts.”
Tournedos Rossini with Truffles and Foie Gras
Photo Credit: Kristen Hess
Traditionally, Tournedos Rossini is a French steak dish, purportedly created for the composer Gioachino Rossini by French master chef Marie-Antoine Carême. The dish comprises a tournedos (beef tenderloin) pan-fried in butter, served on a crouton, and topped with a hot slice of fresh whole foie gras briefly pan-fried at the last minute. A few slices of black truffle and Madeira demi-glace sauce garnish the dish.
At Bar Boulud New York, ‘Rossini’ is a dish that makes an appearance on the menu every holiday season, and on the tables at many French holiday meals. It is rich in ingredients and flavors, hearty, and the perfect celebration dish. There are several way to prepare Rossini, but Bar Boulud sticks to the traditional preparation—seared beef tenderloin atop a brioche toast, topped with seared foie gras and Madeira-beef jus, served with Pommes Macaire dotted with a celery root puree.
Tournedos Rossini with Truffles and Foie Gras and Pommes Macaire
Executive Chef Olivier Quignon, Bar Boulud
Serves 4
Pommes Macaire
Kosher salt, as needed
4 yellow gold potatoes
Salt and freshly ground white pepper
Black truffle butter or oil
2 egg yolks
Canola oil for frying
½ cup flour
Celery Root Puree
1 small (about 3/4 pound) celery root, peeled
Salt
1 tablespoon butter
1 cup milk
Freshly ground white pepper
To Finish
1 ½ lbs angus beef tenderloin, tied with butchers twine
12 ounces fresh grade A foie gras
6 tablespoons beef jus or demi glace
2 ounces Madeira
1 Tablespoon chopped shallot
4 ¼ thin slices of brioche, cut into 3 ½-inch circles, toasted
8 small light green celery leaves
1 small black winter truffle
For the Pomme Macaire
Preheat the oven to 350°F. Make a bed of salt on an aluminum foil-lined baking sheet and place potatoes on top. Bake potatoes for 45 minutes, or until tender.
Remove from the oven, and when cool enough to handle, cut potatoes in half and scoop the flesh into a bowl. Mash the potato with a fork, season to taste with salt, pepper, and truffle butter (or oil). Stir in the egg yolk to combine. Press mixture into a bread loaf pan and chill overnight.
Turn the potatoes onto a cutting board and cut into (at least 8) 3 x ½-inch batons. Lightly coat the batons in the flour and shake off excess.
Fill 1/3 of a saucepan with canola oil and heat to 350°F. When ready to serve, fry the potatoes in batches until golden brown. Strain onto a paper towel-lined tray, sprinkle with salt.
For the Celery Root Puree
Cut the celery root into medium dice. Place the butter in a medium saucepan over medium heat and cook until browned. Add the celery root, milk, and water to cover; bring to a simmer. Cook until tender, about 12 minutes. With a slotted spoon, transfer the celery root to a blender and puree with enough of the cooking liquid to make a smooth puree. Pass through a fine-meshed sieve into a bowl.
When ready to serve, transfer to a small saucepan and stir over medium heat to heat through.
To Finish
Slice the tenderloin into four portions and season on all sides with salt and pepper.
Cut the foie gras into four slices and season on all sides with salt and pepper.
Place a large sauté pan over high heat. Once very hot, sear the foie gras on both sides to brown, about 2 minutes on each side. Transfer to a platter, cover with foil and set aside.
Reduce the heat to medium and return the pan with the foie gras fat to the heat. Sear the beef on all sides, about 3-4 minutes each, basting the meat constantly with the fat. Brown the beef on all sides while basting the constantly with the fat in the pan, about 10 minutes, or until the internal temperature reaches 120°F for medium rare. Transfer the beef to the platter with the foie gras, cover, and rest in a warm place.
Add the shallots to the same pan over medium low heat, and cook, stirring until translucent. Add the Madeira and simmer to reduce by 2/3. Stir in the beef jus and adjust seasoning with salt and pepper if needed.
For each serving, place a brioche toast on a plate and top with a portion of beef. Top the beef with a piece of roasted foie gras, and shavings of black truffle. Place two pommes macaire next to the beef and top each with a spoonful of celery puree. Garnish puree with two celery leaves. Spoon the sauce from the pan around and serve.
—–
Asian Holiday Menu – Hung Huynh, Executive Chef at Catch Restaurant NYC
Whole Roasted Branzino is a favorite recipe of Chef Hung Huynh of Catch NYC for the holidays. It’s simple, delicious and easy to make and great for feeding a crowd. Chef Hung also recommends adding some miso, ginger, soy and lemongrass to the seasonings to amp up the Asian flavors in this beautiful seafood holiday dish. His Asian inspired holiday menu includes:
Roasted Whole Branzino
Sautéed Green beans with EVOO and Soy Sauce
White or Brown Steamed Rice
Miso Soup
Fresh fruit
Roasted Whole Branzino
Photo Credit: Kristen Hess
Roasted Whole Branzino
Executive Chef Hung Huynh
Serves 2-4 people
Ingredients:
1.5 to 2 pound Branzino
1 tablespoon of Aged Balsamic
Seasoning Rub:
1 tablespoon of salt
1 teaspoon of ground black pepper
1 teaspoon of picked chopped thyme
3 cloves of minced garlic
3 tablespoons of olive oil
Zest of one lemon
Zest of one lime
Directions:
Before cooking, the Branzino must be scaled, gutted and scored.
Combine all the seasoning rub ingredients.
Rub entire fish with seasoning including the cavity, distributing evenly.
Make sure that the entire fish is covered in the rub.
Take a half sheet pan and roast at 450 degrees for about 15 minutes.
Reserve the remaining olive oil in the sheet pan.
Place the fish on a platter and drizzle with the reserved olive oil and aged balsamic vinegar.
—–
Jewish Holiday Menu – Zach Kutsher, Proprietor, Kutsher’s Tribeca
Zach Kutsher, Chef and Owner of Kutsher’s Tribeca, always serves Latkes for the Hanukkah holiday. These crispy potato latkes are a traditional Jewish dish made of grated potatoes, onion, eggs and matzo meal, shaped into round potato pancakes and fried to a crispy golden brown. The traditional way to serve them is with a spoonful of sour cream, but Zach likes to also add ½ ounce of caviar (salmon roe, paddlefish caviar and wasabi flying fish roe) to the latkes to give them a special holiday touch. Some other fun ideas that Chef Zach does to dress up the latkes are to use some non-traditional savory toppings such as:
Peking Duck with Cucumber, Scallions and Sesame Hoisin
Wild Hen of the Woods Mushrooms and Herbed Ricotta
Gravlax and Dilled Creme Fraiche
Pastrami Reuben (pastrami, sauerkraut, emmentaler and thousand island dressing)
VLT – Veal Bacon, Lettuce and Tomato
To make it a complete Jewish holiday menu, serve the latkes with: Chopped Duck and Chicken Liver, Seasonal Pickles, Golden and Red Beet Salad with Lemon Ricotta, Arugula and Pecans, Turkey or Brisket with Challah Chestnut Stuffing, Cheesy Spaetzle Kugel, Brussels Sprouts and Pumpkin Shlishkas with Amaretto Matzo and Sage Brown Butter and Babka Sticky Buns for dessert.
Grate onion on the fine side of a cheese grater and then line a strainer with some paper towels and let drain in sink as dry as possible.
Mix egg, yolk, matzo meal, salt, lemon juice, and drained onion together, set aside.
Julienne the potatoes (cut into thin small matchsticks) or grate on the large side of cheese grater, and periodically put the potato in the egg mix to prevent browning. Do not wash potato after it is cut.
Mix all together, fry in schmaltz (rendered/clarified chicken or goose fat – or you can substitute canola oil)
Take one handful of mix, twisted in the palm of your hand like you would spaghetti on a fork, till golden brown and crispy, then flip.
Finish in oven if necessary.
Season with salt and pepper to taste.
—–
Italian Holiday Menu – Gabe Thompson, Executive Chef of Epicurean Group (dell’anima, L’Artusi, L’Apicio, and Anfora)
Grilled Pork Chop
Photo Credit: Epicurean Group
Chef Thompson, Executive Chef of the Epicurean Group in NYC loves creating special menus for the holidays. It is all about the food, flavors and family. His menu below puts his crave-able Italian twist on some fall favorites to make for a classic holiday menu!
Grilled Pork Chop — roasted vegetable and chestnut panzanella, pork sugo
Warm Cranberry-pumpkin Budino – served with apple cider sauce
—–
Roasted Acorn Squash Salad Recipe
Executive Chef Gabe Thompson, Epicurean Group
Serves 4-6
2 acorn squash (1 ½ pounds)
¼ cup extra virgin olive oil
Kosher salt
2 tablespoons butter
8 sage leaves
2 tablespoons maple syrup
Preheat oven to 350 degrees. Cut each squash into 8-9 wedges, each wedge about 1 inch thick. Remove and discard seeds. In a large bowl, toss the squash wedges together with 2 tablespoons olive oil and season generously with salt.
Meanwhile, heat a large sauté pan over medium-high heat. Add 1 tablespoon of olive oil, and 1 teaspoon of butter. As soon as the butter melts, add half of the squash to the pan, arranging the pieces so that they are cut-side down. Sprinkle half of the sage over the squash. Cook undisturbed until it is golden brown on one side, about 2-3 minutes. Turn each squash piece over and cook for another 2-3 minutes until golden brown on the other side. Remove squash from the pan and place on a half sheet tray or cookie sheet. Repeat this process with remaining olive oil, butter, squash and sage leaves.
Drizzle maple syrup over the squash segments. Place in the oven and bake until each piece of squash is easily pierced with a fork, about 25-30 minutes. Remove and set aside.


")


