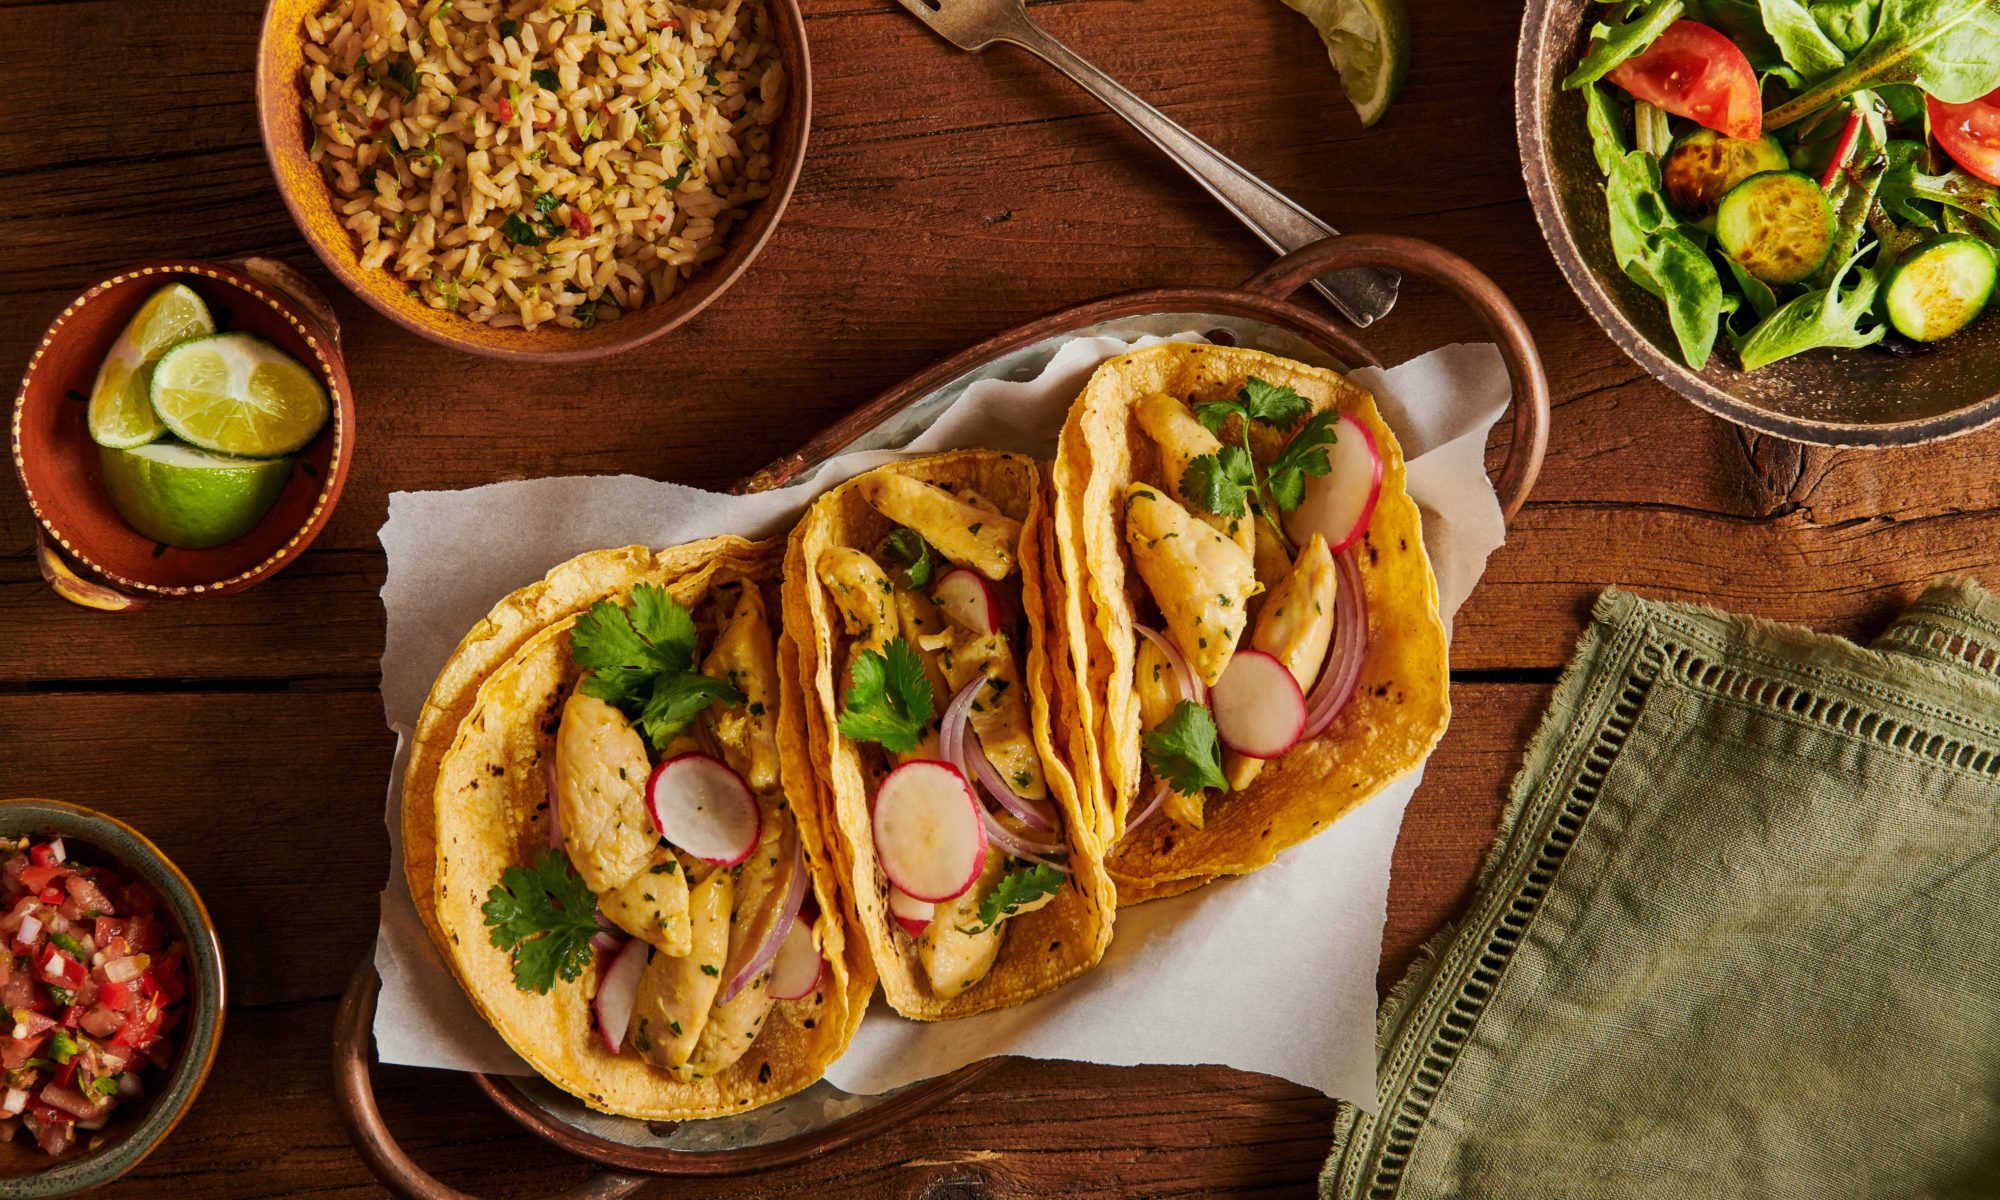
I don’t know about you, but Thai food is one of my favorite foods ever. I love the harmony of flavors and textures in Thai food that all play together like a perfect symphony. One of my all time favorites is Thai Peanut Noodles – similar to Pad Thai, but with a smooth peanut sauce with a hint of heat. I decided to kick it up a notch by adding some Spicy Thai Chicken that pairs perfectly with the creamy peanut-y noodles.
This dish is a gorgeous combination of spicy, savory and sweet with a marinade base for the chicken made with sesame, honey, soy sauce, garlic, and chile sauce, mixed with acidic notes of rice vinegar. It’s the perfect marriage of varying textures from the chewy noodles, crunchy peanuts and water chestnuts, all bathed in a smooth and luscious damn-good-peanut-sauce. Then to perfect it even more, it’s topped with fresh bright flavors of cilantro, lime and scallions. It’s so good, it just might be illegal. And don’t be ashamed to dig in right out of the pan. Grab some chopsticks, a pal or two and go to town. It’s rustic Asian comfort food at its best. Serve with a sweeter wine such as a Riesling, which pairs nicely with the spicy Asian flavors in this dish.
2 pounds chicken breast cutlets, sliced into thin strips
1 can water chestnuts, diced
1 package Thai Rice Noodles (flat, wide or Pad Thai)
Instructions
Prepare Spicy Chicken Marinade:
In a large mixing bowl, add all nine ingredients (sesame oil through dried ginger) along with sliced chicken breast and mix together thoroughly, coating chicken well. Top with plastic wrap and let chicken marinade in the refrigerator for at least 30 minutes up to 2 hours.
Once chicken is done marinating, bring a large pot of salted water to a boil and cook Thai noodles according to package directions, drain and rinse in cold water to stop cooking. Set aside.
Meanwhile, heat a large saute pan over medium heat, spray with cooking spray and saute chicken for approximately 8 minutes until cooked through and no longer pink. Add diced water chestnuts and saute for another minute or two until soft and heated through. Note: Make sure to drain and discard extra marinade off the chicken before sauteing to allow the chicken to brown in the pan and not steam. Reduce heat to low, cover and keep warm.
Make the peanut sauce: combine soy sauce, peanut butter, broth, garlic-chile sauce, honey, salt and lime juice in a medium saucepan over medium heat, mixing and stirring well until sauce is smooth and blended. Toss noodles together with peanut sauce.
Add the peanut noodles into the large pan with the cooked chicken and water chestnuts, toss together well with tongs to blend the flavors and ingredients. Squeeze fresh lime juice over the top, and garnish with chopped peanuts, cilantro, and sliced scallions. Add additional red pepper flakes or garlic-chile sauce for extra heat, as desired.
Notes
A sweet German Riesling wine would pair well with the spicy acidic flavors in this Asian dish.
Valentine’s Day is quickly approaching, and I got inspired to make a LOVE-LY Strawberry Chambord Cake with Strawberry Coulis to celebrate.
I wanted to create a simple cake that highlighted the flavors of the strawberries and Raspberry Chambord liqueur, and used a yellow cake mix flavored with vanilla and almond extract, along with some pureed strawberries and Chambord. I made a classic vanilla frosting to use in between the cake layers and the top of the cake as a canvas for my lovely Strawberry heart design.
To make it even more luscious, I made a Strawberry Coulis for the base of my Strawberry heart on top of the cake. I simply chopped up some strawberries, added water, sugar, vanilla and Chambord; then boiled it down into a thick strawberry glaze.
Top off the glaze with more fresh sliced strawberries creating a LOVE-LY heart shape. Cut into slices and sip some bubbly to celebrate with your honey.
A LOVE-LY Strawberry Chambord Valentine’s Day Cake
Prep Time: 15 minutes
Cook Time: 45 minutes
Total Time: 1 hour
Yield: 6-8
Serving Size: 1 slice
Ingredients
Cake:
1 box yellow cake mix
3 eggs
3/4 cup water
1/2 cup vegetable oil
1 cup chopped strawberries, pureed
2 tablespoons Raspberry Chambord liqueur
1 teaspoon vanilla extract
1 teaspoon almond extract
Vanilla Frosting:
1/2 cup butter (1 stick), room temp
3 cups powdered sugar
1/4 cup whole milk, room temp
1 teaspoon vanilla extract
Strawberry Coulis:
1 cup strawberries, quartered and chopped
1/2 cup water
1/2 cup sugar
2 teaspoons vanilla extract
1-2 tablespoons fresh lemon juice
1/4 cup Raspberry Chambord Liqueur
1 cup sliced strawberries, for topping
Instructions
Cake:
Preheat oven to 400 and grease two 9 inch round cake pans.
Add all ingredients in a large mixing bowl and beat on low with a hand mixer for 30 seconds. Increase speed to medium and beat for an additional 2 minutes.
Pour cake batter into both pans and bake for 30-35 minutes until a toothpick comes out clean.
Let cakes cool on a wire cooling rack in the pan for 10 minutes. Remove from pans and let cool completely.
Vanilla Frosting:
In a medium bowl, beat the butter until light and smooth with a hand blender. Add the powdered sugar, milk and vanilla and beat until frosting is smooth and creamy.
Strawberry Coulis:
Add chopped strawberries, water, sugar, vanilla, lemon juice and Chambord in a small sauce pan and bring to a boil, stirring well. Lower heat to medium-low and simmer for about 5-10 minutes until Strawberry Coulis thickens into a glaze. Remove from heat and let cool.
Cake Assembly:
Place one layer of the cake on a large plate or platter. Spread Vanilla frosting on the top. Place the second layer of cake on top and spread the rest of the Vanilla frosting on top.
Spread the Strawberry Coulis on top of the cake making a heart shaped pattern. Layer the sliced strawberries on top of the glaze also in a heart shaped pattern.
Slice cake and serve with a glass or two of bubbly.
Also in spirit of celebrating Valentine’s Day, Shari’s Berries has some delightful and lovely gift packages to send to your honey. One of my favorite things to go with strawberries is Champagne, of course, along with some luscious chocolate to pair. Check out their Veuve Clicquot Demi-Sec & Godiva gift set and more chocolate and Valentine’s Day goodies online here.
Demi-Sec, a slightly sweet style of Champagne, is at its best when served with desserts. Veuve Clicquot Demi-Sec, marked by fresh peach, nectarine and orange blossom, pairs beautifully with Godiva‘s assorted deep dark chocolates, smooth milks, velvety ganaches, classic truffles and pralines. Truly irresistible!
Each gift set contains:
Veuve Clicquot Demi-Sec Champagne (750 ML)
Godiva 19-piece Assorted Chocolates in a gold ballotin gift box
All photos, recipes and copy on this post are intellectual property of Kristen Hess/The Artful Gourmet. This post was not paid advertising and all opinions are my own.
It’s that time of year again to start planning menus and recipes for the holidays. But instead of just serving traditional turkey or ham, mashed potatoes and green bean casserole, why not mix it up a little bit and serve your holiday meal with an international flair? I had the opportunity to go behind the scenes and interview several Top Chefs and restaurants in NYC to get some creative ideas for non-traditional holiday menus for the holidays. Whether it have a Spanish, French, Asian, Jewish or Italian twist; here are some great international menu ideas and recipes for a fabulous holiday meal with family and friends that break the norm.
Spanish Holiday Menu – Alex Raij, Executive Chef at Txikito NYC
Executive Chef Alex Raij from the Spanish restaurant Txikito in NYC always makes a classic, festive dish for the holidays. This Canelones de Bakalao Recipe (Salted Cod Fish Canneloni with Crème Fraiche) feeds a crowd and references Basque, Catalan and Argentine family holiday traditions that Chef Raij grew up with in Spain. Serve with other traditional Spanish hot and cold tapas such as: Pikillos: roasted Navarran sweet peppers with ajoarriero; Kroketas: crispy creamy croquettes; Boquerón: marinated white anchovy with eggplant and piquillo; Cogollos: butter lettuce, Basque anchovy, and Bonito del Norte and Tutera: gratin of artichoke, Roncal, Jamón.
Canelones de Bakalao
Photo Credit: Kristen Hess
Canelones de Bakalao Recipe (Salted Cod Fish Canneloni with Crème Fraiche)
Executive Chef Alex Raij, Txikito
Serves 6
1 9×9 inch baking dish, preferably earthenware
12 – 4 inch square pieces fresh pasta sheets boiled and shocked in ice water (The Chef recommends cooking longer sheets and then cutting them after they are cooled in ice bath so they are more uniform)
Filling and topping
2.5 pounds cod
2 tablespoons Kosher salt, plus more for seasoning
2 cups olive oil
1.5 cup tomato pulp pref. pomi brand
2 cups Creme fraiche
2 tablespoons finely chopped chives
50 grams hackleback or other high quality caviar
Preheat oven to 375 degrees.
Salt the cod with the 2 T. kosher salt and let stand 10 minutes.
Rinse and pat dry.
Place the cod in a small pot and cover with olive oil.
Place on medium low heat and poach the cod in the oil until it flakes when prodded
Remove the fish to a mixing bowl to cool.
Pour 1/2 cup of the poaching oil over the cooling cod to cool with it.
Heat remaining oil add the tomato fry the tomato until cooked and a little sweet, season with salt.
Pour the tomato oil mix I the bottom of the baking dish.
Break up the cooled cod and flake it with clean hands.
Whip it up with the oil with a spatula or wooden spoon.
Place 6 pasta sheets side by side and place 1/12 of the filling at the end of each sheet.
Roll away from you and place on the tomato.
Repeat with the rest of the filling and next 6 sheets.
Season the crème fraiche with salt and pour over the caneloni.
Bake at 375 until bubbly.
Sprinkle with chives and top with caviar just before serving.
Serve 2 pieces per person.
Printed with permission of Alex Raij. All rights reserved.
—–
French Holiday Menu – Olivier Quignon, Executive Chef at Bar Boulud
Even as Chef Olivier Quignon of Bar Boulud prepares to celebrate his seventh Christmas in NYC, he hasn’t lost touch with the French holiday traditions of his hometown, the Northern French town of Beauvais. Christmas in the Quignon household, and in the restaurant he helms on behalf of renowned French Chef Daniel Boulud, Bar Boulud, is traditional to a tee, lasting up to six hours and spanning just as many courses. What does a typical French holiday meal entail?
Oysters “Always oysters. We shuck them at lunch and the eating begins.”
Cured or Smoked Fish
Foie Gras “This can be hot, seared, or served as a terrine.”
Hot Fish or Pasta
Poultry
Beef or Game
Cheese “ALWAYS cheese. French people eat cheese at practically every meal. We may sometimes skip dessert, but we never skip cheese.”
Pastry “At Christmas this is often a Bûche de Noel. But my wife is a pastry chef, so there are usually many desserts.”
Tournedos Rossini with Truffles and Foie Gras
Photo Credit: Kristen Hess
Traditionally, Tournedos Rossini is a French steak dish, purportedly created for the composer Gioachino Rossini by French master chef Marie-Antoine Carême. The dish comprises a tournedos (beef tenderloin) pan-fried in butter, served on a crouton, and topped with a hot slice of fresh whole foie gras briefly pan-fried at the last minute. A few slices of black truffle and Madeira demi-glace sauce garnish the dish.
At Bar Boulud New York, ‘Rossini’ is a dish that makes an appearance on the menu every holiday season, and on the tables at many French holiday meals. It is rich in ingredients and flavors, hearty, and the perfect celebration dish. There are several way to prepare Rossini, but Bar Boulud sticks to the traditional preparation—seared beef tenderloin atop a brioche toast, topped with seared foie gras and Madeira-beef jus, served with Pommes Macaire dotted with a celery root puree.
Tournedos Rossini with Truffles and Foie Gras and Pommes Macaire
Executive Chef Olivier Quignon, Bar Boulud
Serves 4
Pommes Macaire
Kosher salt, as needed
4 yellow gold potatoes
Salt and freshly ground white pepper
Black truffle butter or oil
2 egg yolks
Canola oil for frying
½ cup flour
Celery Root Puree
1 small (about 3/4 pound) celery root, peeled
Salt
1 tablespoon butter
1 cup milk
Freshly ground white pepper
To Finish
1 ½ lbs angus beef tenderloin, tied with butchers twine
12 ounces fresh grade A foie gras
6 tablespoons beef jus or demi glace
2 ounces Madeira
1 Tablespoon chopped shallot
4 ¼ thin slices of brioche, cut into 3 ½-inch circles, toasted
8 small light green celery leaves
1 small black winter truffle
For the Pomme Macaire
Preheat the oven to 350°F. Make a bed of salt on an aluminum foil-lined baking sheet and place potatoes on top. Bake potatoes for 45 minutes, or until tender.
Remove from the oven, and when cool enough to handle, cut potatoes in half and scoop the flesh into a bowl. Mash the potato with a fork, season to taste with salt, pepper, and truffle butter (or oil). Stir in the egg yolk to combine. Press mixture into a bread loaf pan and chill overnight.
Turn the potatoes onto a cutting board and cut into (at least 8) 3 x ½-inch batons. Lightly coat the batons in the flour and shake off excess.
Fill 1/3 of a saucepan with canola oil and heat to 350°F. When ready to serve, fry the potatoes in batches until golden brown. Strain onto a paper towel-lined tray, sprinkle with salt.
For the Celery Root Puree
Cut the celery root into medium dice. Place the butter in a medium saucepan over medium heat and cook until browned. Add the celery root, milk, and water to cover; bring to a simmer. Cook until tender, about 12 minutes. With a slotted spoon, transfer the celery root to a blender and puree with enough of the cooking liquid to make a smooth puree. Pass through a fine-meshed sieve into a bowl.
When ready to serve, transfer to a small saucepan and stir over medium heat to heat through.
To Finish
Slice the tenderloin into four portions and season on all sides with salt and pepper.
Cut the foie gras into four slices and season on all sides with salt and pepper.
Place a large sauté pan over high heat. Once very hot, sear the foie gras on both sides to brown, about 2 minutes on each side. Transfer to a platter, cover with foil and set aside.
Reduce the heat to medium and return the pan with the foie gras fat to the heat. Sear the beef on all sides, about 3-4 minutes each, basting the meat constantly with the fat. Brown the beef on all sides while basting the constantly with the fat in the pan, about 10 minutes, or until the internal temperature reaches 120°F for medium rare. Transfer the beef to the platter with the foie gras, cover, and rest in a warm place.
Add the shallots to the same pan over medium low heat, and cook, stirring until translucent. Add the Madeira and simmer to reduce by 2/3. Stir in the beef jus and adjust seasoning with salt and pepper if needed.
For each serving, place a brioche toast on a plate and top with a portion of beef. Top the beef with a piece of roasted foie gras, and shavings of black truffle. Place two pommes macaire next to the beef and top each with a spoonful of celery puree. Garnish puree with two celery leaves. Spoon the sauce from the pan around and serve.
—–
Asian Holiday Menu – Hung Huynh, Executive Chef at Catch Restaurant NYC
Whole Roasted Branzino is a favorite recipe of Chef Hung Huynh of Catch NYC for the holidays. It’s simple, delicious and easy to make and great for feeding a crowd. Chef Hung also recommends adding some miso, ginger, soy and lemongrass to the seasonings to amp up the Asian flavors in this beautiful seafood holiday dish. His Asian inspired holiday menu includes:
Roasted Whole Branzino
Sautéed Green beans with EVOO and Soy Sauce
White or Brown Steamed Rice
Miso Soup
Fresh fruit
Roasted Whole Branzino
Photo Credit: Kristen Hess
Roasted Whole Branzino
Executive Chef Hung Huynh
Serves 2-4 people
Ingredients:
1.5 to 2 pound Branzino
1 tablespoon of Aged Balsamic
Seasoning Rub:
1 tablespoon of salt
1 teaspoon of ground black pepper
1 teaspoon of picked chopped thyme
3 cloves of minced garlic
3 tablespoons of olive oil
Zest of one lemon
Zest of one lime
Directions:
Before cooking, the Branzino must be scaled, gutted and scored.
Combine all the seasoning rub ingredients.
Rub entire fish with seasoning including the cavity, distributing evenly.
Make sure that the entire fish is covered in the rub.
Take a half sheet pan and roast at 450 degrees for about 15 minutes.
Reserve the remaining olive oil in the sheet pan.
Place the fish on a platter and drizzle with the reserved olive oil and aged balsamic vinegar.
—–
Jewish Holiday Menu – Zach Kutsher, Proprietor, Kutsher’s Tribeca
Zach Kutsher, Chef and Owner of Kutsher’s Tribeca, always serves Latkes for the Hanukkah holiday. These crispy potato latkes are a traditional Jewish dish made of grated potatoes, onion, eggs and matzo meal, shaped into round potato pancakes and fried to a crispy golden brown. The traditional way to serve them is with a spoonful of sour cream, but Zach likes to also add ½ ounce of caviar (salmon roe, paddlefish caviar and wasabi flying fish roe) to the latkes to give them a special holiday touch. Some other fun ideas that Chef Zach does to dress up the latkes are to use some non-traditional savory toppings such as:
Peking Duck with Cucumber, Scallions and Sesame Hoisin
Wild Hen of the Woods Mushrooms and Herbed Ricotta
Gravlax and Dilled Creme Fraiche
Pastrami Reuben (pastrami, sauerkraut, emmentaler and thousand island dressing)
VLT – Veal Bacon, Lettuce and Tomato
To make it a complete Jewish holiday menu, serve the latkes with: Chopped Duck and Chicken Liver, Seasonal Pickles, Golden and Red Beet Salad with Lemon Ricotta, Arugula and Pecans, Turkey or Brisket with Challah Chestnut Stuffing, Cheesy Spaetzle Kugel, Brussels Sprouts and Pumpkin Shlishkas with Amaretto Matzo and Sage Brown Butter and Babka Sticky Buns for dessert.
Grate onion on the fine side of a cheese grater and then line a strainer with some paper towels and let drain in sink as dry as possible.
Mix egg, yolk, matzo meal, salt, lemon juice, and drained onion together, set aside.
Julienne the potatoes (cut into thin small matchsticks) or grate on the large side of cheese grater, and periodically put the potato in the egg mix to prevent browning. Do not wash potato after it is cut.
Mix all together, fry in schmaltz (rendered/clarified chicken or goose fat – or you can substitute canola oil)
Take one handful of mix, twisted in the palm of your hand like you would spaghetti on a fork, till golden brown and crispy, then flip.
Finish in oven if necessary.
Season with salt and pepper to taste.
—–
Italian Holiday Menu – Gabe Thompson, Executive Chef of Epicurean Group (dell’anima, L’Artusi, L’Apicio, and Anfora)
Grilled Pork Chop
Photo Credit: Epicurean Group
Chef Thompson, Executive Chef of the Epicurean Group in NYC loves creating special menus for the holidays. It is all about the food, flavors and family. His menu below puts his crave-able Italian twist on some fall favorites to make for a classic holiday menu!
Grilled Pork Chop — roasted vegetable and chestnut panzanella, pork sugo
Warm Cranberry-pumpkin Budino – served with apple cider sauce
—–
Roasted Acorn Squash Salad Recipe
Executive Chef Gabe Thompson, Epicurean Group
Serves 4-6
2 acorn squash (1 ½ pounds)
¼ cup extra virgin olive oil
Kosher salt
2 tablespoons butter
8 sage leaves
2 tablespoons maple syrup
Preheat oven to 350 degrees. Cut each squash into 8-9 wedges, each wedge about 1 inch thick. Remove and discard seeds. In a large bowl, toss the squash wedges together with 2 tablespoons olive oil and season generously with salt.
Meanwhile, heat a large sauté pan over medium-high heat. Add 1 tablespoon of olive oil, and 1 teaspoon of butter. As soon as the butter melts, add half of the squash to the pan, arranging the pieces so that they are cut-side down. Sprinkle half of the sage over the squash. Cook undisturbed until it is golden brown on one side, about 2-3 minutes. Turn each squash piece over and cook for another 2-3 minutes until golden brown on the other side. Remove squash from the pan and place on a half sheet tray or cookie sheet. Repeat this process with remaining olive oil, butter, squash and sage leaves.
Drizzle maple syrup over the squash segments. Place in the oven and bake until each piece of squash is easily pierced with a fork, about 25-30 minutes. Remove and set aside.
Homestyle Meatloaf with Ancho Chile-Red Pepper Glaze
OK, so I know Meatloaf is one of those dishes we’re all a little bored of by now. Not so glamorous or gourmet, and usually a quick go-to dish when we have nothing else in the fridge and want to make an easy dinner with a few ingredients on hand. Well that was the case last weekend, so I thought – how can I jazz this meatloaf up a bit and make it a little healthier to boot?
Kickin’ Ketchup
I have some samples of Kickin’ Ketchup in my pantry that I’ve been meaning to try – it’s a spicy ketchup made out in California with a touch of heat and smooth sweetness. I thought I would experiment making a spicy concoction made with the ketchup and some ancho chile powder and red pepper jelly (try this one or make your own) – perfect for a Meatloaf glaze or dipping sauce for homemade cocktail meatballs. The balance of the smoky chile powder mixed with the spicy heat of the ketchup and sweet heat of the red pepper jelly is a harmonious combination and I’m lovin’ it. For the meatloaf, I used a combination of ground beef, ground pork and ground veal – the holy grail for a savory juicy meatloaf. I added onions and garlic, some minced zucchini, a dollop of Kickin’ Ketchup and a dash of ancho chile powder along with oatmeal substituted for regular breadcrumbs. I made some Wild Mushroom Risotto on the side, but this would be perfect with some roasted carrots, sauteed zucchini or mashed potatoes to accompany. Dig in!
1 1/2 pounds meatloaf mix (ground beef, veal and pork)
1 teaspoon red pepper flakes
1/2 teaspoon ancho chile powder
1 teaspoon salt
1/2 teaspoon fresh ground black pepper
2 tablespoons Kickin' Ketchup (or use regular ketchup and add some cayenne)
1/4 cup instant or steel-cut oats
ANCHO CHILE-RED PEPPER GLAZE
1/4 cup Kickin' Ketchup
4 tablespoons Red Pepper Jelly
1/2 teaspoon garlic salt
1/2 teaspoon ancho chile powder
1/2 teaspoon black pepper
Instructions
HEALTHY HOMESTYLE MEATLOAF
Melt butter in a large saute pan over medium high heat. Add onions and zucchini and cook for about 8 minutes, until tender. Add minced garlic and saute for another minute or two. Remove cooked vegetables from the pan into a small bowl, let cool completely and set aside.
Preheat oven to 350 degrees. Spray a ceramic or glass rectangular baking dish with no-stick cooking oil spray.
Whisk eggs together in a large mixing bowl, add the cooled cooked veggies, meat, spices, ketchup and oats and mix together thoroughly and gently with your hands.
Take the meatloaf mixture and press together into one large or two small loaves into the baking dish.
Make the Ancho Chile-Red Pepper Glaze per instructions below, and brush over entire meatloaf, saving some extra glaze for serving.
Bake for 1 hour up to 1 1/4 hours until a thermometer inserted in center reads 155 degrees F.
Remove baked meatloaf from oven and let cool for about 10 minutes.
Slice and serve with additional glaze and a side of roasted veggies, mashed potatoes or mushroom risotto.
ANCHO CHILE-RED PEPPER GLAZE
Mix together ketchup, red pepper jelly, garlic salt and ancho chile powder and black pepper. Brush glaze on to meatloaf and save additional glaze for serving.
To make the mushroom stock, wash and trim the stems of the fresh mushrooms. Reserve the stems and slice the mushroom caps for use later in the recipe. (Make sure to dust of the dirt first and don’t soak the mushrooms).
Combine the chicken stock, stems, dried porcini mushrooms in a medium saucepan. Bring to a boil, turn down to a simmer, and cook for 30 minutes over low heat. Strain through a cheesecloth and reserve the liquid for the risotto.
Heat a large sauté pan and add 4 tbsp of butter. Add the sliced mushrooms and sauté until browned. Deglaze the Madeira and reduce until almost all the liquid has evaporated. Reserve the mushrooms. (Try to let the Madeira glaze sit, don’t stir).
For the risotto, heat a wide pot or rondeau (flat bottom pot with tall sides) over medium-high heat and add 2 tbsp butter. Add the shallots and sauté until translucent, about 3 minutes. Add the rice and stir the mixture together to coat the rice with the shallots and butter.
Add the white wine, lower the heat and cook, stirring constantly, until the wine has evaporated. Begin adding the mushroom stock, a large ladleful at a time. Continue to add the mushroom stock (slowly and continuously), stirring constantly until the rice is just cooked through and all the stock has been absorbed, about 20 mins. The rice should be slightly al dente but have a creamy consistency and not dry.
Stir in the reserved mushrooms, the remaining tablespoon of butter, chives, and parsley. Top off the risotto with Pecorino Romano and season with salt and pepper to taste.
I recently took a really fun and cool pizza making class to learn the secrets of making a true Neapolitan Pizza (Vera Napoletana) with the Food Bloggers NYC Meetup Group sponsored by Vimbly.com.
Class having a blast making doughNYC Food Bloggers Meetup Group
We sat around a big table in a private room upstairs and learned the techniques, traditions and passions behind producing a perfectly thin crispy Neapolitan pizza while sipping on Italian wines and making new friends.
Making Pizza Dough
We learned the intricacies behind making and kneading our own dough accustom to the Neapolitan style by making wells of flour filled with yeast water and the patient process of kneading using only 2 fingers as the dough slowly came together by kneading, mixing and adding more flour and water.
Chef Chris throwing dough
We watched Chef Chris toss pizza dough in the air and even tried it ourselves (too fun!).
Chef Chris demonstrating how to sauce the pizza
We then made our own Margherita sauce made with San Marzano tomatoes from Italy, and topped off the pizzas with cubes of fresh cow’s milk Mozzarella and fresh basil before our pizzas were thrown delicately into a 900 degree oven on a pizza peel to reveal a perfectly crispy gorgeous pizza of bubbly cheesy goodness.
Prepping our Pizzas
Layer the dough with sauce…
San Marzano Tomato Sauce, Fresh Mozzarella & Basil
Add some delicious Fresh Cow’s Milk Mozzarella and Basil…
Good Times constructing our pizzas
Patiently waiting for the oven…
Pizzas ready for the Wood-fired ovenLook. At. This. Masterpiece. Creation.
And let the deliciousness devouring begin.
Good Times
The story behind Neapolitan pizza goes like this: In June 1889, a Neapolitan tavern owner Raffaele Esposito served the Queen of Italy, Margherita of Savoy, a special dish named in her honor. The wood-fired Flatbread was topped with Melted Mozzarella, Tomato Sauce and Basil leaves, symbolizing the colors of the Italian Flag. The Queen was so pleased with her meal that she had a wood-fired “flat-bread oven” built into the palace. And history was made.
Pizzaiolo at 180
The art behind making a perfect, true Neapolitan pizza has become a standard practice with strict rules of approval. The Associazione Verace Pizza Napoletana is a non-profit official governing association in Italy that maintains the standards and regulations of all Pizzaioli and Establshments serving Vera Napoletana Pizza. It was founded in Naples in 1984 by the oldest and well-known Neapolitan pizzaioli, and according to the “rules” proposed by them, there are specific ingredients and techniques that must be used to pass the official Italian seal of approval.
The Perfect Neapolitan Pizza
So just what are the secrets behind making that crispy crust with gooey cheese and succulent sauce? Here’s a few secrets from Restaurateur/Chef and native New Yorker, Nick Accardi of Tavola in Hell’s Kitchen:
Measure by weight rather than volume to get the perfect water to flour ratio for your crust. Many elements can change the density of ingredients such as age, storage temperature, or environmental climate. Measuring by weight assures the perfect hydration ratio.
Use double zero (type 00) flour which is a highly refined flour that has been milled to a standard “00” and completely free of bran or germ.
Use natural Neapolitan yeast or brewer’s yeast, sea salt and water. (New York City tap water is the BEST secret ingredient in making the perfect pizza dough!)
Keep yeast refrigerated and check the expiration date on the package to make sure it’s fresh.
The dough must be kneaded by hand or with a low-speed mixer.
Allow the dough to rise for 24 hours at room temperature. The bare minimum standard is 6 hours (after mixing let the dough rise for 2 hours, then hand cut and roll into small balls, let rise for 4 more hours).
After the rising process, the dough must be formed by hand without the help of a rolling pin or other machine, and may be no more than 3 millimeters (0.12 in) thick. Use your hands to gently work the dough from the center outward.
Use San Marzano tomatoes, which grow on the volcanic plains to the south of Mount Vesuvius, for the pizza sauce like a bona fide pro (easy to find in grocery stores or Italian markets).
Vera Napoletana Pizza must be made using only fresh, all-natural, non-processed ingredients including Fior di Latte (Cow’s Milk) or Bufala Mozzarella, fresh basil and drizzled with real Extra Virgin Olive Oil. You can find Genuine imported EVOO also at Italian markets such as Eataly or Tavola in NYC.
Less is More: Don’t drown a pizza in sauce and toppings. The most delicious pies use smaller portions of the highest quality of fresh ingredients.
A thin crust is the signature trait of Neapolitan pizza. While having a wood fired oven at home is not common these days, making your crust as thin as possible will allow for fast cooking time, which intensifies and seals in the flavors of each ingredient. Note: The Associazione Vera Pizza Napoletana requires the thickness of the crust to be 1-2 cm.
The pizza must be baked for 60-90 seconds in a 905°F stone oven with an oak-wood fire. When cooked, it should be crispy, tender and fragrant.
There are three official variants to Neapolitan pizza: Pizza Marinara, which is made with tomato, garlic, oregano and extra virgin olive oil, Pizza Margherita, made with tomato, sliced mozzarella, basil and extra-virgin olive oil, and Pizza Margherita Extra made with tomato, mozzarella from Campania in fillets, basil and extra virgin olive oil.
1 (28-ounce) can whole San Marzano tomatoes, passed with juices through a food mill
12 ounces Mozzarella di Bufala (see note) or mozzarella fior di latte cheese, cut into 1/4-inch-thick slices
4 large or 8 small basil leaves
Extra virgin olive oil
Medium coarse sea salt
Special equipment: a pizza stone and peel
Instructions
Make the dough: Sprinkle yeast over water; let stand until yeast is creamy, 5 to 10 minutes. (If yeast does not become creamy, discard and start over with new yeast.)
In a large bowl, whisk together flour and salt; form a well in center. Add yeast mixture and warm water; stir until dough just comes together. Turn out dough onto a lightly floured work surface and knead vigorously, for 10 minutes. Cover with a damp dish towel and let rest for 10 minutes, then knead vigorously for 10 minutes more. Lightly oil a large bowl. Form dough into a ball, transfer to bowl and turn to lightly coat with oil. Cover bowl tightly with plastic wrap and refrigerate overnight.
Punch down dough with your fist (dough will be stiff), then fold sides over one another, turn dough, tightly cover bowl with plastic wrap and refrigerate at least 4 hours or up to 24 hours.
Divide dough into 4 pieces; shape pieces into balls and place on a lightly floured work surface, leaving a few inches between balls. Loosely cover with a damp dish towel (not terry cloth) and let rise at warm room temperature until doubled, about 2 hours; time may vary depending on room temperature and freshness of yeast. If skin forms on dough while rising, lightly spray surface with water.
Heat Stone While Dough Rises: Position rack in lower third of oven. Place pizza stone on rack. At least 45 minutes before baking pizza, heat oven to maximum temperature (500 to 550 degrees).
Assemble Pizza: On a lightly floured work surface, press 1 dough ball with your fingers to begin to shape into a round. Use your fist and hands to gently stretch dough to a 10-inch round. (A floured rolling pin can be used to help roll out dough.) Transfer dough to a lightly floured peel; gently shake peel to make sure dough does not stick.
Working fairly quickly, spread a 1/3 cup sauce over dough, leaving about a 1/2 -inch border. Tear 3 ounces cheese into pieces and arrange on top of sauce. Tear 1 or 2 basil leaves into small pieces and arrange on top. Drizzle very lightly with oil and sprinkle with salt. Slide pizza onto stone. Bake until cheese is melted and bubbling in spots and edge of dough is crisp and golden, about 7 minutes. Using the peel and a large spatula or pair of tongs, transfer pizza to a plate and serve. Repeat with remaining ingredients.
Notes
Note: Soft “00” flour produces a pliable, easy-to-work-with pizza dough and a tender yet sturdy crust with a crisp yet not too dry edge. Mozzarella fior di latte has a firmer texture than Mozzarella di Bufala, which falls apart when cut, though both cheeses are creamy when melted. You can find “00” flour, San Marzano tomatoes, mozzarella di bufala, mozzarella fior di latte at Italian markets, specialty stores, and online.
I love Spring. There’s nothing better than a dose of gorgeous sunshine, cherry blossoms in bloom, and the tempting promises of Summer on the way. It’s the perfect time of year to throw open the windows, do some Spring cleaning and celebrate new beginnings. I also love the bountiful selection of fresh seasonal herbs and vegetables that come along with it.
Asparagus is in its prime now, so I wanted to create a light and savory chicken dish to complement it for an easy, healthy weeknight dinner – a twist on classic Chicken Saltimbocca with the addition of some cheesy goodness and bright lemony flavor.
I picked up some fresh lemons, thin chicken breast cutlets at the market along with some Italian Prosciutto, fresh sage and Provolone cheese to stuff them with. To start, I laid out the chicken breasts in a large baking pan and layered the ingredients on top – first a slice of Prosciutto topped with a few sage leaves and thinly sliced cheese. I then folded them over and secured them with toothpicks and seared them in a pan in olive oil to get a nice golden brown crust. Once the chicken breasts were browned, I set them back in the pan, poured the juices on top and finished in the oven for about 15 minutes.
The best part of this dish is the buttery lemon wine sauce for serving. I sliced up some garlic and sautéed it in olive oil for a minute or two, then added some chicken broth, white wine and let it come to a boil, then reduced the heat and simmered it down to reduce the sauce, stirred in some lemon juice, a nob of butter and set the sauce aside for drizzling on the chicken later.
While the chicken was roasting in the oven, I blanched the asparagus for a minute or two and then tossed it with sliced garlic, olive oil and sea salt, roasting it for about 10 minutes or so until tender. So easy and soooo good!
Once the chicken and asparagus were done roasting, I served them on a plate and finished them off with the buttery lemon wine sauce. If you want to add a starch to the meal, simply cook up some orzo, pasta or some crusty bread to go with it. You can also use Fontina cheese for a slightly different flavor, or to make it a vegetarian dish, omit the prosciutto and substitute some sautéed mushrooms or spinach and prepare the same way. Keep it light with a side salad and a lemony vinaigrette, and serve with a glass of Pinot Grigio or Pinot Gris.
Here’s to Spring and the days leading up to Summer – Bon Appetit!
Prosciutto Sage Provolone Stuffed Chicken with Roasted Garlic Asparagus
Prep Time: 15 minutes
Cook Time: 30 minutes
Total Time: 45 minutes
Yield: Serves 4 to 6
Ingredients
4-6 chicken breast cutlets
4-6 thin slices of Italian Prosciutto
12 fresh sage leaves
4-6 slices of Provolone or Fontina cheese
2-3 tablespoons of olive oil
Sea salt and freshly ground black pepper, to taste
2 cloves of garlic, sliced plus 1 clove minced (for sauce)
1 bunch of asparagus
½ cup chicken broth
½ cup dry white wine (Pinot Grigio or Pinot Gris)
juice from half a lemon, plus 1 tablespoon zest for garnish
1 tablespoon butter
lemon wedges and additional torn sage leaves for garnish
Instructions
Preheat oven to 350 degrees.
Spread out the chicken cutlets flat in a large baking dish, and season with sea salt and pepper, to taste.
Layer on top of each chicken breast a slice of prosciutto, two sage leaves, and a slice of provolone or fontina cheese, then fold over the chicken in half and secure with a toothpick to secure.
Heat 1 tablespoons of olive oil in a large sauté pan over medium-high and sauté chicken breasts approximately 1-2 minutes per side until golden brown.
Remove the chicken and juices from pan and place back into the baking dish and roast in the oven for another 15 minutes until cooked through. You might want to baste the chicken in its juices once or twice to make sure the chicken doesn’t dry out in the oven.
Meanwhile, slice 2 cloves of fresh garlic, mince 1 clove and set aside. Trim the ends off the asparagus and blanch in boiling salted water in a large pot for about 1 minute. Drain, place asparagus in a baking dish and drizzle with a tablespoon of olive oil, a sprinkle of sea salt and pepper and sliced garlic. Place in oven and roast for about 10-15 minutes until fork tender and slightly browned (be careful not to overcook or the asparagus will get dark and mushy – aim for tender yet crisp and green).
In the same sauté pan for the chicken, heat another tablespoon of olive oil. Sauté the additional clove of minced garlic for about 1 minute until lightly golden and soft. Add the chicken broth, white wine, lemon juice and bring to a boil, then lower the heat to a simmer. . Let sauce reduce to about half, then add 1 tablespoon of butter, swirling in to finish the sauce.
When chicken and asparagus are done roasting, plate them and top off with the lemon butter wine sauce.
Garnish with lemon wedges, torn sage leaves, lemon zest, and salt and pepper to taste. Serve with a side of cooked orzo or pasta, crusty bread or a green salad with a lemon vinaigrette and a dry white wine, such as Pinot Grigio.
If you haven’t tried Moroccan Harissa before, listen up. It’s a lovely pepper sauce blend made with chili peppers, bell peppers, garlic, extra virgin olive oil, vinegar, salt. That’s it. And it’s totally delicious.
Harissa is a staple of Tunisian and Moroccan cuisine, and it is the central condiment in kitchens in North Africa used as a spread, a dip or drizzled on top of nearly any dish. Versatile as it is, you can pair it with lamb or pork, fish, chicken or beef as a marinade or base for a Moroccan tagine dish. Drizzle some over couscous and grilled vegetables, or use it as a dressing for potatoes or dip some grilled flatbread or pita in it.
I first tried Mina Harissa Pepper Sauce last year when I met owner and creator Mina from Casablanca Foods at the Just Food Conference, and fell in love. They were giving away samples of their red pepper Harissa sauce that came in three different styles (Mild, Medium and Spicy). It had just the right amount of heat, and tons of flavor from the chilies,bellpeppers and garlic.
They now have a new flavor made with green chilies and green peppers that is equally delicious with a medium spicy heat and tangy flavor. I was lucky enough to sample some of this new green goodness sauce and created a tasty, fun recipe to go with it – Spiced Moroccan Burgers with Green Harissa, Feta and Mint over Grilled Pita. The burgers are mildly spiced with cumin, ancho chile, onion, garlic and mint, then served over grilled pita and topped with the green harissa sauce, crumbly fresh feta, chopped fresh mint and sun dried tomatoes. They’re super easy to make, and super flavorful with the delicious blend of spices, fresh herbs and ingredients. Enjoy!
Spiced Moroccan Burgers with Green Harissa, Feta and Mint
Ingredients
SPICED MOROCCAN BURGERS
1 pound ground beef or lamb
3/4 cup seasoned bread crumbs
1 large egg, beaten
1/4 cup mint, chopped
Sea salt and freshly ground black pepper to taste
1/2 teaspoon ground cumin
1/2 teaspoon ground ancho chile powder
1 tablespoon dried minced onion
3 garlic cloves, minced
2 tablespoons garlic herb infused oil, for basting
1/2 cup Mina Harissa Green Harissa Pepper Sauce
2-4 sun dried tomatoes, for garnish
1/2 cup crumbled feta cheese, for garnish
1/4 cup fresh mint, chopped for garnish
Dash of smoked paprika, for garnish
GRILLED PITA BREAD
2-4 pieces of pita or flatbread
1-2 tablespoon garlic herb infused oil
Sea Salt, for garnish
Smoked paprika, for garnish
Instructions
Preheat a grill pan over medium high heat.
In a large mixing bowl, combine ground beef or lamb with the next 8 ingredients (through minced garlic).
Gently knead the meat mixture together until ingredients are combined, and make 4-6 burger patties in the shape of an oval, brush burger patties with herb infused oil and set aside.
To make the grilled pita bread: drizzle a tablespoon of herb infused oil on to both sides of the pitas and grill for a few minutes on each side until lightly browned and grill marks appear. Cook each pita separately (depending on the size of your grill pan).
Remove pita from pan and sprinkle with sea salt and smoked paprika, cover with foil to keep warm while burgers are cooking.
Add the burger patties to the heated grill pan, and cook approximately 4 minutes on each side (for medium) until grill marks appear and they are cooked according to your liking.
To serve, place a piece of pita bread on each plate (either whole or broken into two pieces) and place burgers on top of the pita (or in the pita if you prefer).
Top burgers with sun dried tomatoes, feta cheese, green harissa sauce, fresh chopped mint, a dash of smoked paprika, additional salt and pepper if desired, to taste.
Hey guys! I was just featured in the NY Times Food Section yesterday (online and print versions) talking about Chicken French from my hometown Rochester NY!
Here’s a link to the article online discussing where it’s from and how it’s made, and a recipe from staff food writer Julia Moskin, and a few quotes from me and my sister Jen who lives and works in a few Rochester restaurants!
Rochester-Style Chicken French & Lemon Broccolini
Chicken French is an amazing dish that is popular in my hometown in Rochester, NY and on almost every menu. The Italian-American immigrants first introduced this dish in NYC and then migrated Upstate. The recipe also known as Chicken Francaise, uses lightly-floured chicken cutlets, which are then coated with a parmesan cheese and egg batter, then sauteed until golden brown. The luscious sauce is made with garlic, butter, lemon, white wine or sherry, and parsley which is served over the top of the golden brown chicken. You can serve the dish over pasta (my favorite is a linguine) or rice or a green veggie, and I decided to serve this with broccolini, a Chinese broccoli that is similar to Broccoli Rabe, and topped it with the lemon butter sauce and an extra splash of fresh lemon juice for a light and healthy dinner.
This dish has a lovely tangy, buttery flavor with the lemon, wine and garlic, and the flour coating is super light as I made it with an ultra-fine flour (Wegman’s Pan-Searing Flour, or you could use Wondra flour), and I seasoned it with salt and pepper and a hint of cayenne. If you want to use sherry instead of a white wine, this will give you a sweeter flavor to the sauce. I made my sauce with a Marlborough New Zealand Sauvignon Blanc which is light and fruity and gives it a nice semi-sweet tangy flavor.
Serve the chicken and broccolini with some crusty french bread or some fresh pasta (i love linguine with more lemon-butter sauce, parmesan cheese and parsley over the top!) and a glass of dry white wine like Sauvignon Blanc or Pinto Grigio. Enjoy!
Mince the parsley for the egg, cheese and parsley mix.
Prep the wet and dry ingredients to dip the chicken in (flour first, egg-cheese-parsley mixture second).
Saute the chicken in olive oil in a large saute pan over medium heat for approx. 4 minutes on one side.
Flip chicken over and saute another 4 minutes until golden brown. Remove from pan and set aside, covered in a foil tent. Discard the cooking oil except for 1 tablespoon.
Saute the minced garlic on medium low for about a minute until lightly browned, being careful not to burn.
Add the wine, scraping up brown bits from the bottom of the pan, and bring to a boil.
Add the chicken broth and lemon juice and let cook for approx. 5-7 minutes to reduce liquid by half. Stir in the cold butter and red pepper flakes (if using).
Return chicken to the pan and bring to a boil, reduce heat to a simmer and cook for another 4-5 minutes to let liquid reduce further and infuse flavors in the chicken. Throw in some extra chopped parsley. Remove from heat.
Meanwhile, bring a large pot of water to a boil. Insert steamer basket with broccolini and steam covered for about 5 minutes.
Remove cover and let cook over boiling water for another 5 minutes or so, until broccolini is fork tender but still bright green.
Plate the chicken and broccolini and spoon the lemony wine and garlic butter sauce over the top of both. Season with additional salt and pepper to taste.
Garnish with fresh lemons and additional chopped parsley, if desired.
Enjoy with a glass of dry or fruity white wine (like a Sauvignon Blanc or Pinot Grigio) and some crusty Italian bread or pasta (with some of that luscious buttery-lemon-wine sauce over the top).
This is an amazing dish that is popular in my hometown in Upstate Rochester, NY. The Italian-American immigrants first introduced this dish in NYC and then migrated Upstate. The recipe stems from the French Veal Francaise or Chicken Francaise dish, which uses lightly-floured thin veal or chicken cutlets, which are then coated with a parsley-parmesan cheese-egg mixture and sauteed until golden brown.
The luscious sauce is made with garlic, butter, lemon, white wine or sherry, and parsley which is served over the top of the golden brown chicken. I decided to serve this with steamed broccolini, a Chinese broccoli that is similar to Broccoli Rabe, and then topped it with the lemon butter sauce for a fresh and healthy Sunday dinner. It has a lovely tangy and buttery flavor with the lemon, wine and garlic, and the coating is super light as I made it with an ultra-fine flour (Wegman's Pan-Searing Flour) or you could use Wondra, or a regular flour then season it with salt and pepper and a hint of cayenne.
If you want to use sherry instead of a white wine, this will also give you a sweeter flavor to the sauce. I made this with a Marlborough New Zealand Sauvignon Blanc which is light and fruity and gives it a nice semi-sweet tangy flavor.
Ingredients
CHICKEN FRENCH:
1/4 cup olive oil/canola oil blend for sauteing (I used Colavita Garlic Oil Blend)
1 1/2 pounds boneless, skinless chicken breast cutlets
2-3 eggs
1/4 cup shredded Parmigiano Reggiano cheese
Kosher salt and fresh ground black pepper
Dash of cayenne pepper (optional)
1 tablespoon fresh parsley, finely chopped
1/2 cup of superfine flour (Wegmans Pan Searing flour or Wondra)
LEMON BUTTER WINE SAUCE:
1-2 garlic cloves, finely minced
1/2 cup white wine (or sherry for a sweeter flavor)
1 cup chicken broth
Juice from 1 1/2 lemons (about 1/4 cup)
1 teaspoon red pepper flakes (optional)
2 tablespoons cold butter, cut into pieces
Lemon wedges, for garnish
1-2 tablespoons fresh chopped parsley, for garnish
BROCCOLINI:
1 bunch broccolini, trimmed
Lemon Butter Wine sauce (see above)
Fresh lemon juice and salt and pepper, for garnish
Instructions
CHICKEN FRENCH:
Heat oil in a large non-stick saute pan over medium heat.
Meanwhile, whisk together eggs, cheese, salt and pepper, cayenne (if using) and fresh parsley in a large mixing bowl.
Place flour in another flat bowl and season with salt and pepper to taste.
Rinse and pat dry chicken breasts, then dredge each one in flour first (left hand), then egg mixture (right hand).
Place chicken into the heated saute pan and cook for 4 minutes on one side. Flip chicken over and saute for another 4 minutes until golden brown.
Remove from pan and set aside, covered with a foil tent.
LEMON BUTTER SAUCE:
In the same skillet, saute the minced garlic for 1 minute, being careful not to burn.
Add the wine and bring liquid to a boil over high heat, scraping up the brown bits in the pan.
Pour in the chicken broth and lemon juice and red pepper flakes (if using) and let reduce by half, another 5-7 minutes.
Stir in the cold butter and whisk until it melts and creates a velvety sauce and consistency.
Reduce the heat, and add the cooked chicken back into the pan with the sauce, let simmer another 4-5 minutes.
Place chicken on serving plate with the steamed broccolini (and/or cooked pasta) and spoon the lemon butter sauce over the top of the dish.
Garnish with lemon wedges and additional chopped parsley if desired.
BROCCOLINI:
Steam broccolini for about 5 minutes, covered. Remove lid and steam for another 5 minutes until fork tender but still bright green.
Top broccolini with Lemon Butter sauce, additional lemon, salt and pepper to taste.
Parmesan Garlic Shells with Spinach, Zucchini and Ham
This is a super easy and tasty dish that I whipped up one night with some of the ingredients I had on hand. It’s a light and savory pasta dish made with large shell pasta, sauteed spinach, zucchini and ham with garlic and a creamy parmesan alfredo sauce, with a few sprinkles of red pepper flakes, sea salt and fresh ground pepper. Perfect dish for a weeknight dinner, with some crusty French or Italian bread, a green salad and glass of wine. You can also substitute whole wheat pasta in any shape or size you please. Cooked diced bacon or prosciutto are also delicious in place of the cooked ham. If you want to experiment with the veggies, try broccoli or peas or yellow squash, what ever your heart desires!
Parmesan Garlic Shells with Spinach, Zucchini and Ham
Prep Time: 15 minutes
Cook Time: 30 minutes
Total Time: 45 minutes
Yield: 4-6
Ingredients
1 bag of medium-large shell pasta (fresh or dried)
2 tablespoons olive oil
2 cloves of garlic, minced
1 large zucchini, sliced 1/4 inch thin and halved
1 bag of fresh spinach (leaves), chopped
1-2 teaspoons red pepper flakes
1 cup of cooked Virginia ham, diced (can sub cooked prosciutto or bacon)
Kosher salt and fresh ground pepper, to taste
PARMESAN GARLIC SAUCE:
1 tablespoon butter
1 clove garlic, minced
2 teaspoons flour
Sea salt, to taste
1 cup low-fat milk
2 tablespoons neufchatel or cream cheese
1 cup parmesan cheese
Fresh parsley, chopped for garnish
1 green onion, sliced for garnish
Instructions
Bring a large pot of salted water to a boil, add pasta shells and cook according to package directions until al dente (about 8 minutes dried, 3 minutes fresh). Drain pasta, reserving 1/2 cup of cooking water and set aside.
Add 1 tablespoon of olive oil to a medium-large saute pan and add zucchini. Sprinkle with salt and fresh ground pepper to taste and cook for about 8-10 minutes until zucchini is soft. Add 1 tablespoon of garlic and saute for another minute or so until garlic starts to brown. Remove zucchini-garlic mixture from saute pan and set aside in a medium-large mixing bowl.
Add another tablespoon of olive oil to the saute pan and heat for a minute or so. Add the fresh chopped spinach, salt and pepper to taste, and red pepper flakes, stirring through. Saute spinach about 3-5 minutes until wilted. Add the cooked diced ham and saute another few minutes until browned. Remove spinach and ham from saute pan and add to cooked zucchini in mixing bowl.
To make the Parmesan Garlic Sauce:
Melt the butter in a large skillet over medium heat.
Add the garlic and cook until soft and lightly browned, about 1 minute.
Add in the flour and cook, stirring with a wooden spoon, another minute.
Whisk in the milk, a sprinkle of sea salt and cook, whisking constantly, until just thickened, about 3 minutes.
Add the Neufchatel and parmesan cheese; whisk until melted, about 1 minute.
Combine the cooked pasta shells, 1/2 cup cooking water from pasta, sauteed zucchini, spinach and ham to the alfredo garlic sauce, stir thoroughly to mix ingredients for another minute or so.
Sprinkle additional salt, pepper and red pepper flakes to taste into the pasta mixture. Remove from saute pan and place in a large serving bowl. Top pasta with chopped fresh parsley and green onions, and top with more parmesan cheese to taste.
Serve the pasta with some crusty bread, a green salad and glass of wine.
Notes
You can also substitute whole wheat pasta in any shape or size you please. Cooked diced bacon or prosciutto are also delicious in place of the cooked ham. If you want to experiment with the veggies, try broccoli or peas or yellow squash, what ever your heart desires!
There’s a great little place in my neighborhood called Todaro Bros. – a small, locally-owned deli and grocery store that sells fresh and imported Italian food and other gourmet groceries. I usually stop in at least once a week to peruse their cheese department and sample some of their fresh house-made mozzarella, just for kicks (it’s that good!).
It’s impossible to walk in there and just buy one thing – I’m like a kid in a candy store! I found these gorgeous sun-dried tomatoes marinated in herbs and oil and picked up some fresh mozzarella, basil, oregano, chives, tomato sauce, cream and pasta to make a fresh, tasty Summer pasta dish with a Vodka Cream Sauce.
I made it with spaghetti but you could serve this tasty Vodka Sauce with virtually any pasta you wish. It’s tangy, velvety and full of flavor, and the fresh basil gives it a peppery flavor which is rounded out by the creamy fresh mozzarella and sweet sun-dried tomatoes. I also threw in a few pieces of crumbled cooked bacon into the sauce to give it an extra layer of flavor (which is totally optional but also totally worth it!)
Top off the pasta with fresh basil leaves, red pepper flakes, coarse Mediterranean sea salt and fresh ground pepper…
6-8 marinated sun-dried tomatoes, cut into halves or quarters
1 quart tomato sauce (store bought or homemade, pureed smooth)
1 cup of vodka
1/2 cup of heavy cream
1 teaspoon fresh oregano, minced
1 teaspoon fresh chives, chopped
Coarse sea salt and fresh ground black pepper, to taste
fresh unsalted mozzarella, torn into medium pieces, for garnish
fresh basil leaves, whole or torn, for garnish
red pepper flakes (optional), for garnish
1 pound package of cooked and drained pasta (spaghetti, linguine or penne)
Instructions
Cook pasta in a large saucepan according to package directions (until al dente) and drain (reserving a few tablespoons of the pasta water for later); set aside. Meanwhile, cook the bacon over medium heat for about 15 minutes until crispy, drain and crumble.
Heat oil over medium-high heat in a large saucepan or pot. Add garlic and shallots, saute until soft and translucent, about 2 minutes. Add crumbled bacon and sun-dried tomatoes, add salt and pepper to taste. Saute for an additional 5 minutes and turn heat down to medium-low.
Stir in tomato sauce and vodka into the same saucepan and let simmer (approximately 20 minutes) until the sauce thickens and cooks down. Stir in the heavy cream, fresh oregano and chives and let simmer on low for another few minutes until sauce is heated through.
Return the pasta back to the large saucepot and ladle some of the sauce into it, along with a few tablespoons of reserved pasta water and toss to coat.
Ladle coated pasta into serving dishes and top with additional vodka sauce. Garnish with fresh basil leaves, mozzarella, red pepper flakes and salt and pepper to taste.