Red Curry Beef w/ Zucchini Noodles

   Red Beef Curry

Since the holidays are coming soon, we all know what THAT means..lots of holiday parties with food and drinks, and with that in mind, I’ve decided to commit to eating healthier and lighter the next few weeks.

Zucchini Noodles Action

I absolutely love my KitchenAid® Spiralizer Attachment that goes with my KitchenAid® Stand Mixer – and I’m so excited to make some healthier low-carb meals! It comes with five different blades for peeling, coring and slicing and is perfect for fresh fruits and vegetables. I love pasta and rice, but spiralized veggies are such a great substitute when I want to lighten up my recipes and eat low carb.

Red Curry Beef Zoodles

I thought a delicious comfort food dish with a healthy twist would be perfect for the cooler months, and decided to make a Red Curry  Beef with Zucchini Noodles.

Red Curry Beef ingredients

I used lots of fresh, organic ingredients: beef, sweet potatoes, onions, garlic and green beans, and then made a lovely curry sauce with coconut milk, red curry paste, fresh lime juice, fish sauce, some beef broth and a dash of Sriracha to spice it up.

Cutlery and Veggies

I used my Professional Series 3.5″ Paring Knife that came with the 7-piece Professional Series Cutlery set, for chopping my onions and garlic, Thai chilies and basil.

Chop beef into large chunks

The larger Chef’s knife was great for cutting up the large chunks of beef and sweet potatoes with its sturdier grip and large super sharp blade.

Add veggies to curry sauce

My heavy duty KitchenAid ceramic cast iron pot is perfect for making this dish – it cooks evenly and is large enough to make a large pot of curry or stew, and is ovenproof to 500 degrees!

Saute zucchini noodles

The KitchenAid spiralizer attachment is also easy to use! All you need to do is attach it to the KitchenAid mixer, and the spirals come right out perfectly cut. Then you just briefly cook them in a saucepan with some olive or peanut oil, season them with some salt and pepper.

Red Beef Curry

Top the #zoodles with this luscious and creamy curry – lots of great flavors and textures, sweet and spicy – all in one pot. Delish!

Red Beef Curry

This is such a great Winter comfort food dish to make and it’s so easy to make with all the right tools… You’ll definitely want to make this Red Curry Beef  Zucchini Noodles for dinner – tonight!

Red Beef Curry with Zucchini Noodles

Ingredients

  • INGREDIENTS
  • 3-4 medium zucchini
  • 2 1/2 pounds lean stewing beef, (chuck or round), cut into 1 1/2 inch chunks
  • 1 teaspoon Kosher salt
  • 1 teaspoon freshly ground black pepper
  • 3 tablespoons canola oil
  • 1 sweet onion, finely chopped
  • 4 garlic cloves, minced
  • 1/4 cup red curry paste
  • 2 cans (13.5 ounce) unsweetened coconut milk
  • 2 tablespoons Thai fish sauce
  • 2 tablespoons fresh lime juice
  • 2 tablespoons dark brown sugar
  • 1/4 cup beef broth
  • 1 tablespoon Sriracha hot sauce (optional)
  • 1 large handful French green beans, trimmed
  • 3 medium sweet potatoes, peeled and cut into medium chunks
  • 1 (8 ounce) can sliced bamboo shoots, drained
  • 3 tablespoons fresh basil, chopped or torn, for garnish
  • 1-2 Thai green chilies, sliced fine, for garnish
  • 1/2 cup peanuts, for garnish

Instructions

  1. Attach the KitchenAid® Spiralizer Attachment to your KitchenAid® Stand Mixer and choose your desired spiralizing blade. Attach the vegetable skewer to the Spiralizer and secure it to the zucchini. Move the spiralizing blade to the end of the zucchini and turn on the Stand Mixer to low (level 2) to make the spiralized zucchini noodles. Make sure you place a bowl underneath to catch the zucchini noodles as they fall. Set the noodles aside or keep them in the refrigerator until ready to serve.
  2. Cut the beef into 1 1/2 inch large chunks and place in a bowl. Sprinkle with kosher salt and freshly ground black pepper.
  3. Heat the oil over medium-high heat in your KitchenAid® 6.0Qt Cast Iron Cookware and brown the beef in two batches until lightly browned on all sides. Remove the beef from the pot and transfer to a bowl, set aside.
  4. Add the onion and garlic to the same pot and sauté over medium heat for about a minute. Add the curry paste, stirring into the onions and garlic, until lightly fragrant, for about 30 seconds. Add the coconut milk, and deglaze the pan, stirring up all the crispy brown bits with a wooden spoon. Stir in the fish sauce, lime juice, brown sugar, beef broth, Sriracha (if using) and bring the liquid to a boil.
  5. Add the green beans and sweet potatoes and stir into the liquid. Next add the browned beef back in and stir together well. Cover the pot, reduce the heat to low and let simmer for about an hour and 45 minutes. Add the bamboo shoots into the curry and let simmer for another 15 minutes.
  6. Meanwhile, heat a tablespoon of olive oil in your 10? Skillet from the KitchenAid® Stainless Steel 8-Piece Set over medium heat. Add the zucchini noodles, with some salt and pepper to taste, and sauté for a few minutes until the noodles are soft.
  7. Serve the noodles in bowls topped with the Red Beef Curry, garnishing with fresh chopped basil, sliced Thai green chilies and peanuts.
https://www.theartfulgourmet.com/2016/01/red-curry-beef-zucchini-noodles/

CLICK HERE TO VIEW STEP BY STEP VISUALS ON THE KITCHENTHUSIAST BLOG!

Red Beef Curry

Enjoy!

Classic Comfort Food :: Beef Bourguignon

Beef Bourguignon

So Old Man Winter is finally back in town, despite the crazy warm weather we’ve been having lately in New York City. Temperatures drop and there’s nothing better than a big pot of comfort food and a bottle of red to make a girl happy, right? Sometimes it’s the simple things in life that make everything OK…(*sigh). So I did just that this weekend, and made a huge batch of some classic Beef Bourguignon..you know, the classic French braised beef stew with veggies and red wine that Julia Child made famous.

Beef Bourguignon

I made it in a large 6-quart ceramic Dutch oven (KitchenAid brand is my fav!), and it’s chock full of savory deliciousness – sautéed pancetta, braised beef, shallots, garlic and carrots sautéed into a roux with some flour, flambeed brandy (my secret ingredient!), a whole bottle of red (yes, really!) and some beef stock, along with a bouquet garni of fresh herbs (1 bay leaf, 2 sprigs of fresh thyme, 3 sprigs of rosemary wrapped in cheesecloth) slow cooked in the oven for 2 hours.

Beef Bourguignon

The finishing touch of mushrooms and caramelized Cippolini onions sautéed in butter are added in at the end to add tons of buttery, savory flavor to the stew. YUM.

Beef Bourguignon

I don’t think I’ve ever tasted anything so delicious in my life – and I’m quite sure if Julia was still alive, I would make her damn proud, if I do say so myself.

Beef Bourguignon

It’s a flavor bomb in a bowl, my friends, and perfect for a lovely  holiday dinner party for a crowd. Serve in big bowls garnished with fresh Italian parsley over mashed potatoes, polenta or egg noodles, of course accompanied with a bottle of red (Pinot Noir or Burgundy) and some crusty French bread to mop up the sauce. All around a big table of friends and family to partake in all the goodness.

Happy Holidays! 

Beef Bourguignon

Prep Time: 30 minutes

Cook Time: 2 hours, 30 minutes

Total Time: 3 hours

Yield: 10 to 12 servings

This is a delicious heartwarming French Beef Stew made with beef chuck, red wine, brandy, fresh herbs, shallots, garlic, cippolini onions, carrots and pancetta. Perfect one-pot dish for Winter or the holidays!

Ingredients

  • 5 pounds beef chuck, cut into medium-large cubes
  • Kosher salt and freshly ground black pepper
  • 1/2 pound pancetta, diced
  • 1/4 cup vegetable oil
  • 5 large shallots, finely diced
  • 3 large carrots, finely diced
  • 4 cloves garlic, finely diced
  • 1/4 cup brandy
  • 1/3 cup all-purpose flour
  • 1 bottle dry red wine (Pinot Noir or Burgundy)
  • 4 cups beef or veal stock
  • 1 bouquet garni (1 bay leaf, 2 sprigs thyme, 3 sprigs Italian parsley)
  • 3 tablespoons unsalted butter (divided)
  • 5-7 small to medium Cippolini onions, quartered
  • 1 pound mushrooms, sliced (White button or Cremini)
  • Flat leaf Italian Parsley, minced, for garnish

Instructions

  1. Preheat oven to 350 degrees.
  2. Place beef in a single layer on a rimmed baking sheet and season with a couple teaspoons of Kosher salt and freshly ground black pepper.
  3. Heat a large Dutch oven or stockpot over medium-high heat for several minutes to get it hot.
  4. Add pancetta and cook until crispy and browned, drain on paper towels and set aside.
  5. Increase the heat to high and add the beef in to the pot in a single layer and brown on all sides, turning with tongs (be careful not to crowd or overfill the pot as you will need to cook beef in batches to get a nice browning).
  6. Place the browned beef back on to the baking sheet and set aside.
  7. Add the oil and diced shallots and carrots to the Dutch oven and cook for a few minutes. Lower the heat to medium-high and continue to saute until they begin to soften, about 10 minutes.
  8. Add the brandy and flambe (light it in the pan with a long lighter or match) and let the flames keep going for as long as possible, until they go out to burn off alcohol.
  9. Reduce heat to medium, add flour and stir together with the vegetables for a few minutes to make a roux base for the stew.
  10. Next deglaze the pan by pouring in the red wine, a little bit at a time, stirring well to incorporate and remove any lumps, scraping the brown bits off the bottom of the pan (these babies are full of flavor!)
  11. Add 3 3/4 cups of the stock, browned meat and bouquet garni and bring to a boil over high heat.
  12. Remove pot from the heat, cover and cook the stew in the oven for 2 hours, until meat is fork tender. (The meat should shred/fall apart easily when you pierce it with a fork - if not, place it back in the oven for another 15-20 minutes).
  13. While stew is cooking, caramelize the onions in a medium saute pan with 1 tablespoon of butter and salt and pepper, until the onions are lightly browned.
  14. Add the remaining 1/4 cup stock and cover, reduce heat to medium-low, and cook for about 15-20 minutes, stirring occasionally, until the onions are soft and glazed and liquid is evaporated.
  15. Transfer onions to a bowl and set aside.
  16. In the same pan, turn the heat up to high. Melt 2 tablespoons of butter, the mushrooms, salt and pepper to taste, sear over high heat until mushrooms are lightly browned, about 5 minutes. Remove from the pan and mix into the caramelized onions, set aside.
  17. Remove the stew from the oven and gently stir in cooked pancetta, mushrooms and onions. Adjust seasonings (salt and pepper to taste).
  18. Serve the stew in bowls with a sprinkling of fresh parsley over mashed potatoes, polenta or egg noodles, with a glass of red and crusty bread to mop up the sauce of course!

Notes

Recipe adapted from Mother's Best Comfort Food Cookbook.

Schema/Recipe SEO Data Markup by Yummly Rich Recipes
https://www.theartfulgourmet.com/2015/12/classic-comfort-food-beef-bourguignon/

Beef Bourguignon

Other Beef Bourguignon recipes you may enjoy:

Julia Child’s Beef Bourguignon

Slow-Cooked Beef Bourguignon The Kitchn

Martha Stewart Beef Bourguignon

Meatball Madness!

Meatball Madness

Fall is one of my favorite times of the year simply because it’s a time when the leaves are changing, the weather is getting cooler, and you have an excuse to stay inside to watch football with friends and family and gather around the table with some delicious party food!

Whenever I host a party, I like to create a smorgasbord of food that’s easy for people to grab. I love bite-sized finger foods and tapas-style spreads that are fun to make and eat. My idea for a great fall football party is Meatball Madness – an experiment with different types of meatballs paired with unique sauces, fillings and bases to eat them on.

Meatballs are super fun and easy to make with the help of my KitchenAid® Copper Core 12″ Nonstick Skillet and my KitchenAid® Professional-Grade Nonstick Sheet Pans when I’m cooking for a large crowd. Both are great for cooking meatballs easily and evenly with their high quality nonstick coating, and they are both large enough so I can cook big batches of meatballs.

Greek Meatballs

For this post, I decided to make some Greek Beef Meatballs with Tzatzkiki Sauce served on toasted flatbreads,

Asian Meatballs

and some Asian Chicken Meatballs with a Spicy Peanut Sauce served on Gem Lettuce Cups as thought starters for this party idea, but I’d love to hear from you what other themes, flavors and creative ideas you would incorporate when you throw your own Meatball Madness Party!

MeatballMadness-Group

You can mix and match different themes with different fillings and flavors for the meatballs, for example – you could make Spanish Meatballs made with pork, chorizo and onions and create a Roasted Red Pepper Aioli to dip them in and serve on toasted pita. Or you could make traditional Italian Meatballs with Cheese and Tomato Sauce on mini slider buns topped with fresh basil and parsley. Or make German Meatballs with Bratwurst and Sauerkraut with a Grainy Mustard Sauce served on mini Rye breads – the possibilities are endless and super fun to come up with!

CLICK HERE TO SEE THE RECIPES AND HOW I MADE THEM WITH MY KITCHENAID EQUIPMENT ON THE KITCHENTHUSIAST BLOG! 

Veggie, Bacon & Cheese Tarts in a Toasted Quinoa Crust

Veggie, Bacon & Cheese Quinoa Tarts

I love making savory tarts and pies, but unfortunately I don’t love the carbs and calories that come along with them. It’s also Summertime, and I’m trying to cook and eat lighter than usual…and the Fall season will come soon enough with all that yummy comfort food!

Quinoa Tart 1

I’ve been experimenting lately with alternatives to pasta and dough – things like zucchini, cauliflower, almond flour, and quinoa. Not only are they lighter, but also , gluten-free and less carbs than traditional flours and equally as satisfying and tasty!

Veggie, Bacon & Cheese Quinoa Tarts

I found a recipe on Cooking Light for a savory Fall tart made in a toasted quinoa crust and decided to experiment a little with the crust, fillings and flavors. MISSION ON.

Toasted Quinoa

I love the flavor of the nutty toasted quinoa, which is done in the oven and gives a nice depth of flavor and crunch to the tart crust.

Toasted Quinoa Tart Shells

I mixed in some Bob’s Red Mill almond flour, corn starch, Parmesan cheese and an egg for binding the quinoa, then added a little garlic salt and olive oil to bring it all together for the crust. Then I pressed the quinoa mixture into four small tart pans and baked for about 10 minutes before filling them and baking again.

Mascarpone & Cheddar

While the tart crusts were baking, I made a savory filling with mascarpone and cheddar cheese and spooned in this delightful cheesy goodness on to the par-baked crusts.

Crispy Cooked Bacon

I also cooked up some crispy gorgeous bacon in the oven while the tarts were baking..(for about 20 minutes or so)..

Top with Crispy Bacon

then chopped it to pieces and layered it on top of the cheeses. HELLO PRETTIES. Come to me.

Blanched Cauliflower and Peas

Next I started filling the tarts with my blanched cauliflower and baby peas,

Veggie Tart fillings

more Parmesan cheese and a drizzle of olive oil,

Ready to bake the tarts again

popped them back in the oven..

Tarts Cooling

and baked these cuties for another 5-10 minutes and let them cool on a wire rack for a few…

Tarts cooling

the anticipation of these delicious things in my mouth is MOUNTING.

Cooked Quinoa Tarts

Once the tarts were cooled a bit, I garnished them with some fresh chopped basil, chives and freshly cracked black pepper and a few red pepper flakes. Mini Green Goddesses!

Veggie, Bacon & Cheese Quinoa Tarts

And Oh Holy Delicious.

Veggie Bacon & Cheese Tarts in a Toasted Quinoa Crust

This is a great base recipe for any savory tart really – feel free to substitute different fillings for the tarts depending on the season..butternut squash and spinach in the Fallcorn, tomatoes and zucchini in the Summer… roasted carrotspotatoes and Gruyere in the Winter..asparagus and leeks in the Spring…oh, the ideas are endless!

Veggie Bacon & Cheese Tarts in a Toasted Quinoa Crust

Veggie, Bacon & Cheese Tarts in a Toasted Quinoa Crust

Prep Time: 30 minutes

Cook Time: 30 minutes

Total Time: 1 hour

Yield: Makes four 4 5/7-inch tarts

Serving Size: 1 tart

This is a gluten-free tart recipe made with a toasted quinoa crust, filled with a savory filling of mascarpone and cheddar cheese, bacon, cauliflower, peas topped with Parmesan, and fresh basil and chives.

Ingredients

  • Toasted Quinoa Tart Crust:
  • 1 cup uncooked quinoa
  • 1/2 cup almond meal flour
  • 1 tablespoon cornstarch
  • 2 tablespoons Parmesan cheese
  • 1/4 teaspoon garlic salt
  • 2 tablespoons olive oil
  • 1 large egg, beaten
  • Cooking spray
  • Tart Filling:
  • 1 cup cauliflower florets
  • 1 cup baby green peas, frozen
  • 4-5 slices of bacon, cooked and chopped
  • 1/2 cup mascarpone cheese, softened
  • 1/2 cup shredded cheese (Cheddar, Jack, or Gouda)
  • 4 tablespoons grated Parmesan cheese
  • 1 tablespoon olive oil, divided
  • 1/2 teaspoon coarsely ground black pepper
  • 2 tablespoons chopped fresh basil, for garnish
  • 1 tablespoon finely minced chives, for garnish

Instructions

  1. Make the Toasted Quinoa Tart Crusts:
  2. Preheat oven to 350°.
  3. Place quinoa on a baking sheet. Bake at 350° for 10 minutes or until golden brown; cool.
  4. Place half of quinoa in a food processor; pulse 30 seconds.
  5. Transfer to a large bowl. Add remaining toasted quinoa, almond meal, cornstarch, and salt to bowl; stir to combine.
  6. Add oil and egg; stir until mixture is crumbly but holds together when pressed.
  7. Press into bottom and up sides of four 4 5/7-inch removable-bottom fluted tart pans coated with cooking spray.
  8. Bake at 350° for 10 minutes or until golden, but not completely cooked (you will put them back in the oven later after you fill them with the veggies, bacon and cheese.)
  9. Prep the Tart fillings:
  10. While the tart crusts are baking, chop the cauliflower into small florets and measure out the baby peas.
  11. Blanch the veggies in boiling water for about 2-3 minutes, then drain and rinse them in very cold water or shock them in an ice bath, set aside.
  12. Cook the bacon and drain, chop into small chunks, set aside.
  13. Measure out the mascarpone, Cheddar and Parmesan cheese, and chop basil and chives, set aside.
  14. Fill the Tart Crusts:
  15. Spread the mascarpone cheese evenly in bottom of each tart crust.
  16. Top each tart with shredded cheese, then crumbled bacon.
  17. Arrange cauliflower and peas evenly over cheese and bacon mixture on the tarts and drizzle with some olive oil, Parmesan cheese and black pepper.
  18. Bake tarts for another 5-7 minutes in the oven.
  19. Remove tarts from the pans; cool completely on a wire rack.
  20. Garnish with fresh chopped basil and chives, serve warm.

Notes

Recipe adapted from Cooking Light, Nov 2014.

Schema/Recipe SEO Data Markup by Yummly Rich Recipes
https://www.theartfulgourmet.com/2015/07/veggie-bacon-cheese-tarts-in-a-toasted-quinoa-crust/

Other Tart Recipes you might enjoy:

Savory Harvest Fall Tart

Quinoa Tart with Zucchini & Sundried Tomato Dressing

Gluten-Free Tomato Tart

Gluten-Free Spinach and Onion Tart

Summer Veggie Frittata + Time to Relax.

Summer Veggie Frittata

Summer is that time of year when we get to take some time off from our crazy busy lives, at least for a little while, to clear our heads, visit with friends and family, go to the beach, have a backyard cookout, or simply lie in a hammock and read a book or take a good, long nap.

Summer Veggie Frittata

It’s also a time when i tend to get a little lazy because it’s so hot outside. Or because I actually have some time on my hands to just, well do nothing. Or sleep in a little longer.

Summer Veggie Frittata 5

Because I’m constantly cooking as a profession, the last thing I feel like doing on vacation is well, cooking. Even though I get to stay at my parent’s house with a huge kitchen and backyard patio that actually has a grill and some room to move. And I always have all these big plans to make all this delicious food when I’m here but really just want to do – well, not much. You know – relax a little bit. 🙂

Summer Veggie Frittata 3

I decided to make something easy for breakfast today. And healthy. All in one big pan. A Summer Veggie Frittata that’s full of spinach and onions and fresh zucchini with some shredded cheese that’s lovely and light and just tasty and good all around. Yes, I threw in a tablespoon or two of cooked bacon because I just can’t help myself but if you’re a vegetarian feel free to leave it out.

Summer Veggie Frittata 4

I think I could get used to these lazy Summer vacation days. Don’t you agree?

Summer Veggie Frittata

Prep Time: 15 minutes

Cook Time: 10 minutes

Total Time: 25 minutes

Yield: 4-6

Serving Size: 1 wedge

Ingredients

  • 2 tablespoons light cream or half and half
  • 1 teaspoon dill seasoning
  • kosher salt
  • freshly cracked black pepper
  • dash of red pepper flakes
  • 6 large eggs
  • 1-2 slices of cooked bacon, crumbled
  • 1 tablespoon olive oil or butter
  • 1/2 cup minced onion
  • 1 package frozen spinach, defrosted and drained well (or 2 cups fresh spinach leaves)
  • 1 cup shredded cheese (Jack, Cheddar, Mozzarella)
  • 1 small zucchini, sliced

Instructions

  1. Preheat broiler to high.
  2. Meanwhile, combine cream, eggs, salt, pepper, cooked bacon and seasonings in a mixing bowl, whisking well.
  3. Heat a medium-large ovenproof skillet over medium heat. Add oil or butter to the pan and saute onions for a few minutes until soft and translucent.
  4. Add spinach and cook for a few more minutes until heated through (or wilted if using fresh spinach).
  5. Pour the egg mixture into the pan and cook for about 5 minutes until eggs are slightly set.
  6. Sprinkle half of the cheese over the top evenly.
  7. Top the frittata with the zucchini slices over the egg and cheese mixture.
  8. Sprinkle the remaining cheese over the top and place in the oven.
  9. Broil for about 3-5 minutes until the top is lightly browned and cheese is melted.
  10. Remove from oven and cut into wedges.
  11. Serve with additional fresh veggies or a green salad.

Notes

You can also add a little extra protein by mixing in some cooked ham or sausage. Feel free to substitute the veggies by adding in summer squash, peppers, tomatoes, whatever you have on hand. Goes great with a green salad and a glass of white wine if you're in the mood!

Schema/Recipe SEO Data Markup by Yummly Rich Recipes
https://www.theartfulgourmet.com/2015/06/summer-veggie-frittata-time-to-relax/


Cool off with some Spicy Fish Tacos & Summer Wine pairings

Yum

Spicy Fish Tacos
Spicy Fish Tacos

There’s an interesting theory that in the Summertime heat, eating spicy foods actually lowers your body temperature as well as a plethora of other health benefits such as raising your metabolism, improving digestion, mood and aids in better sleep. For a recent photoshoot I did for Miditto.com, we decided to pair some of their monthly wine selections with a spicy dish – and what better than some delicious fish tacos made with a kickin’ spice rub and a fresh mango-avocado-jalapeno salsa?

You can always adjust the heat by increasing or decreasing the amount of cayenne red pepper (or omit it all together if you like the spice flavor without the heat), and to be perfectly honest this spice rub and fruity fresh salsa combination would go great with grilled chicken or shrimp too! I used tilapia for this recipe but you can also substitute any other mild flaky white fish such as cod, orange roughy, flounder, halibut or haddock.

Spicy Fish Tacos
Spicy Fish Tacos

Garnish the tacos with some extra cilantro, jalapeñosfresh cracked black pepper. Some sliced red cabbage would also add a little bit of fresh crunch too. Add a splash of fresh lime juice, a dollop of  chipotle cream (recipe follows) — both great toppings to cool the spicy heat!

Rose wine

For wine pairing, Miditto recommends a crisp Sauvignon Blanc, a light dry Rose, a fruity Riesling, a bold red Zinfandel or spicy Shiraz to compliment the spicy flavors of the dish.

Read more about the best Summer Wines on Food & Wine

Read more about the health benefits of eating spicy foods

Cool off with some Spicy Fish Tacos & Summer Wine pairings

Prep Time: 15 minutes

Cook Time: 15 minutes

Total Time: 30 minutes

Yield: Serves 4.

Serving Size: 1 taco

Spicy Fish Tacos with Mango, Avocado & Jalapeño Salsa and Chipotle Crema. Perfectly paired with Summer white wine or rose to cool the heat!

Ingredients

  • Spicy Fish Fillets:
  • 1/2 tbsp cumin
  • 3/4 teaspoon salt, divided
  • 1/2 teaspoon paprika
  • 1/4 teaspoon cayenne
  • 1/4 teaspoon freshly ground black pepper
  • 2 garlic cloves, minced
  • 1 pound white fish fillets (cod, tilapia,haddock)
  • 1 tablespoon canola oil
  • Avocado-Mango-Jalapeno Salsa:
  • 1 cup sliced peeled avocado
  • 2/3 cup finely chopped peeled ripe mango
  • 1/4 cup chopped green onions
  • 1/4 cup finely chopped red onion
  • 2 tbsp finely chopped fresh cilantro
  • 1 tbsp fresh lime juice
  • 1/4 teaspoon ground red pepper
  • 1 jalapeño pepper, thinly sliced (optional)
  • 1 cup red cabbage, shredded (optional)
  • 1 lime, fresh juice of for garnish 8 (6-inch) corn or flour tortillas
  • Chipotle Crema:
  • 1/2 cup low-fat sour cream or plain yogurt
  • 1 tbsp low-fat mayonnaise
  • 2 teaspoons chipotle pepper (finely chopped) in adobo sauce
  • fresh lime juice from 1/2 lime
  • Kosher salt and freshly ground black pepper to taste

Instructions

  1. Prepare Spicy Fish:
  2. Wash fish fillets and pat dry, set aside.
  3. Prep all fresh ingredients (chop garlic, herbs, fruit, onions, avocado, etc.) and set aside.
  4. Measure out all dry spices (cumin, 1/2 teaspoon salt, paprika, cayenne, black pepper) and add to a mixing bowl, combine well. Rub spices over fish and let sit covered in plastic wrap for about 10-15 minutes in the refrigerator.
  5. Cook fish in a skillet with oil for about 2 minutes on each side (check to make sure the fish is done by cutting a slit in the thickest part. If still pink, cook another minute or so until done). Keep the fish warm tented with some foil on a side plate while preparing the salsa.
  6. Avocado-Mango-Jalapeno Salsa:
  7. To make the salsa, add together the rest of the salt (1/4 teaspoon), avocado, mango, onions, cilantro, lime juice, red pepper and jalapeño (if using).
  8. Rub a small amount of canola oil on the tortillas on both sides and heat in a skillet over medium-low. (You can also put them in the microwave for about 1 minute or warm them in the oven at 350 for about 5-10 minutes).
  9. Cut the fish into medium size pieces and add them to the tortillas. Top each taco with a couple tablespoons of the mango-jalapeno-avocado salsa.
  10. For garnishes, add a squeeze of fresh lime juice, cilantro, jalapeno slices, cabbage, salt and pepper to taste.
  11. For a little extra flavor, add a drizzle of chipotle cream or top with a dollop of sour cream to cool the spicy heat.
  12. Chipotle Crema:
  13. In a small to medium mixing bowl, add all ingredients and mix together well. If you like a smoother cream texture, throw everything into a blender or food processor until blended well. Add chipotle cream to a squeeze bottle or plastic bag with a hole cut from one of the corners and squeeze over top of the tacos, or add a dollop of sour cream as a cool topping. Makes 1/2 cup.

Notes

Recipe adapted from Cooking Light, May 2012

Schema/Recipe SEO Data Markup by Yummly Rich Recipes
https://www.theartfulgourmet.com/2012/06/cool-off-with-some-spicy-fish-tacos-summer-wine-pairings/

Hawaiian Chicken with Grilled Pineapple Salsa :: Frozen Watermelon Martinis

hawaiian chicken

hawaiian chicken

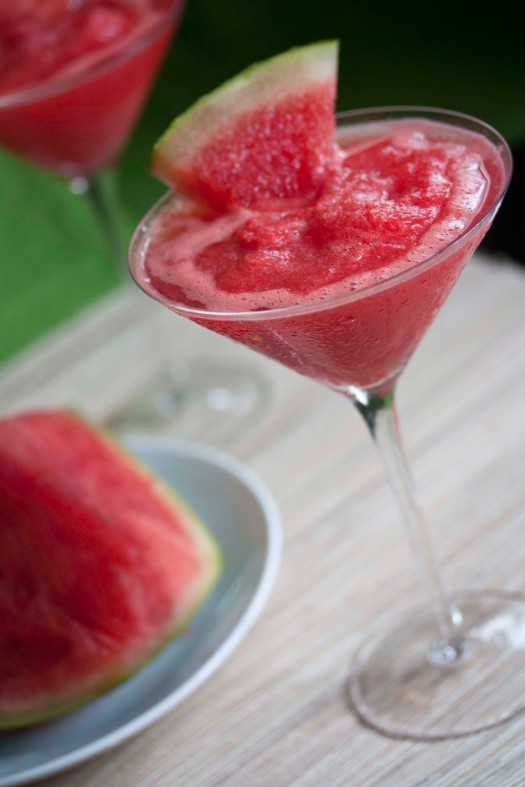
Grilling with fruit is an easy and staple technique in the summertime – it gives fresh flavor to ordinary BBQ dishes and is a healthy compliment to whatever it is your grilling. This recipe is a Spicy Hawaiian Chicken with a Grilled Pineapple Salsa, made of cilantro, jalapeno pepper and onion (if you prefer a less spicy dish, substitute a red bell pepper instead of the jalapeno). The BBQ sauce is spicy and sweet made with honey, garlic, hot sauce, ketchup and soy sauce (you can also make less spicy by adding more ketchup and soy and honey in place of the hot sauces). The dish is rounded out by a side of rice, perfect mixed in with the pineapple jalapeno salsa and grilled chicken. Top it off with a refreshing frozen watermelon martini (recipe following) – made with vodka, fresh juicy watermelon, crushed ice and some cosmopolitan martini mix…now that’s a sweet and savory dinner perfect for a summer night. Enjoy!

Hawaiian Chicken with Grilled Pineapple Salsa :: Frozen Watermelon Martinis

Prep Time: 15 minutes

Cook Time: 15 minutes

Total Time: 30 minutes

Yield: Serves 4.

Serving Size: 1 chicken breast / 1 martini

Grilling with fruit is an easy and staple technique in the summertime - it gives fresh flavor to ordinary BBQ dishes and is a healthy compliment to whatever it is your grilling. This recipe is a Spicy Hawaiian Chicken with a Grilled Pineapple Salsa, made of cilantro, jalapeno pepper and onion (if you prefer a less spicy dish, substitute a red bell pepper instead of the jalapeno). The BBQ sauce is spicy and sweet made with honey, garlic, hot sauce, ketchup and soy sauce (you can also make less spicy by adding more ketchup and soy and honey in place of the hot sauces). The dish is rounded out by a side of rice, perfect mixed in with the pineapple jalapeno salsa and grilled chicken. Top it off with a refreshing frozen watermelon martini (recipe following) - made with vodka, fresh juicy watermelon, crushed ice and some cosmopolitan martini mix...now that's a sweet and savory dinner perfect for a summer night. Enjoy!

Ingredients

  • Ingredients
  • 1/4 c pineapple juice
  • 3 tbsp ketchup
  • 2 tbsp soy sauce
  • 2 tbsp Country Sweet sauce
  • 1 tbsp Chili Garlic sauce
  • 1/2 tbsp Cholula hot pepper sauce
  • Fresh ground pepper
  • 4 chicken breasts (skinless, boneless, preferably organic for plumper breasts)
  • Cooking spray
  • 4 pineapple slices for grilling, then diced
  • 1 bunch cilantro, chopped
  • 1/2 red onion, diced
  • 1 small jalapeno pepper, seeded and deveined, chopped (or 1/2 red bell pepper)
  • 2 cups cooked rice (white or yellow)

Instructions

  1. Combine the first seven ingredients to make the BBQ marinade and add the chicken breasts, storing in a Ziplock bag or covered baking dish, reserving some of the marinade for basting. Let marinate for 1-2 hours in the refrigerator.
  2. Prepare the rice per package instructions, keep warm and fluff with a fork when ready to serve.
  3. To prep the grilled pineapple salsa, chop the jalapeno pepper, red onion and cilantro into a medium dice, mix together and set aside to add grilled pineapple for serving.
  4. Heat the grill or grill pan over medium-high heat (spray the grates or pan with cooking spray just before grilling). Grill chicken breasts about 6-7 minutes per side, basting with the reserved marinade a few times on each side until the chicken gets a nice golden brown color and grill marks. Grill the pineapple slices about 1 minute until browned and chop into medium diced pieces. Mix pineapple chunks into the jalapeno, onion and cilantro mixture, and serve with the chicken and rice. Garnish with some extra cilantro leaves and salt and pepper to taste.
https://www.theartfulgourmet.com/2011/07/hawaiian-chicken-with-grilled-pineapple-salsa-frozen-watermelon-martinis/

Frozen Watermelon Martini

Frozen Watermelon Martinis:
4 shots vodka
4 cups ice
2 cups fresh watermelon
1 cup cosmopolitan martini mix

Mix all ingredients together in a blender and serve in martini glasses with fresh watermelon wedges for garnish.

Makes 4 cocktails.