So Fall is finally here guys! My absolute favorite time of the year – cooler temperatures, the leaves changing, sweaters, jeans and boots, leather jackets, crickets late in the day along with spectacular sunsets… and especially the FOOD!
I had some gorgeous porcini linguine that I bought at the RochesterDowntown Farmer’s Market on hand, and thought a Spicy Beef and Mushroom Ragu sauce would be the perfect compliment for a savory tasty Fall pasta dish.
I added someCrushed Hot Chili Pepper Spread to the beef and mushroom mixture sautéed with shallots and garlic, which took the flavor and heat up just a notch…then added a little spicy marinara sauce, but not too much…
After I cooked the pasta, I mixed the beef and mushroom ragu back into the pot, and tossed it all together with some of the reserved pasta water and lots of parmesan cheese, just because.
Of course I topped it all of with a generous sprinkle of freshparsley and torn mozzarella cheese, salt and pepper… and it happily made my day.
This pasta dish has a savory umami flavor from the porcini mushroom linguine, along with a spicy beef and mushroom ragu zested up with some red chile pepper paste, shallots and garlic. Super healthy and delicious with some crusty Italian bread and olive oil and a glass of red wine.
Ingredients
* 1 pound porcini mushroom linguine
* 2 tbsp olive oil
* 3/4 pound ground beef
* 6-8 baby bella mushrooms, sliced
* 2 shallots, sliced thin
* 2 cloves garlic, minced
* 2 tablespoons spicy hot chili pepper paste (Colavita)
* 3/4 cup marinara sauce
* 1/4 teaspoon kosher salt
* Freshly ground black pepper, to taste
* 2-3 slices fresh mozzarella cheese, torn into pieces
* 2 tablespoons chopped fresh parsley
Instructions
Cook pasta in salted boiling water for about 9-10 minutes until al dente, drain, reserving 1 cup of pasta water, and set aside.
Heat 1 tablespoon of olive oil in a sauce pan over medium heat, cook the ground beef, about 5-7 minutes, drain and set aside.
Add the additional tablespoon of olive oil and cook garlic, mushrooms and shallots for another 5 minutes or so until soft and cooked through. Mix into the cooked ground beef mixture and add spicy chili pepper paste and marinara sauce with some of the reserved pasta water until it's soft and mixes together into a sauce (but not overly saucy). Feel free to add more sauce and water to your liking for the desired consistency and thickness / thinness of the sauce.
Toss the meat ragu in with the cooked pasta, add parmesan cheese. Season with salt and pepper to taste.
Serve pasta with fresh torn mozzarella and chopped fresh parsley.
Hey guys! I’ve been so busy working on client projects I haven’t had the time to post many new recipes lately so I wanted to share a super delicious one I created for a client that I know you’re gonna love!
This recipe for Maple Balsamic Quinoa Salad is absolutely delicious! I made a dressing with Seven Barrels Maple Balsamic vinegar and olive oil and tossed it with quinoa, chickpeas, dried tart cherries, arugula, celery, green onions and crunchy pecans.
Not only is this super healthy and light but absolutely delicious! It has the perfect balance of tangy vinegar with a slight sweetness from the maple balsamic, agave and tart cherries, and a delightful crunch from the celery, chickpeas and green onions.
This is a perfect side dish to make ahead for a Summer picnic and it’s full of protein and veggies and fiber making it the perfect meal on it’s own.
You can also substitute dried cranberries for the tart cherries if you can’t find them, and use a variety of nuts like cashews, almonds, or walnuts instead of pecans. Throw in some edamame or black beans too if you want more protein. Or how about a little crispy bacon???? YUM.
Cook quinoa according to package directions. Let cool completely.
Toast the pecans for about 5 to 7 minutes over medium-low heat in a saute pan, let cool and chop coarsely.
Make the dressing: Whisk together the olive oil, Maple Balsamic vinegar and agave syrup (or honey) in a small mixing bowl.
Add 3/4 cup dressing to the cooked quinoa. Mix in the chopped toasted pecans, tart cherries, celery, scallions, and sea salt. Serve refrigerated or at room temperature; just before serving, stir in remaining 1/4 cup dressing, arugula and season with salt and pepper, to taste.
Notes
You can also substitute dried cranberries for the tart cherries and use any type of nuts (cashews, walnuts, almonds).
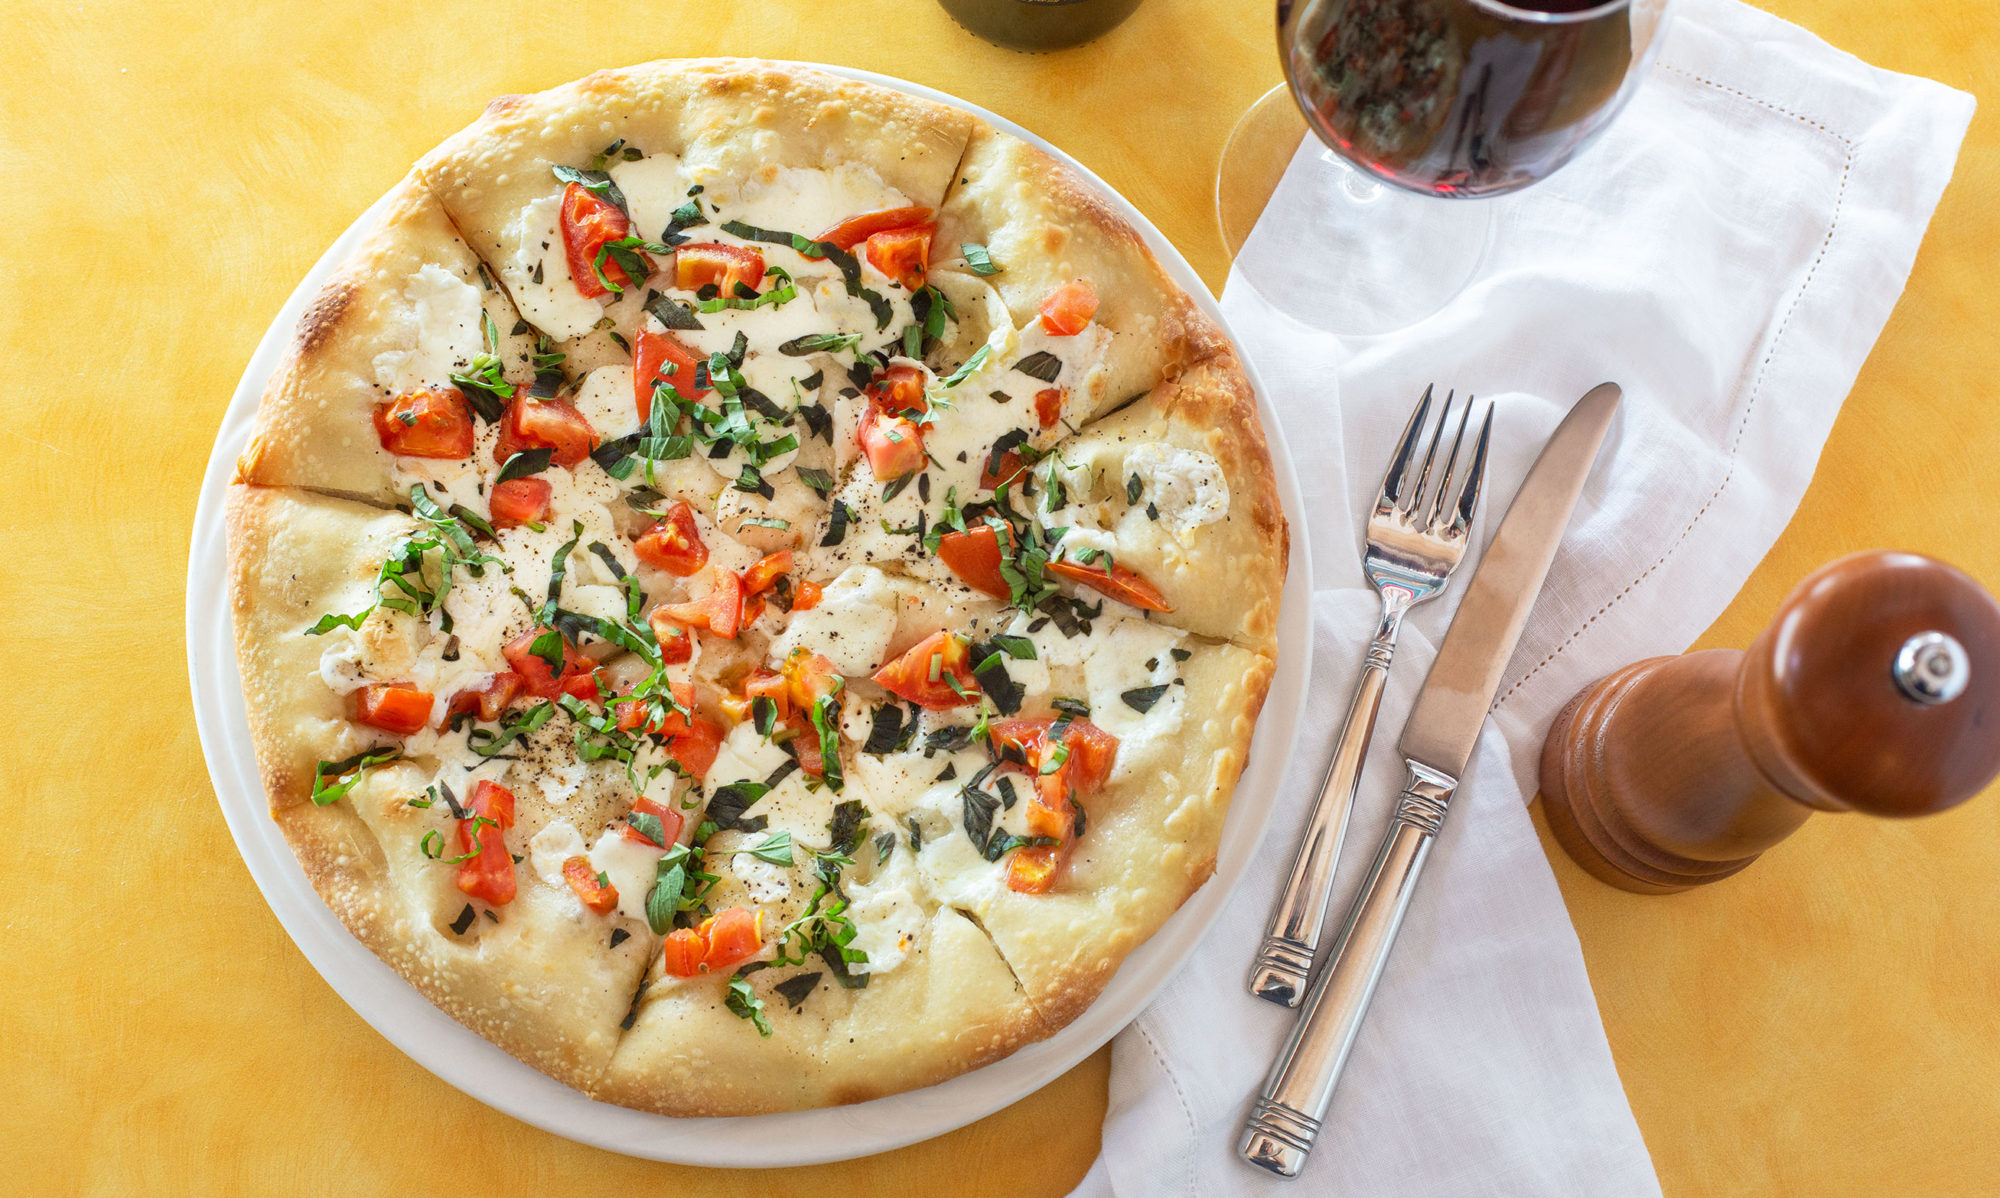
If there was one last thing I could eat before my last day on earth yes, it would be pizza. Italian food is one of my favorite things to eat and cook – in fact my Techniques of Italian Cooking course at the Institute of Culinary Education got me hooked on making homemade pizza and pasta from scratch.
But sometimes making pizza dough at home is time-consuming and labor intensive and all I want to do is eat pizza. Sure, I live in NYC and it’s easy enough to walk downstairs and get a slice or two at the local pizza shop. But when I want pizza but don’t really feel like paying $6 a slice or $25 for a whole pie, I make my own. And, I’m absolutely in love with thin crust pizza and honestly, it’s the toppings and flavor combinations that are so much fun to experiment with. It’s also Summer and beach days are calling, so using up all my carbs and calories with one slice of pizza is no fun. Alas, I discovered FlatOut flat breads that you can prepare yourself with the use of bread machines that you can get easily online at sites like Village-Bakery.com. They’re thin and light and bake up into a crispy shell in minutes and are the perfect base for any pizza. And they’re only 130 calories and 2 g of fat in each one. And that’s pretty awesome.
So today I made a Spinach Artichoke, Chicken and Bacon flatbread pizza on one of these cuties. And it’s absolutely delicious. And not too filling. And I don’t feel so guilty eating it that I want to hide under the covers and never put on a bathing suit again. Or fall asleep on my laptop after eating while writing this. I used the Honey Wheat thin flat breads which are perfect for one person, but you could also try another flavor (plain, whole wheat, spinach) or try one of their pizza flat breads which are a little longer and bigger if you’re feeding a crowd.
This flavor bomb pizza has a layer of spinach and artichoke dip on the base of the flatbread which I baked for a couple of minutes on the oven rack to get it crispy and lightly browned before adding the dip as a base for the other ingredients.
Then I topped it with some crispy bacon, sauteed onions and mozzarella cheese..
and a touch of garlic powder and a healthy dose of grated parmesan cheese.
I popped it in the oven for about 5 minutes until the cheese melted, then topped it off with some chile flakes, green onions and more parmesan cheese as a garnish, and a few cracks of freshly ground black pepper. OMG> so delicious and so easy.
I’m thinking this will be my new thing for Summer and I’ve already thought of a million pizza combinations and ideas I’m planning to make. In fact, you could use the same ingredients to make a kick butt quesadilla on the stove or a healthy chicken wrap. Sayonara gut bomb thick crust pizza, hello thin and crispy skinny pizza.
This flavor bomb pizza has a layer of spinach and artichoke dip on the base of the flatbread (I had some leftover from last night but you can certainly make your own) which I baked for a couple of minutes on the oven rack to get it crispy and lightly browned. Then I topped it with some sautéed onions, crispy bacon, seasoned cooked chicken breast, and parmesan cheese. I popped it in the oven for about 5 minutes until the cheese was melted and then topped it off with some chile flakes, green onions and more parmesan cheese as a garnish, and a few cracks of freshly ground black pepper. OMG> so delicious and so easy.
Ingredients
2 FlatOut 100% Whole Wheat flatbreads
1 cup Spinach and Artichoke Dip (homemade or store bought)
½ cup grated parmesan cheese, plus extra for garnish
Dash of red chile flakes
½ cup green onions, sliced
Freshly ground black pepper
Instructions
Preheat oven to 375°F. Place two FlatOut flatbreads on a cookie sheet (or directly on oven rack for crispier crust). Bake crust for two minutes. You can also grill the flatbread with a little olive oil in a grill pan or on the grill for a couple of minutes.
Remove flatbreads from the oven and spread the spinach and artichoke dip onto the flatbread and sprinkle with half of the mozzarella cheese.
Cook the onions in some olive oil over medium heat and remove from sauté pan. Add the additional tablespoon of oil into the pan and season the chicken breast. Cook chicken for about 5-6 minutes until cooked through, cut into strips or large chunks. Meanwhile, fry the bacon until crisp, then drain and crumble, and set all ingredients aside.
To make the pizzas, sprinkle the cooked onions, chicken and bacon on top of the cheese. Sprinkle with garlic powder, parmesan cheese, more mozzarella cheese and chili flakes.
Bake for 5 minutes until cheese is melted. Remove flatbread from the oven, and top with sliced green onions, red chile flakes, freshly ground black pepper, and additional grated parmesan, to taste.
Notes
You can substitute any flatbread you like for this pizza or even use real pizza dough if made super thin.
Feel free to experiment with the toppings too - the sky is the limit!
There’s nothing more comforting and heartwarming on a crazy cold day than braised short ribs with roasted veggies and mashed potatoes. Can we say heaven in a bowl?
These short ribs take a while to make but they’re worth the wait (I promise!) – I made them a little bit spicy with dried chile peppers,garlic and onions, fresh rosemary and thyme, and a chipotle infused olive oil (I love 7 Barrels brand!) along with a dash of cocoa powder (the super intense Dutch red kind made by Guittard is my fav). They’re braised in broth, a full bottle of red wine (you’re welcome), and topped with fresh parsley.
Once they’re done cooking they will be falling off the bone – then I made a reduced sauce with a knob of butter at the end to make it super silky and delicious. I served these with roasted brussels sprouts and cauliflower (simply roast them in olive oil and sea salt on 375 for about 45 minutes, tossing them every 15 minutes until crispy and delicious), but I recommend serving them with some creamymashed potatoes or egg noodles as well (or even some crusty French bread) to mop up that delicious spicy-savory-chocolate-chile-wine sauce. OMG.
Go ahead, indulge. You can always work it off tomorrow. Besides, a big bowl of comfort food and Netflix is more fun anyways 🙂
A classic Winter comfort food dish, these delicious braised short ribs are made with chile peppers, chocolate, red wine and lots of fresh garlic, onions and herbs. Super savory and tasty, served with roasted veggies, and either mashed potatoes or egg noodles.
Ingredients
2 large dried chile peppers, stemmed and deseeded
1 cup boiling water
5 1/2 pounds center cut short ribs, on the bone
Kosher salt and freshly ground black pepper
3 tablespoons chipotle olive oil (or regular EVOO if you prefer less spicy)
3 cups beef stock
2 tablespoons tomato paste
2 teaspoons Dutch red cocoa powder (Guittard)
4-5 cloves garlic, smashed
3 small onions, chopped
One bottle red wine (Pinot Noir or Merlot or Cab Sauv)
2 tablespoons balsamic vinegar
A few sprigs of fresh herbs (rosemary and thyme)
Knob of unsalted butter (1-2 tablespoons)
Fresh parsley, chopped for garnish
Roasted cauliflower and brussels sprouts, for serving
Mashed potatoes or egg noodles, for serving
Instructions
Preheat oven to 325 degrees. Adjust rack to lower third.
Cover chopped chile peppers with boiling water and let sit, covered for about 20 minutes until soft.
Meanwhile, sprinkle short ribs on both sides generously with kosher salt and pepper and let rest to room temperature about 15 minutes while peppers are soaking.
Heat olive oil in a large Dutch oven over medium-high heat and cook short ribs in batches, searing evenly on both sides until golden brown crust forms (about 7 minutes per side/15 minutes per batch).
Once all short ribs are seared, place on a platter tented with foil and set aside.
In a blender or food processor, add the chiles, water, stock, tomato paste, cocoa, garlic, onions, and a little dash of salt and mix thoroughly together until smooth.
Pour the red wine in the Dutch oven and scrape the brown bits up from the bottom of the pan (deglazing the pan) and turn heat up to high bringing to a boil for 2-3 minutes, then reducing heat to a simmer, letting wine reduce by half (about 20 minutes).
Add the pureed chile-onion mixture, balsamic vinegar and fresh herbs to the pot and boil together for a few minutes. Return the short ribs to the pot, cover tightly with a lid and braise in the oven for about 2 1/2 hours until meat is tender and falls off the bone.
Place the ribs back on to a large platter and tent with foil to keep warm while making the sauce.
Put the Dutch oven on the stove and heat over medium-high for another 10 minutes or so until sauce thickens and reduces. Remove from heat and add a knob of butter into the sauce to make it extra silky and smooth.
Add the ribs back into the sauce and coat thoroughly. Serve on plates with sauce on top along side roasted veggies and mashed potatoes or egg noodles. Garnish with fresh parsley and additional salt and pepper to taste.
Notes
You can also substitute hard cider or a dark lager beer for the red wine.
It’s the holidays and we all know what that means..time to cook and bake, and eat all the delicious treats of the season..like this savory 3-Cheese Butternut Squash Tart with Bacon. Can we say yay?
It’s so easy to make with some store-bought puff pastry because who has time to make their own with so many goodies to make and presents to wrap? And delicious holiday food to eat?
It’s got a gorgeous crispy, buttery crust topped with ricotta and Parmesan and Gruyere cheese, roasted butternut squash with maple syrup and of course, bacon. Then it’s topped with a drizzle of balsamic glaze and some fresh thyme along with some sea salt and freshly ground pepper. Sounds pretty perfect to me.
First, defrost and roll out your dough. Cut 1/2 inch strips around the edges to double up to make a pastry border and brush it with egg wash. Pop it in the fridge for about 30 minutes.
Next, drizzle olive oil, salt and pepper, and some garlic powder over the butternut squash, then drizzle it with some maple syrup and roast it for about 15 minutes.
Cook that delicious bacon, drain and set aside to crumble on the tart later.
Whip up your ricotta with an egg, salt and pepper and some shredded Parmesan cheese.
Spread it on top of the tart pastry evenly. (Repeat all steps with the second pastry throughout.)
Top it with some of that luscious grated Gruyere cheese.
Place the roasted squash on top along with the bacon. Sprinkle some fresh thyme on top.
Then simply bake it for 30 minutes on 375 F, then drizzle it with some balsamic glaze, cut into squares and devour!
This delicious savory tart features three luscious cheeses (ricotta, gruyere and parmesan) along with crispy bacon and roasted butternut squash and thyme. It makes a great appetizer for the holidays!
Ingredients
2 large eggs
14 ounces frozen all-butter puff pastry, thawed
2 packages butternut squash, precut into 1-2" cubes
2 tablespoons extra virgin olive oil
1 tablespoon maple syrup or honey
Sea salt and freshly ground black pepper
1 teaspoon garlic powder
6-8 slices bacon
1 pound fresh ricotta cheese
1 tablespoon whole milk or cream
2/3 cup shredded parmesan cheese
1 cup shredded gruyere cheese
Balsamic glaze, for garnish
fresh thyme, for garnish
Instructions
Roll out 1 piece of puff pastry into a large rectangle. Cut a 1/2 inch border around the edges and place the strips on the edges of the pastry sheet to create a border crust. Prick holes around the pastry to avoid puffing.
Beat 1 egg and brush the pastry edges and repeat same procedure with second pastry sheet; chilling both for 1/2 an hour in the fridge.
While pastry is chilling, preheat oven to 450 degrees.
Cut the butternut squash into small chunks and drizzle with olive oil, maple syrup, salt and pepper and garlic powder.
Bake for 15 minutes and set aside.
Cook bacon according to package directions and drain on paper towels. Crumble once cooled and set aside.
Reduce heat in oven to 375.
Mix the ricotta cheese with one beaten egg, parmesan cheese and additional salt and pepper.
Remove pastry from the fridge and spread the ricotta mixture evenly over the tops of both.
Sprinkle with shredded gruyere cheese and crumbled bacon.
Top both pastries with the butternut squash and sprinkle with some fresh thyme.
Bake for 30 minutes until the pastry is golden brown and puffed around the edges.
Cut into squares after cooling on a rack and serve warm.
Garnish with a drizzle of balsamic glaze on top and additional fresh thyme if desired.
They’re a perfect fall dessert, and healthy too! These doughnuts are made with all natural vegan ingredients – red kidney beans, unsweetened soy milk, vanilla extract, coconut sugar, cocoa powder, flour and baking powder – and you wouldn’t believe how good they taste.
They are so delicious (and cute!) and easy to make with the help of my KitchenAid® Diamond Blender and Mini Doughnut Pans – and they bake in only 10 minutes in my Convection Countertop Oven!
The glaze is super easy to make too – made in my KitchenAid Stainless Steel sauce pan with fresh pumpkin puree, coconut cream and coconut sugar and pumpkin pie spice all cooked into a gooey luscious caramel sauce then topped with flaky sea salt – it’s the most lovely combination of Fall flavors in one tiny bite!
ooh…aren’t they lovely and delicious? Oh, and they’re vegan and gluten-free too! Isn’t that wonderful.
Mini Vegan Chocolate Donuts w/ Salted Caramel Pumpkin Spice Glaze
Yield: Makes about 16-18 mini donuts and 1 cup of glaze.
These mini vegan donuts are a perfect fall dessert, and healthy too! Made with all natural vegan ingredients – red kidney beans, unsweetened soy milk, vanilla extract, coconut sugar, cocoa powder, flour and baking powder – and you wouldn’t believe how good they taste.
Ingredients
Donuts:
1 (15-ounce) can red kidney beans
1 cup unsweetened soy milk (or almond milk)
1 tablespoon pure vanilla extract
½ cup coconut sugar
1 cup cocoa powder (Guittard Cocoa Rouge)
2 teaspoons baking powder
1-2 tablespoons coconut or vegetable oil (if needed, for dough)
Salted Caramel Pumpkin Spice Glaze:
1 cup coconut sugar
¾ cup coconut cream (top thick layer from full-fat coconut milk), refrigerated
1 ½ teaspoons pure vanilla extract
¾ teaspoon Himalayan pink sea salt
¼ cup pumpkin puree
½ teaspoon pumpkin pie spice
Flaky sea salt (such as Maldon), for garnish
Instructions
Donuts:
First, rinse and drain the kidney beans and place them in your KitchenAid Diamond blender along with the soy milk, coconut sugar and cocoa powder, blending them together on Mix (3) setting.
Then, transfer the mixture to your large KitchenAid Ceramic Mixing Bowl and stir in the flour, baking powder and vanilla until the dough comes together smoothly and thoroughly mixed. If it seems a little dry, add a little more soy milk or a tablespoon or two of coconut or vegetable oil.
Spoon a couple tablespoons of dough into the donut pan (fill to the top and smooth). This recipe makes approximately 16-18 donuts so you’ll need at least 2 mini donut pans or make them in 3 batches.
Bake the donuts in your preheated KitchenAid Convection Countertop Oven on 350 degrees for 10 minutes, then let them cool for a couple of minutes in the donut pan, then remove and place them on a cooling rack while you make the Salted Caramel Pumpkin Spice Glaze.
Salted Caramel Pumpkin Spice Glaze:
To make the donut glaze, simply place all your ingredients (coconut sugar, coconut cream, vanilla extract, Himalayan pink sea salt, pumpkin puree and pumpkin spice) in your KitchenAid Stainless Steel 3-Qt. Sauce Pan over medium-high heat.
Bring to a rolling boil, and constantly whisk for about 10 minutes until the glaze starts to thicken and caramelize and turns to a dark brown color (be careful to constantly watch and stir, and not let the caramel burn – reducing heat to medium-low if needed). Let the glaze cool to the side for a few minutes after it is done to allow it to thicken a little more.
Spoon the glaze over the donuts on a baking sheet covered in foil or parchment paper and garnish with flaky sea salt. You can also top the donuts with some crushed nuts if you like too (hazelnuts or pecans would be amazing!)
Notes
Glaze can be made ahead of time and will keep in the refrigerator for up to 1 week. It can also be reheated in the microwave or let it come to room temperature before glazing the mini donuts.
Now that Fall is finally here, I’m so excited to start cooking comfort food again with flavorful seasonal ingredients like wild mushrooms, truffles, sage, prosciutto, toasted nuts, hearty greens, whole grains…yum. Fall is definitely my favorite season of the year when it comes to food 🙂
In particular, I love making homemade pasta and one-pot dishes, which is so easy to do with my KitchenAid® Gourmet Pasta Press that attaches to my KitchenAid® Stand Mixer.
It makes six different types of pasta in a snap: Bucatini, Spaghetti, Rotini, small and large Macaroni, and Rigatoni simply by swapping out a different disc for each pasta cut…how cool is that?!?
I decided to make a homemade Buckwheat Bucatini with Truffled Wild Mushroom Sauce, Prosciutto, Spinach, Pecans and Sage. I love Buckwheat pasta because of its rustic flavor, and it’s perfect for fall pasta dishes. Similar to the traditional Italian Pizzoccheri (flat buckwheat fettuccine), buckwheat noodles have hearty depth of flavor, and pair perfectly with warm fall flavors and ingredients like wilted greens, potatoes, cabbage, cheese and garlic.
My pasta dish is topped with a luscious savory sauce made with crispy prosciutto and sage, nutty toasted pecans, garlic, shallots and wild mushrooms (portabella, porcini, oyster, beech, cremini, and shiitake) that I sautéed in olive oil and butter, then made into a luscious sauce with chicken broth and truffle oil.
Celebrating Fall Flavors: Buckwheat Bucatini w/ Truffled Wild Mushroom Sauce
Yield: Serves 6.
This homemade pasta dish is topped with a luscious savory sauce made with crispy prosciutto and sage, nutty toasted pecans, garlic, shallots and wild mushrooms (portabella, porcini, oyster, beech, cremini, and shiitake) that I sautéed in olive oil and butter, then made into a luscious sauce with chicken broth and truffle oil.
Ingredients
Buckwheat Pasta Dough
Ingredients:
1 cup buckwheat flour
1 cup bread flour
1 teaspoon fine sea salt
1 teaspoon garlic pepper
¼ cup hot water
2 large eggs, room temperature
Method:
To make the fresh Bucatini pasta, measure out equal parts buckwheat and cake flour, sea salt and garlic pepper; blend together in your KitchenAid 14-cup Food Processor. Then beat the eggs into the hot water and add to the flour mixture through the tube with the food processor running, and turn it off. Give the dough about ten 3-second pulses until it gathers into a ball and clears the side of the bowl.
Then lightly knead the dough on a work surface for a couple of minutes until it’s smooth and supple, and wrap the disk in plastic film to rest for about 20 minutes before cutting into quarters and using the pasta press.
To make the buckwheat Bucatini, you need to attach your KitchenAid Gourmet Pasta Press (with the Bucatini pasta cutter inserted) to your KitchenAid Artisan Stand Mixer by unscrewing the black knob and removing the front silver cap. Pop in the attachment and secure it tightly with the knob until it stays in place.
Remove the dough from the plastic wrap and press it out on to a floured work surface, then cut the pasta dough into 3 or 4 portions. Turn your stand mixer on the highest setting (speed 10), and slowly feed walnut-sized balls of dough into the hopper; dough should self-feed through the auger – just wait until the auger is visible before adding the next piece. Use the combo tool to push dough only if the dough becomes caught and no longer self-feeds.
Once the dough starts coming through the bottom of the press, use the attached cutter to cut pasta at desired length as it exits the press (for Bucatini approx. 9.5 inches long).
Separate the pasta after extrusion, and place long noodles on a drying rack or in a single layer on a tea towel placed on a baking sheet or flat surface. Dry the pasta for about 30 minutes, turning them occasionally.
Next, bring some salted water to a boil in your KitchenAid Stainless Steel Stockpot with Strainer and cook the fresh pasta for about 3-4 minutes.
Drain and toss into your KitchenAid Ceramic Mixing Bowl with a little olive oil and set aside while you prepare the pasta sauce.
Makes about 1 pound of fresh pasta, cooked. You can also double the recipe and freeze a portion of it to use later.
------
PHOTO: PastaHero1.jpg
Truffled Wild Mushroom Sauce with Prosciutto, Spinach, Pecans and Sage
Ingredients:
3 tablespoons extra-virgin olive oil, divided
3 tablespoons chilled butter, divided
6 thin slices aged Prosciutto de Parma, torn into large pieces
To make the Truffled Wild Mushroom Sauce with Prosciutto, Spinach, Pecans and Sage, begin by prepping your fresh ingredients (shallots and garlic) on your KitchenAid Wood Cutting Board. Measure out the other ingredients (prosciutto, sage, wild mushrooms, spinach, chicken stock, olive oil, butter, truffle oil, and grated Parmesan cheese) in small bowls and set aside.
Heat a tablespoon of olive oil in your KitchenAid Anodized Nonstick 12” skillet over medium-high heat, and cook the prosciutto in batches for a few minutes until crispy and browned, drain on paper towels and set aside.
Add the pecans to the skillet and toast for a few minutes until lightly browned with a nutty aroma (being careful not to burn); remove nuts from pan and set aside.
Add a tablespoon of butter to the skillet and sauté the sage leaves until crisp, about 1 minute per side. Transfer to paper towels.
Heat remaining 2 tablespoons of olive oil and 2 tablespoons of butter in the same pot over medium-high heat. Add the mushrooms, shallots, garlic and sauté until mushrooms are brown and liquid evaporated, about 10 minutes. Add the spinach and sauté for another 2 minutes until wilted and transfer mixture to a mixing bowl.
Pour in the chicken stock to the same pot and bring the liquid to a boil. Scrape up the browned bits and cook until liquid is reduced by half, about 7 minutes. Remove from the heat and add truffle oil, mushroom mixture, cooked prosciutto, pecans and sage. Mix together well, season with sea salt and garlic pepper to taste.
Serve the cooked bucatini pasta tossed with the sauce and garnish with shaved Parmigiano-Reggiano cheese.
Sauce can be made up to 2 hours ahead; let stand at room temperature.
I’d love to hear how you would use the KitchenAid Pasta Press and what recipes you would make! Share your take on my Buckwheat Bucatini & Truffled Wild Mushroom Sauce recipe on KitchenAid’s Instagram page using #MadeWithKitchenAid for a chance to be featured.
So here it is, the last day of the year 2015..oh how time flies, and so much has happened! I’m so thankful for all the wonderful opportunities that have come into my life and the lessons learned along the way. Here are some of my Top / Most Popular posts from The Artful Gourmet blog this year — and wishing everyone a safe and Happy New Year 2016!
So Old Man Winter is finally back in town, despite the crazy warm weather we’ve been having lately in New York City. Temperatures drop and there’s nothing better than a big pot of comfort food and a bottle of red to make a girl happy, right? Sometimes it’s the simple things in life that make everything OK…(*sigh). So I did just that this weekend, and made a huge batch of some classic Beef Bourguignon..you know, the classic French braised beef stew with veggies and red wine that Julia Child made famous.
I made it in a large 6-quart ceramic Dutch oven (KitchenAid brand is my fav!), and it’s chock full of savory deliciousness – sautéed pancetta, braised beef, shallots, garlic and carrots sautéed into a roux with some flour, flambeed brandy (my secret ingredient!), a whole bottle of red (yes, really!) and some beef stock, along with a bouquet garni of fresh herbs (1 bay leaf, 2 sprigs of fresh thyme, 3 sprigs of rosemary wrapped in cheesecloth) slow cooked in the oven for 2 hours.
The finishing touch of mushrooms and caramelized Cippolini onions sautéed in butter are added in at the end to add tons of buttery, savory flavor to the stew. YUM.
I don’t think I’ve ever tasted anything so delicious in my life – and I’m quite sure if Julia was still alive, I would make her damn proud, if I do say so myself.
It’s a flavor bomb in a bowl, my friends, and perfect for a lovely holiday dinner party for a crowd. Serve in big bowls garnished with fresh Italian parsley over mashed potatoes, polenta or egg noodles, of course accompanied with a bottle of red (Pinot Noir or Burgundy) and some crusty French bread to mop up the sauce. All around a big table of friends and family to partake in all the goodness.
This is a delicious heartwarming French Beef Stew made with beef chuck, red wine, brandy, fresh herbs, shallots, garlic, cippolini onions, carrots and pancetta. Perfect one-pot dish for Winter or the holidays!
Ingredients
5 pounds beef chuck, cut into medium-large cubes
Kosher salt and freshly ground black pepper
1/2 pound pancetta, diced
1/4 cup vegetable oil
5 large shallots, finely diced
3 large carrots, finely diced
4 cloves garlic, finely diced
1/4 cup brandy
1/3 cup all-purpose flour
1 bottle dry red wine (Pinot Noir or Burgundy)
4 cups beef or veal stock
1 bouquet garni (1 bay leaf, 2 sprigs thyme, 3 sprigs Italian parsley)
3 tablespoons unsalted butter (divided)
5-7 small to medium Cippolini onions, quartered
1 pound mushrooms, sliced (White button or Cremini)
Flat leaf Italian Parsley, minced, for garnish
Instructions
Preheat oven to 350 degrees.
Place beef in a single layer on a rimmed baking sheet and season with a couple teaspoons of Kosher salt and freshly ground black pepper.
Heat a large Dutch oven or stockpot over medium-high heat for several minutes to get it hot.
Add pancetta and cook until crispy and browned, drain on paper towels and set aside.
Increase the heat to high and add the beef in to the pot in a single layer and brown on all sides, turning with tongs (be careful not to crowd or overfill the pot as you will need to cook beef in batches to get a nice browning).
Place the browned beef back on to the baking sheet and set aside.
Add the oil and diced shallots and carrots to the Dutch oven and cook for a few minutes. Lower the heat to medium-high and continue to saute until they begin to soften, about 10 minutes.
Add the brandy and flambe (light it in the pan with a long lighter or match) and let the flames keep going for as long as possible, until they go out to burn off alcohol.
Reduce heat to medium, add flour and stir together with the vegetables for a few minutes to make a roux base for the stew.
Next deglaze the pan by pouring in the red wine, a little bit at a time, stirring well to incorporate and remove any lumps, scraping the brown bits off the bottom of the pan (these babies are full of flavor!)
Add 3 3/4 cups of the stock, browned meat and bouquet garni and bring to a boil over high heat.
Remove pot from the heat, cover and cook the stew in the oven for 2 hours, until meat is fork tender. (The meat should shred/fall apart easily when you pierce it with a fork - if not, place it back in the oven for another 15-20 minutes).
While stew is cooking, caramelize the onions in a medium saute pan with 1 tablespoon of butter and salt and pepper, until the onions are lightly browned.
Add the remaining 1/4 cup stock and cover, reduce heat to medium-low, and cook for about 15-20 minutes, stirring occasionally, until the onions are soft and glazed and liquid is evaporated.
Transfer onions to a bowl and set aside.
In the same pan, turn the heat up to high. Melt 2 tablespoons of butter, the mushrooms, salt and pepper to taste, sear over high heat until mushrooms are lightly browned, about 5 minutes. Remove from the pan and mix into the caramelized onions, set aside.
Remove the stew from the oven and gently stir in cooked pancetta, mushrooms and onions. Adjust seasonings (salt and pepper to taste).
Serve the stew in bowls with a sprinkling of fresh parsley over mashed potatoes, polenta or egg noodles, with a glass of red and crusty bread to mop up the sauce of course!
Notes
Recipe adapted from Mother's Best Comfort Food Cookbook.
With the holidays approaching, it’s time to start thinking about fun food to make for all the parties and get togethers with family and friends. I love making appetizers, mini tarts, and small bites for potlucks and parties because it’s fun to experiment with different flavor combinations and they’re generally easy to transport.
One of my favorite things to make are Sweet and Savory Mini Tarts, and I’ve used my KitchenAid® Professional-Grade Nonstick Mini Pie Pan to whip up two delicious tarts that you can bring to your next holiday soiree. I love this pie pan because its nonstick professional-grade construction and removable bottoms make it easy to work with. And the pre-engraved ridges for the crust ensure that all of your tarts and mini pies come out looking perfect!
My Mini Cranberry Apple Almond Tarts are super delicious – sweet and tangy with a little bit of crunch, made with fresh cranberries, orange juice, honey, apples, cinnamon and chopped almonds.
I also made some savory Mini Bacon, Veggie and Cheese Tarts that are great for a holiday brunch or even a small evening get together with friends and family. They’ve got tons of good stuff inside too – eggs, cream, shredded cheese, crispy bacon and lots of fresh sautéed veggies like zucchini, mixed bell peppers, green onion and garlic with a touch of fresh thyme for garnish.
So easy to make and so delicious and fun for a holiday party!
I’d love to hear in the comments below what you would make in the mini pie pan for your holiday party – sweet or savory? Or both? What flavors and ingredients would you use? How would you change up the crust? Be sure to share your take on these sweet and savory tart recipes with us on Instagram using #MadeWithKitchenAid for a chance to be featured.
Happy holidays!
Check out how i made them with my KitchenAid mini pie pan Stainless Steel cookware and get the #recipes on the Kitchenthusiast blog HERE!
Disclaimer: As a Kitchenthusiast Contributor, I have been compensated by KitchenAid for this post, but this post represents my own opinion.*