Devilishly Good: Sriracha Jalapeno Honey Sloppy Joes

Devilish Sriracha Jalapeno Sloppy Joes

Sloppy Joes have gotten a bad rap in history over the years, haven’t they? When I think of Sloppy Joes I usually revert to some bad memories of the hair-netted lunch ladies in frocks serving them up on plastic trays in the cafeteria along with a side of some mushy peas and corn with a dried up chocolate chip cookie, along with the scary smells that came out of the school kitchen back in those days.

Devilish Sriracha Jalapeno Sloppy Joes

I had some extra ground beef in the freezer and wanted to make something different. Not another burger. Or meatloaf. Or batch of spaghetti and meatballs. But something I haven’t had in a loooonnnggg time, and Sloppy Joes fit the bill. But how could I remake this old-fashioned simple sandwich a bit tastier and appealing without looking like a big plate of mush?

Devilish Sriracha Jalapeno Sloppy Joes

I was determined to take these elementary school BBQ sammies to the next level by kicking them up a notch in heat level. I added some sliced jalapeños and Sriracha and some hot pepper sauce to the mix to give it some nice spiciness, but kept the caramel sweet undertones by mixing some honey into the brown sugar, and used Cabernet vinegar and shallots which are also a bit sweeter than traditional onion and help balance out the spicy heat a bit more.

Devilish Sriracha Jalapeno Sloppy Joes

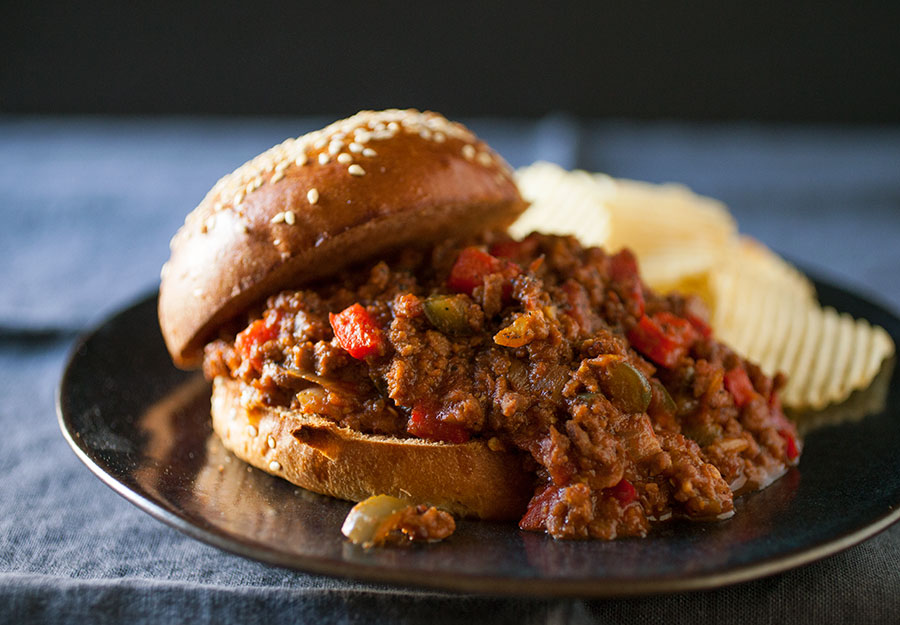
The result was a perfectly sweet and spicy sauce mixed with the ground beef and peppers and jalapeños in every bite. Served on a buttered toasted bun, with a side of pickles and chips. YUM. What would have been even better is some melted cheese on the buns, which I highly recommend. So don’t be afraid of that old school cafeteria food – if you make it yourself and give it a little twist, it’s actually quite spectacular. And devilishy delicious.

Devilishly Good: Sriracha Jalapeno Sloppy Joes

Prep Time: 15 minutes

Cook Time: 30 minutes

Total Time: 45 minutes

Yield: 6

Sloppy Joes with a kick! Made with Sriracha and Jalapenos for heat, plus tangy Dijon mustard, Worcestershire, honey and brown sugar for some sweetness.

Ingredients

  • 1 tablespoon olive oil
  • 1 tablespoon butter
  • 3 shallots, diced (or 1 medium onion)
  • 1/2 cup red bell pepper, diced
  • 1 tablespoon minced garlic
  • 1/4 cup diced jalapenos
  • 1 pound ground beef/sirloin
  • 1/4 cup water
  • 1 cup tomato sauce
  • 1/2 cup ketchup
  • 2 tablespoons Sriracha hot sauce (less or more to taste)
  • 1/2 tablespoon red pepper flakes
  • 1 tablespoon Worcestershire sauce
  • 1 tablespoon Dijon mustard
  • 1 tablespoon Cabernet vinegar
  • 1 tablespoon light brown sugar
  • 1 tablespoon local honey
  • 1 teaspoon Montreal steak seasoning
  • Kosher salt and freshly ground black pepper, to taste
  • 6 large Kaiser sandwich rolls (sesame or onion or poppy)

Instructions

  1. Heat oil and butter in a large saute pan over medium heat.
  2. Add the shallots and red pepper and cook for about 5 minutes until soft.
  3. Add the garlic and jalapenos and cook for another minute or so, stirring often.
  4. Add the ground beef and cook for about 10 minutes until no longer pink.
  5. Stir in water, tomato sauce, ketchup, Sriracha, red pepper flakes, Worcestershire, mustard, vinegar, brown sugar, honey and all the seasonings and bring to a bubbling simmer.
  6. Reduce heat to low and simmer covered, for at least 30 minutes, stirring occasionally, to let all the flavors meld together.
  7. Toast or grill the sandwich rolls (buttered, if you like). You can also melt some cheese on the buns for some extra cheesy flavor.
  8. Top the bottom of the buns with the Sloppy Joe mixture and serve hot.
  9. Serve with a side of pickles and crispy chips.

Notes

Serve on buttered toasted or grilled buns with a side of pickles and chips. Can also melt cheese on the buns before topping with Sloppy Joe mixture.

Schema/Recipe SEO Data Markup by Yummly Rich Recipes
https://www.theartfulgourmet.com/2015/04/devilishly-good-sriracha-jalapeno-honey-sloppy-joes/
Devilish Sriracha Jalapeno Sloppy Joes

Luscious Lobster Pies

Luscious Lobster Pies


There’s nothing better in the Summer time than fresh seafood. Lobster is one of my favorites and an indulgence, at that. Lobster Rolls and Lobster Salad are great picnic and backyard BBQ dishes to serve a crowd. But once the end of Summer arrives, I start to crave some comfort food and one-pot dishes for the cooler days ahead.

This is a classic recipe for Maine Lobster Pie, something I made in a recent cooking class at the Institute of Culinary Education – it’s a luscious pie made with fresh Lobster meat, cream, sherry and butter (um, not diet-friendly!) topped with a buttery, crispy topping made of Ritz crackers, melted butter, Parmesan cheese and paprika. We made a bunch of pies in small ramekins for appetizers, but you could also make one big luscious pie in a medium pie dish and serve it as a main one-pot course with a salad and some rice or pasta on the side.

It’s perfect for entertaining guests during the holidays, or even just for a homey comforting dinner on a crisp Autumn night. Go on – indulge a little. I won’t tell anyone.

Boil Lobster


Cooked Lobster


Lobster Meat


Luscious Lobster Pies

Yield: Makes 6 appetizer servings, or 1 whole pie.

Ingredients

  • Lobster Pie Filling
  • 10 tablespoons butter (1 ¼ sticks), divided
  • ½ cup good quality sherry
  • Meat from 2 cooked lobsters, cut into bite-sized pieces
  • 2 tablespoons all-purpose flour
  • 1 ½ cups half and half
  • 4 egg yolks, beaten
  • Sea salt and freshly ground pepper, to taste
  • Topping
  • ½ cup crushed Ritz crackers
  • ½ teaspoon paprika
  • 2 tablespoons grated Parmesan cheese
  • 4 tablespoons melted butter
  • Fresh tarragon, chives or parsley, minced, for garnish

Instructions

  1. Preheat oven to 325 degrees F.
  2. Melt 4 tablespoons of the butter, add sherry and boil 1 minute.
  3. Add lobster and remove from heat. In a medium saucepan, melt remaining butter. Add flour and cook, stirring, until mixture bubbles; cook at least 1 minute. Remove from heat.
  4. Drain and reserve the sherry from the lobster meat, then slowly whisk sherry and half-and-half into the mixture until thoroughly blended. Return to heat and cook, stirring constantly, until sauce is smooth and thick. Season with salt and pepper, adjust to desired to taste.
  5. Spoon 4 tablespoons of the sauce into a small bowl. Add beaten egg yolks, 1 at a time, stirring well after each addition.
  6. Return egg mixture to sauce and mix well. Whisk constantly over low heat about 3 minutes; do not allow to boil, or the eggs will cook and get clumpy. Remove from heat and add lobster. Turn into four individual ramekins or a small, deep pie plate.
  7. Combine topping ingredients, blend well and sprinkle over pies. Bake about 10 minutes to heat through and until the topping gets crunchy and golden brown. Garnish with some fresh tarragon, chives or parsley, if desired.
  8. Makes 6 appetizer servings, or 1 medium pie.
  9. Recipe adapted from Yankee Magazine
https://www.theartfulgourmet.com/2014/09/lobster-pie/


Lobster Ingredients


Butter


Lobster and Butter


Bechamel


Lobster Pie Filling


Lobster Pies Ready for Oven


Lobster Pies

Maine Wild Blueberry Pie

Maine Wild Blueberry Pie

September is one of my favorite months – the weather is getting cooler, the leaves are turning color, and the breezy nights remind us that Summer is coming to an end with a bountiful harvest to come. I especially love the fruits and vegetables of late Summer/early Fall – especially Maine blueberries, which are primarily found in the Downeast areas of Bar Harbor where they grow wild. They are typically smaller than regular blueberries, giving them a high amount of antioxidants and other healthy nutrients, and have an intense sweet and tangy flavor. They also stay whole when you cook them, making them perfect for baking up a gorgeous berry pie. Although August is the peak season for picking them fresh, they can also be frozen (harvesters freeze them within 24 hours) so they are available year round – Wyman’s and Cascadian Farms are my favorite brands.

In a recent cooking class (that was centered around classic Summer foods of Maine, of course), we made a Wild Blueberry Pie with a gorgeous homemade piecrust with cut holes on top for venting the filling. We used frozen blueberries and thickened them up with a little ground tapioca and apple pectin to create a juicy sliceable filling, that wasn’t too loose and runny. The secret to a crispy piecrust is plenty of super cold butter with a small amount of vegetable shortening to crisp it up, and a touch of vodka for texture, making the crust light and flaky.

Make the Pie Dough


Make the Blueberry Filling


Cut Pie Holes in Crust


Blueberry Pies-2


We also made a slew of other Maine-inspired dishes for our feast: Lobster Pie, Lobster Rolls, Fish Chowda, Summer Corn Pudding and Seaside Slaw, served with Blueberry Beer and some lovely cocktails – Tart Cherry and Blueberry Vodka Lemonade. I’m not sure I’m ready for Summer to be over yet, but these recipes I’ll be making all year around whenever I’m missing sunny skies and blue waters. Next year a Summer vacation on the Maine coast is definitely in order!


Maine Wild Blueberry Pie

Yield: Makes 1 pie, serving 6 to 8

Ingredients

  • Perfect Pie Dough
  • 2 ½ cups unbleached all-purpose flour (12 ½ ounces), divided, plus more for work surface
  • 1 teaspoon salt
  • 2 tablespoons sugar
  • 12 tablespoons cold unsalted butter (1 ½ sticks), cut into ¼ inch slices
  • ½ cup vegetable shortening, cold, cut into 4 pieces
  • ¼ cup vodka, cold
  • ¼ cup cold water
  • Wild Blueberry Filling
  • 6 cups fresh wild blueberries (about 30 ounces), if using frozen, cook but do not mash the berries, as described below
  • 1 Granny Smith apple, peeled and grated on large holes of box grater
  • 2 teaspoons grated zest and 2 teaspoons of juice from 1 lemon
  • ¾ cup sugar
  • 2 tablespoons quick-cooking tapioca, ground in a clean spice grinder
  • Pinch table salt
  • 2 tablespoons unsalted butter, cut into ¼ inch pieces
  • Egg wash; 1 large egg, lightly beaten with 1 teaspoon water

Instructions

  1. Process 1 ½ cups flour, salt, and sugar in food processor until combined, about 2 (1 second) pulses. Add butter and shortening and process until a homogenous dough starts to collect in uneven clumps, about 15 seconds; dough will resemble cottage cheese curds and there should be no uncoated flour. Scrape bowl with rubber spatula and redistribute dough evenly around processor blade. Add remaining cup of flour and pulse until mixture is evenly distributed around bowl and mass of dough has been broken up, 4 to 6 quick pulses. Empty mixture into medium bowl.
  2. Sprinkle vodka and water over mixture. With rubber spatula, use folding motion to mix, pressing down on dough until it is slightly tacky and sticks together. Divide dough into 2 even balls and flatten each into a 4-inch disk. Wrap each in plastic wrap and refrigerate at least 45 minutes or up to 2 days.
  3. Remove 1 disk of dough from refrigerator and roll out on generously floured (up to ¼ cup) work surface to a 12-inch circle, about 1/8-inch thick. Roll dough loosely around rolling pin and unroll into pie plate, leaving at least 1-inch overhand on each side. Working around circumference, ease dough into plate by gently lifting edge of dough with one hand while pressing into plate bottom with other hand. Leave dough that overhangs plate in place; refrigerate while preparing filling until dough is firm, about 30 minutes.
  4. Adjust oven rack to lowest position, place rimmed baking sheet on oven rack, and heat oven to 400 F.
  5. Place 3 cups berries in medium saucepan and set over medium heat. Using potato masher, mash berries several times, to release juices. Continue to cook, stirring frequently and mashing occasionally, until about half of berries have broken down and mixture is thickened and reduce to half (about 1 ½ cups), for 8 minutes. Let cool slightly.
  6. Place grated apple in clean kitchen towel and wring dry. Transfer apple to large bowl. Add cooked berries, remaining 3 cups uncooked berries, lemon zest, juice, sugar, tapioca and salt, toss to combine. Transfer mixture to dough-lined pie plate and scatter butter pieces over filling.
  7. Roll out second disk of dough on generously floured (up to ¼ cup) work surface to 11-inch circle, about 1/8-inch thick. Using a 1 ¼-inch round biscuit cutter, cut round from center of dough. Cut another 6 rounds from dough, 1 ½ inches from edge of center hole and equally spaced around center hole. Roll dough loosely around rolling pin and unroll over pie, leaving at least ½-inch overhang on each side.
  8. Using kitchen shears, trim bottom layer of overhanging dough, leaving ½-inch overhang. Fold dough under itself so that edge of fold is flush with outer rim of pie plate. Flute edges using thumb and forefinger or press with tines of fork to seal. Brush top and edges of pie with egg mixture. If dough is very soft, chill in freezer for 10 minutes.
  9. Place pie on heated baking sheet and bake 30 minutes. Reduce oven temperature to 350 F and continue to bake until juices bubble and crust is deep golden brown, 30 to 40 minutes longer. Transfer pie to wire rack; cool to room temperature, at least 4 hours. Cut into wedges and serve with vanilla ice cream or whipped cream.
https://www.theartfulgourmet.com/2014/09/maine-wild-blueberry-pie/

King Crab BLT’s + a Gorgeous New Candy Red Toaster | KitchenAid Blog

Crown the BLT for KitchenAid

There’s nothing I love to eat more in the summer than some fresh seafood to enjoy with friends for a backyard BBQ, picnic or beach party. Everyone loves Lobster Rolls, but they can get a little pricey, and take a lot of work to make enough for a crowd. If you’re in the mood for seafood, Alaskan King Crab BLT sandwiches are a fresh, healthy and less expensive alternative, and a fun addition to your next outdoor BBQ party or picnic. And, they’re a breeze to make with the help of the new KitchenAid Pro Line® Series 4-Slice Automatic Toaster.

KitchenAid Toaster
KitchenAid Toaster

This gorgeous candy apple red beauty is a new product in the KitchenAid’s Pro Line® Series engineered and designed for culinary pros (and is no ordinary toaster at that!) It’s not only a beautiful addition to your kitchen appliance collection, but also smart as a whip with plenty of options to make the perfect piece of toast in a snap. And it even comes in three sleek colors to choose from: black, white or red. Isn’t it pretty?

King Crab BLT
King Crab BLT

These delicious Crab BLT’s are made with fresh lump Alaskan King crab meat (you can find it in your local grocery market in the seafood section or buy it fresh from a seafood market). They have tons of flavor from all the fresh veggies and herbs inside: minced red bell peppers, jalapenos, fresh cilantro, scallions and chives. For some extra kick, I add a dash of spicy Sriracha (hot chile pepper sauce), a little bit of mayonnaise, fresh lemon juice and capers, and a few breadcrumbs to bind them all together. Simply make the crab cakes by patting them into medium size patties, then coat them in some Japanese Panko breadcrumbs and lightly fry them to perfection in some oil and drain. Rest the crab cakes on a gorgeous bed of lettuce and juicy tomatoes, garnished with crispy bacon and a light and refreshing coleslaw for crunch. The crowning touch is a homemade Sesame-Sriracha Mayo on a beautifully toasted  (or grilled) sesame hard roll. Let the fun begin!

CLICK HERE TO GET THE RECIPE & LEARN MORE ON THE KITCHENAID BLOG


The Perfect Beach Bash + An Amazing Shrimp & Veggie Salad w/ Lemon-Herb Dressing

TableHeroShot_Crop

Summer is here and it’s absolutely my favorite time of the year! The sun is shining, the trees are in bloom, and everyone is outside enjoying the weather making it prime time for entertaining family and friends with barbecue and cocktails by the beach, lake or even in the backyard by the pool. I’ve put together some party planning and decorating tips for the perfect summer outdoor beach party, along with some menu ideas featuring lots of fresh seafood, finger foods, and refreshing fruits and veggies.

ShrimpPastaSalad-RecipeShot

One of my favorite recipes to make for a summer outdoor beach party is a Shrimp and Veggie Pasta Salad with Lemon-Herb Vinaigrette. It has a light, lemony herb dressing with fresh basil and tarragon, lots of veggies including cucumbers, celery, roasted red peppers, grilled corn and scallions for some extra crunch, and fresh sautéed savory shrimp. It goes perfectly with grilled chicken, burgers, skewers and fresh fruit like watermelon, pineapple and mango.

Standalone_1175X1290

I made this amazing summer salad using my KitchenAid® 3-Speed Hand Blender – check out the full post on KitchenEnthusiast.com for the full recipe and all my fun tips on creating the Perfect Beach Bash this Summer!

CLICK HERE FOR PARTY PLANNING TIPS AND THE FULL RECIPE! http://blog.kitchenaid.com/tips-perfect-beach-party-recipe/

Summer Veggie Pasta with Roasted Garlic, Tomatoes, Zucchini & Corn

VeggiePasta-hero
Summer Veggie Pasta with Roasted Garlic, Tomatoes, Zucchini & Corn

There’s nothing better in the Summer than a visit to the Farmer’s Market to get some super fresh veggies that are ripe in the peak of the season. Some of my favorites are fresh cherry tomatoes, zucchini and corn that are lightly roasted or sauteed tossed with some roasted garlic, fresh herbs, extra virgin olive oil and freshly grated parmesan cheese over pasta. It’s light, healthy and refreshing for a Summer dinner with a glass of wine with some friends at a table out on the back patio served with a green salad and some crusty bread.

Summer Veggie Pasta with Roasted Garlic, Tomatoes, Zucchini & Corn

Yield: 4

A light and healthy Summer pasta dish with farm market fresh vegetables including roasted garlic, cherry tomatoes, corn and zucchini topped with fresh herbs and shaved Parmigiano-Reggiano cheese. Delicious!

Ingredients

  • 1 package fresh or dried spaghetti (can sub fettucine, penne or tagliatelle)
  • 3 tablespoons extra virgin olive oil
  • 1 small to medium garlic bulb
  • 4 cups cherry tomatoes, halved
  • 1 medium zucchini, sliced into ribbons
  • 1 or 2 ears of corn, husked
  • 1/2 teaspoon sea salt
  • 1/4 cup fresh mint or basil leaves, torn
  • Freshly ground black pepper, to taste
  • ½ cup shaved Parmigiano-Reggiano cheese

Instructions

  1. Preheat oven to 400 degrees.
  2. Shave off ¼” of the top of garlic bulb and peel away the outer layers of the garlic bulb skin. Drizzle with extra virgin olive oil and wrap in foil. Roast for 45 minutes up to one hour and let cool. Squeeze out the garlic bulbs, slice or mash, and place in a bowl to the side.
  3. Bring a pot of water to a boil (you can add a teaspoon of sugar and milk to the water if you like sweeter corn), and add the corn, bringing water back to a boil (about 5-7 minutes.) Once water is back to a boil, remove the corn ears. Let cool, shave off kernels and set aside.
  4. Cut zucchini in half lengthwise and then cut in half again into quarters. Shave zucchini into thin ribbons and set aside.
  5. In another large pot, bring salted water to a boil. Cook pasta according to package directions until al dente. Drain; place pasta in a large serving bowl.
  6. While pasta cooks, heat 1 tablespoon of olive oil in a medium saucepan over medium heat. Add zucchini to pan; and sauté for 5-7 minutes until soft and cooked through, stirring often. Add cooked corn kernels and roasted garlic and sauté together for another minute or so.
  7. Add 2 tablespoons of olive oil to the pan along with tomatoes and ½ teaspoon salt; cover and cook 4-6 minutes. Add tomato-garlic-corn mixture to the cooked pasta; toss to combine. Top with torn mint or basil leaves, shaved Parmigiano-Reggiano cheese and freshly ground black pepper.

Notes

Serve with a green salad and crusty bread and a glass of crisp white wine such as Pinot Grigio or Sauvignon Blanc.

https://www.theartfulgourmet.com/2013/08/pasta-with-fresh-tomato-basil-zucchini-corn/

Here are some photos from my trip to Union Square Greenmarket in NYC – enjoy the fruits (and veggies!) of the Summer season while it lasts! 🙂

Fresh Cherry Tomatoes

Fresh Herbs

Fresh Pasta

garlic

fresh veggies

fresh corn

cherry tomatoes

fresh garlic

fresh herbs

Savoring the Fruits of Summer :: Peach-Raspberry Almond Vanilla Cream Tart

Peach-Raspberry Vanilla Almond Cream Tart

Summer is my favorite time of year – blue sunny skies, lazy days on the patio, weekend trips to the beach and lake and backyard gatherings with friends and family. Most of all, I love the fresh juicy fruits of summer – stone fruits like peaches and plums and cherries and all the fresh berries in season like blackberries, strawberries and raspberries.

Over the July 4th holiday weekend we had a fun backyard BBQ at my parents house with some of my relatives that I haven’t seen in awhile. I used to look forward to all the fun cookouts we did every summer with my family and cousins when I was a kid so it was a fun surprise to hear they were coming over for the day.

I wanted to make a special summery dessert and something different than our usual holiday traditions such as Aunt Irene’s Reception Salad and Grandma’s Lemon Meringue Pie. I decided on a Peach-Raspberry Almond Vanilla Cream Tart made with luscious juicy fresh peaches and raspberries that are bathed in a gorgeous peach glaze. They lie on a bed of sweet creamy ricotta and cream cheese blended with a hint of almond and vanilla on top of a flaky buttery puff pastry as the base.

The combination of the sweet fruit and tangy sweet almond vanilla cream over the layers of flaky buttery pastry was the perfect refreshing yet sinful treat to top off an awesome hot Summer day out on the back patio. My Aunt and Grandma may not be with us anymore to make their legendary desserts, but I’ve decided to step in their shoes and make this delicious concoction a new yearly tradition for our family summer backyard gatherings going forward.

Happy summer! 🙂

Savoring the Fruits of Summer :: Peach-Raspberry Almond Vanilla Cream Tart

Prep Time: 40 minutes

Cook Time: 30 minutes

Total Time: 1 hour, 10 minutes

Yield: Makes 2 tarts serving 12 to 16.

Ingredients

  • 2 puff pastry sheets, defrosted
  • 2 eggs
  • 2 tablespoons water
  • 2 peaches, diced
  • 1 cup granulated sugar
  • 2 teaspoons fresh lemon juice
  • 2 lemon rind quarters
  • 1 cup ricotta cheese
  • 2 - 8 oz. packages cream cheese (one regular, one light) at room temperature
  • ½ cup confectioner’s sugar
  • 1 teaspoon vanilla extract
  • 1 teaspoon almond extract
  • 4 peaches, sliced thin
  • 1 cup raspberries

Instructions

  1. Preheat oven to 400 degrees.
  2. Tart pastry: Rollout puff pastry sheets on a floured surface and place on two lightly greased rectangular baking sheets.
  3. Score a 1-inch border around each pastry sheet. Beat eggs and water together and lightly brush the pastry sheets.
  4. Bake for about 15-20 minutes until pastry is puffed and golden brown. Remove from oven and let pastry sheets cool completely.
  5. Glaze: Meanwhile, dice two peaches and add sugar, lemon juice, lemon rinds and 2 cups of water into a small-medium pan on the stove. Simmer over medium heat until the peach is soft and the glaze is thickened about 10-15 minutes. Remove the lemon rinds and let the glaze cool to the side.
  6. Cream Filling: In a large mixing bowl, add the ricotta cheese, cream cheese, confectioner’s sugar, vanilla and almond extract. Beat together with a mixer until smooth and spread evenly on to each pastry sheet, leaving a 1-inch border on the pastry. Arrange the peach slices on top of the cream filling in layered rows and brush the peaches with all but a few tablespoons of the glaze. Toss the raspberries with the rest of the glaze and randomly place on top of the peaches. Serve right away or keep cool in the refrigerator covered for a few hours.
  7. To serve, cut the tarts into squares and garnish with toasted almonds or whipped cream if desired.

Notes

Chef’s Note: The pastry and cream filling is really delicious and super versatile for making any type of fruit tart. You can substitute the peaches and raspberries for any type of berry – blueberries, strawberries, blackberries or use fresh plums or kiwi fruit and adjust the recipe accordingly for the glaze and fruit topping. You can also substitute some toasted pistachios in place of the almonds. Get creative!

https://www.theartfulgourmet.com/2013/07/savoring-the-fruits-of-summer-peach-raspberry-almond-vanilla-cream-tart/

Peaches

Almond Vanilla Cream

Peach Raspberry Almond Vanilla Cream Tart

More Fruit Tart Recipes you might enjoy:

Freeform Summer Fruit Tart Recipe

Fruit and Cream Mini Tarts

Ina Garten’s Strawberry Tarts Recipe

Cool off w/ a Stoli Cucumber-Melon Martini & Prosciutto-Melon-Feta Bites

Martini-Bites

Summer is in the air and it’s that time of year to cool down with some refreshing Stoli cocktails and light small bites for the patio or beach. I love melon in the Summer time, especially paired with cucumbers with their light flavors that make a great refreshing cocktail.

I created a Cucumber-Melon Martini that’s made with Stoli vodka, cucumber liqueur, agave cayenne lemonade (or regular lemonade or limeade),  garnished with cucumbers, mint and cubes of honeydew melon. It has a hint of sweetness from the lemonade and a lovely refreshing flavor from the melons and cucumbers and a spike of minty freshness and kick of  heat from the cayenne lemonade.

A great small bite pairing to go with the martinis are Prosciutto, Melon and Feta Bites. They’re super easy to make and just as light and refreshing as the cocktails that go with them.

A little bit sweet, a little bit tangy and a whole lot delicious. Here’s to the lazy days of Summer! ENJOY 🙂

—–

Martini-Hero

Stoli Cucumber-Melon Martini

1 part Stoli vodka

1 part cucumber liqueur

2 parts lemonade or limeade

Garnish with Cucumber slices, honeydew melon cubes and fresh mint sprigs

Pour vodka and lemon or limeade into a drink shaker over ice. Shake well and strain into martini glasses. Drop cubes of melon into the martini. Garnish with cucumber slices and fresh mint sprigs.

Makes 1 cocktail.

—–

Prosciutto-Feta-Melon-Bites

Prosciutto-Melon-Feta Bites

1 package of prosciutto, sliced thin and cut in half (about 20 slices)

1 package of feta cheese, sliced into ¼ inch sliced cubes

8 ounces honeydew melon, cubed

8 ounces cantaloupe melon, cubed

Prep all ingredients by cutting the feta cheese and melons into similar size chunks. First layer the melon with the feta, then top with a slice of prosciutto folded into small squares and secure with toothpicks. Serve on a platter along with the Cucumber-Melon Martinis.

Makes approximately 20 small bites.

Note: You can also include watermelon in the mix for some extra flavor or serve the bites over arugula with a cucumber melon vinaigrette. Simply throw the melon and cucumber slices in a blender with some olive oil and vinegar, a dash of salt and pepper; then drizzle over the bites.

Happy Summer!!!

Celebrating Memorial Day with Stoli Vodka! Grilled Honey Orange Chicken Skewers w/ Cucumber-Orange-Cilantro Salsa | Honey Orange Blossom Cocktails

Stoli Vodka

Cooking with Stoli Vodka for Memorial Day Weekend

There’s no better time than Memorial Day weekend to break out the grill and cook up some tasty BBQ to celebrate the beginning of Summer! I had the opportunity to create some recipes with Stoli Vodka for the holiday and decided to make Grilled Honey Orange Chicken Skewers with a Cucumber Orange Cilantro Salsa – a savory and light dish with tons of flavor and a hit of refreshment from the oranges and cucumbers. I used Stoli Ohranj (Orange flavor) and Stoli Sticki (Honey flavor) in both the chicken marinade and my delicious Honey Orange Blossom Cocktails.

The cocktails are made with a shot of each Stoli vodka flavor, honey, orange blossom water, vanilla extract, and organic lemon infused sparkling spring water, garnished with fresh orange slices and edible flowers. It’s light and refreshing with just a dash of honey and orange to cool your palette. It reminds me of a Creamsicle (remember those??) – the perfect treat for a hot Summer day.

I hope you enjoy the recipes and have an amazing Memorial Day weekend with family and friends..as for me, I’m hitting the beach for a dose of sunshine and R&R!

Stoli Ohranj Honey Blossom Cocktail


Grilled Chicken Skewers with Orange Cucumber Cilantro Salsa

Grilled Honey Orange Chicken Skewers w/ Cucumber-Orange-Cilantro Salsa

Prep Time: 30 minutes

Cook Time: 15 minutes

Total Time: 45 minutes

Yield: 4-6

Ingredients

  • Honey Orange Chicken:
  • 1 ½ pounds boneless, skinless chicken breasts or thighs
  • ¼ cup fresh squeezed orange juice
  • ¼ cup olive oil
  • 1 tablespoon Stoli Ohranj vodka
  • 1 tablespoon Stoli Sticki vodka
  • 2 tablespoons honey
  • 2 tablespoons chopped fresh cilantro
  • 2 cloves garlic, minced fine
  • 6 chives, minced fine
  • ½ teaspoon grated orange zest
  • 1/8 teaspoon cayenne pepper
  • Sea salt and freshly ground black pepper, to taste
  • ½ red onion, cut into large chunks
  • 1 red, yellow or orange bell pepper, cut into large chunks
  • Cucumber-Orange-Cilantro Salsa:
  • ½ large orange, chopped fine
  • ½ cucumber, diced fine
  • 1 tablespoon chopped fresh cilantro
  • 6 chives, minced fine
  • 1/2 jalapeno, minced fine
  • 2 tablespoons extra-virgin olive oil
  • 1 tablespoon white wine vinegar
  • Sea salt and freshly ground black pepper, to taste

Instructions

  1. Honey Orange Chicken:
  2. Cut chicken into large chunks and set aside.
  3. Soak wooden skewers in water for at least an hour before using (or simply use metal skewers to make your life easier).
  4. Combine next 11 ingredients (orange juice through S&P) in a large mixing bowl, add chicken and let marinade in the refrigerator for at least 30 minutes up to 2 hours.
  5. Remove chicken from fridge and let stand at room temperature for at least 15 minutes.
  6. Preheat a grill or grill pan over medium-high heat.
  7. Thread marinated chicken, red onion and bell peppers onto skewers (should make at least 4 large or 5 medium skewers).
  8. Grill chicken skewers about 10-12 minutes until cooked through (internal temperature should read 165 degrees), turning once.
  9. Serve with Cucumber-Orange-Cilantro and grilled pita or flatbread and Stoli Honey Orange Blossom Cocktails.
  10. Cucumber-Orange-Cilantro Salsa:
  11. In a medium mixing bowl, add diced cucumber, orange pieces, fresh cilantro, chives and diced jalapeno.
  12. Add olive oil and vinegar, and S&P to taste, mixing thoroughly.
  13. Serve on top of grilled chicken skewers or on the side.
https://www.theartfulgourmet.com/2013/05/celebrating-memorial-day-with-stoli-vodka-grilled-honey-orange-chicken-skewers-w-cucumber-orange-cilantro-salsa-honey-orange-blossom-cocktails/

Cooking with Stoli Memorial Day


Stoli Ohranj Honey Blossom Cocktail

Stoli Honey Orange Blossom Cocktails

Prep Time: 5 minutes

Total Time: 5 minutes

Yield: 1 cocktail

Ingredients

  • 1 shot Stoli Ohranj vodka
  • 1 shot Stoli Sticki vodka
  • 2 tablespoons honey
  • 1 tablespoon Orange blossom water
  • 1 teaspoon vanilla extract
  • 10.5 fl oz Sparkling lemon spring water
  • Orange slices, for garnish
  • Edible flowers, for garnish

Instructions

  1. Add vodka, honey, orange blossom water and vanilla into a cocktail shaker and mix together with a tall spoon.
  2. Add ice and sparkling lemon spring water and close lid securely.
  3. Shake gently until mixed together.
  4. Serve in cocktail glasses over ice, garnish with orange wedges and edible flowers.
https://www.theartfulgourmet.com/2013/05/celebrating-memorial-day-with-stoli-vodka-grilled-honey-orange-chicken-skewers-w-cucumber-orange-cilantro-salsa-honey-orange-blossom-cocktails/

Grilled Honey Orange Chicken Skewers with Cucumber Orange Cilantro Salsa

Stoli Sticki and Stoli Ohranj

About Stoli Vodka

Stoli Sticki has hints of honey and herb flavors, slightly sweet and floral.

Stoli Ohranj has a bright orange flavor of orange zest and varied flavors such as mandarin, kumquat and tangerine with a hint of lemon.

The two mixed together are the perfect combination for my BBQ marinade and refreshing cocktails!

Find out more about Stoli Vodka

Become a fan on Stoli’s Facebook page

Become a fan on Twitter: http://bit.ly/11deDwL

Become a fan on Pinterest: http://bit.ly/197F9PJ


This is a sponsored post created for Stoli Vodka – I received samples of Stoli product for purposes of sampling and creating recipes and photographs for the Stoli brand. All opinions, recipes, ideas and photographs are my own, copyright © 2013 Kristen Hess/The Artful Gourmet.

Please do not share or use images without my expressed permission. If you want to share this post on social media, feel free, as long as you credit the story and recipes and photos to Kristen Hess/The Artful Gourmet and provide a link back to the original story on my website. Thanks!

Savor Stoli Responsibly. STOLICHNAYA® Premium Vodka. 40%
Alc/Vol. Distilled from grain. William Grant & Sons, Inc. New York, NY. © 2012 Spirits International, B.V

Pan-Seared Scallops w/ Leek, Thyme & Wine Cream Sauce; Lemon-Leek Orzo & Sauteed Zucchini Squash

Pan-Seared Scallops with Leek, Thyme & Wine Cream Sauce, Lemon-Leek Orzo & Sauteed Garlic Zucchini & Squash

This dish is a special treat I created for a recent audition for a new cooking show for ABC – I decided to create a dish that would not only impress the food judges and producers but also one featuring fresh, seasonal ingredients and irresistible to the tastebuds! Fresh Pan-seared Scallops served in a Leek and Thyme Wine Cream sauce with a side of Orzo (a small rice-shaped pasta) made with Meyer lemon-infused oil, lemon zest, and leeks. Sauteed Zucchini and Summer Squash is a perfect accompaniment to the scallops and orzo; made with garlic, olive oil, herbs de Provence, and a touch of butter, topped with some Himalayan pink onion sea salt and fresh ground black pepper.

Lemon-Leek Orzo

Prep Time: 15 minutes

Cook Time: 30 minutes

Total Time: 45 minutes

Yield: 4

Ingredients

  • 1 tablespoon lemon-infused oil
  • 1 clove garlic, minced
  • 1/4 cup leeks, trimmed, rinsed, sliced
  • 1/2 cup orzo pasta
  • 1/2 cup chicken broth
  • 1/2 cup white wine
  • 1/2 teaspoon fresh thyme leaves
  • 1/2 teaspoon lemon zest
  • Italian Sea Salt with Lemon, to taste
  • Freshly ground black pepper, to taste

Instructions

  1. Heat oil in a medium saucepan over medium-high heat. Add garlic and leeks and saute for about 5 minutes until soft.
  2. Add orzo, broth, wine, thyme, lemon zest, sea salt and pepper to taste; mix ingredients together and bring to a boil. Cover and immediately reduce to a simmer on low heat.
  3. Cook orzo for about 15 minutes until all the liquid is absorbed and stir ingredients together. Pasta should be al dente and will be an opaque color when done. (Read the package directions if adjusting quantity to ensure cooking time is correct).
  4. Set aside, covered, and keep warm. Serve with the Pan-seared Scallops and Leek-Thyme Wine Cream Sauce and Sauteed Zucchini Squash.
https://www.theartfulgourmet.com/2012/07/pan-seared-scallops-w-leek-thyme-lemon-leek-orzo-sauteed-zucchini-squash/

Pan-Seared Scallops in Leek & Thyme Wine Cream Sauce

Prep Time: 15 minutes

Cook Time: 15 minutes

Total Time: 30 minutes

Yield: 4

Ingredients

  • 2 tablespoons olive oil
  • 1 clove garlic, minced
  • 1 leek, rinsed, trimmed and sliced
  • 1/2 cup white wine
  • 1/4 cup chicken broth
  • 1/2 tablespoon parsley
  • 1/4 teaspoon fresh thyme leaves, chopped
  • 1/2 cup half and half
  • 1 pound jumbo sea scallops
  • Kosher or Sea Salt
  • Freshly ground black pepper
  • 1 tbsp olive oil

Instructions

  1. Saute garlic and leeks in olive oil over medium heat for about 3-5 minutes, being careful not to burn garlic.
  2. Add the wine, chicken broth, parsley and thyme, raise the heat to medium-high and let the liquid thicken and reduce to about half, stirring often (cook about 5-7 minutes until you get desired thickness).
  3. Stir in the cream, reduce heat to low and let simmer for another minute or so, mixing the sauce well.
  4. Rinse sea scallops and pat dry. Sprinkle with salt and pepper.
  5. Heat olive oil in a cast iron saute pan over medium-high heat. Sear the scallops for about 3 minutes on each side, until a golden brown crust forms and scallops are no longer pink (do not turn scallops until each side is done).
  6. Serve scallops with the Leek and Thyme Wine Cream Sauce garnished with some extra parsley and thyme with the Lemon-Leek Orzo and Sauteed Zucchini (recipes follow). A crisp white wine such as a Pinot Gris or Sauvignon Blanc is the recommended pairing for this dish.
https://www.theartfulgourmet.com/2012/07/pan-seared-scallops-w-leek-thyme-lemon-leek-orzo-sauteed-zucchini-squash/

Sauteed Garlic and Zucchini Squash

Prep Time: 10 minutes

Cook Time: 10 minutes

Total Time: 20 minutes

Yield: 4

Ingredients

  • 1 tablespoon olive oil
  • 1 tablespoon butter
  • 2 cloves fresh garlic, minced
  • 1 zucchini, sliced and cut in half
  • 1 yellow summer squash, sliced and cut in half
  • 1 teaspoon herbes de Provence
  • Himalayan Pink Onion Salt, to taste
  • Freshly ground black pepper

Instructions

  1. In a large saute pan, heat olive oil and butter over medium heat.
  2. Saute garlic for about 1 minute until lightly browned.
  3. Add zucchini, yellow squash, herbes de Provence, onion salt and black pepper; mix well. Saute for about 5-10 minutes, stirring occasionally, until zucchini and squash are slightly browned and soft.
  4. Serve as a side dish to the Pan-seared Scallops and Lemon-Leek Orzo.
https://www.theartfulgourmet.com/2012/07/pan-seared-scallops-w-leek-thyme-lemon-leek-orzo-sauteed-zucchini-squash/