Spicy Korean Chicken Lettuce Wraps

Spicy Korean Chicken Lettuce Wraps

Spicy Korean Chicken Lettuce Wraps

I was recently invited to participate in another great blogger recipe challenge– this time for Lucky Foods, a family-owned business and premiere Asian food brand. For the contest, I decided to make some Spicy Korean Chicken Lettuce Wraps made with two of their popular sauces – Gochujang chili paste and Kimchi Mayo.

Spicy Korean Chicken Lettuce Wraps

These delicious spicy chicken lettuce wraps are full of flavor, light on carbs and the perfect mixture of sweet and spicy, crunchy and creamy all in one bite! The gochujang chili paste gives it a nice kick of heat and the kimchi mayo rounds out the flavor with some creamy tangy goodness to top it all off.

Lucky Foods Gochujang

Gochujang is a Korean chili pepper paste made from fermented red chili peppers and it has a nice spicy bite with a subtle sweetness and umami flavor from the fermented soybeans.. It’s great on noodles, in fried rice, as a marinade, or drizzling on soups, stews and salad bowls.

Lucky Foods Kimchi Mayo

Their Kimchi mayo is also a delicious condiment made with spicy fermented kimchi (cabbage) and vegan mayonnaise.

Spicy Korean Chicken Lettuce Wraps

First I sautéed some fresh garlic, sliced scallions and ginger over medium heat until softened, about 2 minutes. Then I increased the heat to medium high and added the diced chicken and zucchini and sprinkled with sesame seeds and some salt and pepper, sautéing for about 4 minutes until browned.

Spicy Korean Chicken Lettuce Wraps

To make the spicy sauce, I whisked together the Gochujang chili paste, hot honey, soy sauce and rice vinegar, then added it into the pan with the chicken and zucchini. Then I tossed in the cooked cauliflower rice, honey roasted peanuts and sliced carrots and let the mixture cook for another 4-5 minutes until the sauce thickened and liquid was reduced.

Spicy Korean Chicken Lettuce Wraps

To serve, I spooned the spicy chicken mixture inside the lettuce leaves, then garnished the wraps with more grated carrots, cilantro, sesame seeds,  and a drizzle of spicy Kimchi Mayo with extra on the side.

Spicy Korean Chicken Lettuce Wraps

You guys – this is the most delicious thing I have ever tasted! The balance of spicy / sweet / umami flavors along with the crunchy and creamy textures is absolutely DIVINE.  And these sauces will go great with any protein you choose – try it with tofu or shrimp or beef. And it’s low carb, paleo and keto-friendly too!

Spicy Korean Chicken Lettuce Wraps

Prep Time: 25 minutes

Cook Time: 20 minutes

Total Time: 45 minutes

Yield: Serves 8.

Serving Size: 2-3 lettuce wraps

These delicious spicy chicken lettuce wraps are full of flavor, light on the carbs and the perfect mixture of sweet and spicy, crunchy and creamy all in one bite! The gochujang chili paste gives it a nice kick of heat and the kimchi mayo rounds out the flavor with some creamy tangy goodness to top it all off.

Ingredients

  • 2 tablespoons vegetable oil
  • 1 tablespoon sesame oil
  • 3 scallions, thinly sliced
  • 3 cloves garlic, minced
  • 4 teaspoons finely chopped fresh ginger
  • 1 medium zucchini, sliced into half-moon wedges
  • 1 pound chicken thighs, fat trimmed, cut into 1-inch chunks
  • 2 teaspoons sesame seeds, plus additional for garnish
  • Kosher salt and freshly ground black pepper
  • 4 teaspoons Lucky Foods Gochujang chili paste
  • 2 tablespoons hot honey
  • 1/3 cup soy sauce
  • 3 tablespoons rice vinegar
  • 1 package frozen cauliflower rice, cooked
  • 1 cup honey roasted or spicy peanuts
  • 6 baby carrots, sliced
  • Butter lettuce leaves, for serving
  • Grated carrots, for garnish
  • Cilantro leaves, for garnish
  • Lucky Foods Kimchi Mayo, for drizzling/dipping

Instructions

  1. Heat vegetable and sesame oil in a large nonstick skillet over medium heat. Add the fresh garlic, sliced scallions and ginger and cook over medium heat until softened, about 2 minutes.
  2. Increase the heat to medium high and add the chicken thighs and zucchini, sprinkle with sesame seeds and some salt and pepper, to taste, sautéing for about 5-6 minutes until chicken is browned and cooked through. 
  3. Whisk together the Gochujang chili paste, hot honey, soy sauce and rice vinegar to make a spicy sauce, then add it into the pan with the chicken and zucchini. Stir to coat with the sauce.
  4. Add in the cooked cauliflower rice, peanuts and sliced carrots and stir; let mixture cook for another 5 minutes until the sauce thickened and liquid mostly evaporated. 
  5. To serve, scoop the spicy chicken mixture inside the lettuce leaves, then garnish the wraps with more grated carrots, cilantro, sesame seeds, and a drizzle of spicy Kimchi Mayo with extra on the side for dipping.

Notes

Feel free to substitute tofu, shrimp or beef for the chicken or use chicken breasts instead of thighs.

https://www.theartfulgourmet.com/2021/08/spicy-korean-chicken-lettuce-wraps/

Spicy Korean Chicken Lettuce Wraps

To get more info on Lucky Foods products, check out their website. Their product line ranges from traditional and gluten-free spring rolls to Asian fusion sauces and BBQ sauces, kimchi and Korean pancakes. All of their products are free from MSG, GMOs, and added colors and preservatives. Their products only feature wholesome produce and fresh, aromatic spices, which is something I absolutely love!

They have more great recipe ideas on their Instagram & Facebook pages, and you can buy their products online or find them locally at Whole Foods, Giant, Acme and Food Lion.

#luckyfoodsrecipechallenge #eatluckyfoods

Note: I received complimentary products to use and try out for this Blogger recipe challenge. All opinions, writing, recipes and photos are my own.
 

Sweet + Spicy Meyer Lemon Shrimp Stir Fry

Sweet + Spicy Meyer Lemon Shrimp Stir Fry

Hey guys! Oh my gosh, it’s almost the end of the year! Can you believe it? Where does time fly? I’m so ready for a New Year though – #2019 can’t come soon enough! 🙂

I was invited to participate in the #Steviva #Holiday #Keto #Blogger #Recipe Challenge this year and made a Sweet and Spicy Meyer Lemon Shrimp Stir Fry. With all the #holidays going on and the rich, delectable #food I’ve been enjoying this month, I wanted to make a recipe a little bit lighter and healthier, and on the lower carb side…(before it all happens again this weekend for New Years!)

Sweet + Spicy Meyer Lemon Shrimp Stir Fry

I love Steviva products because they are lower in carbs, low glycemic, low calorie and they use all natural ingredients in their products. Their line of good-for-you all natural alternative sweeteners are terrific options for cooking and baking without sugar. Whether you need a granulated sweetener to replace table sugar, a powdered sweetener to replace confectionery sugar or a liquid sweetener to replace corn syrup, they have carefully developed safe, low glycemic, low caloric sweeteners that taste and act just like sugar.

Steviva + Nectevia Marinade

This dish is super easy and quick to make and has great flavors using fresh Meyer Lemon juice, soy sauce, sesame, Nectevia Agave Stevia Blend, Steviva Erythritol Blend, a dash of ginger and #Sriracha for some spiciness to make a delicious sticky marinade to go with the shrimp and fresh veggies. And it’s low carb and low cal! BONUS*** 🙂

Marinate Shrimp

Simply make your marinade for the shrimp with all the ingredients and put it in the fridge in a ziplock baggie for 1/2 an hour. Then stir fry the shrimp for a few minutes until they are no longer pink and remove the shrimp from the pan.

Saute the shrimp and veggies in marinade

Add the veggies and stir fry those for about 5-7 minutes until tender crisp and the sauce starts to thicken. Add the cooked shrimp back in and toss together for another minute or so.

Sweet + Spicy Meyer Lemon Shrimp Stir Fry

Serve immediately over brown or cauliflower rice, zucchini noodles or soba noodles and spoon the rest of the spicy and sweet sauce on top and garnish with a few more sesame seeds and even some green onions if you wish.

Sweet + Spicy Meyer Lemon Shrimp

Sweet + Spicy Meyer Lemon Shrimp Stir Fry

Prep Time: 40 minutes

Cook Time: 10 minutes

Total Time: 1 hour

Yield: 4

A super easy and delicious stir fry made with shrimp and fresh veggies, marinated in a spicy and sweet sauce made with Meyer lemon juice, soy sauce, Sriracha, Steviva Blend and Nectevia. Great for a weeknight dinner or special occasion. Best served over brown rice, cauliflower rice, zucchini noodles or soba noodles.

Ingredients

  • 4 tablespoons Steviva Blend
  • 4 tablespoons Nectevia agave syrup
  • 1/4 cup soy sauce
  • 1 tablespoon minced garlic
  • juice of one Meyer lemon
  • 1 teaspoon sesame oil
  • 1 tablespoon sesame seeds
  • 1 tablespoon Sriracha
  • dash of red pepper flakes (optional)
  • dash of ginger (fresh minced or dried)
  • 1 pound medium shrimp, peeled and deveined
  • 2 tablespoons butter
  • 2 cups fresh sliced veggies (broccoli florets, red pepper, snap peas)
  • white pepper, to taste

Instructions

  1. Whisk together Steviva Blend, Nectevia agave nectar, soy sauce, garlic, lemon juice, sesame oil, sesame seeds, Sriracha, red pepper flakes and ginger in a small mixing bowl.
  2. Add half of the sauce to the shrimp and let marinade in the refrigerator for 30 minutes or more.
  3. Heat butter in a medium sized skillet over medium high heat. Add the shrimp, discard marinade from the bag (save the other unused half for making the sauce). Saute for about 3-5 minutes until shrimp is no longer pink.
  4. Remove shrimp from the pan and add the fresh vegetables. Saute for about 5 minutes or so until soft.
  5. Add the reserved marinade and pour over the vegetables. Cook for another few minutes until sauce thickens.
  6. Add the cooked shrimp back into the pan and toss together with the vegetables and the sauce. Season with pepper, to taste.
  7. Serve immediately, garnish with additional sesame seeds and green onions if desired over brown rice, cauliflower rice, soba noodles or zucchini noodles.

Notes

You can also use this marinade for scallops or chicken or beef, just increasing the cook time appropriate for the protein (about 10-12 mins for chicken or beef until cooked through). Vegetables can be swapped out as well whatever you prefer!

https://www.theartfulgourmet.com/2018/12/sweet-spicy-meyer-lemon-shrimp-stir-fry/

Sweet + Spicy Meyer Lemon Shrimp

I’d love to hear your comments on this recipe below if you decide to make it! Please make sure to tag @stevivabrands and @artfulgourmet with a link back to this original post on my blog if you do share any recipes or photos on social media!

For more information on #Steviva Brands products and more recipes, please visit their website and social media pages:

Facebook

Twitter

Pinterest

Instagram

—–

Note: I received products from Steviva Brands to experiment with recipes for the Blogger Challenge Recipe Contest. All opinions, recipes, photos and text are my own. 

Spicy Pork + Kale Udon Noodle Soup

Spicy Pork + Kale Mushroom Udon Noodle Soup

I love soup in the winter time because it’s a great way to warm up in the freezing weather, and a delicious, healthy thing to eat after all the heavy food from the holidays. And I especially love noodle soup with lots of veggies, meat and seasonings.

JSL Foods Fortune Udon Noodles

I recently was invited to join the blogger recipe challenge for JSL Foods to create a unique soup recipe using their Fortune Udon Noodles.

Mushroom Udon Noodles

I created a soup recipe using their Mushroom Udon noodles – they are so good and easy to make! They are fresh and pre-cooked, perfect for a soup or stir fry and fortified with Omega-3 and have no MSG.

Cooked Udon Noodles

You simply add the noodles to some water and add the flavor packet provided, then cook for a few minutes after the water comes to a boil. Alternatively you can microwave the noodles in just 3 minutes and then add it to your soup base.

Spicy Pork Mixture

After the noodles were done, I set them aside and made the Spicy Pork mixture to go in the soup. First I added all the seasonings and spices, sriracha, fish sauce, soy sauce and togarashi seasoning (a Japanese spicy pepper seasoning you can find online) to the ground pork and sautéed over medium-high heat until cooked through.

Add kale corn and pork to udon

Then I returned the pot of cooked noodles to the burner, added some chicken broth, fresh chopped kale, yellow sweet corn and a little more garlic salt and pepper and let that cook until the kale wilted and the corn was heated through. I added the cooked spicy pork mixture back into the pot with the noodles, kale and corn and let it simmer for another 5-10 minutes on low heat to let all the flavors meld together.

Spicy Pork + Kale Mushroom Udon Noodle Soup

And voila! A super delicious and healthy soup for the winter with a great combination of flavors from the mushroom Udon noodles, the spicy pork, the fresh kale and corn, all topped with more sliced green onions, togarashi seasoning and a pat of butter to give it another layer of silky flavor and dash of sweetness to cool the heat from the spicy broth.

Spicy Pork + Kale Udon Noodle Soup

Prep Time: 15 minutes

Cook Time: 15 minutes

Total Time: 30 minutes

Yield: 4-6

Serving Size: 1 cup

This is spicy and delicious mushroom Udon noodle soup - topped with a spicy pork mixture, kale, corn, garlic and green onions to make a savory soup perfect for winter.

Ingredients

  • 1 package Fortune Udon noodles, mushroom flavor
  • 1 tablespoon vegetable or peanut oil
  • 1 tablespoon sesame oil
  • 1 pound ground pork
  • 1 1/2 tablespoons garlic, minced
  • 1 tablespoon ginger paste
  • 1 teaspoon lemongrass, minced
  • 1 teaspoon fish sauce
  • 2 tablespoons soy sauce
  • 2 tablespoons Sriracha
  • 1 tablespoon Togarashi seasoning
  • Black pepper, to taste
  • 4 cups chicken broth
  • 1 teaspoon garlic salt
  • 1 (11 ounce) can sweet yellow corn
  • 3-4 large handfuls kale, chopped
  • 2 green onions, sliced
  • Butter, for garnish (optional)

Instructions

  1. Cook the Fortune Udon noodles in a large pot according to package directions (add 1 1/4 cups of boiling water and seasoning packet to the noodles and simmer for 3 minutes). Set aside.
  2. Heat the oil in a medium saute pan over medium high heat, add the ground pork, garlic, ginger, lemongrass, fish sauce, soy sauce, Sriracha, Togarashi seasoning and black pepper and cook for about 5 minutes or so until the pork is cooked all the way through.
  3. Return the pot of cooked Udon noodles back to the burner, add the chicken broth, garlic salt, kale, corn and green onions, and let simmer over medium heat until kale is wilted and the corn is cooked through.
  4. Add the cooked spicy pork mixture and stir together, simmering for a few more minutes until the flavors are blended through the soup.
  5. Serve the Udon noodle soup immediately and garnish with additional sliced green onions and a pat of butter until melted, for garnish.
https://www.theartfulgourmet.com/2017/12/spicy-pork-kale-udon-noodle-soup/

Spicy Pork + Kale Mushroom Udon Noodle Soup

You can also try their other flavors in chicken and original flavor – check out their website and social media pages for more info on their products. You can purchase JSL Foods products at the following stores: Hannaford’s, Price Rite, and Shop Rite.

Website: http://www.jslfoods.com/

Facebook: https://www.facebook.com/JSLFoods/

Twitter: https://twitter.com/JSL_Foods 

Spicy Pork + Kale Mushroom Udon Noodle Soup

How. Good. Does. This. Look?

Spicy Pork and Kale Mushroom Udon Noodle Soup

Perfect Winter Soup for a chilly day. Enjoy!

——-

Disclosure: This is a sponsored post and I received products from the client to develop and test a recipe and create photos and copy for the post. All recipes, images, copy and opinions are my own. Do feel free to share this post, but please make sure to link back to this page and give credit to me as “Kristen Hess/The Artful Gourmet” for any photos, recipes and copy shared online.  

Kung Pao Beef w/ Cauliflower Rice (Sugar + Gluten Free)

Kung Pao Beef

Kung Pao Beef w/ Cauliflower Rice

I recently was approached by Steviva to compete in the Sweetin It-Up Blogger Recipe Challenge and decided to make a sugar free, gluten free Kung Pao Beef with Cauliflower Rice. I love Asian food, but oftentimes it has many hidden sugars in the sauce, so I thought it would be cool to make this savory dish for the challenge.

Steviva Recipe Ingredients

Steviva has a wide range of stevia-based products and I chose to use Nectevia and Erysweet for my recipe to replace the normal sugar in the sauce. Erysweet is a pure, non-GMO erythritol that is naturally derived and can be substituted cup-for-cup for sugar in recipes. Nectevia is an organic blue agave nectar infused with premium 100% pure stevia extract – and has only 1/4 the calories, carbs and sugars of regular agave, or table sugar with a warm honey flavor.

Kung Pao Beef w/ Cauliflower Rice

Kung Pao is made with chicken or beef marinated in soy sauce, sesame oil, and rice wine, which is then sautéed in a wok on high heat with crunchy bell peppers, water chestnuts, garlic, ginger, green onions and hot chilies.

Kung Pao Beef w/ Cauliflower Rice

I made a sweet and spicy sauce made with more soy sauce, rice wine, Chinese black vinegar, chicken broth, Erysweet and Nectevia in the pan with the cooked meat and veggies and tossed in some spicy peanuts, which was thickened into a luscious sweet/spicy/savory pot of yum. To serve, I topped the dish with fresh cilantro and more crunchy peanuts along with some yellow cauliflower rice sautéed with soy sauce and sesame oil and some fresh cilantro tossed in to keep it gluten free.  Absolutely delicious without all the sugar and carbs!

Kung Pao Beef w/ Cauliflower Rice (Sugar + Gluten Free)

Prep Time: 20 minutes

Cook Time: 20 minutes

Total Time: 40 minutes

Yield: 4-6

Serving Size: 1 cup

Ingredients

  • MARINADE:
  • 1 3/4 pounds boneless beef sirloin
  • 1 tablespoon soy sauce
  • 2 tablespoons sesame oil
  • 1 tablespoon rice wine
  • 1 egg white, lightly beaten
  • 1/2 teaspoon kosher salt
  • 1/2 teaspoon freshly ground black pepper
  • KUNG PAO:
  • 2 tablespoons peanut oil
  • 4-6 dried red chilies
  • 1 tablespoon garlic, minced
  • 1/2 tablespoon ginger, grated (or ginger paste)
  • 1 teaspoon red chile flakes
  • 3 scallions, sliced on the bias, 1/2-inch pieces
  • 1/2 red bell pepper, sliced into strips
  • 1 can water chestnuts, sliced in half
  • 2 tablespoons soy sauce
  • 3 tablespoons rice wine
  • 1 tablespoon Chinese black vinegar (or balsamic)
  • 2 tablespoons Nectevia Original
  • 2 teaspoons Erysweet
  • 1 cup chicken broth
  • 1 tablespoon cornstarch mixed with 2 tablespoons water
  • 3/4 cup roasted spicy peanuts
  • 1/4 cup cilantro, chopped
  • Cauliflower rice sautéed with soy sauce, sesame oil and cilantro

Instructions

  1. MARINADE:
  2. Trim the fat from the steak all over and cut into 1-inch cubes. Combine the marinade ingredients in a large bowl and mix in the beef. Stir together to coat well, and place covered in the fridge for at least an hour to overnight.
  3. KUNG PAO:
  4. Heat the peanut oil in a wok or large sauce pan over medium heat, add chilies and cook for a minute until they begin to brown. Add garlic, ginger and cook for another minute. Turn heat up to high and add scallions, peppers, water chestnuts and chile flakes; saute for about 5 minutes until they begin to get soft and lightly browned. Add steak (remove from marinade and discard excess) and cook for about 3 minutes or so until beef begins to brown. Add soy sauce, rice wine, Chinese vinegar, Erysweet, Nectevia and chicken broth. Mix in the cornstarch, stirring well, to thicken the sauce. Toss in the roasted peanuts and serve over cauliflower rice with chopped cilantro, additional peanuts if desired.
https://www.theartfulgourmet.com/2017/10/kung-pao-beef-w-cauliflower-rice-sugar-gluten-free/

Kung Pao Beef w/ Cauliflower Rice

Hope you enjoy making this recipe – please let me know what you think if you made it in the comments below! And feel free to share this post on social media tagging #theartfulgourmet and #steviva with a link back to the original post on this blog.

For more info on Steviva products, check them out online and social media:

Website: https://www.steviva.com/

Facebook: https://www.facebook.com/steviva

Twitter: https://twitter.com/steviva

Instagram: https://www.instagram.com/stevivabrands/

Pinterest: https://www.pinterest.com/stevivabrands/

Disclaimer: This was a sponsored post by Steviva Brands and I received products to create recipes and photos for this post. All opinions, images, and text are my own. 

Spicy Thai Chicken Peanut Noodles

Spicy Thai Chicken Peanut Noodles

I don’t know about you, but Thai food is one of my favorite foods ever. I love the harmony of flavors and textures in Thai food that all play together like a perfect symphony. One of my all time favorites is Thai Peanut Noodles – similar to Pad Thai, but with a smooth peanut sauce with a hint of heat. I decided to kick it up a notch by adding some Spicy Thai Chicken that pairs perfectly with the creamy peanut-y noodles.

This dish is a gorgeous combination of spicy, savory and sweet with a marinade base for the chicken made with sesame, honey, soy sauce, garlic, and chile sauce, mixed with acidic notes of rice vinegar. It’s the perfect marriage of varying textures from the chewy noodles, crunchy peanuts and water chestnuts, all bathed in a smooth and luscious damn-good-peanut-sauce. Then to perfect it even more, it’s topped with fresh bright flavors of cilantro, lime and scallions. It’s so good, it just might be illegal. And don’t be ashamed to dig in right out of the pan. Grab some chopsticks, a pal or two and go to town. It’s rustic Asian comfort food at its best. Serve with a sweeter wine such as a Riesling, which pairs nicely with the spicy Asian flavors in this dish.

Spicy Thai Chicken Peanut Noodles

Prep Time: 30 minutes

Cook Time: 20 minutes

Total Time: 50 minutes

Yield: 6-8

Ingredients

  • Spicy Chicken Marinade:
  • 2 tablespoons sesame oil
  • 6 tablespoons soy sauce
  • 2 tablespoons Rice Vinegar
  • 1 tablespoon Sriracha hot sauce
  • 1 tablespoon Thai Garlic-Chile Sauce
  • 1 tablespoon minced garlic
  • 2 tablespoons honey
  • 1 teaspoon sesame seeds
  • 1 teaspoon white pepper
  • 1/2 teaspoon dried ginger
  • Thai Peanut Sauce:
  • 2 teaspoons soy sauce
  • 1 cup peanut butter
  • 2 cups chicken broth
  • 2 tablespoons Thai Garlic-Chile Sauce
  • 1 teaspoon honey
  • 1 teaspoon salt
  • Squeeze of fresh lime juice
  • Chopped peanuts, for garnish
  • Fresh squeezed lime, for garnish
  • Chopped Cilantro, for garnish
  • Sliced scallions, for garnish
  • Canola oil cooking spray
  • 2 pounds chicken breast cutlets, sliced into thin strips
  • 1 can water chestnuts, diced
  • 1 package Thai Rice Noodles (flat, wide or Pad Thai)

Instructions

  1. Prepare Spicy Chicken Marinade:
  2. In a large mixing bowl, add all nine ingredients (sesame oil through dried ginger) along with sliced chicken breast and mix together thoroughly, coating chicken well. Top with plastic wrap and let chicken marinade in the refrigerator for at least 30 minutes up to 2 hours.
  3. Once chicken is done marinating, bring a large pot of salted water to a boil and cook Thai noodles according to package directions, drain and rinse in cold water to stop cooking. Set aside.
  4. Meanwhile, heat a large saute pan over medium heat, spray with cooking spray and saute chicken for approximately 8 minutes until cooked through and no longer pink. Add diced water chestnuts and saute for another minute or two until soft and heated through. Note: Make sure to drain and discard extra marinade off the chicken before sauteing to allow the chicken to brown in the pan and not steam. Reduce heat to low, cover and keep warm.
  5. Make the peanut sauce: combine soy sauce, peanut butter, broth, garlic-chile sauce, honey, salt and lime juice in a medium saucepan over medium heat, mixing and stirring well until sauce is smooth and blended. Toss noodles together with peanut sauce.
  6. Add the peanut noodles into the large pan with the cooked chicken and water chestnuts, toss together well with tongs to blend the flavors and ingredients. Squeeze fresh lime juice over the top, and garnish with chopped peanuts, cilantro, and sliced scallions. Add additional red pepper flakes or garlic-chile sauce for extra heat, as desired.

Notes

A sweet German Riesling wine would pair well with the spicy acidic flavors in this Asian dish.

https://www.theartfulgourmet.com/2014/03/spicy-thai-chicken-peanut-noodles/

Spicy Thai Chicken Peanut Noodles4

Spicy Thai Chicken Peanut Noodles 3

Spicy Thai Chicken Peanut Noodles 2

Citrus Honey Soy Chicken with Toasted Almond Farro

Citrus Honey Soy Chicken with Toasted Almond Farro

Tuscan Fields, provider of organic, Italian farro, is offering a scholarship to this spring’s Eat Write Retreat food bloggers conference in Philadelphia. They sent some of their delicious samples to me to create a farro recipe for a chance to win a scholarship to the conference this year!

If farro is new to you, you’ll love discovering this ancient grain made of 100% organic semi-pearled farro. It has a mellow, nutty taste, a pleasing “al dente” texture when cooked, and offers loads of nutrients in each bite. Plus, it’s versatile enough to elevate side dishes, salads, soups and main courses to culinary excellence. You can use farro in place of white or brown rice, couscous or pasta and pair it with roasted vegetables, meats and poultry or make a fresh spring salad with farro as your whole grain base, layered with vegetables, fruit or fresh herbs tossed in a vinaigrette dressing.

I decided to create a recipe for Citrus Honey Soy Chicken with Toasted Almond Farro – made with stir-fried chicken marinated in honey, soy sauce, orange juice, garlic, sriracha hot sauce, ponzu sauce, white pepper, black and white sesame seeds, and water chestnuts topped with green onion, fresh orange slices and toasted almonds over a bed of cooked farro. The sauce has a sweet and tangy zing that pairs great with the nutty farro and toasted crunchy almonds. The fresh orange slices give it a fresh and healthy twist.

I am lovin’ this grain – and plan to come up with some other cool recipes to make with it!

Learn more about Tuscan Fields Farro

Learn more about Eat Write Retreat food bloggers conference

Citrus Honey Chicken with Toasted Almond Farro

Prep Time: 30 minutes

Cook Time: 30 minutes

Total Time: 1 hour

Yield: 4

Ingredients

  • CITRUS HONEY CHICKEN
  • 1/4 cup organic wildflower honey
  • freshly squeezed juice from half of a large navel orange (about 1/4 cup)
  • 1 tablespoon soy sauce
  • 1 tablespoon citrus Ponzu sauce
  • 1 tablespoon Sriracha (asian hot sauce)
  • 1/2 tablespoon grated fresh ginger
  • 1 teaspoon sesame oil
  • 3 garlic cloves, minced
  • 1 tablespoon black and white sesame seeds
  • White pepper, freshly ground, to taste
  • 1 tablespoon canola oil
  • 1 can water chestnuts, diced
  • 4-5 boneless, skinless chicken thighs, cut into medium-size chunks
  • TOASTED ALMOND FARRO
  • 1 box Tuscan Fields Organic Farro Perlato
  • 1 orange, peeled and sectioned
  • 1/2 cup almonds, toasted
  • 2 green onion, sliced for garnish

Instructions

  1. CITRUS HONEY CHICKEN WITH TOASTED ALMOND FARRO
  2. To make the Citrus Honey marinade, add the first ten ingredients into a large mixing bowl and stir together well.
  3. Add the chicken pieces, stirring to coat, then cover with plastic wrap and let marinate in the refrigerator for up to one hour.
  4. Meanwhile, rinse farro in a colander under cold water and then cook in salted boiling water for approximately 20 minutes, drain and set aside.
  5. Toast almonds in a saute pan over medium heat for about 5-7 minutes until lightly browned.
  6. Peel and section oranges and slice the green onions.
  7. Once chicken is done marinating, heat 1 tablespoon of oil in a large saute pan or wok over medium-high heat.
  8. Add the water chestnuts and saute for a few minutes.
  9. Remove chicken pieces from marinade, shaking off extra sauce and set marinade aside (do not discard).
  10. Add chicken to the saute pan and cook for approximately 8-10 minutes until chicken is no longer pink and starts to brown.
  11. Pour the reserved marinade into the pan with the chicken and water chestnuts and stir thoroughly, cook for another few minutes on medium-low heat to let the sauce thicken a little bit.
  12. To serve, make a bed of farro on to each dinner plate. Top with the chicken and water chestnut sauce mixture.
  13. Garnish with toasted almonds, sliced green onions, fresh orange slices, and additional white pepper to taste.
https://www.theartfulgourmet.com/2013/04/citrus-honey-soy-chicken-with-toasted-almond-farro/

Citrus Honey Soy Chicken with Toasted Almond Farro

All photographs, copy and content on this website are copyrighted © 2010-2013 by Kristen Hess/The Artful Gourmet. Please do not use, share or distribute without expressed permission from me first. Thanks!

Chinese New Year Potluck :: Kung Pao Chicken Recipe

Chinese Potluck Event

In spirit of the Chinese New Year, I attended a Chinese Potluck party with a group of NYC food bloggers hosted by Tiger Beer, Jackie of The Diva that Ate NY and Ken of Hungry Rabbit NYC. We were all asked to make our favorite Chinese dish to share with the group for the party and I decided to make my all-time favorite, Kung Pao Chicken. This is a semi-spicy Chinese dish made with soy and rice vinegar marinated chicken, chile sauce, garlic, water chestnuts, green onions, and peanuts, served over white or fried rice. You can adjust the heat by adjusting the amount of chile sauce, and if you prefer a spicier dish just add a little Sriracha and red pepper flakes to give it a kick.

Gold Dusted Cookies
Gold Dusted Cookies

Thanks to Jackie and Ken for a great time and to Tiger Beer for sponsoring a great party full of amazing Chinese food and fellow New York foodies!

Click here to see a slideshow of all the food and the festivities at the party!

Kung Pao Chicken

Kung Pao Chicken
Kung Pao Chicken

1 lb skinless, boneless chicken breasts, cut in to chunks
1 lb skinless, boneless chicken thighs, cut into chunks
4 tbsp rice wine vinegar
4 tbsp soy sauce
4 tbsp sesame oil
4 tbsp cornstarch, dissolved in equal part water
fresh ground black or white pepper to taste
2 1/2 tbsp hot chile paste
1 tsp dried red pepper flakes (omit if you like less spicy)
1/2 tbsp Sriracha sauce  (omit if you like less spicy)
2 tsp white wine vinegar
4 tsp brown sugar
6-8 green onions, sliced
2 tbsp garlic, chopped (approx 2 garlic cloves)
2 (8 oz) cans water chestnuts, diced
2/3 cup dry roasted peanuts
garnishes: green onion, peanuts, sesame seeds, red pepper chile flakes

Soy-Chile Sauce & Marinade

Marinade and Soy-Chile Sauce: 

Marinade: Combine 2 tbsp wine, 2 tbsp soy sauce, 2 tbsp sesame oil, and 2 tbsp cornstarch/water slurry, a sprinkling of white or black pepper and mix together in a large mixing bowl. Add chicken and cover with plastic wrap and refrigerate for up to 30 minutes.

Soy-Chile Sauce: combine additional 2 tbsp wine, 2 tbsp soy sauce, 2 tbsp sesame oil, and 2 tbsp cornstarch/water slurry in a separate mixing bowl, and add chile paste, vinegar, brown sugar and mix well with a whisk to combine.

Ingredients
Ingredients

Meanwhile, preheat a wok or large saute pan over medium heat. Chop green onions, garlic, water chestnuts and peanuts and mix together with the soy chile sauce marinade. Pour the sauce and vegetables and peanuts into the wok/saute pan and cook approximately 5-7 minutes until sauce becomes aromatic and vegetables are slightly browned. Remove sauce and veggies from the pan and set aside.

Kung Pao Chx
Saute chicken and veggies in Soy-Chile sauce

Remove the chicken from the fridge and with a slotted spoon add to the large skillet and saute approximately 8-10 minutes until chicken is browned. Add the sauce and vegetables back to the pan and simmer over medium-low another 5-7 minutes until sauce is thickened. Serve hot over white or fried rice and garnish with sliced green onions, sesame seeds, red pepper flakes (optional) and peanuts.

Chinese Treats
Chinese Treats
Fortune Cookie
Fortune Cookie

Asian Five Spice Sesame Beef and Sugar Snap Peas

beef-sugar-snap-pea-stir-fry


beef-sugar-snap-pea-stir-fry

I love Chinese food. Especially when it’s raining outside and there’s nothing else to do but cozy up under the covers and watch a movie or two like I did last weekend. I was craving some stir fry that day but instead of ordering the usual from my favorite place on 3rd Avenue, I decided to whip up my own dish with some steak, sugar snap peas, water chestnuts and scallions that I had on hand. I thought I would spice it up a little bit with a 5-spice powder I found in my pantry that I have to admit, have never used.

5-spice powder has a slightly sweet and spicy flavor to it that should be used very sparingly, as it is quite potent! It’s a mixture of cinnamon, anise, fennel, ginger, clove and licorice root and the smell actually reminds me of those little German holiday cookies flavored with anise and covered in powdered sugar that my Mom is obsessed with. You really only need a sprinkle of it in the steak marinade so it doesn’t overwhelm the stir fry dish with its intense flavoring. You might even want to try 5-spice on duck, spare ribs or pork as it complements these meats quite well when prepared as an Asian Barbecued Char Siu dish.

Super easy to make and super tasty to eat.. it definitely hit the spot for my lazy, rainy Sunday when I would have rather ordered an egg roll and some Won Ton soup and analyzed my fortune or learned a new word in Chinese. And yes, the leftovers tasted even better the next day.

Ingredients

1 lb. Angus Steak, sliced thin
1/4 c. Soy Sauce
1 1/2 tbsp Rice Vinegar
1 tbsp Brown Sugar
1 tbsp Cornstarch
1/2 tbsp Sesame Seeds
1/2 tsp Five Spice Powder
1 can of water chestnuts, diced
4-6 oz. Sugar Snap Peas, Ends Trimmed
3 Scallions, sliced
1 1/2 tbsp Sesame Oil
Crushed Red Pepper
Brown or White Rice, cooked

Preparation

Mix together the soy sauce, vinegar, brown sugar, cornstarch, sesame seeds and five spice powder in a large mixing bowl. Add the sliced steak and let marinate at room temperature for at least 30 minutes up to an hour.

Heat one tablespoon of oil in a heavy cast iron or nonstick skillet or wok over high heat. Add sugar snap peas and cook, stirring often for about 1 minute. Remove peas and set aside. Add water chestnuts and cook for another few minutes and remove from pan, adding to reserved sugar snap peas.

Add the additional 1/2 tablespoon of oil to the pan and allow pan to heat up again to high. Add half of the steak and scallions, reserving marinade in bowl, and cook for about 1 minute (don’t stir to allow a nice golden browning of the steak). Turn the meat over and cook for about another 30 seconds (don’t overcook as you don’t want the steak to get tough). Remove steak and scallions from the pan and reserve on a plate to the side.

Let the pan heat to high again, and then add the rest of the uncooked steak and scallions. Cook for another minute and turn steak over, adding the first batch of steak and scallions, sugar snap peas, water chestnuts, and reserved marinade to the pan. Stir everything together over high heat for about 30 seconds, then turn off the heat. Let sit in the pan for another minute so the sauce has a chance to thicken a little.

Serve the stir fry mixture over the rice, sprinkling some crushed red pepper and additional sesame seeds for garnish.

Serves 4.

Other Stir Fry recipes you may enjoy:
Spicy Beef Stir Fry
Stir-fried Beef with Broccoli and Ginger
Ginger Beef Stir Fry

Hawaiian Chicken with Grilled Pineapple Salsa :: Frozen Watermelon Martinis

hawaiian chicken

hawaiian chicken

Grilling with fruit is an easy and staple technique in the summertime – it gives fresh flavor to ordinary BBQ dishes and is a healthy compliment to whatever it is your grilling. This recipe is a Spicy Hawaiian Chicken with a Grilled Pineapple Salsa, made of cilantro, jalapeno pepper and onion (if you prefer a less spicy dish, substitute a red bell pepper instead of the jalapeno). The BBQ sauce is spicy and sweet made with honey, garlic, hot sauce, ketchup and soy sauce (you can also make less spicy by adding more ketchup and soy and honey in place of the hot sauces). The dish is rounded out by a side of rice, perfect mixed in with the pineapple jalapeno salsa and grilled chicken. Top it off with a refreshing frozen watermelon martini (recipe following) – made with vodka, fresh juicy watermelon, crushed ice and some cosmopolitan martini mix…now that’s a sweet and savory dinner perfect for a summer night. Enjoy!

Hawaiian Chicken with Grilled Pineapple Salsa :: Frozen Watermelon Martinis

Prep Time: 15 minutes

Cook Time: 15 minutes

Total Time: 30 minutes

Yield: Serves 4.

Serving Size: 1 chicken breast / 1 martini

Grilling with fruit is an easy and staple technique in the summertime - it gives fresh flavor to ordinary BBQ dishes and is a healthy compliment to whatever it is your grilling. This recipe is a Spicy Hawaiian Chicken with a Grilled Pineapple Salsa, made of cilantro, jalapeno pepper and onion (if you prefer a less spicy dish, substitute a red bell pepper instead of the jalapeno). The BBQ sauce is spicy and sweet made with honey, garlic, hot sauce, ketchup and soy sauce (you can also make less spicy by adding more ketchup and soy and honey in place of the hot sauces). The dish is rounded out by a side of rice, perfect mixed in with the pineapple jalapeno salsa and grilled chicken. Top it off with a refreshing frozen watermelon martini (recipe following) - made with vodka, fresh juicy watermelon, crushed ice and some cosmopolitan martini mix...now that's a sweet and savory dinner perfect for a summer night. Enjoy!

Ingredients

  • Ingredients
  • 1/4 c pineapple juice
  • 3 tbsp ketchup
  • 2 tbsp soy sauce
  • 2 tbsp Country Sweet sauce
  • 1 tbsp Chili Garlic sauce
  • 1/2 tbsp Cholula hot pepper sauce
  • Fresh ground pepper
  • 4 chicken breasts (skinless, boneless, preferably organic for plumper breasts)
  • Cooking spray
  • 4 pineapple slices for grilling, then diced
  • 1 bunch cilantro, chopped
  • 1/2 red onion, diced
  • 1 small jalapeno pepper, seeded and deveined, chopped (or 1/2 red bell pepper)
  • 2 cups cooked rice (white or yellow)

Instructions

  1. Combine the first seven ingredients to make the BBQ marinade and add the chicken breasts, storing in a Ziplock bag or covered baking dish, reserving some of the marinade for basting. Let marinate for 1-2 hours in the refrigerator.
  2. Prepare the rice per package instructions, keep warm and fluff with a fork when ready to serve.
  3. To prep the grilled pineapple salsa, chop the jalapeno pepper, red onion and cilantro into a medium dice, mix together and set aside to add grilled pineapple for serving.
  4. Heat the grill or grill pan over medium-high heat (spray the grates or pan with cooking spray just before grilling). Grill chicken breasts about 6-7 minutes per side, basting with the reserved marinade a few times on each side until the chicken gets a nice golden brown color and grill marks. Grill the pineapple slices about 1 minute until browned and chop into medium diced pieces. Mix pineapple chunks into the jalapeno, onion and cilantro mixture, and serve with the chicken and rice. Garnish with some extra cilantro leaves and salt and pepper to taste.
https://www.theartfulgourmet.com/2011/07/hawaiian-chicken-with-grilled-pineapple-salsa-frozen-watermelon-martinis/

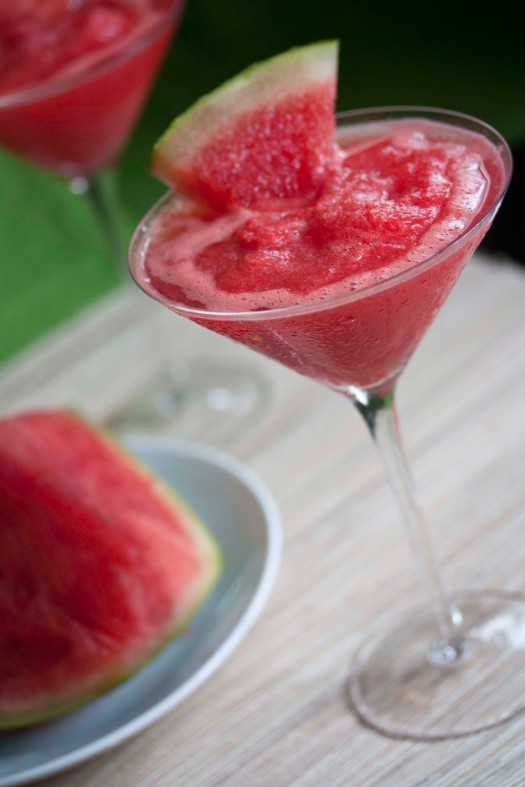
Frozen Watermelon Martini

Frozen Watermelon Martinis:
4 shots vodka
4 cups ice
2 cups fresh watermelon
1 cup cosmopolitan martini mix

Mix all ingredients together in a blender and serve in martini glasses with fresh watermelon wedges for garnish.

Makes 4 cocktails.