It’s that time of year again – Halloween! My favorite holiday of all times. I love the crisp Fall air, the falling colored leaves, pumpkins, apples, fresh cider and glazed doughnuts from the cider mill and the crazy fun goblins, ghost, monsters and whacky costumes creeping around the city at the annual Halloween parade in Greenwich Village in NYC.
Here are some fun Halloween cocktails you can make to celebrate the season, from top mixologists at some of NYC’s best restaurants including Courvoisier, JIMMY at The James, David Burke Kitchen, Bagatelle & more. It’s a selection of great drinks with a little something for any costume party!
Beetle Juice
Beetle Juice
Ingredients:
1.50 parts Courvoisier Rosé
.50 parts DeKuyper Crème de Cassis
Orange Juice Directions:
Build cocktail in an ice filled highball glass. Garnish with a lime squeeze.
Graveyard Gruel
Graveyard Gruel
Ingredients:
1.25 parts Courvoisier VSOP
.75 parts DeKuyper Rootbeer Schnapps
1 part Pineapple Juice Directions:
Shake all ingredients with ice and strain into a chilled cocktail glass. Garnish with a cherry.
Bloody Punch
Bloody Punch
Ingredients:
1.25 parts Courvoisier Rosé
.75 parts DeKuyper Red Apple
1.50 parts Fresh Lemon Sour
1.50 parts Pineapple Juice
2 dashes Angostura Bitters Directions:
Build cocktail in an ice filled highball glass. Garnish with a pineapple wedge on the rim.
Pumpkin Head
Pumpkin Head
Served at JIMMY at The James NY
Ingredients:
1 oz Tito’s vodka
1 oz Drambuie liquor
1/2 oz Lime Juice
1 oz Orange Juice
Bar spoon of Pumpkin Puree
Directions:
Shake with ice, strain into a tall glass
Add ice and stir in hard cider
Garnish with a thyme sprig
Bobbing for Apples
Bobbing for Caramel Apples
Served at David Burke Kitchen
Ingredients:
1.5 oz Stoli Salted Caramel vodka
.75 oz Stirrings Apple Pucker
Directions:
Freeze apple cubes- use as ice
Pour vodka and Apple Pucker over “apple ice”
Top with apple cider
Calico Jack – Bagatelle
Calico Jack
Served at Bagatelle
Ingredients:
50ml Bourbon whiskey aged with figs
10ml Capim Santo (Brazilian ingredient similar to lemongrass) infused with lemon
15ml of tonic citrus
Directions:
Pour ingredients in highball glass and serve on skull-shaped ice
Today is one of those dreary Fall days where it’s cold and rainy and I’m in need of a little pick me up from some classic comfort food. One that involves BACON. And CHEESE. And PASTA. And all those yummy yums that aren’t that good for you. I was looking through some of my family recipes and this one came up that looked perfect for the mood I’m in today. It’s a sinfully good baked Pierogi casserole that my family used to make around the holidays – I remember sitting around the table with my family devouring this tasty dish with absolutely no shame. It’s not fancy. It’s easy to make. Has layers of flavor from the crispy bacon, earthy mushrooms, creamy sauce and tangy sauerkraut. And it’s so darn GOOD.
Traditional Pierogies are like Polish or Ukrainian Ravioli, made with fresh made dough that is filled with potatoes and cheese, meat or sauerkraut, and usually boiled or sauteed in butter with golden brown fried onions. This recipe takes the main ingredients of Pierogi (butter, mushrooms, sauerkraut, bacon, fried onions, pasta and cheese) and blends them together into a bubbling baked one-pot dish of goodness you’re gonna die for. It’s the ultimate comfort food perfect for a chilly dreary day that will keep you coming back for more…trust me.
1 lb. spiral pasta or Girelle (little spiral tops)
6-8 strips bacon, fried and crumbled
1 large sweet onion (Vidalia), chopped
1 stick (8 ounces) butter, divided
4 oz. fresh mushrooms, chopped
1-14 ounce package sauerkraut, rinsed well
2 cans Cream of Mushroom soup
1 cup 2% milk
1 cup shredded Cheddar cheese
Fresh ground pepper, to taste
Instructions
Preheat oven to 375 degrees.
Boil pasta 7-9 minutes and drain, set aside.
In a large saute pan, fry bacon over medium heat about 6-8 minutes until crispy, drain and crumble, set aside.
Sauté onions in same saute pan with 1/2 stick of butter for another 7-8 minutes until soft and translucent. Remove from pan and set aside.
Add the other 1/2 stick of butter and and sauté mushrooms about 8 minutes until tender.
Stir all ingredients together in large mixing bowl, adding soup and 2% milk, sauerkraut, sautéed onions and mushrooms, shredded cheese, and fresh ground pepper to taste.
Pour mixture over cooked pasta into a greased rectangle casserole dish, mix thoroughly and cover with foil.
Bake at 375 degrees for 45 mins.
Remove foil and turn up oven to 500 degrees, bake for another 5-10 minutes until top gets golden brown.
Pizza is probably one of my most favorite things on the planet. Seriously. Who can resist that crispy crunchy crust topped with melted gooey cheese and fresh, savory baked toppings? A pizza is a creative endeavor that is only limited to your imagination. The pizza dough is like a blank canvas just waiting for the artist to paint a masterpiece on.
Speaking of dough, you can certainly take a stab at making your own – here is a basic pizza dough recipe that’s easy enough to make. If you don’t want to bother making your own and want to save time, you can use pre-made refrigerated pizza dough from the grocery store (I get mine from Fairway stores, or you can try Pillsbury pizza dough which is inexpensive and easy to use. They even have Artisan, thin and gluten-free crusts now which is kinda cool.)
I made these rustic pizzas the other day in an attempt to use up some fresh veggies, pizza dough and ingredients from my kids cooking show I taped last week – we made all kinds of fun pizza on set but i couldn’t bear to waste the leftovers!
So here’s how easy these babies are to make…I divided the pizza dough and patted out the dough on to pizza pans to make four rustic pizzas – one of them topped with sauteed garlic, spinach, olive oil, savory chicken, sun dried tomatoes and plenty of mozzarella gooey cheese. The other one I made with sauteed bell peppers in different colors, broccoli, pepperoni, ham, tomato sauce and two gooey cheeses – mozzarella and muenster, great for melting. The trick to a great pizza in my experience is to saute your veggies in some olive oil and garlic BEFORE you put them on the pizza (the chicken too!). This gives them a deeper flavor and keeps them from drying out in the oven when you bake the pizzas. Throw them in a preheated oven on 400 degrees for about 15-17 minutes, let them cool on a baking rack for about 5 minutes, and then top them with some fresh torn basil, some extra parmesan cheese and pepper flakes and you’ve got some serious deliciousness going on.
Chicken, Spinach, Garlic and Sundried Tomato Pizza
Prep Time: 15 minutes
Cook Time: 15 minutes
Total Time: 30 minutes
Yield: 2-4
This is a tasty and healthy pizza made with sauteed garlic and spinach, red pepper flakes, sauteed chicken breast, sundried tomatoes and Parmesan and Mozzarella cheese.
Ingredients
1 package refrigerated pizza dough (or handmade)
4 tablespoons extra virgin olive oil, divided
1/2 cup shredded Parmesan cheese
1 tablespoon garlic, minced
1 teaspoon red pepper flakes
1/2 package fresh spinach, chopped
6-8 thin chicken cutlets, cut into 1" chunks
1 tablespoon seasoned salt or poultry seasoning
Fresh ground black pepper, to taste
1/4 cup sundried tomatoes, julienned (thin strips)
1 cup shredded Mozzarella cheese
Instructions
Preheat oven to 400 degrees.
Divide pizza dough in half and shape into two oval or rectangular pizzas on a greased pizza pan.
Drizzle 1 tablespoon of olive oil and 1/4 cup of Parmesan cheese on to the base of each pizza dough.
Heat an additional tablespoon of olive oil over medium heat in a large saute pan and saute minced garlic and red pepper flakes for about a minute.
Add chopped spinach and stir. Saute together for another 3-4 minutes until spinach starts to wilt.
Remove spinach garlic mixture from pan and set aside in a mixing bowl.
Heat additional 2 tablespoons olive oil in the same pan, add seasonings and saute the chicken for approximately 8 minutes until golden brown. Remove pan from heat.
Top pizza crusts with spinach-pepper-garlic mixture, sundried tomatoes and sauteed chicken (divided into equal portions for both pizzas).
Top both pizzas with shredded mozzarella cheese and place pizza pan in oven.
Bake for 15-17 minutes until cheese starts to get bubbly and golden brown.
This is a healthy and hearty version of classic pizza made with sauteed garlic, bell peppers and broccoli with diced ham and pepperoni topped with gooey mozzarella and muenster cheese.
Ingredients
1 package refrigerated pizza dough (or handmade)
2 tablespoons extra virgin olive oil, divided
1 tablespoon garlic, minced
1/4 cup red bell pepper, diced
1/4 cup orange bell pepper, diced
1/4 cup yellow pepper, diced
1/4 cup green bell pepper, diced
1/2 cup broccoli florets, chopped
Sea salt and pepper to taste
1 cup tomato sauce or puree
2 tablespoons tomato paste
1 teaspoon Italian seasoning
1 teaspoon garlic salt
1/4 cup pepperoni, chopped
1/4 cup ham, chopped
1 cup shredded Mozzarella cheese
1/2 cup Muenster cheese, torn into pieces
1 tablespoon garlic salt
Instructions
Preheat oven to 400 degrees.
Divide pizza dough in half and shape into two oval or rectangular pizzas on a greased pizza pan.
Heat olive oil over medium heat in a large saute pan and saute minced garlic for about a minute.
Add diced bell peppers, chopped broccoli, salt and pepper and stir. Saute together for 5-7 minutes until vegetables get tender and soft.
Remove pan from heat.
In a small mixing bowl, mix together tomato sauce, tomato paste, Italian seasoning and garlic salt to make tomato sauce for pizzas.
Top pizza crusts with tomato sauce, pepperoni, ham and sauteed vegetables (divided into equal portions for both pizzas).
Top both pizzas with shredded mozzarella and muenster cheeses, sprinkle with garlic salt and place pizza pan in oven.
Bake for 15-17 minutes until cheese starts to get bubbly and golden brown.
Channels: Time Warner 34/ Cablevision 67/ RCN 82/ Verizon 42 and the Internet: Channel 1
BCAT TV Network cablecasts in all five boroughs of NYC on Verizon FIOS cable.
This is a quick and healthy weeknight dish I whipped up the other day with some fresh ingredients I had on hand in the fridge. It’s got some savory and slightly spicy sauteed chicken made with olive oil, garlic and cajun seasonings (I use Tony Chacere’s Creole seasoning which is awesome). I also added a secret ingredient that I absolutely love which gives it a boost of flavor – Sazon seasoning – a type of seasoned salt found in Spanish and Latin markets (you can also find it online or in the international food section of your grocery store.) The seasoning is used on meats, fish, poultry and to add savory flavor to soups and stews. Typical ingredients include coriander, cumin, paprika, cilantro, achiote, garlic, salt. Try the Sazon by Goya Foods or you can make your own seasoning following this recipe.
Now back to my recipe. I cut up some red, yellow and green peppers and broccoli, (you could also add some corn, peas and carrots into the mix if you like), which I then sauteed with minced garlic and olive oil and tossed into the chicken and garlic mixture, served over cooked rice. For leftovers, I heated up some more garlic infused oil back in the pan and reheated the rice, then added the chicken and veggies into the pan and stirred it all together to mix all the savory flavors together into one big yummy rice bowl. It’s healthy, full of flavor and color and has a little kick to it too. Who said cooking tasty food had to be difficult? This dish absolutely ROCKS. x
This is a quick and easy and healthy weeknight dish made with sauteed chicken and veggies with Cajun seasonings served over cooked rice.
Ingredients
For the sauteed veggies:
2 tablespoons olive oil
2 cloves garlic, minced
1 small red pepper, diced
1 small yellow pepper, diced
1 small green pepper, diced
1/2 cup broccoli florets, chopped
1 teaspoon garlic salt
For the sauteed chicken:
2 tablespoons garlic-infused olive oil
2 lbs thin chicken cutlets, cut into strips or chunks
1 tablespoon Cajun seasoning
1/2 packet Sazon season
fresh ground black pepper, to taste
White or saffron/yellow cooked rice, for serving
extra red yellow and green diced peppers for garnish
Instructions
Cook the white or yellow rice in a large pot of boiling water according to package directions and drain, set aside.
Heat oil in a large saute pan over medium and add minced garlic, cook for 1 minute.
Raise heat to medium high and add bell peppers, broccoli and garlic salt; saute for about 5-7 minutes until soft. Remove from heat and set aside in a mixing bowl.
Add an additional 2 tablespoons of garlic-infused olive oil and heat in same saute pan for another minute.
Add chicken (make sure to pat dry after rinsing to remove excess water or the chicken will steam instead of saute) to the pan, add Cajun and Sazon seasonings and saute for about 8 minutes until it starts to brown. Sprinkle with some freshly ground black pepper to taste.
Return sauteed veggies to the pan and turn the heat down to medium-low and saute the ingredients together for another few minutes.
Place rice into individual serving bowls and serve chicken and veggie mixture on top of the rice.
Add additional cajun seasoning or salt and pepper to taste. Garnish with additional red, yellow and green diced peppers if you wish (makes it prettier and more colorful!)
Notes
Chef's Note: this tastes better the next day and is awesome if you saute the chicken and veggies in a pan with the rice. Simply add a few tablespoon of oil and start reheating the rice over medium heat and then add the leftover chicken and veggie mixture, stir together and cover with a lid. Let it reheat for about 5 minutes, stirring occasionally and serve. YUM.
On a recent trip up to Rochester, I had the pleasure of discovering a lovely little Italian place called the Mona Lisa Café. My mother and I stopped in there on a whim one afternoon for a cappuccino, but after entering the café and seeing all the delicious pastries and gelato and enticing smells of amazing food, we decided to stay for lunch instead.
We sat at a table by a large window and enjoyed a glass of wine while perusing the menu. At first we thought we would just split an appetizer, but there were just too many tasty choices on the menu to settle for just one item. We opted for a delicious Italian Panini and their amazing Greens and Beans appetizer made with escarole and cannelloni beans sautéed with heaps of garlic, savory Italian sausage, white wine, olive oil and bread crumbs topped with Parmesan cheese. WOW. Best thing I’ve ever tasted! I loved this dish so much I was inspired to recreate it at home, and my own version of Garlicky Greens and Beans with Sausage I now present to you. Delicioso!
2 cups Fingerling potatoes, peeled and cut into quarters or chunks
1 1/4 pound sweet Italian sausage (may use chicken or turkey sausage if you prefer)
4 tablespoons extra-virgin olive oil, divided
6 garlic cloves, sliced or chopped fine
1 teaspoon dried red pepper flakes
1 large bunch of greens (I used collards, but you can use spinach, kale, escarole, or mustard/turnip greens)
1 can white cannellini beans, drained and rinsed
2 1/2 cups chicken broth
1/2 cup water
1 tablespoon dried minced onion
2 tablespoons white wine vinegar
Sea salt and freshly ground pepper, to taste
1/2 cup shredded Parmigiano-Reggiano cheese, plus extra for garnish
Crusty bread or garlic bread, for dipping
Instructions
Rinse and drain potatoes, cut into quarters or chunks, depending on the size.
Bring a large pot of water to a boil and cook potatoes for about 10-12 minutes until tender. Drain and set aside.
At the same time, add 1/2 inch of water to a large saute pan over medium heat. Add sausages to and cover with a lid, simmering for 10 minutes (without turning). Remove the lid, turn sausages over, and cook for another 5 minutes until almost cooked through.
Meanwhile, measure out your liquids and dry seasonings and set aside.
Chop the garlic.
Wash the greens well and drain. Remove and discard the veins and stems, cutting leafy green parts off on either side into 1-inch strips.
Remove sausages from pan and cut into coin-sized chunks. Drain fat from pan and wipe down.
Add 1 tablespoon of oil into the same pan and return to medium heat. Add garlic and red pepper flakes, and saute while stirring often, for about 1 minute being careful not to burn garlic.
Add additional 3 tablespoons of oil and start sauteing greens by the handful until they are just starting to wilt.
Add cannellini beans, sausage, potatoes, broth, water and minced onion; bring ingredients to a boil. Reduce heat, cover and let simmer on low for 10-15 minutes to let the flavors meld.
Remove lid, add 2 tablespoons of white wine vinegar, and let simmer for another 5 minutes or so until the liquid reduces a little (you can simmer it down longer if you like a thicker stew or add more broth/water if you like a thinner stew).
Season with salt and pepper to taste.
Serve the Greens and Beans in large bowls topped with shredded Parmigiano-Reggiano cheese and crusty bread for dipping in the broth.
Delicioso!
Notes
Substitute sweet Italian sausage with chicken or turkey sausage or omit all together and adjust water/broth down to 2 cups if you prefer a vegetarian dish.
Mona Lisa Cafe uses breadcrumbs and white wine in their dish which I omitted in my version because of the starch from the potatoes and adding a splash of white wine vinegar which gives it a nice tangy flavor to the broth. Feel free to experiment by topping it with toasted breadcrumbs and using some wine in place of the water in my recipe, but you'll need to adjust the amount of liquids down if you omit the potatoes from the dish so it's not too watery/brothy. The consistency should be of a nice light stew with a balance between the meat and vegetables and the broth.
Serve with a dry white Italian wine such as Pinot Grigio and crusty bread for dipping up the broth.
Parmesan Garlic Shells with Spinach, Zucchini and Ham
This is a super easy and tasty dish that I whipped up one night with some of the ingredients I had on hand. It’s a light and savory pasta dish made with large shell pasta, sauteed spinach, zucchini and ham with garlic and a creamy parmesan alfredo sauce, with a few sprinkles of red pepper flakes, sea salt and fresh ground pepper. Perfect dish for a weeknight dinner, with some crusty French or Italian bread, a green salad and glass of wine. You can also substitute whole wheat pasta in any shape or size you please. Cooked diced bacon or prosciutto are also delicious in place of the cooked ham. If you want to experiment with the veggies, try broccoli or peas or yellow squash, what ever your heart desires!
Parmesan Garlic Shells with Spinach, Zucchini and Ham
Prep Time: 15 minutes
Cook Time: 30 minutes
Total Time: 45 minutes
Yield: 4-6
Ingredients
1 bag of medium-large shell pasta (fresh or dried)
2 tablespoons olive oil
2 cloves of garlic, minced
1 large zucchini, sliced 1/4 inch thin and halved
1 bag of fresh spinach (leaves), chopped
1-2 teaspoons red pepper flakes
1 cup of cooked Virginia ham, diced (can sub cooked prosciutto or bacon)
Kosher salt and fresh ground pepper, to taste
PARMESAN GARLIC SAUCE:
1 tablespoon butter
1 clove garlic, minced
2 teaspoons flour
Sea salt, to taste
1 cup low-fat milk
2 tablespoons neufchatel or cream cheese
1 cup parmesan cheese
Fresh parsley, chopped for garnish
1 green onion, sliced for garnish
Instructions
Bring a large pot of salted water to a boil, add pasta shells and cook according to package directions until al dente (about 8 minutes dried, 3 minutes fresh). Drain pasta, reserving 1/2 cup of cooking water and set aside.
Add 1 tablespoon of olive oil to a medium-large saute pan and add zucchini. Sprinkle with salt and fresh ground pepper to taste and cook for about 8-10 minutes until zucchini is soft. Add 1 tablespoon of garlic and saute for another minute or so until garlic starts to brown. Remove zucchini-garlic mixture from saute pan and set aside in a medium-large mixing bowl.
Add another tablespoon of olive oil to the saute pan and heat for a minute or so. Add the fresh chopped spinach, salt and pepper to taste, and red pepper flakes, stirring through. Saute spinach about 3-5 minutes until wilted. Add the cooked diced ham and saute another few minutes until browned. Remove spinach and ham from saute pan and add to cooked zucchini in mixing bowl.
To make the Parmesan Garlic Sauce:
Melt the butter in a large skillet over medium heat.
Add the garlic and cook until soft and lightly browned, about 1 minute.
Add in the flour and cook, stirring with a wooden spoon, another minute.
Whisk in the milk, a sprinkle of sea salt and cook, whisking constantly, until just thickened, about 3 minutes.
Add the Neufchatel and parmesan cheese; whisk until melted, about 1 minute.
Combine the cooked pasta shells, 1/2 cup cooking water from pasta, sauteed zucchini, spinach and ham to the alfredo garlic sauce, stir thoroughly to mix ingredients for another minute or so.
Sprinkle additional salt, pepper and red pepper flakes to taste into the pasta mixture. Remove from saute pan and place in a large serving bowl. Top pasta with chopped fresh parsley and green onions, and top with more parmesan cheese to taste.
Serve the pasta with some crusty bread, a green salad and glass of wine.
Notes
You can also substitute whole wheat pasta in any shape or size you please. Cooked diced bacon or prosciutto are also delicious in place of the cooked ham. If you want to experiment with the veggies, try broccoli or peas or yellow squash, what ever your heart desires!
The holidays are here, and what better way to celebrate by throwing a holiday cocktail party with friends and family? I’ve teamed up with Colavita this season to celebrate with all of you, by creating some delicious Holiday Appetizer recipes using their World Selection andPrivate SelectionExtra Virgin Olive Oils and Flavored Cooking Oil blends.
Colavita Olive Oil Giveaway!
*THIS GIVEAWAY HAS ENDED – Congratulations to Manda Kay, the winner of our Colavita holiday giveaway! Hope you cook up lots of goodies with your EVOO & Balsamic Glace! Happy Holidays 🙂
I’ve teamed up with Colavita this holiday season and giving away some of their delicious olive oils and balsamic vinegars so you can celebrate the season by cooking up some holiday goodies of your own! The winner will receive: one (1) 3/4 liter of Colavita Private Selection Fruttato EVOO, one (1) 32 oz Roasted Garlic EVOO plus one (1) 29.5 oz bottle of their Balsamic Glace.
All you have to do to enter the giveaway is leave me a comment at the end of this post telling me what your favorite Holiday Appetizer to make with olive oil is.
*For extra entries, just follow me on twitter, facebook, pinterest, google+, tumblr or sign up for my newsletter (at the top right hand side of this page) and tell me you did so in the comments section. **As an added bonus, Colavita is also offering a 25% discount to all of my readers on any purchase in their online store. Simply enter the code ‘AG25’ to receive the discount upon checkout!
**This giveaway begins on Sunday, Dec 9th and ends Sunday Dec 23rd at midnight EST, where one person will be selected by random from the comments section below.**
Colavita World Selection Olive Oils are a new collection of extra virgin olive oils exploring the tradition in countries outside of italy from estates and farms in Australia, Argentina, California, Greece, Spain and Portugal as well as other prime olive oil growing nations. Read more about a few of my favorites that I used in my recipes below!
Colavita 100% Californian EVOO
The warm climate in the “Golden State” of California fosters both grape and olive cultivation perfect for wines and olive oils. The Colavita 100% Californian EVOO is pressed from olives grown in the Sacramento and San Joaquin valleys of California. The mild flavor makes this oil perfect for all culinary applications. Enrich your favorite meal with a drizzle of EVOO and a glass of wine.
Colavita Roasted Garlic EVOO is a product originally created exclusively for BJ’s Wholesale Stores. To many it has become the “gateway product” that exposes customers to the entire Colavita family of products. It is raved about on their online store so we wanted to share it with all of you! It’s the perfect finishing oil and wonderful for enhancing garlic already present in your dish. Try it on Garlic Bread or my Homemade Pita Chips (recipe below).
The Argentina EVOO was a hands-down favorite at this year’s New York Wine and Food Festival. Arbequino, Coratina and Manzanilla olive cultivars grown in the Catamarca and Mendoza regions of Argentina give this EVOO and intense, fruity aroma and taste. Pair this EVOO with soups, roasted fish, grilled vegetables and red meat for an unbeatable duo.
Colavita’s Fruttato Oil has recently been inducted into the Colavita “Private Selection” line. This line was created to highlight the products which have received the honor of being marked a Colavita family favorite. It is made by cold pressing new harvest olives just before their peak ripeness. The result is a full bodied EVOO which is slightly pungent with peppery flavor notes.
This Colavita Premium Blend is an all-purpose cooking, frying, and salad dressing oil which combines the delicate hint of roasted garlic in a light Canola Oil and Virgin Olive Oil Blend. It is a versatile oil that is naturally low in saturated fats and has no trans fats.
These yummy sweet and spicy Asian Chicken bites combine honey, soy sauce, orange and Sriracha to make a fun bite-sized appetizer with a delicious glaze.
This is a lovely tart recipe that combines sweet and savory flavors. The caramelized onions give it a sweet flavor with a hint of fig balsamic vinegar, balanced out by creamy ricotta, nutty Gruyere cheese, fresh herbs and crispy pancetta.
Ingredients
1 package pancetta (8 thin slices)
3 tablespoons Colavita Fruttato EVOO
2 sweet Vidalia onions, halved lengthwise and sliced thin
1 tablespoon brown sugar
Kosher salt
Fresh ground black pepper
1-1 1/2 tablespoons Fig balsamic vinegar (Tavern Direct brand)
1 cup fresh ricotta
1 egg yolk
1 tablespoons dried Fines Herbes (or 2 tablespoons fresh herbs)
1/2 cup shredded Gruyere cheese
1 frozen pie shell, defrosted, or homemade tart dough
Instructions
Preheat oven to 350 degrees.
Heat a saute pan over medium heat and cook pancetta until browned but not fully cooked, about 5 minutes. Drain fat from pan and place pancetta on paper towels to drain to the side. Once cooled, chop pancetta into small pieces.
Peel onions, remove top and bottom stems and cut in half lengthwise.
Slice onions thin (about 1/8" thick or desired thickness).
In the same saute pan, add 3 tablespoons olive oil and heat over medium high heat.
Add onions and cook over medium high for about 10 minutes.
Sprinkle brown sugar, salt and pepper over onions and stir well, cook another 10-20 minutes, reducing heat to medium low if onions start to brown too quickly.
Continue cooking and stirring onions over medium low for another 15 minutes, add a few teaspoons of water if desired.
Add the fig balsamic vinegar to the onions, turn heat down to low and let cook until they are caramelized, soft and sweet, up to an hour total.
Combine the ricotta, egg yolk and Fines Herbes together in small mixing bowl.
Spread the ricotta mixture over the pie shell in a 9" tart pan with removeable bottom.
Sprinkle Gruyere cheese over ricotta.
Top with caramelized onions and pancetta.
Bake the tart in the oven for approximately 30-45 minutes until pastry and filling are golden brown, and pancetta is crispy.
Let tart cool on a cooling rack for 10-15 minutes before serving.
Serve tart cut into wedges.
Notes
If you prefer to make your own tart dough rather than using a frozen pie crust, Martha Stewart has a great recipe for Flaky Tart Dough on her website at http://www.marthastewart.com/319448/flaky-tart-dough
Hot Artichoke dip is one of my all time favorite holiday dip recipes, and this one is extra special, using Colavita's California EVOO, lemon zest and minced garlic with lots of gooey cheese. Instead of using mayonnaise, I substitute a light sour cream to cut some of the fat and calories. Serve with my homemade baked pita chips or crackers.
Ingredients
2 tablespoons Colavita California extra virgin olive oil
1 package frozen artichokes, defrosted
1 tablespoon minced garlic
zest and juice from 1/2 lemon
Garlic salt with parsley (to taste)
Fresh cracked black pepper (to taste)
1/2 cup shredded parmesan cheese
1 cup shredded light monterey jack cheese, plus 1/2 cup for topping
1/2 cup light sour cream
dash of cayenne (optional)
dash of paprika (for garnish)
1 green onion, sliced thin (for garnish)
Instructions
Heat oil in a saute pan over medium high heat. Add artichokes and minced garlic, saute about 5-7 minutes until heated through.
Add lemon juice, zest, garlic salt and pepper, mix well and cook another few minutes, set aside.
Meanwhile, add shredded cheeses and sour cream together in a mixing bowl.
Add sauteed artichokes, garlic and lemon to cheese and sour cream.
Sprinkle with a dash of cayenne (if desired), mix well and transfer to a casserole dish.
Sprinkle additional monterey jack cheese over the top and bake in the oven for about 20-30 minutes until bubbly and cheese is melted on top.
Let cool a few minutes, sprinkle with paprika and green onions. Serve with homemade baked pita chips (recipe follows), crackers or crudites.
Making homemade pita chips is super easy and way better than buying the storebought kind for your holiday party. Mine are made with whole wheat pita bread, drizzled with EVOO, and sprinkled with garlic salt and cumin for some extra flavor. So delicious and crispy straight out of the oven and so addicting you'll never buy them again! Serve with Hot Parmesan Garlic Artichoke Dip or any of your other favorite party dips.
Ingredients
6 whole wheat pita rounds
2 tablespoons Colavita California EVOO
1 tablespoon garlic salt
1/2 tablespoon cumin
Instructions
Preheat oven to 400 degrees.
Cut pita rounds into triangles (6 wedges per pita).
Lay out pita wedges on a baking sheet and brush each wedge with olive oil.
Sprinkle garlic salt and cumin on top.
Flip over pita wedges, repeat coating with oil, salt and cumin.
Place baking sheet(s) in oven and cook pita wedges for about 15 minutes (checking to make sure they don't burn!)
Let cool, and serve with Hot Parmesan Garlic Artichoke Dip.
Everyone loves cocktail meatballs at holiday parties! These lovelies have a hint of lemon and sage and are light and fluffy, made with ground pork or chicken. They are first browned on the stovetop and then finished in the oven until golden brown. They're delicious alone, or dipped in a hot pepper jelly (Williams-Sonoma brand is great), balsamic pear jam (there's one by Academia Barilla that is to die for) or simply dipped in balsamic vinegar glace.
Red Pepper jelly, for dipping (Williams Sonoma brand)
Balsamic Pear jam, for dipping (Academia Barilla brand)
Colavita Balsamic Glace, for dipping
Instructions
Preheat oven to 350 degrees F.
Remove crusts from bread and tear into small pieces in a large mixing bowl, add milk and let soak for 10-15 minutes.
Mix in ground pork or chicken, sage, garlic, onion, lemon juice and zest, cheese, pepper flakes, egg, salt and pepper with soaked bread crumbs with your hands in a claw-like motion to keep meatballs light and fluffy.
Roll meat mixture into small to medium size meatballs (small makes approximately 36, medium makes approximately 18).
Heat olive oils in a large saute pan over medium heat (if not using cooking oil blend, mix EVOO with a tablespoon of butter to avoid temperature from getting too high and splattering).
Cook meatballs in batches in the oil for about 5 minutes each batch until meatballs are browned on all sides, drain on paper towels.
Once all meatballs are browned, place them on a large rimmed baking sheet coated with cooking spray to avoid sticking.
Bake in the oven for approximately another 15 minutes until cooked through and to keep warm.
Top with additional garlic salt (if desired), fresh chopped sage, and serve with red pepper jelly and balsamic pear jam, and Colavita Balsamic Glace for dipping.
These zucchini sticks are a great appetizer for any holiday party. They have a light crunchy coating of Japanese Panko seasoned bread crumbs and are finished with a splash of lemon and sprinkling of sea salt. They go perfect with the cool and creamy yogurt dill sauce or even a ranch dressing for dipping.
Ingredients
CRUNCHY ZUCCHINI STICKS
Colavita Roasted Garlic Cooking Oil Blend
4 medium zucchini, cut into half, into long strips
1 cup all-purpose flour
1 cups Panko Japanese-style seasoned breadcrumbs
Sea salt and fresh ground pepper
2 large eggs
Sea salt, for sprinkling, to taste
Lemon wedges, for garnish
Fresh minced dill, for garnish
YOGURT DILL SAUCE
1 cup of Greek yogurt
2-3 tablespoon minced dill
Sea salt and pepper, to taste
Instructions
CRUNCHY ZUCCHINI STICKS
Heat olive oil over medium high heat in a large deep saute pan, about 2 inches high.
Trim ends off zucchini, cut in half and then in half again lengthwise.
Cut zucchini into large strips about 1/2 an inch thick.
Pour the flour and Panko breadcrumbs into one large bowl and season with salt and pepper.
Beat eggs in a separate bowl.
Dip zucchini sticks in egg, shaking off excess, then dip in bowl to coat with flour and breadcrumbs.
Place coated zucchini on a baking sheet.
Fry in batches until golden brown, draining excess oil on another baking sheet lined with paper towels.
Squeeze some fresh lemon juice on top of zucchini and sprinkle with fresh dill and additional sea salt to taste.
YOGURT DILL SAUCE
In a medium bowl, mix together greek yogurt, dill, salt and pepper to taste.
*This is a sponsored post by Colavita, but as usual, all opinions expressed are my own. I received 5 bottles of Colavita olive oil samples to create the recipes for this article and holiday promotion. Winners of the giveaway will receive the prizes directly from Colavita by mail and should expect 2-3 weeks delivery time due to the holidays.
**All photographs, recipes and copy are copyrighted by Kristen Hess/The Artful Gourmet 2012 and cannot be republished without my permission or credit on the reposted original material from this article or website.
‘Baking for Friends’ Cookbook by Kathleen King, Tate’s Bake Shop
If you haven’t heard of Tate’s Bake Shop before or experienced their amazing line of desserts and cookies and baked goods, well you absolutely need to. I remember the first time I tried some of their chocolate chip cookies (the ones on the cover of their cookbook), I almost died and went to heaven. They’re light, crispy and thin, and filled with loads of gooey chocolate chips that melt in your mouth for days. They are still my favorite chocolate chip cookies (other than mine, of course), and I can’t resist them any time I spot them at the store.
Kathleen King, Chef and Author
Author Kathleen King is the creator and owner of the nationally acclaimed Tate’s Bake Shopin the Hamptons, known for her delicious baked goods made with wholesome yet elegant ingredients.
BAKING FOR FRIENDS isa gorgeous cookbook with over 120 scrumptious recipes and mouthwatering photos.With the holidays just around the corner, this is the perfect cookbook to read for all your holiday baking. The book features recipes that are perfect for both special occasions and everyday baking. Chapters include Scones & Shortcakes; Pies, Tarts & Crisps; Tea Loaves & Quick Bread; Party Cakes & Cupcakes; and Cookies. The book also offers delectable, taste-tested recipes for readers with dietary restrictions, including gluten-free, low-fat, vegan, and nut-free. Each chapter also features Kathleen’s innovative baking tips and tricks, designed to help save precious time and energy in the kitchen.
Holiday Cookie and Bar Tower Giveaway! (a $48 value)
Holiday Cookie and Bars Tower
**THIS GIVEAWAY HAS ENDED. CONGRATULATIONS TO TERI TROCKWOOD, THE WINNER OF THE TATE’S BAKE SHOP HOLIDAY COOKIE AND BARS TOWER! (Teri, please send me your shipping address so I can get this prize out to you this week!) ENJOY!**
Just to celebrate the holidays, I’ve teamed up with Tate’s Bake Shop who is giving away one of their Holiday Cookie and Bar Towers (a $48 value)! It includes three 7-oz boxes of cookies – one each of chocolate chip, oatmeal raisin and white chocolate chip macadamia nut. It also includes two rich and buttery raspberry bars, two chocolate chip and walnut-loaded blondies, and two rich, dense and fudgy plain brownies. Each 7-oz box contains approximately 12 cookies, and the bars are a generous size..and all wrapped in pretty holiday packaging! HOW TO ENTER THE GIVEAWAY
All you have to do to enter for a chance to win is tell me your favorite holiday dessert in the comments section below for one (1) entry. For extra chances to win, follow/like me on all or one of my social hangouts : twitter, facebook, pinterest, google +, and/or sign up for my monthly newsletter (see box at the top of this page), and tell me that you did at the end of this post. You have to be connected to Facebook to enter comments on this post. If you don’t have a Facebook profile, just send me an email for your entries at kristen (at) theartfulgourmet (dot) com. The giveaway begins on Saturday Dec 1st and ends on Sunday December 12 at midnight EST, where one person will be picked by random from the comments below. Don’t forget to tell your friends about the giveaway by sharing this page at the end of the post and letting me know in the comments below for extra entries!
Thumbprint cookies are traditionally flavored with vanilla and filled with fruit jam, but these are chocolate cookies stuffed with more chocolate! They will be a welcome treat on your holiday cookie platter, and they are a perfect hostess gift.
Ingredients
Cookies
2 ounces unsweetened chocolate, finely chopped
2 cups unbleached all-purpose flour
¼ teaspoon salt
½ pound (2 sticks) salted butter, at room temperature
½ cup granulated sugar
1/3 cup firmly packed dark brown sugar
2 large eggs, separated, at room temperature
1 teaspoon pure vanilla extract
3 cups finely chopped pecans
Filling
8 ounces semisweet chocolate, finely chopped
2 teaspoons vegetable oil
Instructions
To make the cookies: Heat the chocolate in a microwave-safe medium bowl on Medium (50% power), stirring at 30-second intervals, until fully melted and smooth. Let stand, stirring occasionally, until tepid, but still fluid.
In a medium bowl, whisk together the flour and salt. In a large bowl, beat the butter, granulated sugar, and brown sugar with an electric mixer set on high speed until combined, about 1 minute. One at a time, beat in the egg yolks, followed by the tepid chocolate and the vanilla. With the mixer on low speed, mix in the flour mixture, just until combined. Divide the dough in half and shape each half into a thick disk. Wrap in plastic wrap and refrigerate until chilled, about 2 hours.
Position the oven racks in the top third and center of the oven and preheat the oven to 350°F. Line 2 large rimmed baking sheets with parchment paper or silicone baking mats.
Using a heaping teaspoon for each, roll the dough into 78 marble-sized balls, putting them in a baking pan or platter. (If you wish, you can cover the balls with plastic wrap and refrigerate for up to 2 days.) Beat the egg whites in a small bowl until foamy. One at a time, dip each ball in the whites, roll in the pecans, and arrange 1 ½ inches apart on the prepared baking sheets. Refrigerate the remaining balls until ready to bake. Using your thumb (or, if you have long fingernails, the end of a wooden spoon), press an indentation into the center of each cookie.
Bake, rotating the positions of the sheets from top to bottom and front to back halfway through baking, until the edges of the cookies look set, about 10 minutes. Remove the baking sheets from the oven, and, using your thumb (or the end of the wooden spoon), reform the center indentation in each cookie. Return to the oven and continue baking until the cookies are crisp, about 10 minutes more. Let cool on the baking sheets for 5 minutes. Transfer to wire cooling racks and let cool completely. Repeat with the remaining balls, egg whites, and pecans, on cooled baking sheets.
To make the filling: Heat the chocolate and oil together in a microwave-safe bowl on Medium (50% power), stirring at 30-second intervals, until fully melted and smooth. Let stand, stirring occasionally, until tepid but still fluid.
Using a teaspoon, fill the indentations with the chocolate mixture. Let stand until the chocolate sets (you can refrigerate them to speed things up).
Notes
Recipe from Tate’s Bakeshop ‘Baking with Friends’ Cookbook, pp 116-118.
Monday through Friday, my friend Hakan Ciling designs for the textile and fashion industries. On the weekend, he is an equally talented baker, as this moist, fruit studded cake shows. If you are serving it for an evening dessert, top it with shipped cream flavored with ground cinnamon or nutmeg.
Ingredients
Softened butter and all-purpose flour for the pan
3 cups unbleached all-purpose flour
1 teaspoon baking soda
1 ¾ cups sugar
1 ¼ cups vegetable or grapeseed oil
3 large eggs, at room temperature
1 tablespoon pure vanilla extract
1 cup very coarsely chopped walnuts
1 cup dried cranberries
1 cup pitted dates or dried plums (prunes), cut in half
1 cup golden or dark raisins
12 ripe figs, tips trimmed and cut lengthwise into quarters (about 1 ½ cups)
Instructions
Position an oven rack in the center of the oven and preheat the oven to 350 degrees F. Lightly butter and flour a 9-inch tube pan with a removeable bottom (such as angel food cake pan) and tap out the excess flour.
In a medium bowl, whisk together the flour, baking soda, and salt. In a large bowl, beat the sugar and oil with an electric mixer set on high speed until the mixture is very pale, about 5 minutes. One at a time, beat in the eggs, followed by vanilla, scraping down the sides of the bowl as needed. Fold in the walnuts, cranberries, dates and raisins. The batter will be very thick.
Spread half of the batter in the prepared pan. Arrange half of the figs in a ring in the pan, pressing them lightly into the batter. Repeat with the remaining batter and figs.
Bake until a long bamboo skewer inserted in the center of the cake comes out clean, about 1 ¼ hours. Let cool in the pan on a wire cooling rack for 15 minutes. Run a knife around the inside of the pan and the tube and lift out the insert. Invert the cake onto the rack, unmold and let cool completely.
Notes
Recipe from Tate’s Bakeshop ‘Baking with Friends’ Cookbook, pp 56-57.
When all the local farm stands are stocked with big baskets of berries, I can't resist buying them. I love the way blackberries cook up and hold their shape, with their sweet/tart taste. And the blackberries against the yellow hue of the cornmeal in the crust make a beautiful presentation. Serve this the day it's made, with fresh whipped cream or ice cream - it's lovely on its own too!
Ingredients
DOUGH
1 cup unbleached all-purpose flour, plus more for rolling the dough
1/2 cup fine yellow cornmeal (not coarse or polenta)
1 tablespoon sugar
1/4 teaspoon salt
6 tablespoons (3/4 stick) cold salted butter, cut into pieces
1 large egg yolk
2 tablespoons cold water
FILLING
1 teaspoon unbleached all-purpose flour
2 cups fresh blackberries
3 tablespoons sugar
1 tablespoon cold salted butter, cut into small pieces
1 tablespoon sugar for sprinkling (optional)
Instructions
To make the dough:
In a medium bowl, mix together the flour, cornmeal, sugar and salt. Work in the butter with a pastry blender, 2 knives, or your fingertips until the mixture resembles coarse meal with small pea-sized pieces of butter. In a small bowl, mix together the egg yolk and water. Add to the flour mixture and stir gently with a fork until the mixture is moist enough to hold together.
Gather the dough into a thick disk. Wrap in plastic wrap and refrigerate until chilled but not hard, at least 30 minutes, or up to 2 hours. (The dough can be refrigerated for up to 2 days, but let it stand for 15 minutes before rolling out. It can also be frozen for up to 1 month.)
Preheat the oven to 400 degrees F. Line a large rimmed baking sheet with a silicone baking mat or parchment paper.
On a ligthly floured work surface, roll out the dough into a 10-inch round about 1/8 inch thick. Fold the dough in half, and then reopen on the prepared baking sheet. The dough cracks easily, but just press it back together if it does and don't worry, as the look of the dessert is very rustic.
For the filling:
Sprinkle 1 teaspoon of flour over the dough leaving a 2-inch border all around. Spread the berries over the floured section of the dough. Sprinkle them with the sugar and dot with butter. Fold the uncovered dough up over fruit, pleating it as necessary. If the dough cracks, not to worry - just seal the tears. If you wish, brush the edges of the dough with a pastry brush dipped in water and sprinkle with the tablespoon of sugar.
Bake until the crust starts to brown a bit and the fruit bubbles, about 40 minutes. Let the galette cool on the baking sheet. Transfer the galette to a serving platter with a wide spatula or pick up the baking mat and slide it off onto the platter.
Notes
Recipe from Tate’s Bakeshop ‘Baking with Friends’ Cookbook, pp 92-94.
Tate’s Bake Shop also has some holiday exclusives (see below) which are super delicious and seasonal, available for purchase online and at the Southampton store location.
Disclosure: All opinions expressed here are my own and for participating in Tate’s Bake Shop Holiday Giveaway Promotion, I received a copy of their new cookbook “Baking with Friends”.
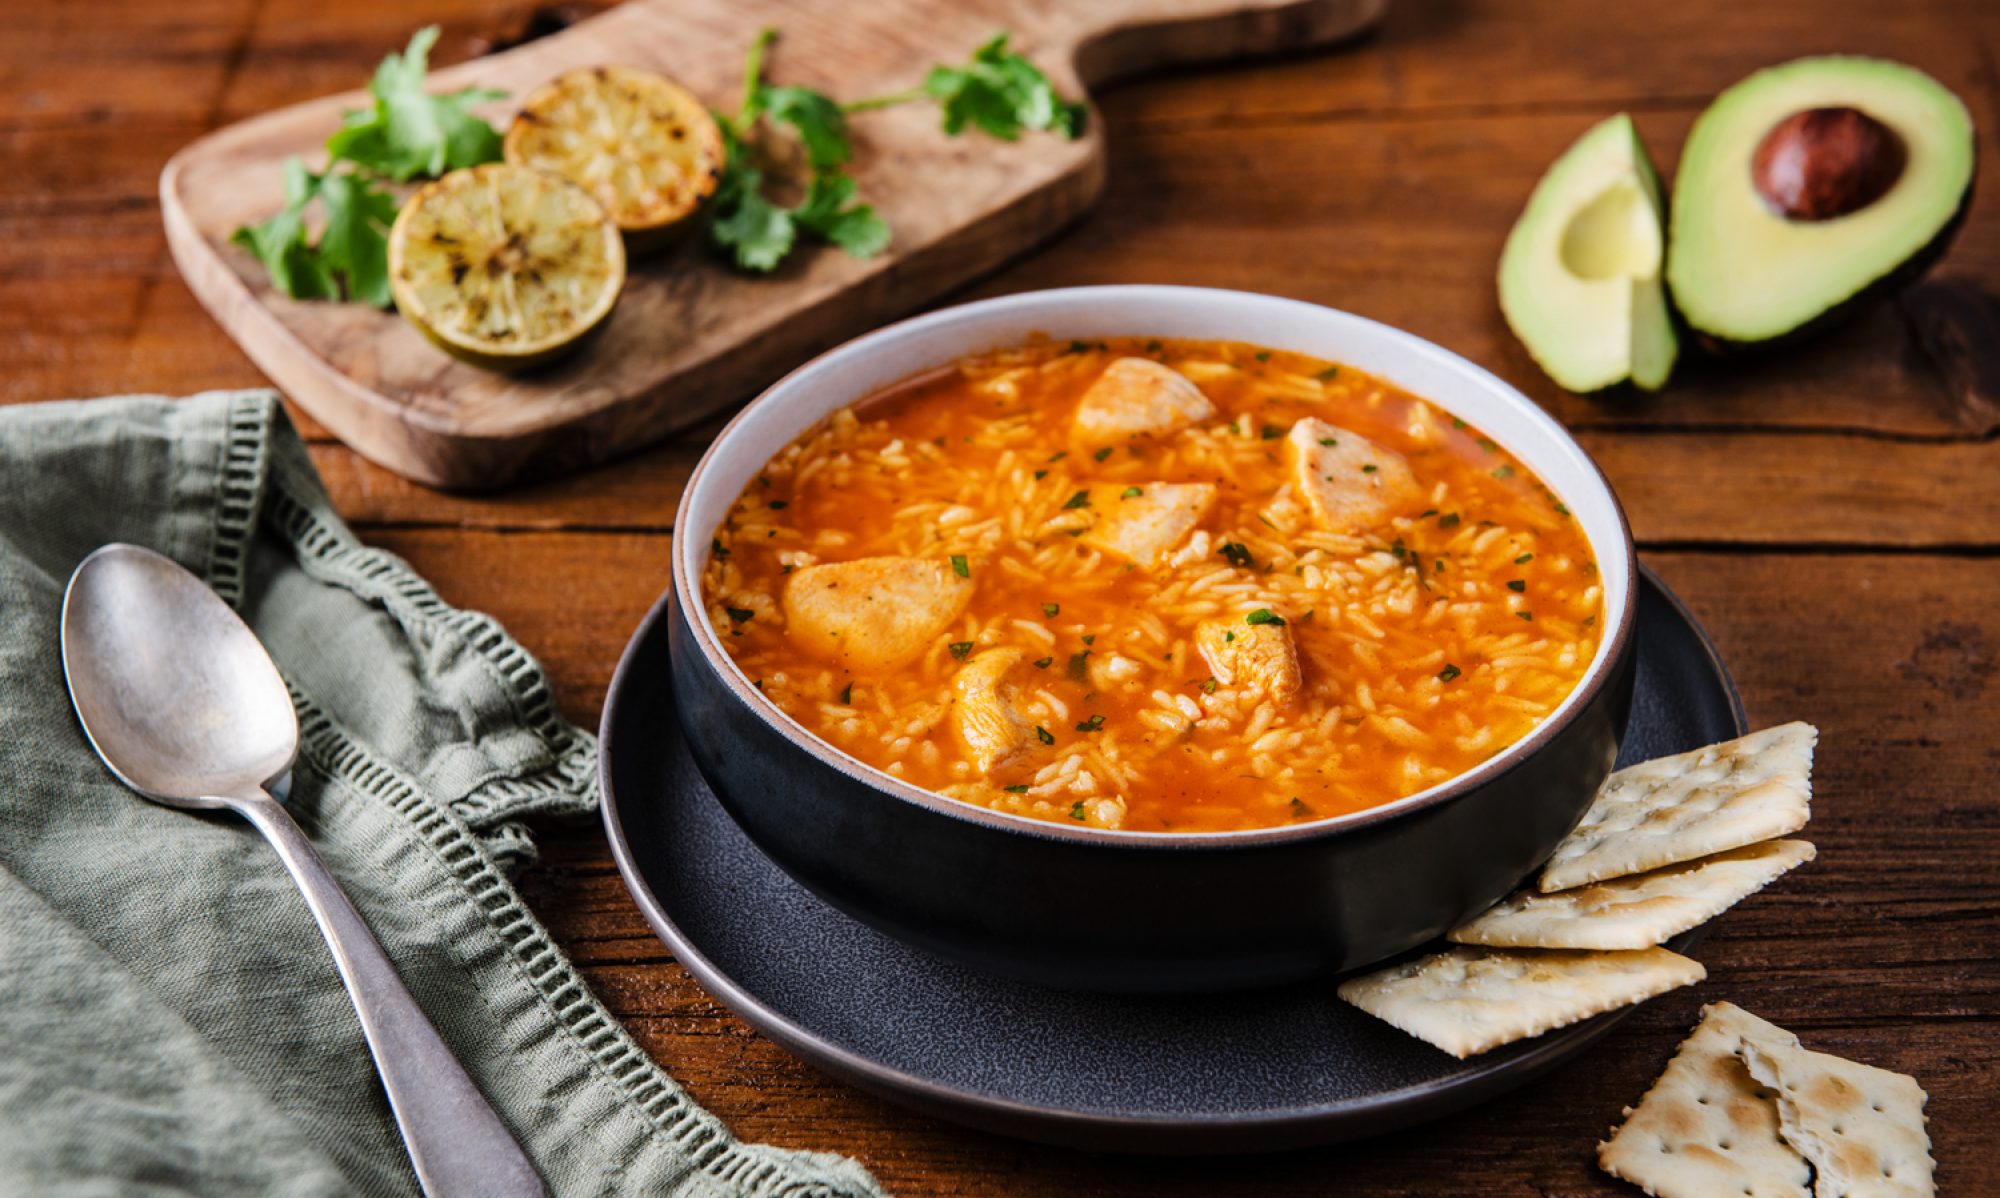
I love coming home for the holidays, not only to spend some quality time with family and friends but for some of Mom’s cooking! With all this crazy weather lately I haven’t been feeling so hot and of course, just in time for Thanksgiving. I flew home to stay with my parents earlier this week, and Mom had the perfect remedy – a big ol’ pot of her homemade Chicken Noodle Soup. I could smell the delicious golden aroma brewing on the stovetop the second I walked in the door and knew I was home.
My Grandmother used to make this recipe with a secret ingredient called George Washington Golden Seasoning, a powdered chicken soup base with chicken fat and seasonings that gives an extra savory, golden chicken-y flavor to the soup broth, developed by a distant relative of George Washington. I’m not sure if this is even around anymore, but my Mom uses Lisa Marie chicken base (a brand from Syracuse, NY). If you can’t find this brand, use a few tablespoons of any quality chicken bouillon or chicken soup base to bump up the flavor of the chicken broth – you can find plenty of these at your grocery store or at Amazon online. Make sure to add plenty of fresh veggies (carrots, celery and onion) and let the soup simmer to it’s shimmering, golden delicious state for at least a few hours to let the flavors meld.
One tip: we always keep the egg noodles and cooked, pulled chicken separate from the broth to avoid the broth getting cloudy – this also ensures the noodles don’t get soggy and you are left with an absolute pure and delicious golden broth that will warm your bones and lift your spirits.
Good Food Ireland, the first-ever, all industry network driving food tourism in Ireland, kicks off its international debut in the U.S.. Seeking to promote innovations in contemporary Irish cuisine and the country’s commitment to sustainable, authentic products, the organization also hopes to inspire Americans to travel to Ireland to experience and engage with its citizens and culture.
Good Food Ireland was established by Margaret Jeffares to link the agri/food sector with the hospitality industry. It was her philosophy that by supporting Irish farmers and producers, she could establish a healthy business environment where commercial opportunities for agriculture could be promoted through tourism and visa-versa.
“It is my mission to grow Ireland as a food tourism destination and to establish the ‘Good Food Ireland’ brand as the brand of choice for good food lovers everywhere,” says Jeffares. “One of Ireland’s greatest secrets is its locally produced ingredients and Good Food Ireland aims to set the standard for quality across a variety of industries – agriculture, food, manufacturing, tourism and hospitality.”
The premise is that by creating trusted and authentic Irish food experiences, Good Food Ireland will drive business to the hospitality sector and that, in turn,
inspires consumer purchase of more Irish food from farmers and purveyors,
contributing greatly to the local Irish economy.
Good Food Ireland’s U.S. launch includes:
They have kicked off the debut of Good Food Ireland Approved Provider foods at Dean and DeLuca’s flagship store in NYC, featuring the highest quality food the island has to offer. The foods available for sale in the Dean and DeLuca Store include:
In addition to bringing both providers and products to New York City, Good Food Ireland seeks to increase awareness for its hub at www.goodfoodireland.ie.
In addition, there’s the opportunity to meet the people behind the products. Special offers and recipes are also available online, and I’ve included a few below.
Salmon Fishcakes
Ingredients
2 shallots finely chopped
1 lb salmon, filleted and skinned
1 Tablespoon Kerrygold butter
5 fl oz dry white wine
1 tablespoon chopped parsley
Mashed Potatoes – no cream no butter
For the Coating:
2 tablespoons plain flour
2 eggs
2 oz soft white breadcrumbs
Method
Pre-heat oven to 200c/400fgas 6
Butter and season a tray. Sprinkle with the shallots and sit the salmon on top. Drizzle with white wine and season with salt and pepper. Cover with foil and bake in the oven for 8- 10 minutes – the salmon should be firm to touch but still pink in the middle .
Sit the salmon in a colander over a pan to collect all the juices.
When all the juices have drained, place in a small pot and reduce on a stove to a nice syrup consistency.
Break up the salmon into flakes, add the syrup and chopped parsley, then fold in the potato until you have a binding texture. Check for seasoning and roll into 12 to 18 ball shaped cakes.
To Breadcrumb – Lightly pass through the flour, beaten eggs and breadcrumbs, repeat the process again.
To Cook – Deep fry at 180c/ 350f for 4-5 minutes drain well.
Serving suggestion: Serve 3 per portion on a bed of steamed baby spinach and lemon butter sauce.
—–
Irish Porridge
Ingredients
2 oz Porridge Oats
7 fl oz Milk
Heat the milk, add porridge oats and cook for 1 min serve with honey or salt.
—–
Bircher Muesli made with Irish Porridge Oats
5 oz porridge oats
1 oz Irish honey
20 fl oz milk
14 oz natural yogurt
4 oz sultanas (raisins)
1 whole Banana, chopped
1 apple, grated
4 oz blueberries
Combine ingredients and devour!!
—–
Good Food Ireland sets strict criteria for Approved Provider status based on a core commitment to using local Irish ingredients and operating at a standard that is “best in class” and its branding on packaging of authentic Irish products is already recognized as the standard bearer of the industry. Beyond food products, the Good Food Ireland brand can also be used by hotels, restaurants & cafes, cookery schools and markets that meet Good Food Ireland standards. To date there are 450 Approved Providers that ensure consumers that all products and services bearing the brand meet the strictest “best in class” standards. All products and service standards are independently assessed.
Since Good Food Ireland was founded approximately five years ago, almost 70% of its Approved Providers have increased their business profile or heightened their awareness of local food. As a result, 92% have increased their purchasing of Irish food over the last 3 years, directly contributing close to 50 million euro to the local economy. (Source: Grant Thornton Survey – April 2012).
The Good Food Ireland Food Experience Awards celebrates excellence in food experience, the Food Lovers’ Choice Award lets you have your say. Simply vote for your favourite shortlisted GFI Approved Provider from the list below. The provider that gets the most votes will be announced on November 20th in the Shelbourne Hotel and presented with an award from An Taoiseach Enda Kenny T.D.
About Good Food Ireland:
Good Food Ireland is a grassroots industry network aimed at promoting innovations in Irish food, the country’s commitment to sustainable, authentic products across food, hospitality and travel industries – incorporating farmers, chefs, hoteliers and outposts of cultural interest. The organization seeks to promote its authentic products in the U.S. and to inspire Americans to travel to Ireland to experience the contemporary cuisine and engage with its citizens and culture. The cross section of agriculture, food & culinary, production/manufacturing and tourism industries seek to grow and sustain the Irish economy.
Visit Good Food Ireland on Facebook Follow Good Food Ireland on Twitter Visit Dean and Deluca on Facebook Follow Dean and Deluca on Twitter